크롤링(2)
# 주피터에서 실행시 설치 필요
# !pip install html5lib

import pandas as pd
df = pd.read_html('https://kind.krx.co.kr/corpgeneral/corpList.do?method=download',encoding='cp949')[0]
df
df['종목코드']
# - .head() 함수를 통해 데이터프레임의 상위 5개의 행을 시각적으로 확인해 볼 수 있습니다.
# - 주식에서 중요한 6자리 종목코드가 앞 자리 0이 모두 사라져 이에 대한 처리가 필요합니다.
# - 종목 코드는 상장사의 식별코드이며 6자리수로 이루어져 있습니다.def six_digit(x):
return "%06d" %x
df['종목코드'] = df['종목코드'].apply(six_digit)
df.head()네이버 코스피 총액 지수
import csv
import requests
from bs4 import BeautifulSoup

url = 'https://finance.naver.com/sise/sise_market_sum.nhn?sosok=0&page='

# 1페이지 데이터만 수집
for page in range(1, 2):
  # 페이지 요청 및 HTML 응답 확인
  res = requests.get(url + str(page))
  res.raise_for_status()
  soup = BeautifulSoup(res.text, 'lxml')
  # 시세 정보를 포함하는 테이블의 행 데이터를 추출
  table_rows = soup.find('table', attrs={'class':'type_2'}).find('tbody').find_all('tr')

for row in table_rows:
  # 각 행에서 열(<td>) 추출
  columns = row.find_all('td')
  # 데이터가 없는 행은 건너뛰기
  if len(columns) <= 1:
    continue
   # 각 열의 텍스트 데이터를 리스트에 저장
  row_data = [column.get_text().strip() for column in columns]
  # 추출된 행 데이터 출력
  print(row_data)
url = "https://finance.naver.com/sise/sise_market_sum.nhn?sosok=0&page="
filename = "시가총액1-200.csv"
f = open(filename, "w", encoding="utf-8-sig", newline="")
#utf-8-sig : 엑셀파일에서 한글이 깨지는 경우 사용, newline="" : 자동줄바꿈 제거
writer = csv.writer(f)
for page in range(1, 5):
res = requests.get(url + str(page))
res.raise_for_status()
soup = BeautifulSoup(res.text, "lxml")
data_rows = soup.find("table", attrs={"class":"type_2"}).find("tbody").find_all("tr")
for row in data_rows:
columns = row.find_all("td")
if len(columns) <= 1: # 의미없는 데이터 skip(공백 제거)
continue
data = [column.get_text().strip() for column in columns]
print(data)
writer.writerow(data) # list 형태의 데이터 쓰기import requests
from bs4 import BeautifulSoup
import pandas as pd
url = 'https://finance.naver.com/sise/sise_market_sum.naver'
html = requests.get(url)
html = BeautifulSoup(html.text)
table = html.find('table', class_ = 'type_2')
table = pd.read_html(str(table))
table = table[0]
del table['토론실']
del table['N']
table = table.dropna().reset_index(drop=True)
tableimport requests
from bs4 import BeautifulSoup
url = 'https://novel.naver.com/webnovel/weekday'
res = requests.get(url)
soup = BeautifulSoup(res.text,'lxml')
webtoons = soup.find("div", attrs={"id" : "integrationRaking"})
titles = webtoons.find_all("span", attrs ={"class" :"title"})
for title in titles:
if title:
print(title.get_text())
else:
print('Title Not Found')# 추출한 제목을 정리하여 리스트에 저장
clean_titles = [title.get_text().strip() for title in titles if title.get_text().strip()]
print(clean_titles[:10])#단어 빈도 분석 / 제목에서 가장 많이 등장한 단어들을 찾기 위해, 각 제목을 단어 단위로 분리하고 등장 빈도를 계산합니다.
from collections import Counter
import re
# 제목을 소문자로 변환하고 알파벳 및 숫자만 추출하여 단어로 분리
words = []
for title in clean_titles:
words.extend(re.findall(r'\w+', title.lower())) # 소문자로 변환하고 알파벳 추출
# 각 단어의 등장 빈도 계산
word_counts = Counter(words)
# 가장 많이 등장한 상위 10개의 단어 출력
print(word_counts.most_common(10))# 확장된 장르 키워드 예시
extended_keywords = ['로맨스', '사랑', '연애', '판타지', '마법', '모험', '액션', '전투', '싸움',
'전쟁', '드라마', '감동', '미스터리', '추리', '스릴러', '긴장', '코미디', '유머',
'공포', '귀신', 'SF', '미래', '우주', '로봇', '과학', '기술', '계약', '복수', '결혼', '복수극']
# 제공된 웹툰 제목들
titles = ['남편을 버렸다', '빌런의 순정', '후회조차 사치인 당신들에게', '못난이 아내',
'프레스턴 경의 비밀 가정교사', '교환 아내', '계약혼', '사랑해서 미칠 것 같아',
'남편의 정부가 어느 날 황후가 되었다', '마교전선 비룡십삼대', '49번 남았습니다, 스승님!',
'내 남편을 뺏은 동생에게 복수하는 방법', '어차피 시한부, 후회는 없습니다',
'전무님과 아이를 키웁니다', '계약이 끝나는 날']
# 장르 카운트 초기화
genre_counts = {genre: 0 for genre in extended_keywords}
# 제목에서 각 장르 키워드를 찾고 카운트
for title in titles:
clean_title = re.sub(r'[^\w\s]', '', title) # 특수문자 제거
clean_title = clean_title.lower() # 소문자로 변환
for keyword in extended_keywords:
if keyword in clean_title: # 부분 매칭
genre_counts[keyword] += 1
# 결과 출력
print(genre_counts)!sudo apt-get install -y fonts-nanum
!sudo fc-cache -fv
!rm ~/.cache/matplotlib -rfimport matplotlib.pyplot as plt
plt.rc('font', family='NanumBarunGothic')
# 데이터 준비
genres = list(genre_counts.keys())
counts = list(genre_counts.values())
# 막대 그래프 생성
plt.figure(figsize=(10, 6))
plt.barh(genres, counts, color='skyblue')
# 제목과 라벨 설정
plt.title('장르별 웹툰 제목 카운트', fontsize=16)
plt.xlabel('카운트', fontsize=12)
plt.ylabel('장르', fontsize=12)
# 그래프 출력
plt.show()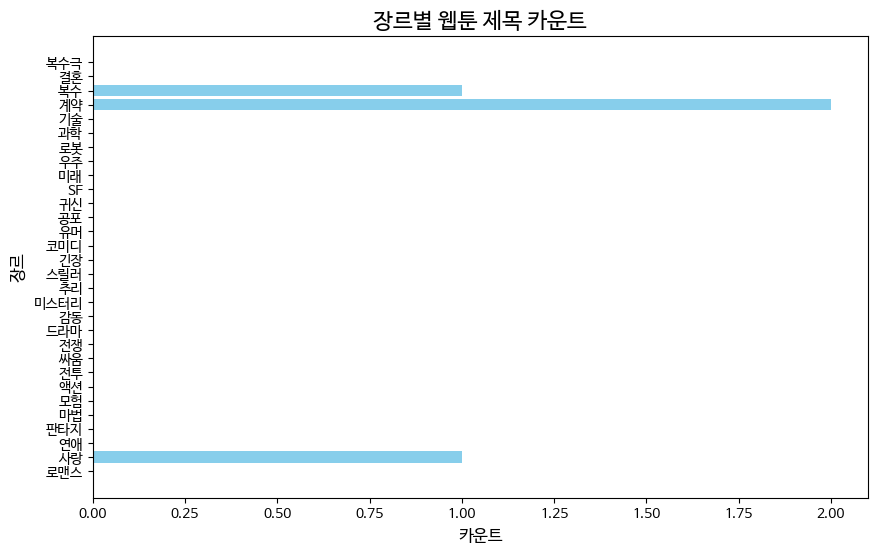
from wordcloud import WordCloud
import matplotlib.pyplot as plt
import re

# 제공된 웹툰 제목들
titles = ['남편을 버렸다', '빌런의 순정', '후회조차 사치인 당신들에게', '못난이 아내',
          '프레스턴 경의 비밀 가정교사', '교환 아내', '계약혼', '사랑해서 미칠 것 같아',
          '남편의 정부가 어느 날 황후가 되었다', '마교전선 비룡십삼대', '49번 남았습니다, 스승님!',
          '내 남편을 뺏은 동생에게 복수하는 방법', '어차피 시한부, 후회는 없습니다',
          '전무님과 아이를 키웁니다', '계약이 끝나는 날']

# 제목에서 단어 추출
all_words = []

for title in titles:
    clean_title = re.sub(r'[^\w\s]', '', title)  # 특수문자 제거
    words = clean_title.split()  # 단어로 분리
    all_words.extend(words)  # 모든 단어를 리스트에 추가

# 단어를 하나의 문자열로 결합
text = ' '.join(all_words)

# 단어 클라우드 생성
wordcloud = WordCloud(font_path='/usr/share/fonts/truetype/nanum/NanumGothic.ttf', width=800, height=400, background_color='white').generate(text)

# 단어 클라우드 시각화
plt.figure(figsize=(10, 5))
plt.imshow(wordcloud, interpolation='bilinear')
plt.axis('off') # 축 제거
plt.show()
import requests
from bs4 import BeautifulSoup
import pandas as pd
from collections import Counter
import matplotlib.pyplot as plt

# URL 정의
url = 'https://quotes.toscrape.com'

# 웹 페이지 요청
response = requests.get(url)

# HTML 파싱
soup = BeautifulSoup(response.text, 'html.parser')

# 명언과 저자 정보 추출
quotes = soup.find_all('div', class_ = 'quote')

# 데이터를 저장할 리스트
quote_list = []
tags_list = []

# 명언과 저자 정보 수집
for quote in quotes:
  text = quote.select_one('span.text').text # CSS Selector
  # text = quote.find('span', class_ = 'text').text # 명언 텍스트 추출
  author = quote.select_one('span small').text
  # author = quote.find('small', class_ = 'author').text  # 저자 텍스트 추출
  tags = [tag.text for tag in quote.select('.tag')]
  # tags = [tag.text for tag in quote.find_all('a', class_ = 'tag')]
  quote_list.append((text, author))
  tags_list.append(tags)

# DataFrame 생성
df = pd.DataFrame(quote_list, columns = ['명언', '저자'])

# tag 정보를 DataFrame에 추가
df['tags'] = tags_list

# 결과 출력
print(df.head())
# 태그 빈도수 분석
all_tags = [tag for sublist in tags_list for tag in sublist]
tag_count = Counter(all_tags)
# 상위 10개 태그 출력
top_tags = tag_count.most_common(10)
print("\n Top 10 Tags:")
for tag, count in top_tags:
print(f"{tag}: {count}")
# 저자별 명언 빈도수 계산
author_count = Counter(df['저자'])
# 상위 10명 저자별 명언 빈도수 시각화
top_authors = author_count.most_common(10)
author_names, author_freq = zip(*top_authors)
## 저자 이름과 빈도를 수동으로 분리(zip을 사용하지 않은 경우)
#author_names = [author[0] for author in top_authors]
#author_freq = [author[1] for author in top_authors]
plt.figure(figsize=(12, 6))
plt.bar(author_names, author_freq, color='skyblue')
plt.title('Top 10 Authors by Quote Frequency')
plt.xlabel('Author')
plt.ylabel('Frequency')
plt.xticks(rotation=45, ha='right')
plt.show()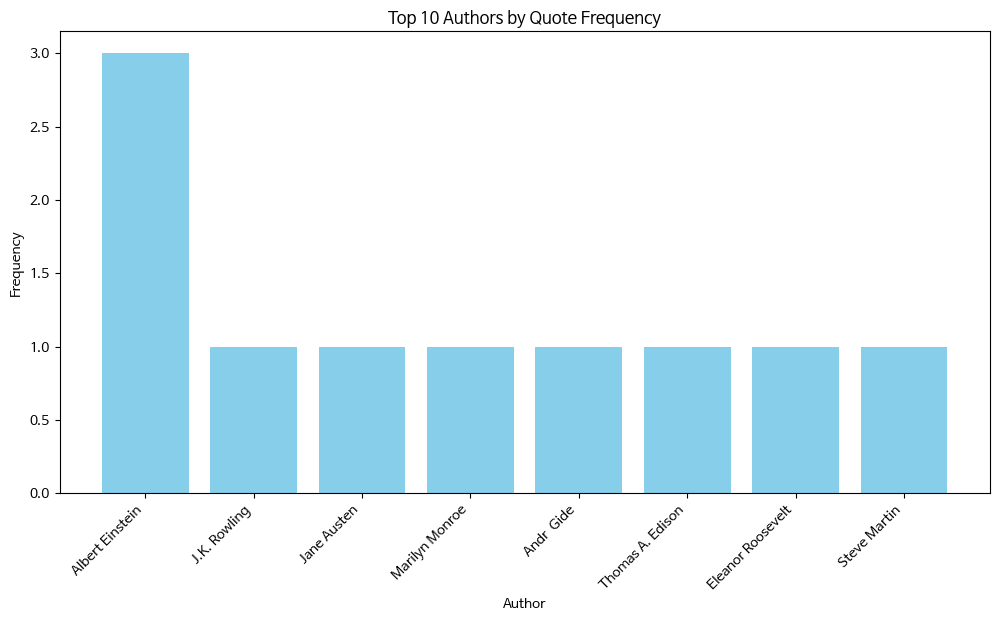
import matplotlib.pyplot as plt
import seaborn as sns
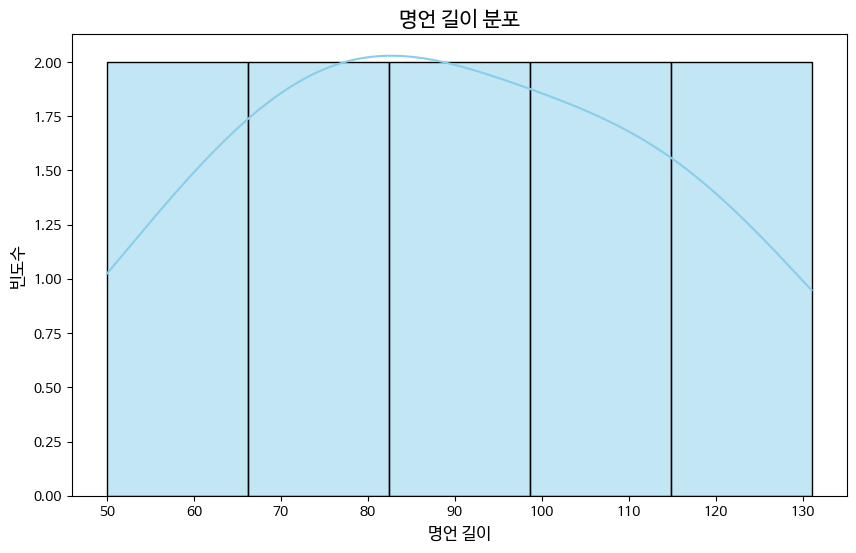
# 명언 길이 계산
df['명언 길이'] = df['명언'].apply(len)
# 1. 저자별로 가장 많이 등장한 명언 수
author_counts = df['저자'].value_counts()
plt.figure(figsize=(10, 6))
sns.barplot(x=author_counts.index, y=author_counts.values, palette='viridis')
plt.title('저자별 명언 개수', fontsize=15)
plt.xlabel('저자', fontsize=12)
plt.ylabel('명언 개수', fontsize=12)
plt.xticks(rotation=45)
plt.show()
# 2. 명언 길이 분포
plt.figure(figsize=(10, 6))
sns.histplot(df['명언 길이'], kde=True, color='skyblue')
plt.title('명언 길이 분포', fontsize=15)
plt.xlabel('명언 길이', fontsize=12)
plt.ylabel('빈도수', fontsize=12)
plt.show()
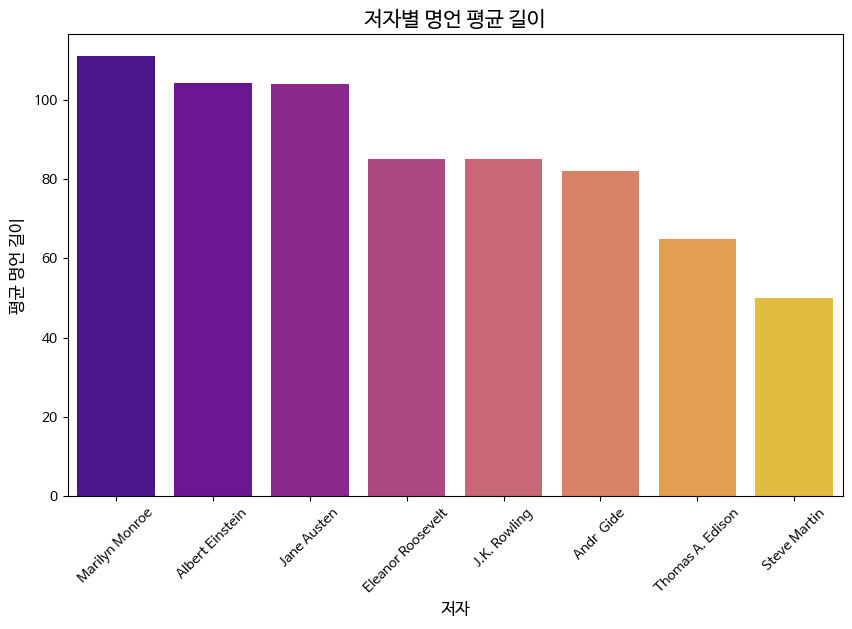
# 3. 저자별 명언의 평균 길이
author_avg_length = df.groupby('저자')['명언 길이'].mean().sort_values(ascending=False)
plt.figure(figsize=(10, 6))
sns.barplot(x=author_avg_length.index, y=author_avg_length.values, palette='plasma')
plt.title('저자별 명언 평균 길이', fontsize=15)
plt.xlabel('저자', fontsize=12)
plt.ylabel('평균 명언 길이', fontsize=12)
plt.xticks(rotation=45)
plt.show()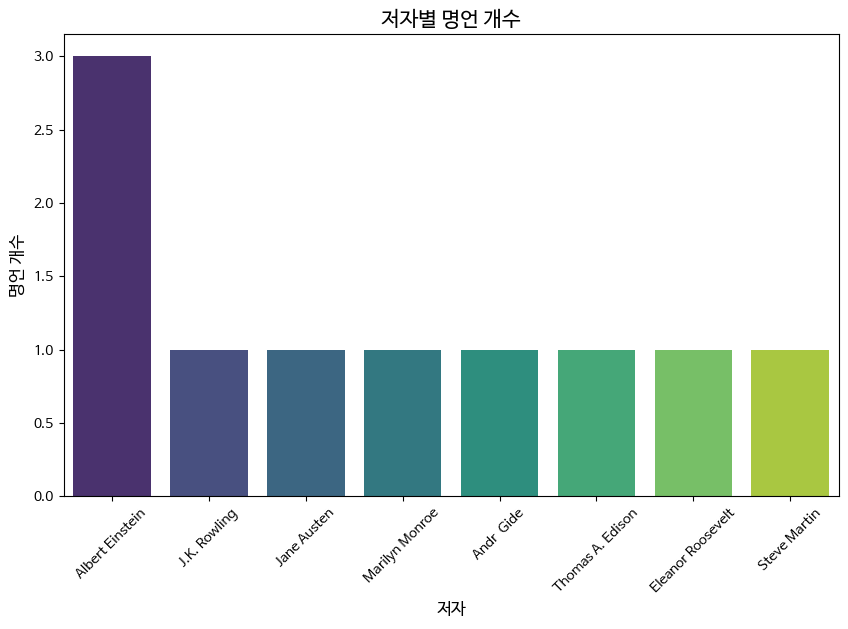
import requests
import os
import pandas as pd
from bs4 import BeautifulSoup

# 파일 다운로드
url = 'http://kind.krx.co.kr/corpgeneral/corpList.do?method=download&searchType=13'
response = requests.get(url)

# 다운로드한 파일 저장
file_path = 'krx_corp_list.html'
with open(file_path, 'wb') as f:
    f.write(response.content)

# 파일 형식 확인
file_extension = os.path.splitext(file_path)[1]
print(f"다운로드된 파일 확장자: {file_extension}")

# HTML 형식인 경우 BeautifulSoup을 사용하여 데이터 추출
if file_extension == '.html':
    try:
        # 바이너리 형식으로 HTML 파일을 처리하고 BeautifulSoup으로 파싱
        soup = BeautifulSoup(response.content, 'html.parser')

        # 테이블 데이터 찾기 (보통 데이터가 테이블 안에 있음)
        table = soup.find('table')
        rows = table.find_all('tr')

        # 테이블 헤더 추출
        headers = [header.text.strip() for header in rows[0].find_all('th')]

        # 테이블 데이터 추출
        data = []
        for row in rows[1:]:
            cols = row.find_all('td')
            cols = [col.text.strip() for col in cols]
            data.append(cols)

        # 데이터프레임 생성
        df = pd.DataFrame(data, columns=headers)

        print("HTML에서 추출한 데이터 미리보기:")
        print(df.head())

    except Exception as e:
        print(f"HTML 파일을 처리하는 중 오류 발생: {e}")

# 이후 동일한 데이터 처리 (엑셀 파일 처리 부분과 동일)
if 'df' in locals():
    # '종목코드' 열을 6자리로 포맷팅
    df['종목코드'] = pd.to_numeric(df['종목코드'], errors='coerce')  # 변환 불가한 값은 NaN으로 처리
    df = df.dropna(subset=['종목코드'])  # NaN 값 제거

    # 6자리로 포맷팅
    df['종목코드'] = df['종목코드'].map(lambda x: '{:06d}'.format(int(x)))

    # 종목코드를 기준으로 오름차순 정렬
    df_sorted = df.sort_values(by='종목코드')

    # 종목코드가 "005930" (삼성전자)인 회사 정보 출력
    samsung_data = df_sorted[df_sorted['종목코드'] == '005930']
    print("\n삼성전자 데이터:")
    print(samsung_data)

    # 결측값이 있는지 확인
    missing_data = df_sorted[df_sorted.isnull().any(axis=1)]
    print("\n결측값이 있는 데이터:")
    print(missing_data)

    # '상장일' 열의 기본 통계값 출력
    print("\n'상장일' 열의 기본 통계값:")
    print(df_sorted['상장일'].describe())

    # 데이터 타입 확인
    print("\n각 열의 데이터 타입:")
    print(df_sorted.dtypes)

    # '업종'별로 기업 수 세기
    industry_counts = df_sorted['업종'].value_counts()
    print("\n'업종'별 기업 수:")
    print(industry_counts)

    # 상장일 기준으로 가장 오래된 10개의 기업 출력
    oldest_companies = df_sorted.sort_values(by='상장일').head(10)
    print("\n가장 오래된 10개의 기업:")
    print(oldest_companies[['회사명', '상장일']])

    # 상장일을 기준으로 가장 최근에 상장한 10개 기업 출력
    newest_companies = df_sorted.sort_values(by='상장일', ascending=False).head(10)
    print("\n가장 최근에 상장한 10개의 기업:")
    print(newest_companies[['회사명', '상장일']])
# '상장일' 열을 날짜 형식으로 변환
df['상장일'] = pd.to_datetime(df['상장일'], errors='coerce')

# 변환 후 상장일 확인
print(df['상장일'].head())
# 업종별 기업 수 세기
industry_counts = df['업종'].value_counts()
# 업종별 기업 수 출력
print(industry_counts)# 상장일 기준으로 기업 수 세기
company_count_by_year = df['상장일'].dt.year.value_counts().sort_index()
# 상장일 기준 기업 수 변화 출력
print(company_count_by_year)# NaN 값 처리
df['업종'] = df['업종'].dropna()import matplotlib.pyplot as plt
# 업종별 기업 수 시각화
if not industry_counts.empty: # 업종별 기업 수가 비어있지 않으면
plt.figure(figsize=(12, 6))
industry_counts.plot(kind='bar', color='skyblue')
plt.title('업종별 기업 수')
plt.xlabel('업종')
plt.ylabel('기업 수')
plt.xticks(rotation=90) # X축 레이블 회전
plt.tight_layout()
plt.show()
else:
print("업종별 기업 수가 비어 있습니다. 데이터를 확인해주세요.")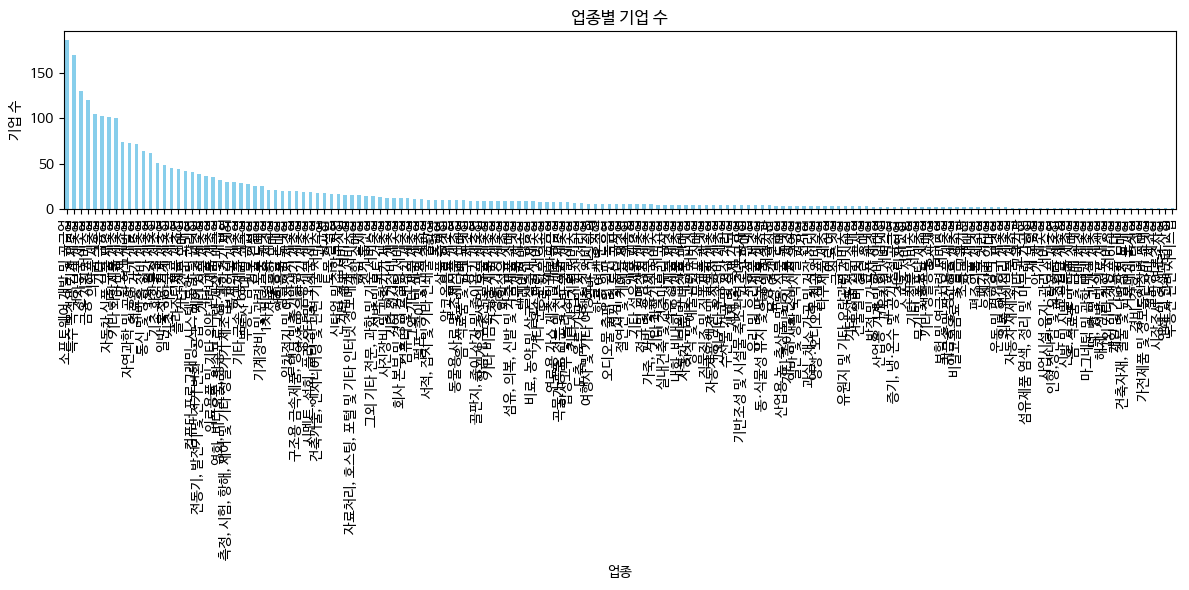
# 상장일 기준 기업 수 변화 시각화
plt.figure(figsize=(12, 6))
company_count_by_year.plot(kind='line', marker='o', color='orange')
plt.title('상장일 기준 기업 수 변화')
plt.xlabel('상장 연도')
plt.ylabel('기업 수')
plt.tight_layout()
plt.show()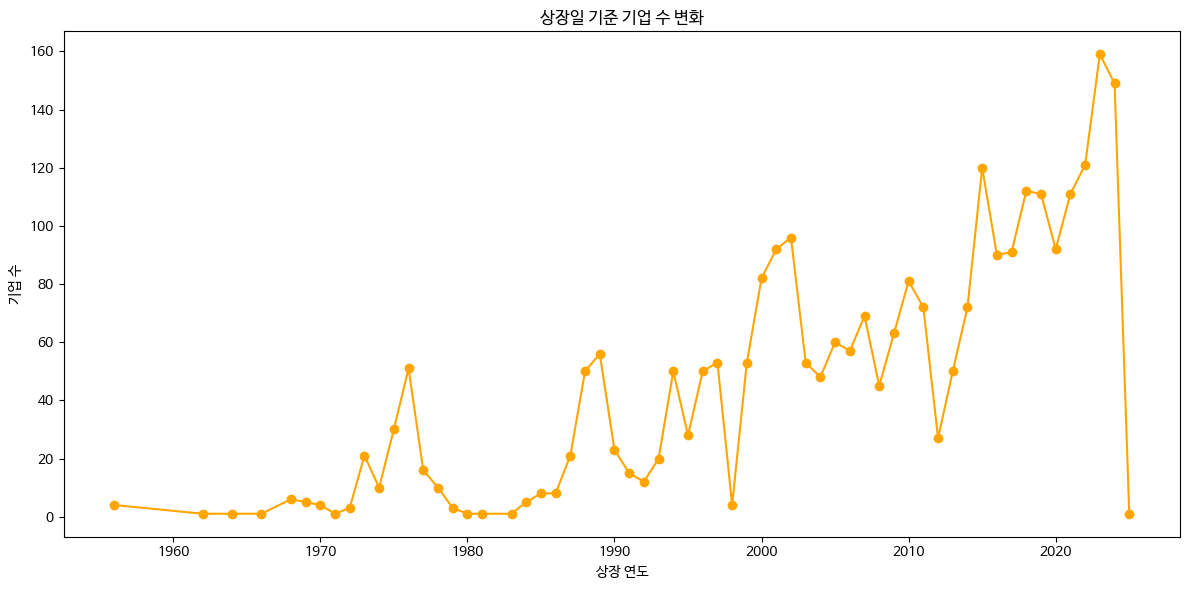
# 결산월별 기업 수
company_count_by_month = df['결산월'].value_counts().sort_index()

# 결산월별 기업 수 시각화
plt.figure(figsize=(12, 6))
company_count_by_month.plot(kind='bar', color='green')
plt.title('결산월별 기업 수')
plt.xlabel('결산월')
plt.ylabel('기업 수')
plt.tight_layout()
plt.show()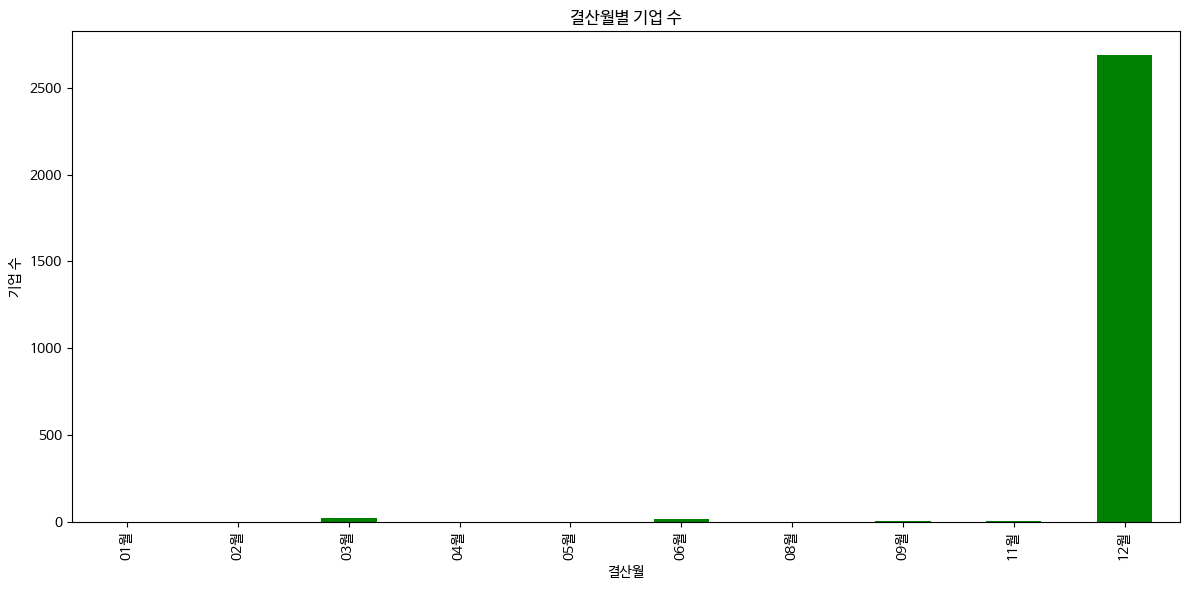
import requests
from bs4 import BeautifulSoup
import pandas as pd

# 첫 번째 페이지에서 마지막 페이지 번호를 추출
url = 'https://finance.naver.com/item/sise_day.nhn?code=005930&page=1'
response = requests.get(url, headers={'User-agent': 'Mozilla/5.0'})
html = BeautifulSoup(response.text, "lxml")

# 마지막 페이지 번호 찾기
pgrr = html.find('td', class_='pgRR')
s = str(pgrr.a['href']).split('=')
last_page = s[-1]
print("Last page:", last_page)

# DataFrame 초기화
df = pd.DataFrame()

# 크롤링할 페이지 범위 설정 (예: 첫 5페이지만 크롤링)
for page in range(1, 6):  # 5페이지까지 크롤링
    page_url = f'https://finance.naver.com/item/sise_day.nhn?code=005930&page={page}'
    response_page = requests.get(page_url, headers={'User-agent': 'Mozilla/5.0'}).text
    try:
        page_df = pd.read_html(response_page)[0]
        df = pd.concat([df, page_df], ignore_index=True)  # 데이터 프레임 합치기
    except Exception as e:
        print(f"Error processing page {page}: {e}")

# 결측값 제거 및 인덱스 리셋
df = df.dropna()
df = df.reset_index(drop=True)

# 데이터 확인
print(df)
import pandas as pd
import matplotlib.pyplot as plt
import mplfinance as mpf
# 3. 30일 간 종가 추이 확인 (그래프)
df = df.iloc[:30] # 30일 간의 데이터 추출
df = df.sort_values(by='날짜') # 날짜 기준으로 정렬
# 날짜 형식 변경: 점(.)을 하이픈(-)으로 변경 후 datetime으로 변환
df['날짜'] = df['날짜'].str.replace('.', '-', regex=False)
df['날짜'] = pd.to_datetime(df['날짜'], format='%Y-%m-%d')
# 종가 추이 시각화
plt.figure(figsize=(10, 6))
plt.plot(df['날짜'], df['종가'], 'co-', label='종가') # 'co-'로 파란색 원형 마커 표시
plt.title('30일 간 Celltrion 종가 추이')
plt.xlabel('날짜')
plt.ylabel('종가')
plt.xticks(rotation=45) # X축 레이블 회전
plt.grid(True, linestyle='--', color='gray') # 그리드 추가
plt.legend()
plt.tight_layout() # 레이아웃 최적화
plt.show()
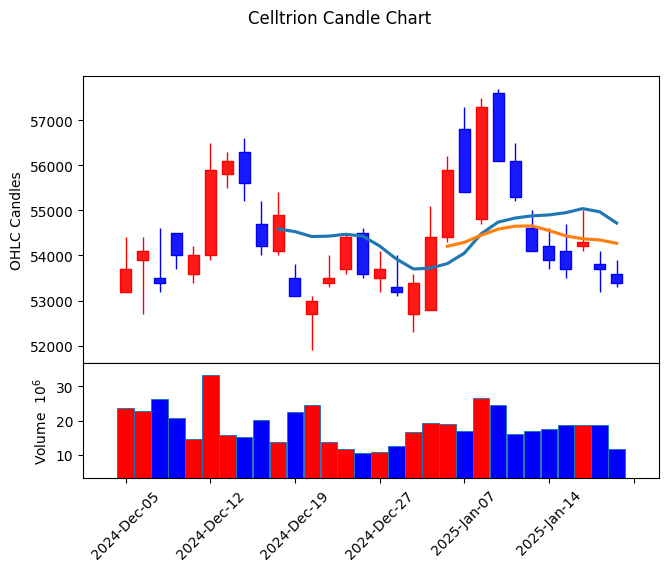
# 4. 캔들차트 작성 (mplfinance 사용)
df = df.rename(columns={
'날짜': 'Date',
'시가': 'Open',
'고가': 'High',
'저가': 'Low',
'종가': 'Close',
'거래량': 'Volume'
})
df = df.sort_values(by='Date') # 날짜 기준으로 정렬
df.index = pd.to_datetime(df['Date']) # 날짜 인덱스로 설정
# 필요한 열만 남기기
df = df[['Open', 'High', 'Low', 'Close', 'Volume']]
# 매수/매도 색상, 스타일 설정
mc = mpf.make_marketcolors(up='r', down='b', inherit=True)
s = mpf.make_mpf_style(marketcolors=mc)
# 캔들차트와 이동평균선, 거래량을 포함한 차트 출력
kwargs = dict(
title='Celltrion Candle Chart',
type='candle',
mav=(10, 20, 30), # 10, 20, 30일 이동평균선 추가
volume=True,
ylabel='OHLC Candles'
)
mpf.plot(df, **kwargs, style=s)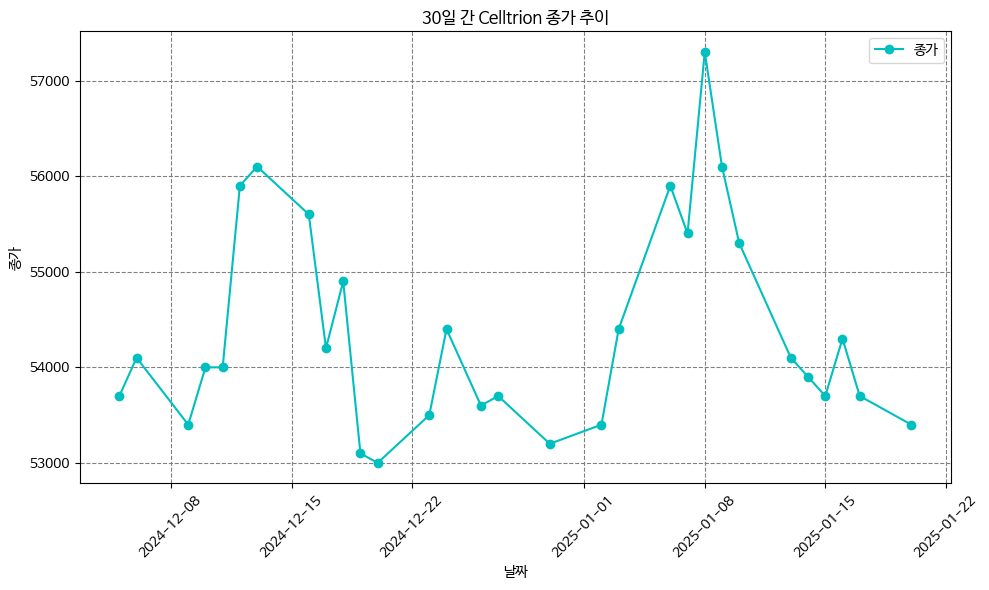
yes24 베스트셀러
- 순위, 제목, 저자를 가져오자
import requests
import pandas as pd
from bs4 import BeautifulSoup

book_list = []

# 페이지 수를 반복하면서 데이터를 가져옵니다
for page_num in range(1, 11):  # 예시로 1~10페이지까지 크롤링
    url = f'https://www.yes24.com/main/default.aspx?page={page_num}'  # 페이지 번호를 URL에 추가
    res = requests.get(url)
    soup = BeautifulSoup(res.text, 'html.parser')
    books = soup.select('li.tp02')  # 책 목록 선택

    for book in books:
      rank = book.select('strong')[0].text.strip()  # 순위
      title = book.select('strong')[1].text.strip() # 제목
      author = book.select('em')[1].text.strip()  # 저자
      book_url = 'https://www.yes24.com' + book.select_one('a')['href']  # 책 상세 페이지 URL

      # 책 정보 리스트에 추가
      book_list.append([rank, title, author, book_url])

# 데이터프레임으로 변환
df = pd.DataFrame(book_list, columns=['순위', '제목', '저자', '링크'])

# Excel로 저장
df.to_excel('./yes24_best_books_all_pages.xlsx', index=False)

# 확인
print(df.head())
Selenium => 동적크롤링
웹크롤링을 하다 보면 여러 가지 어려운 상황을 마주치게 됩니다. 대표적인 상황은 다음과 같습니다.
해당 웹사이트가 프로그램을 통한 접근 허용하지 않는 경우
해당 웹사이트가 로그인을 요구하는 경우
해당 웹사이트가 동적 웹페이지로 구성되어 있는 경우
이런 경우에는 requests 라이브러리만으로 해결하기에는 쉽지 않습니다. 이럴 때 상황을 해결하는 가장 손쉽고 효과적인 방법이 바로 selenium을 이용하는 것.
# 코랩을 시작할 때 아래코드를 한 번 돌려줍니다.
!pip install selenium   # selenium 설치
!apt-get update # apt-get : linux 명령어 update
!apt install chromium-chromedriver  # apt install (linux) 설치
!cp /usr/lib/chromium-browser/chromedriver /usr/bin # copy A B A->B
from selenium import webdriver # Selenium을 사용하여 브라우저를 제어
from selenium.webdriver.common.by import By # 요소를 선택하기 위한 By 모듈
from selenium.webdriver.support.ui import WebDriverWait # 대기 기능을 제공
from selenium.webdriver.support import expected_conditions as EC # 특정 조건을 기다릴 때 사용
from bs4 import BeautifulSoup # HTML 파싱을 위한 BeautifulSoup
import os # 디렉토리 생성 및 파일 경로 처리를 위한 os 모듈
import requests # HTTP 요청을 처리하여 이미지를 다운로드
3.11/dist-packages (from trio~=0.17->selenium) (1.3.1)
Requirement already satisfied: wsproto>=0.14 in /usr/local/lib/python3.11/dist-packages (from trio-websocket~=0.9->selenium) (1.2.0)
Requirement already satisfied: pysocks!=1.5.7,<2.0,>=1.5.6 in /usr/local/lib/python3.11/dist-packages (from urllib3[socks]<3,>=1.26->selenium) (1.7.1)
Requirement already satisfied: h11<1,>=0.9.0 in /usr/local/lib/python3.11/dist-packages (from wsproto>=0.14->trio-websocket~=0.9->selenium) (0.14.0)
Hit:1 https://dl.google.com/linux/chrome/deb stable InRelease
Hit:2 https://cloud.r-project.org/bin/linux/ubuntu jammy-cran40/ InRelease
Hit:3 https://developer.download.nvidia.com/compute/cuda/repos/ubuntu2204/x86_64 InRelease
Get:4 http://security.ubuntu.com/ubuntu jammy-security InRelease [129 kB]
Hit:5 http://archive.ubuntu.com/ubuntu jammy InRelease
Hit:6 https://r2u.stat.illinois.edu/ubuntu jammy InRelease
Get:7 http://archive.ubuntu.com/ubuntu jammy-updates InRelease [128 kB]
Hit:8 https://ppa.launchpadcontent.net/deadsnakes/ppa/ubuntu jammy InRelease
Hit:9 https://ppa.launchpadcontent.net/graphics-drivers/ppa/ubuntu jammy InRelease
Hit:10 https://ppa.launchpadcontent.net/ubuntugis/ppa/ubuntu jammy InRelease
Hit:11 http://archive.ubuntu.com/ubuntu jammy-backports InRelease
Fetched 257 kB in 2s (117 kB/s)
Reading package lists... Done
W: Skipping acquire of configured file 'main/source/Sources' as repository 'https://r2u.stat.illinois.edu/ubuntu jammy InRelease' does not seem to provide it (sources.list entry misspelt?)
Reading package lists... Done
Building dependency tree... Done
Reading state information... Done
chromium-chromedriver is already the newest version (1:85.0.4183.83-0ubuntu2.22.04.1).
0 upgraded, 0 newly installed, 0 to remove and 57 not upgraded.
cp: '/usr/lib/chromium-browser/chromedriver' and '/usr/bin/chromedriver' are the same file
[33]
# 1. Selenium을 설정하여 Chrome 브라우저를 headless 모드로 실행
chrome_options = webdriver.ChromeOptions() # Chrome 옵션 생성
chrome_options.add_argument('--headless') # GUI 없이 실행 (Headless 모드)
chrome_options.add_argument('--no-sandbox') # 샌드박스 모드 비활성화 (권한 문제 방지)
# 외부로부터 들어온 프로그램이 보호된 영역에서 동작해 시스템이 부정하게 조작되는 것을 막는 보안 형태
chrome_options.add_argument('--disable-dev-shm-usage') # 공유 메모리 문제 방지
# 2. ChromeDriver를 사용해 브라우저를 초기화
driver = webdriver.Chrome(options=chrome_options)
# 3. 연도별 Daum 검색 페이지에서 이미지를 크롤링
for year in range(2018, 2023): # 2018년부터 2022년까지 반복
# 연도별 Daum 검색 URL 생성
url = f"https://search.daum.net/search?nil_suggest=btn&w=tot&DA=SBC&q={year}%EB%85%84+%EC%98%81%ED%99%94+%EC%88%9C%EC%9C%84"
try:
# URL을 브라우저로 열기
driver.get(url)
# "wrap_thumb" 클래스를 가진 요소가 로드될 때까지 기다림 (최대 20초 대기)
WebDriverWait(driver, 20).until(
EC.presence_of_all_elements_located((By.CLASS_NAME, "wrap_thumb"))
)
except Exception as e:
# 페이지 로딩 실패 시 오류 메시지 출력 및 다음 연도로 넘어감
print(f"{year}년 페이지 로딩 실패: {e}")
continue
# 4. BeautifulSoup을 사용해 HTML 파싱
soup = BeautifulSoup(driver.page_source, "html.parser") # 현재 페이지의 HTML 소스를 BeautifulSoup으로 분석
images = soup.select("div.wrap_thumb img") # "wrap_thumb" 클래스 내부의 <img> 태그를 선택
# 5. 디버깅: 선택된 이미지 태그 개수와 URL 출력
print(f"{year}년 이미지 태그 개수: {len(images)}")
if len(images) > 0: # 이미지가 존재할 경우
for img in images: # 각 이미지 태그에서 URL 추출
print(img.get("src"))
# 이미지가 없을 경우 다음 연도로 넘어감
if not images:
print(f"{year}년에는 이미지가 없습니다.")
continue
# 6. 이미지를 저장할 디렉토리 생성
save_dir = f"movie_images/{year}" # 연도별 디렉토리 이름 설정
os.makedirs(save_dir, exist_ok=True) # 디렉토리가 없으면 생성
# 7. 이미지 다운로드 및 저장
count = 0 # 저장한 이미지 수를 세기 위한 변수
for idx, img_tag in enumerate(images): # 선택된 각 이미지 태그를 반복
image_url = img_tag.get("src") # 이미지 URL 가져오기
# URL 검증: 유효하지 않은 URL은 제외 # *** startswith 자주 사용하는 문법 ! ***
if not image_url or image_url.startswith("data:image/"): # base64 또는 잘못된 URL 제외
continue
if image_url.startswith("//"): # URL이 "//"로 시작하면 "https:"를 추가
image_url = "https:" + image_url
try:
# 이미지 다운로드
response = requests.get(image_url) # HTTP GET 요청으로 이미지 데이터 가져오기
response.raise_for_status() # HTTP 요청 실패 시 예외 발생
# 이미지 저장
image_path = os.path.join(save_dir, f"movie_{year}_{idx + 1}.jpg") # 파일 경로 생성
with open(image_path, "wb") as f: # 바이너리 쓰기 모드로 파일 열기
f.write(response.content) # 이미지 데이터를 파일에 쓰기
count += 1 # 저장한 이미지 수 증가
if count >= 5: # 연도별 최대 5개의 이미지만 저장
break # 반복 종료
except Exception as e:
# 이미지 다운로드 실패 시 오류 메시지 출력
print(f"{year}년 이미지 {idx + 1} 다운로드 실패: {e}")
# 8. 브라우저 종료
driver.quit()11번가 Best 500 아이템 정보 추출하기
추출 항목 : 순번, 제품명, 가격, URL
https://www.11st.co.kr/browsing/BestSeller.tmall?method=getBestSellerMain&xfrom=main^gnb
# 코랩을 시작할 때 아래코드를 한 번 돌려줍니다.
!pip install selenium
!apt-get update
!apt install chromium-chromedriver
!cp /usr/lib/chromium-browser/chromedriver /usr/bin
from selenium import webdriver # selenium을 사용하여 브라우저를 제어
from selenium.webdriver.common.by import By # 요소를 선택하기 위한 By 모듈
from selenium.webdriver.support.ui import WebDriverWait # 대기 기능을 제공
from selenium.webdriver.support import expected_conditions as EC # 특정 조건을 기다릴때 사용
from bs4 import BeautifulSoup # HTML 파싱을 위한 BeautifulSoup
import os # 디렉토리 생성 및 파일 경로 처리를 위한 os모듈
import requests # HTTP 요청을 처리하여 이미지를 다운로드
import time
# 1. Selenium 설정하여 Chrome 브라우저를 headless 모드로 실행
chrome_options = webdriver.ChromeOptions() # Chrome 옵션 생성
chrome_options.add_argument('--headless') # 브라우저 화면 없이 동작 (GUI 비활성화)
chrome_options.add_argument('--no-sandbox') # 샌드박스 모드 비활성화 (권한 문제 방지)
# 외부로부터 들어온 프로그램이 보호된 영역에서 동작해 시스템이 부정하게 조작되는 것을 막는 보안 형태
chrome_options.add_argument('--disable-dev-shm-usage') # 공유 메모리 문제 방지
# 2. ChromeDriver를 사용해 브라우저를 초기화
driver = webdriver.Chrome(options=chrome_options)
#11번가 이동
driver.get('https://www.11st.co.kr/browsing/BestSeller.tmall?method=getBestSellerMain&xfrom=main^gnb')
#스크롤 다운
SCROLL_PAUSE_SEC = 1
#스크롤 높이 가져옴.
last_height = driver.execute_script('return document.body.scrolHeight')
while True:
#끝까지 스크롤 다운
driver.execute_script('window.scrollTo(0, document.body.scrollHeight);')
#1초 대기
time.sleep(SCROLL_PAUSE_SEC)
#스크롤 다운 후 스크롤 높이 다시 가져옴
new_height = driver.execute_script('return document.body.scrollHeight')
if new_height == last_height:
break
last_height = new_height
# lists = driver.find_elements(By.CLASS_NAME, 'viewtype') # 5개가 있음. / 구분이 불가능함
# print(len(lists))
lists = driver.find_element(By.ID, 'bestPrdList').find_elements(By.CLASS_NAME, 'viewtype')
# bestPrdList : 1개, viewtype : 여러개
for list in lists:
bestlist = list.find_elements(By.TAG_NAME, 'li')
for item in bestlist:
print(item.text) #40개정도 밖에 크롤링이 되지 않음.-> 스크롤을 내려야 li 태그들이 완성이 되기 때문에 초기에 보이는 li태그만 가져오기 때문에 40개 밖에 안보임# - best의 순번만 가지고오자!
for list in lists:
bestlist = list.find_elements(By.TAG_NAME, 'li')
for item in bestlist:
print(item.find_element(By.CLASS_NAME, 'best').text)# pname안에 상품명이 있으니 pname의 p 태그에 접근을 해보자
for list in lists:
bestlist = list.find_elements(By.TAG_NAME, 'li')
for item in bestlist:
print('NO :' + item.find_element(By.CLASS_NAME, 'best').text) # 순번
print('Product :' + item.find_element(By.CLASS_NAME, 'pname').find_element(By.TAG_NAME, 'p').text) # 제품명
print('Price :' + item.find_element(By.CLASS_NAME, 'sale_price').text) # 가격
print('URL' + item.find_element(By.CLASS_NAME, 'box_pd.ranking_pd').find_element(By.TAG_NAME, 'a').get_attribute('href')) # URL 추
# 중간에 스페이스 태그로 되어있는 것은 .으로 연결이 가능함.
# print('Image' + item.find_element(By.CLASS_NAME,'img_plot').find_element(By.TAG_NAME,'img').get_attribute(By.TAG_NAME,'src'))
# 이미지 접근
# urllib.request.urlretrieve(url, "test.jpg")
print('-'*100)# 7. 데이터를 저장할 리스트 생성
all_data = [] # 제품 정보를 저장할 리스트
# 8. 베스트셀러 순위 데이터를 가져오기
try:
# 베스트셀러 목록 가져오기
lists = driver.find_element(By.ID, 'bestPrdList').find_element(By.CLASS_NAME, 'viewtype')
# li 태그를 통해 각 제품 데이터 탐색
bestlist = lists.find_elements(By.TAG_NAME, 'li')
for item in bestlist:
try:
# 순위, 제품명, 가격, 제품 URL, 이미지 URL 가져오기
rank = item.find_element(By.CLASS_NAME, 'best').text # 순번
product_name = item.find_element(By.CLASS_NAME, 'pname').find_element(By.TAG_NAME, 'p').text # 제품명
price = item.find_element(By.CLASS_NAME, 'sale_price').text # 가격
product_url = item.find_element(By.CLASS_NAME, 'box_pd.ranking_pd').find_element(By.TAG_NAME, 'a').get_attribute('href') # 제품 URL
image_url = item.find_element(By.CLASS_NAME, 'img_plot').find_element(By.TAG_NAME, 'img').get_attribute('src') # 이미지 URL
# 수집한 데이터를 딕셔너리 형태로 리스트에 추가
all_data.append({
"Rank": rank,
"Product Name": product_name,
"Price": price,
"Product URL": product_url,
"Image URL": image_url
})
except NoSuchElementException:
# 특정 요소가 없는 경우 예외 처리
print('An element was not found in this item.')
except NoSuchElementException:
# 목록 자체가 없는 경우 예외 처리
print('The product list was not found.')
# 9. 수집한 데이터를 DataFrame으로 변환
df = pd.DataFrame(all_data)
# 10. DataFrame 확인 및 저장
print(df.head()) # 데이터프레임의 상위 5개 행 출력
# 데이터를 CSV 파일로 저장
df.to_csv('./11st_best_sellers.csv', index=False, encoding='utf-8') # UTF-8로 저장, 인덱스 제외