
- board-app 프로젝트 수행
- 서비스 객체에 트랜잭션 적용하기
- DB 커넥션을 공유했을 때 발생하는 문제 해결하기
- 트랜잭션 관리자 역할을 별도의 클래스로 분리하기
074. 서비스 객체에 트랜잭션 적용하기
1 적용전
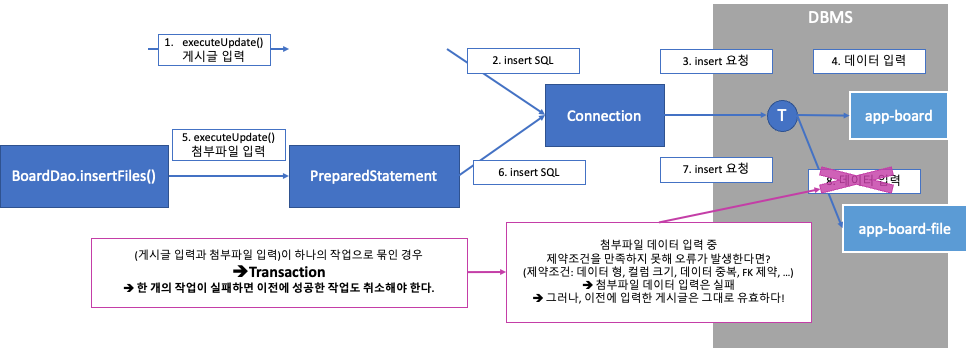
작업 성공의 예
- 트랜잭션이 필요한 이유와 적용하는 방법

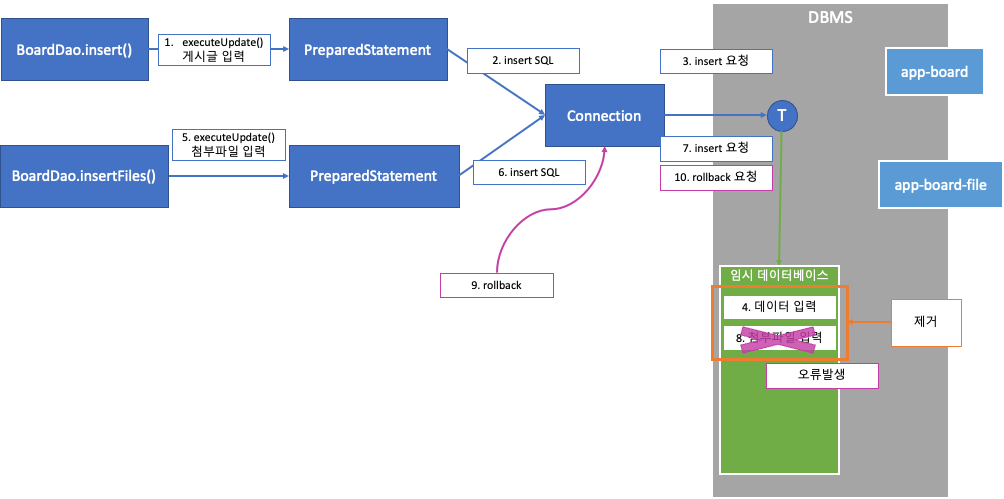
2 적용전
작업 실패의 예
3 적용후
작업 성공의 예

4 적용후
작업 실패의 예
트랜잭션 적용하기

1단계 - 서비스 객체에 Connection 객체를 주입한다.
- com.bitcamp.board.service.DefaultBoardService 클래스 변경
- 생성자 변경
- com.bitcamp.board.listener.ContextLoaderListener 클래스 변경
- BoardService 객체를 생성할 때 생성자에 Connection 객체를 삽입한다.
2단계 - 게시글 입력과 변경, 삭제에 트랜잭션을 적용한다.
-
com.bitcamp.board.service.DefaultBoardService 클래스 변경
- add(), update(), delete() 수정
-
DefaultBoardService class, add()
public class DefaultBoardService implements BoardService{
    Connection con; // 트랜잭션을 다룰 때 사용할 객체
    BoardDao boardDao;

    public DefaultBoardService(BoardDao boardDao, Connection con) {
        this.boardDao = boardDao;
        this.con = con;
    }

    @Override
    public void add(Board board) throws Exception {
        con.setAutoCommit(false);
        try {
            // 1) 게시글 등록
            if (boardDao.insert(board) == 0) {
                throw new Exception("게시글 등록 실패!");
            }

            // 2) 첨부파일 등록
            boardDao.insertFiles(board);
            con.commit();
        } catch (Exception e) {
            con.rollback();
            throw e;

        } finally {
            con.setAutoCommit(true);
        }
    }

    ...
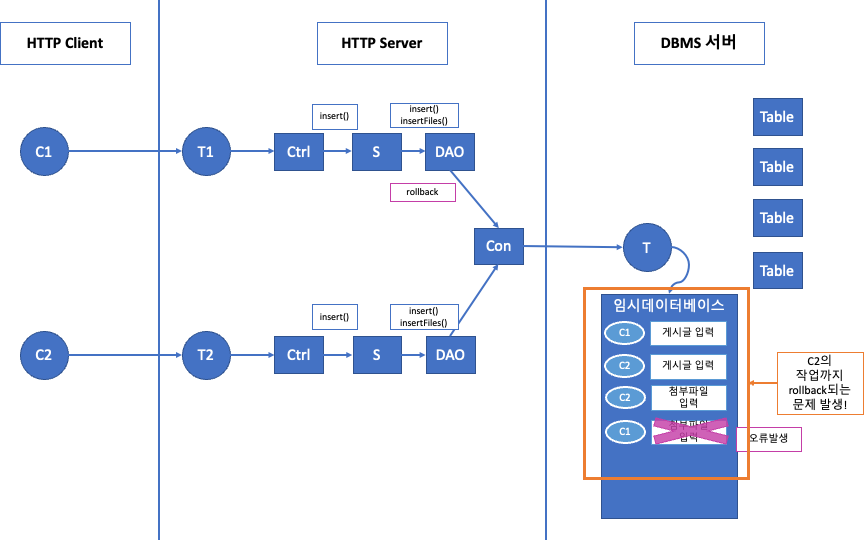
075. DB 커넥션을 공유했을 때 발생할 수 있는 문제와 해결책
문제점
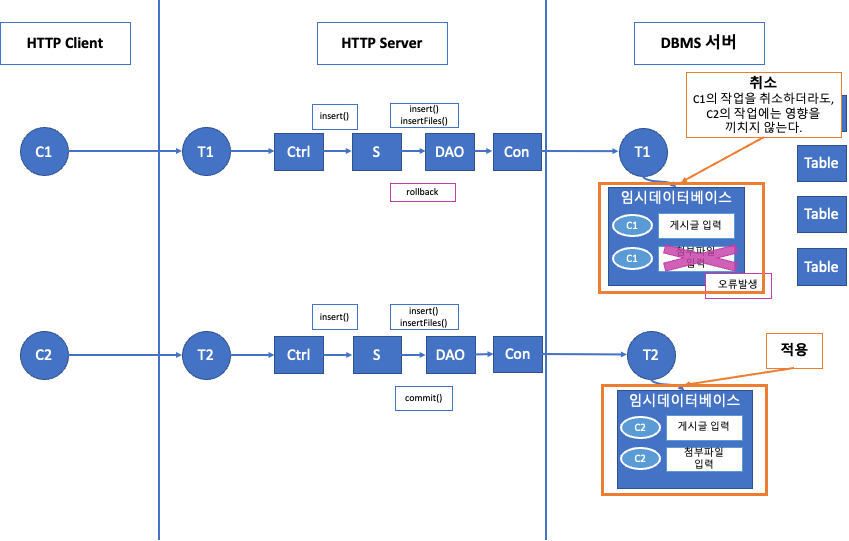
해결책
Client 요청별로 Connection 객체를 생성한다.
Controller-Service-DAO-Table
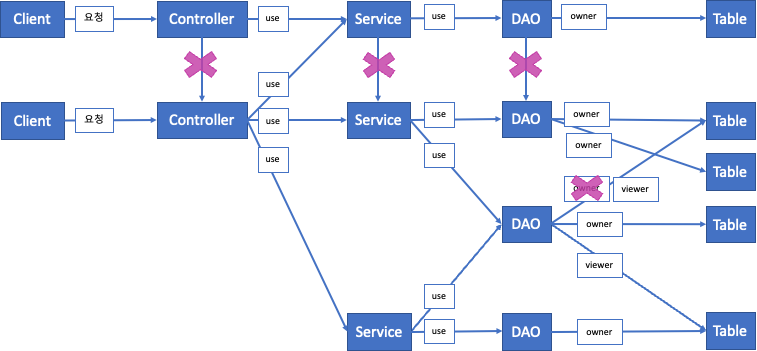
Controller가 다른 Controller 안씀
Service가 다른 Service 안씀
DAO가 다른 DAO 안씀
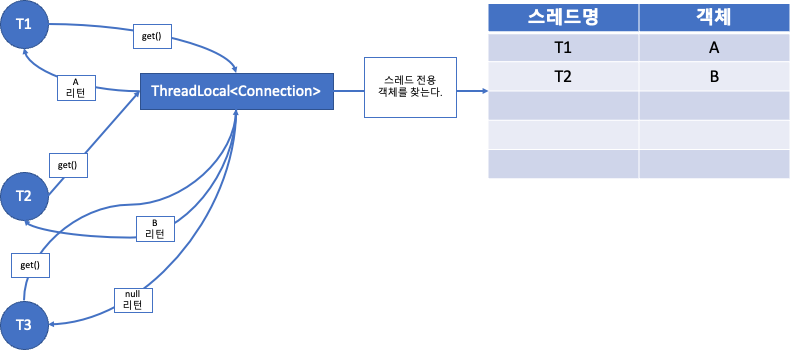
1단계 - 스레드 전용 DB 커넥션을 제공해주는 일을 할 객체를 만든다.
-
com.bitcamp.sql.DataSource 클래스 생성
-
DataSource class
// 스레드 전용 DB 커넥션을 제공하는 일을 한다.
//
public class DataSource {

    String jdbcUrl;
    String username;
    String password;

    // 스레드 전용 DB 보관소 객체
    ThreadLocal<Connection> conStore = new ThreadLocal<>();

    public DataSource(String driver, String jdbcUrl, String username, String password) throws Exception{
        //JDBC Driver 클래스 로딩하기
        Class.forName(driver);

        this.jdbcUrl = jdbcUrl;
        this.username = username;
        this.password = password;
    }

    public Connection getConnection() throws Exception {
        Thread currThread = Thread.currentThread();
        System.out.printf("%s => getConnection() 호출\n", currThread.getName());

        // 현재 스레드의 보관소에서 DB 커넥션 객체를 꺼낸다.
        Connection con = conStore.get();
        if(con == null) { // 현재 스레드  보관소에 커넥션 객체가 없다면,
            con = DriverManager.getConnection(jdbcUrl, username, password);
            conStore.set(con); // 새로 만든 DB 커넥션 객체를 다음에 다시 사용할 수있도록 보관한다.
            System.out.printf("%s =>  Connection 객체 생성\n", currThread.getName());
        }
        return con;
    }

}
2단계 - DAO에 DataSource 객체를 주입한다.
- com.bitcamp.board.listener.ContextLoaderListener 클래스 변경
3단계 - DataSource에서 제공하는 Connection을 사용하여 데이터를 처리한다.
-
com.bitcamp.board.dao.MariaDBBoardDao 클래스 변경
-
com.bitcamp.board.dao.MemberDBBoardDao 클래스 변경
-
com.bitcamp.board.service.DefaultBoardService 클래스 변경
-
DefaultBoardService class
public class DefaultBoardService implements BoardService {
    DataSource ds;
    BoardDao boardDao;

    public DefaultBoardService(BoardDao boardDao, DataSource ds) {
        this.boardDao = boardDao;
        this.ds = ds;
    }

    @Override
    public void add(Board board) throws Exception {
        ds.getConnection().setAutoCommit(false);
        try {
            // 1) 게시글 등록
            if (boardDao.insert(board) == 0) {
                throw new Exception("게시글 등록 실패!");
            }

            // 2) 첨부파일 등록
            boardDao.insertFiles(board);
            ds.getConnection().commit();

        } catch (Exception e) {
            ds.getConnection().rollback();
            throw e;

        } finally {
            ds.getConnection().setAutoCommit(true);
        }
    }

    ...
076. 트랜잭션 관리자 역할을 별도의 클래스로 분리하기
- String 프레임워크의 트랜잭션 관리 기법을 모방해보기
- 왜 모방? 나중에 진짜 스프링 프레임워크를 사용할 때 이해도를 높이기 위해
트랜잭션 관리자 도입하기

1단계 - 트랜잭션 제어에 필요한 값을 담을 보관소를 만든다.
- com.bitcamp.transaction.TransactionStatus 클래스 생성
2단계 - 트랜잭션 관리자 역할을 수행할 클래스 생성
- com.bitcamp.transaction.TransactionManager 클래스 생성
3단계 - 서비스 객체에 DataSource 대신 트랜잭션 관리자를 주입한다.
- com.bitcamp.board.listener.ContextLoaderListener 클래스 변경
4단계 - 트랜잭션 관리자를 이용하여 트랜잭션을 처리한다.
- com.bitcamp.board.service.DefaultBoardService 클래스 변경

https://github.com/Dingadung