앞서 장장 3개의 포스트로 service에 대해 설명하였습니다. 아무리 이론을 빠삭하게 알아도 실전 경험만 하지 못하기 때문에 service에 대한 작은 예제를 진행해보겠습니다.
간단한 음악 플레이어입니다. 보통 플레이어에서 음악을 재생할 때, 음악 감상만 하는 것이 아니라 다른 어플을 이용하면서 함께 동작합니다. 만약 스레드로 음악 재생 기능을 구현하면 플레이어를 사용 중일 때만 음악을 재생할 수 있습니다. 즉 플레이어 어플이 백그라운드로 이동하면 음악 재생을 하지 못하기 때문에 스레드가 아닌 service로 구현합니다.
1. background service
1) activity_main.xml
<androidx.constraintlayout.widget.ConstraintLayout xmlns:android="http://schemas.android.com/apk/res/android"
    xmlns:app="http://schemas.android.com/apk/res-auto"
    xmlns:tools="http://schemas.android.com/tools"
    android:layout_width="match_parent"
    android:layout_height="match_parent"
    tools:context=".MainActivity">

    <Button
        android:id="@+id/start"
        android:layout_width="wrap_content"
        android:layout_height="wrap_content"
        android:text="Start"
        app:layout_constraintTop_toTopOf="parent"
        app:layout_constraintBottom_toTopOf="@id/pause"
        app:layout_constraintStart_toStartOf="parent"
        app:layout_constraintEnd_toEndOf="parent"
        app:layout_constraintVertical_chainStyle="packed"
        />

    <Button
        android:id="@+id/pause"
        android:layout_width="wrap_content"
        android:layout_height="wrap_content"
        android:text="Pause"
        app:layout_constraintTop_toBottomOf="@id/start"
        app:layout_constraintBottom_toTopOf="@id/stop"
        app:layout_constraintStart_toStartOf="parent"
        app:layout_constraintEnd_toEndOf="parent"
        />

    <Button
        android:id="@+id/stop"
        android:layout_width="wrap_content"
        android:layout_height="wrap_content"
        android:text="Stop"
        app:layout_constraintTop_toBottomOf="@id/pause"
        app:layout_constraintBottom_toBottomOf="parent"
        app:layout_constraintStart_toStartOf="parent"
        app:layout_constraintEnd_toEndOf="parent"
        />
> </androidx.constraintlayout.widget.ConstraintLayout>
xml에서는 간단히 음악 재생, 멈춤, 정지 버튼을 배치합니다.
2) AndroidManifest.xml
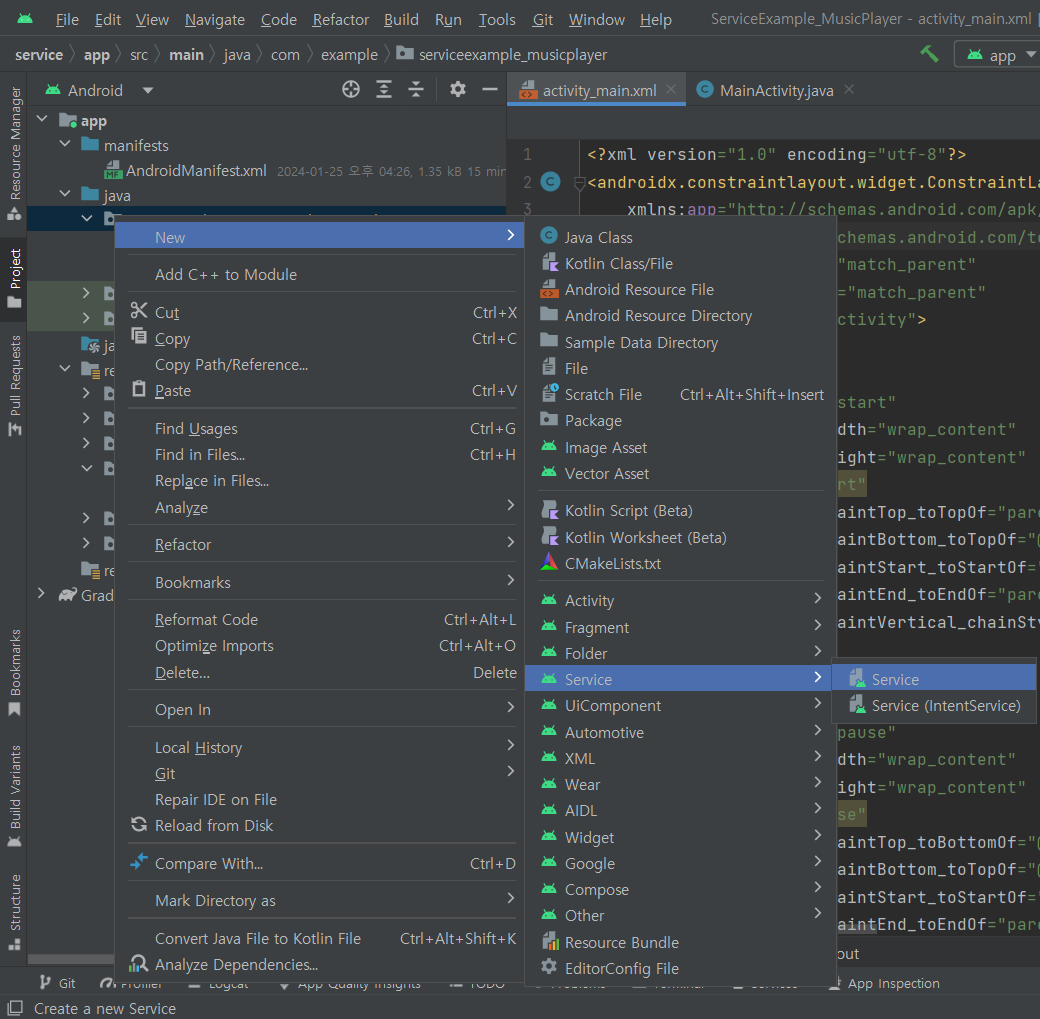
위와 같이 New->Service->Service와 같이 service를 생성하면 자동으로 service가 매니페스트에 등록이 됩니다.
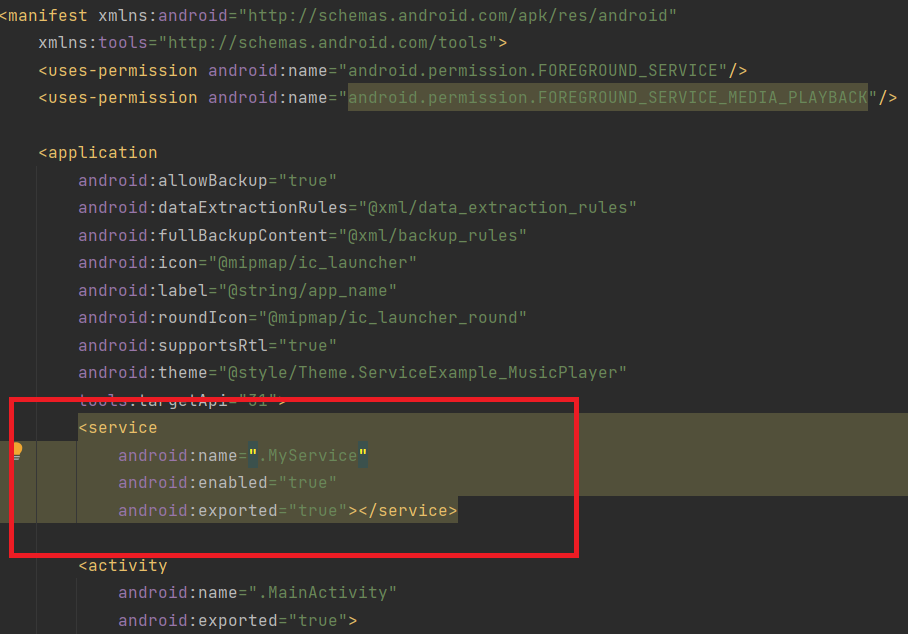
3) MyService.java
public class MyService extends Service {
    public MyService() {
    }

    @Override
    public IBinder onBind(Intent intent) {
        // TODO: Return the communication channel to the service.
        throw new UnsupportedOperationException("Not yet implemented");
    }
}
음악을 재생하기 위한 MediaPlayer를 선언해줍니다.
public class MyService extends Service {
    MediaPlayer mp;
      ...
이 앱에서는 service가 시작할 때 음악이 재생되고 service가 소멸될 때 음악이 정지되도록 할 겁니다. MediaPlayer를 선언하였으니 생성을 해야하는데 이는 service가 처음 생성되었을 때 콜백 되는 onCreate()에 생성하도록 하겠습니다.
(service의 생명주기 확인을 위해 service내 각 메소드에는 toast를 입력하였습니다. )
@Override
    public void onCreate() {
        super.onCreate();//MediaPlayer 생성
        mp= MediaPlayer.create(this, R.raw.butterfly);
        Toast.makeText(getApplicationContext(), "onCreate()",Toast.LENGTH_SHORT).show();
    }

    @Override
    public int onStartCommand(Intent intent, int flags, int startId) {
        mp.start();
        Toast.makeText(getApplicationContext(), "onStartCommand()",Toast.LENGTH_SHORT).show();
        return START_STICKY;//강제 종료 후 인텐트 null초기화 되어 service 재시작
    }

 @Override
    public void onDestroy() {
        super.onDestroy();
        if(mp!=null){
            mp.stop();
            mp.release();//MediaPlayer 리소스 해제
            mp=null;
        }
        Toast.makeText(getApplicationContext(), "onDestroy()",Toast.LENGTH_SHORT).show();
} MediaPlayer.create()를 통해 원하는 음원을 넣으면 됩니다. 음원은 res->New-> Android Resource Directory을 통해 resource type이 raw인 디렉토리를 생성한 후 mp3파일을 그 안에 넣어두면 됩니다.
MediaPlayer.create()은 간단히 음원을 앱에 재생할 수 있도록 등록하는 과정이라 생각하면 됩니다. 그러니 service가 시작될 때가 아닌, 처음 생성할 때만 등록하면 되기에 onCreate()에 입력합니다. 음원을 멈춤 후 다시 재생할 때는 onStartCommand()만 콜백합니다. 이미 생성된 service이기 때문입니다. 그러니 음원 재생은 onStartCommand()에서 하고 service가 소멸되는 onDestroy()에서 음원을 해제합니다.
그렇다면 음원 멈춤은 어떻게하면 좋을까요. MainActivity에서 멈춤 버튼 클릭을 인식하면
MyService에서 음원을 멈추는 mp.pause()를 호출하면 좋을 겁니다. 그래서 그걸 어떻게..? 여기서 bind service를 떠올릴 수 있습니다. 바인딩을 하면 activity는 service와 상호작용 할 수 있습니다. 그렇기에 service의 메서드에 직접 엑세스가 가능해지죠.
public void onMusicPause() {
        if(mp!=null&&mp.isPlaying()){
            mp.pause();
            Toast.makeText(getApplicationContext(), "onPause()",Toast.LENGTH_SHORT).show();
        }
    }
activity가 엑세스 가능한 음원 멈춤 public 메소드를 만듭니다. mp의 nulll체크와 플레이 중일 때 pause()를 호출하였습니다.
public class LocalBinder extends Binder {
       MyService getService(){
           Toast.makeText(getApplicationContext(), "getService()",Toast.LENGTH_SHORT).show();
           return MyService.this;
       }
   }
activity와 service가 상호작용하게 해줄 인터페이스인 IBinder를 service내에 구현합니다. 단순히 service를 구현한 MyService를 리턴합니다.
 IBinder binder=new LocalBinder();

   @Override
    public IBinder onBind(Intent intent) {
        Toast.makeText(getApplicationContext(), "onBind()",Toast.LENGTH_SHORT).show();
        return binder;
    }
구현한 binder를 생성하고 onBinder를 통해 binder를 리턴해줍니다.
service의 전체 코드입니다.
public class MyService extends Service {
  MediaPlayer mp;
  IBinder binder=new LocalBinder();

  @Override
  public void onCreate() {
      super.onCreate();
      mp= MediaPlayer.create(this, R.raw.butterfly);
      Toast.makeText(getApplicationContext(), "onCreate()",Toast.LENGTH_SHORT).show();
  }

  @Override
  public int onStartCommand(Intent intent, int flags, int startId) {
      mp.start();
      Toast.makeText(getApplicationContext(), "onStartCommand()",Toast.LENGTH_SHORT).show();
      return START_STICKY;
  }

  @Override
  public IBinder onBind(Intent intent) {
      Toast.makeText(getApplicationContext(), "onBind()",Toast.LENGTH_SHORT).show();
      return binder;
  }

  @Override
  public void onDestroy() {
      super.onDestroy();
      if(mp!=null){
          mp.stop();
          mp.release();
          mp=null;
      }
      Toast.makeText(getApplicationContext(), "onDestroy()",Toast.LENGTH_SHORT).show();
  }

  public void onMusicPause() {
      if(mp!=null&&mp.isPlaying()){
          mp.pause();
          Toast.makeText(getApplicationContext(), "onPause()",Toast.LENGTH_SHORT).show();
      }
  }

  public class LocalBinder extends Binder {
      MyService getService(){
          Toast.makeText(getApplicationContext(), "getService()",Toast.LENGTH_SHORT).show();
          return MyService.this;
      }
  }

}
4) MainActivity.java
MainActivity에 각 버튼의 클릭 리스너를 등록하고 메서드를 생성합니다.
public class MainActivity extends AppCompatActivity implements View.OnClickListener {

    @Override
    protected void onCreate(Bundle savedInstanceState) {
        super.onCreate(savedInstanceState);
        setContentView(R.layout.activity_main);
        Button start=findViewById(R.id.start);
        Button pause=findViewById(R.id.pause);
        Button stop=findViewById(R.id.stop);
        start.setOnClickListener(this);
        pause.setOnClickListener(this);
        stop.setOnClickListener(this);
    }

    @Override
    public void onClick(View v) {
        if(v.getId()==R.id.start){
            startMusic();
        }else if(v.getId()==R.id.pause){
            pauseMusic();
        }else if(v.getId()==R.id.stop){
            stopMusic();
        }
    }

    void startMusic(){

    }

    void pauseMusic(){

    }

    void stopMusic(){

    }

}
service 생성과 종료는 service로 이동하는 인텐트를 단순히 startService와 stopService에 전달만 하면 됩니다.
  void startMusic(){
        Intent intent= new Intent(this, MyService.class);
        startService(intent);
    }
 ...
void stopMusic(){
        Intent intent= new Intent(this, MyService.class);
        stopService(intent);
 }
다음으로 음악 멈춤을 위해 service의 binder를 받아야 합니다. 우선 service의 bound 여부를 저장할 변수와 구현한 service 객체를 선언해줍니다.
MyService mService;
boolean isBound=false;
인터페이스 binder를 받기 위해서는 onServiceConnected()를 통해 얻어야 합니다.
 private ServiceConnection connection=new ServiceConnection() {
        @Override
        public void onServiceConnected(ComponentName name, IBinder service) {
            Toast.makeText(getApplicationContext(), "onServiceConnected()",Toast.LENGTH_SHORT).show();
            MyService.LocalBinder binder=(MyService.LocalBinder) service;
            mService=binder.getService();
            isBound=true;
        }

        @Override
        public void onServiceDisconnected(ComponentName name) {
            Toast.makeText(getApplicationContext(), "onServiceDisconnected()",Toast.LENGTH_SHORT).show();
            isBound=false;
        }
    };
ServiceConnection 구현을 통해 onServiceConnected()와 onServiceDisconnected() 에 필요한 내용을 입력합니다. onServiceConnected()의 IBinder를 LocalBinder로 캐스팅합니다.(service에서 구현한 binder). 이 binder로 getService()를 통해 통신 인터페이스를 얻습니다. 여기서는 바인딩 된 상태이기 때문에 isBound에 true를 할당합니다.
onServiceDisconnected()는 연결이 끊길 때가 아닌, 비정상 종료 되었을 때 호출되기 때문에 별다른 코드를 입력하지 않습니다. 그저 콜백을 알릴 toast와 연결 끊김을 표현할 isBound에 false를 할당합니다.
이제 service의 onMusicPause()를 호출할 수 있습니다. 음악을 시작할 때 bind하고 음악을 종료할 때 unbind합니다.
    void startMusic(){
        Intent intent= new Intent(this, MyService.class);
        startService(intent);
        bindService(intent, connection, Context.BIND_AUTO_CREATE);
    }

    void pauseMusic(){
        if(isBound){
            mService.onMusicPause();
        }
    }

    void stopMusic(){
        Intent intent= new Intent(this, MyService.class);
        if(isBound) unbindService(connection);
        stopService(intent);
        isBound=false;
    }
bindService의 세 번째 매개변수는 바인딩 옵션을 나타냅니다. 일반적으로는 BIND_AUTO_CREATE를 사용하는데, 이는 service가 아직 활성화되지 않았을 경우 service를 생성한다는 의미입니다.
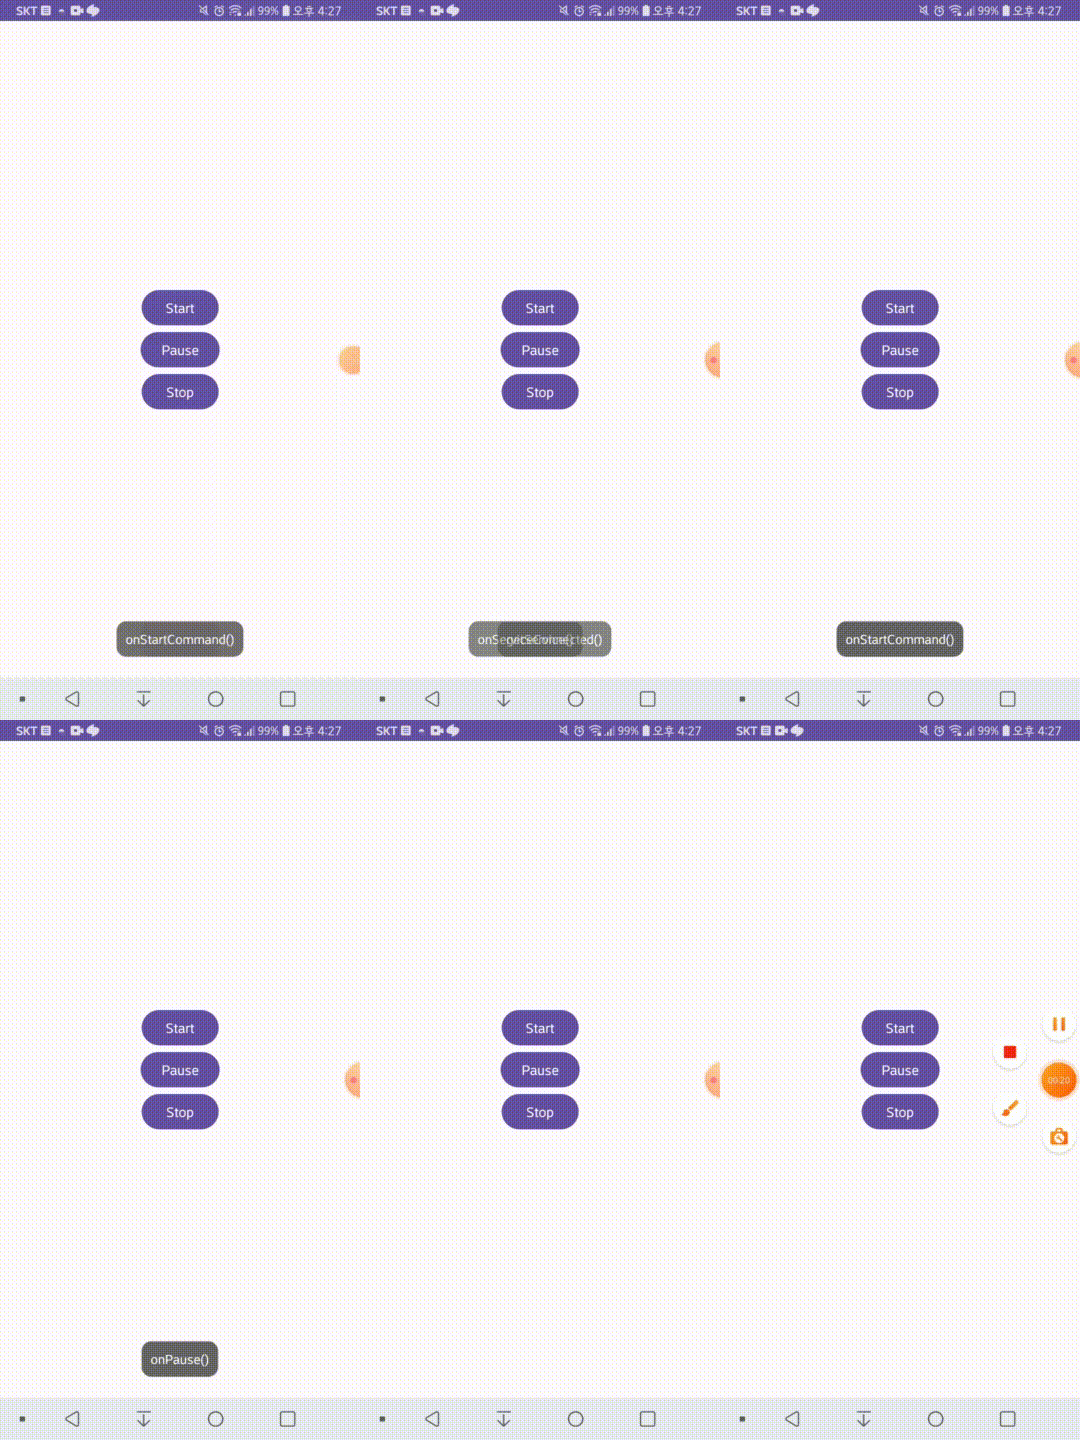
어플을 실행하고 처음으로 start 버튼을 누르면
onCreate()->onStartCommand()->onBind()->onServiceConnected()->getService()
으로 호출됩니다. 처음으로 service를 실행하였기에 onCreate()가 호출되고 service가 시작되면서 onStartCommand()가 호출됩니다. bind service도 호출하였기에 onBind(), binder를 받기 위에 onStartCommand(), service에서 binder를 주면서 getService()가 호출됩니다.
만약 음악이 재생되고 있는 상태에서 start버튼을 다시 누르면 onStartCommand()만 호출됩니다. 처음 실행된 것도 아니고 이미 bind된 상태이기 때문입니다.
pause 버튼을 누르면 onPause()이 호출됩니다.
stop 버튼을 누르면 onDestroy()만 호출됩니다. onServiceDisconnected()는 호출되지 않나 싶지만 이 메서드는 비정상 종료때만 호출되기 때문입니다.
2. foreground service
background로 구현된 service를 foreground service로 바꿔보겠습니다. 우선 foreground는 background와 달리 권한 허용이 필요합니다.
1)AndroidManifest.xml
<manifest xmlns:android="http://schemas.android.com/apk/res/android"
    xmlns:tools="http://schemas.android.com/tools">

    <uses-permission android:name="android.permission.FOREGROUND_SERVICE"/>
    <uses-permission android:name="android.permission.FOREGROUND_SERVICE_MEDIA_PLAYBACK"/>//음악 플레이를 위한 권한

    <application
        android:allowBackup="true"
	...
        <service
            android:name=".MyService"
            android:foregroundServiceType="mediaPlayback"
            android:enabled="true"
            android:exported="true"></service>
	...
foreground와 background 또 다른 점은 foreground는 알림을 필수적으로 구현해야합니다.
2) MyService.java
public int onStartCommand(Intent intent, int flags, int startId) {
      mp.start();

      if(Build.VERSION.SDK_INT >= Build.VERSION_CODES.O){
          NotificationChannel notificationChannel = new NotificationChannel("default","default", NotificationManager.IMPORTANCE_LOW);
          NotificationManager notificationManager = (NotificationManager) getSystemService(NOTIFICATION_SERVICE);
          notificationManager.createNotificationChannel(notificationChannel);
          Notification.Builder notification =
                  new Notification.Builder(this, notificationChannel.getId())
                          .setContentTitle("음악 재생 중")
                          .setContentText("음악...")
                          .setSmallIcon(R.drawable.ic_launcher_foreground);
          startForeground(1, notification.build());
      }

      Toast.makeText(getApplicationContext(), "onStartCommand()",Toast.LENGTH_SHORT).show();
      return START_STICKY;
  }
코드량이 길지만 단지 알림에 대한 코드라고만 아시면 됩니다. 주목해야할 코드는 startForeground()밖에 없습니다. 알림을 생성하고, startForeground()에 생성된 알림과 알림의 id를 전달하면 됩니다.
3) MainActivity.java
void startMusic(){
        Intent intent= new Intent(this, MyService.class);
        if (Build.VERSION.SDK_INT>=Build.VERSION_CODES.O) {
            startForegroundService(intent);
        }
        else{
            startService(intent);
        }
        bindService(intent, connection, Context.BIND_AUTO_CREATE);
    }
MainActivity에는 startService() 부분만 수정하면 됩니다. 빌드 버전 O부터 foreground service를 시작하기 위해 startService() 대신 startForegroundService()를 사용하기 때문에 이부분만 수정하면 service foreground로 실행할 수 있습니다.
이로써 간단한 음악 플레이어 제작이 끝났습니다! 이 예제로 service에 대한 이해가 높아졌으면 좋겠습니다:)
마지막으로 예제 영상을 올리며 마무리하겠습니다.
이전 SERVICE 포스트
<service_1>
<service_2>
<service_3>