3.0 Class Components and State
-state는 보통 우리가 동적 데이터와 함께 작업할 때 만들어진다. Component에는 data를 넣을 공간이 있고 그 데이터는 변경될 수도 있는데 그러한 데이터를 state라고 말한다.
-동적 데이터란 갑자기 생기거나, 사라지거나 다시 변경되는 형태의 데이터를 말한다.
-이전에 만든 component 'function app'은 함수를 수행하여 이런한 것들을 function component라고 부른다.
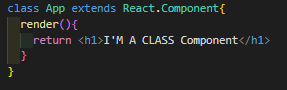
-state를 활용하기 위해서 우리는 class component를 만들어야하는데, class component는 class이며, react component로부터 확장된다.class App extends React.Component{ }-class Component의 선언은 extend를 사용하여 react component를 확장한다.
이는 React.Component를 기반으로 class 형태인 App Component를 만든 것이다.
선언 후엔 React.Component의 많은 부분들을 class Component에서 구현할 수 있고 그 중 하나가 바로 state이다.
-class react component는 function이 아니기 때문에 function component와 달리 return을 가지고 않다. 그러나 react component에서 확장했기 때문에 render method를 가지고 있다.

class component와 function component는 차이?!
-Function component는 function이기 때문에 뭔가를 return한다. 그리고 screen에 표시가 된다.
-class component는 class이고 react component로 부터 확장되어서 render method 안에 넣으면 screen에 표시된다. react는 자동적으로 class component의 render method를 실행한다.
class component를 쓰는 이유?
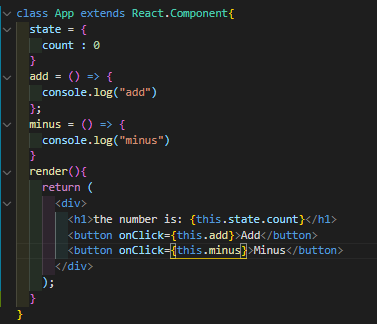
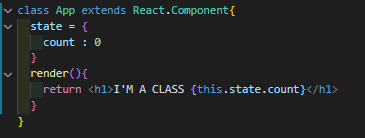
- class component는 state를 가지고 있는데, state는 object이다.
component의 data를 넣을 공간을 가지고 이 데이터는 변한다. 이것이 우리가 state를 사용하는 이유이다.
- 먼저 state에는 바꾸고자하는 data를 넣는다. 만약 state를 render에 넣고 싶으면 state는 class이기 때문에 this.state.count라고 해야한다.
- div 안에 h1을 넣어주고 두개의 button을 넣어주고 class안에 add, minus function을 만든다.
- button에 함수를 호출 하기 위해서 onClick prop을 사용한다. 따라서 button을 클릭했을 때 this.해당함수를 호출하도록 넣어준다.
3.1 All you need to know about State
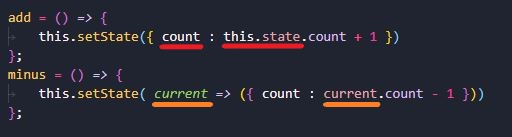
-state를 직접적으로 바꾸면 오류가 발생하고 setState()를 사용하라는 문구가 나온다.
-React는 setState function을 호출해야 state가 변경됐다는 것을 감지하고 변경 된 state를 보여주기 위해 rerender를 실행합니다.
-이는 우리가 set State를 호출할 때 마다 react는 새로운 state와 함께 render function을 호출하는 방식이다.
-set.state를 호출할때마다 react는 다시 render하고 새로운 state와 함께 0으로, 1로 , 2로 ,3으로 0으로, -1로 다시 render하는 식이다.
this.state를 쓰는 것이 권장되지 않아 다음과 같이 함수안에 current라는 변수를 넣어서 current.count를 변경하는 방법이 더 좋다. this.state를 자체를 변경하는 것은 권장되지 않는다.
3.2 Component Life Cycle
- react class conponent는 생성 후 실행되는 render말고 전 과 후 호출되는 여러 function이 있다 이러한 것을 life cycle method라고한다.
- life cycle method는 기본적으로 react가 component를 생성하고 그리고 없앨 때 진행되는 cycle을 의미한다.
- Component의 여러종류의 Life Cycle method 중 우리는 자주 쓰는 Mounting, Updating, Unmounting 세가지를 알면된다.
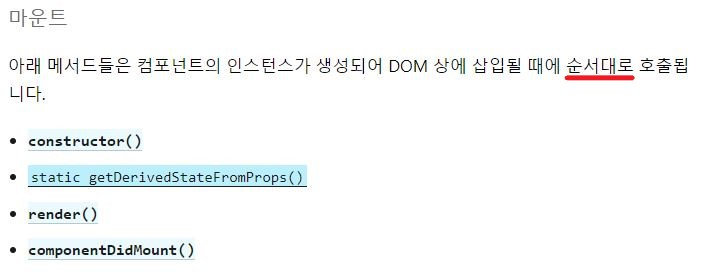
1>Life Cycle : Mounting
-Life Cycle 중 Mounting은 처음 DOM상에 삽입될 때 그림의 메서드의 순서대로 호출된다. 처음 페이지를 로드 했을 때라고 생각하면 된다.
-위의 순서대로 constructor, render, componentDidMount 순으로 실행된다.
-constructor()는 자바스크립트에서 class 내에서 작성된 오브젝트를 작성하고 초기화하기위한 특수 메소드이다.
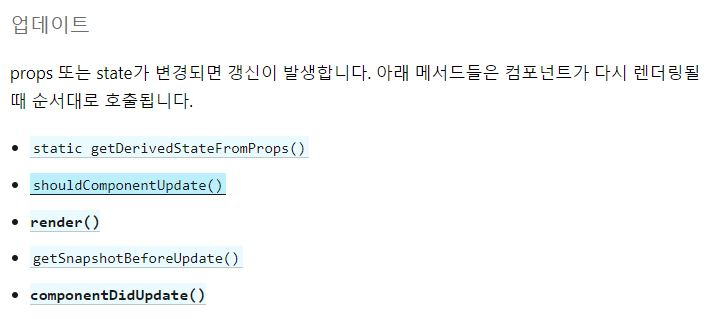
2>Life Cycle : Updating
-Updating은 업데이트 되었을 때 실행됩니다. Add나 Minus버튼을 클릭해서 state를 변경할 때 실행된다.
3>Life Cycle : Unmounting
-Unmounting은 Component가 DOM에서 제거될 때 호출됩니다. 다른 작업을 하거나 페이지를 이동하거나 할 때 호출된다.
- 따라서 setState를 호출하면, 콘솔 창처럼 component를 호출하고, 먼저 constructor, render, componentDidMount, 순으로 메소드를 호출하고 버튼을 누르면 업데이트가 완료되었다는 componentDidUpdate가 실행된다.
<script>
import React from 'react';
class App extends React.Component{
  constructor(d){
    super(d);
    console.log("h")
  }
  state = {
    count : 0
  }
  add = () => {
    this.setState(current => ({ count: current.count +1 }));
  };
  minus = () => {
    this.setState({ count: this.state.count -1 })
  }
  componentDidMount(){
    console.log("rendered")
  }
  componentDidUpdate(){
    console.log("i just updaate")
  }
  componentWillUnmount(){
    console.log("good bye")
  }
  render(){
    console.log("rendering")
    return (
      <div>
        <h1>the number is: {this.state.count}</h1>
        <button onClick={this.add}>Add</button>
        <button onClick={this.minus}>Minus</button>
      </div>
    );
  }
}
export default App;
</script>
3.3 Planning the Movie Component
-우리가 할 일은 componentDidMount에서 data를 fetch하는 것이다.
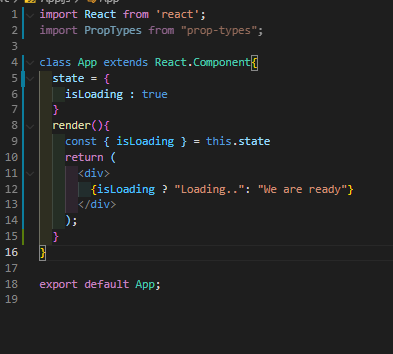
- App Component의 state에 isLoading : true 값을 넣어준다.
- javascript의 삼항연산으로 isLoading이 true일 땐 "Loading"을 반환, false면 "We are ready"를 반환하게 만든다.
- this.state 대신 javascript의 es6문법을 활용하해 this.state를 하나의 상수로 만들어 할당해준다.
- React Component가 Mounting, 생성될 때, render method 직후 componentDidMount method가 실행된다.
- render 함수가 실행 되고 나서 setTimeout함수를 활용해 isLoading을 false로 바꾸는 코드를 작성한다. componentDidMount() method 안에 setTimeout함수가 6초 후에 state의 isLoading을 false로 바꾸는데 역시 setState를 활용한다.
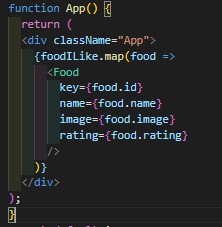
- 위와 같은 원리를 활용하여 state안에 movie 빈 배열을 만들어 영화 목록 API로 부터 data fetching이 완료되면 "we are ready" 대신에 movie를 Render하고 map을 만들고 movie를 render할 수 있도록 만든다.