
express와 socket.io를 이용해서 채팅 앱을 구현하는 방법
1. 기본 뼈대 폴더 생성 및 모듈 설치
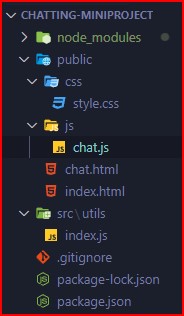
- npm i express socket.io nodemon
2. HTML CSS 뼈대 구성
- index.html
<!DOCTYPE html>
<html lang="ko">
  <head>
    <meta charset="UTF-8" />
    <meta name="viewport" content="width=device-width, initial-scale=1.0" />
    <link rel="stylesheet" href="./css/style.css" />
    <title>Document</title>
  </head>
  <body>
    <div class="centered-form">
      <div class="centered-form-box">
        <h2>채팅방 입장</h2>
        <form action="/chat.html">
          <label for="">유저 이름</label>
          <input type="text" name="username" placeholder="유저 이름" />
          <label for="">방 이름</label>
          <input type="text" name="room" placeholder="방 이름" />
          <button>입장하기</button>
        </form>
      </div>
    </div>
  </body>
</html>
- chat.html
<!DOCTYPE html>
<html lang="ko">
  <head>
    <meta charset="UTF-8" />
    <meta name="viewport" content="width=device-width, initial-scale=1.0" />
    <link rel="stylesheet" href="./css/style.css" />
    <script src="./js/chat.js" defer></script>
    <title>Document</title>
  </head>
  <body>
    <div class="chat">
      <div id="sidebar" class="chat_sidebar"></div>
      <div class="chat_main">
        <div id="messages" class="chat_messages"></div>
        <div class="form_container">
          <form id="message-form" action="">
            <input
              name="message "
              type="text"
              placeholder="메시지를 입력하세요."
              required
            />
            <button>전송</button>
          </form>
        </div>
      </div>
    </div>
  </body>
</html>
- style.css
3. express socketio 서버 연동
// 서버 index.js
const express = require("express");

const app = express();
const path = require("path");

// express 서버와 socketio 서버를 연동하려면 http에 express 넣어야함
const http = require("http");
const server = http.createServer(app);
const { Server } = require("socket.io");
const io = new Server(server);

// io가 connection이 일어나면 socket을 받아온다.
io.on("connection", (socket) => {
  console.log("socket", socket.id);

  socket.on("join", () => {});
  socket.on("sendMessage", () => {});
  socket.on("disconnect", () => {
    console.log(socket.id);
  });
});

const publicDirectoryPath = path.join(__dirname, "../public");
app.use(express.static(publicDirectoryPath));

const port = 3000;

server.listen(port, () => {
  console.log(`server open ${port}`);
});
3-1. client js에서도 socket을 불러올 수 있다.
// 클라이언트 chat.html
<script src="/socket.io/socket.io.js"></script>

// 클라이언트 index.js
const socket = io(); // socket io 모듈을 사용하면 socket io client도 포함돼 있어서 사용 가능하다.
- express에 socket io를 설치해서 html 파일에서도 socket 클라이언트를 사용할 수 있다.
4. socket에 진입(user가 room에 들어가면 room이 socket에 진입한다.)
4-1. users 로직 파일을 생성한다.
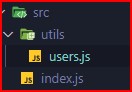
 4-2. users.js에 파일에 방에 입장할 로직 구현
 // users.js
 // db연결 시 db에서 찾아야됨
 const users = [];

// 방에 입장할 유저 로직 // 서버 socket io 로직에서 사용

const addUser = ({ id, username, room }) => {
username = username.trim();
room = room.trim();

if (!username || !room) {
 return {
  error: "사용자 이름과 방이 필요합니다.",
};
}
// 방에 있는 유저
const existingUser = users.find((user) => {
  return user.room === room && user.username === username;
});
if (existingUser) {
  return {
  error: "사용자 이름이 사용 중입니다.",
};
}

const user = { id, username, room };
users.push(user);

return { user };
};

4-3. 클라이언트에서 서버로 데이터를 전송
//chat.js
const socket = io(); // socket io 모듈을 사용하면 socket io client도 포함돼 있어서 사용 가능하다.

const query = new URLSearchParams(location.search); //     url query문 가져올 수 있다.

const username = query.get("username");
 const room = query.get("room");

 // 서버로 join으로 데이터를 전송한다.
 socket.emit("join", { username, room }, (error) => {
 if (error) {
alert(error);
location.href = "/";
}
});

4-4. 클라이언트에서 보낸 데이터로 서버에서 로직 구현
// index.js
   // 클라이언트에서 join으로 데이터를 받아온다.
 socket.on("join", (options, callback) => {
  const { error, user } = addUser({ id: socket.id, ...options });
 if (error) {
  return callback(error);
}

 socket.join(user.room); // 방이 socket에 진입한다.
  });
5. 유저가 채팅방에 입장하면 동적으로 user와 room 이름 표시
5-1. 환영 메시지 로직 구현(utils 폴더에 messages.js 파일생성)
//utils/messages.js
const generateMessage = (username, text) => {
return {
username,
text,
createdAt: new Date().getTime(),
};
};

 module.exports = {
 generateMessage,
 };

 5-2. 서버에서 방에 들어갈 시 데이터를 보낼 함수 로직
    // 클라이언트에서 join으로 데이터를 받아온다.
 socket.on("join", (options, callback) => {
  const { error, user } = addUser({ id: socket.id, ...options });
if (error) {
  return callback(error);
}

socket.join(user.room); // 방이 socket에 진입한다.

socket.emit(
  "message",
  generateMessage("Admin", `${user.room}방에 오신 걸 환영합니다.`)
); // 나에게 보냄
socket.broadcast // 나를 제외한 방에 있는 유저에게 보냄
  .to(user.room)
  .emit("message", generateMessage("", `${user.username}가 참여했습니다.`));

io.to(user.room).emit("roomData", {
  room: user.room,
  users: getUsersInRoom(user.room),
});
});

// users.js
// 같은 방에 있는 유저 찾는 로직
const getUsersInRoom = (room) => {
 room = room.trim();

 return users.filter((user) => user.room === room);
};


5-3. 방에 들어가면 메시지 보여주기
// chat.html
// Mustache.js를 사용해서 동적으로 데이터를 받아오도록 템플릿 생성

 <script src="https://cdnjs.cloudflare.com/ajax/libs/mustache.js/3.0.1/mustache.min.js"></script>

    <script id="sidebar-template" type="text/html">
  <h2 class="room-title">방 이름:{{room}}</h2>
  <p class="list-title">유저들</p>
  <ul class="users">
    {{#users}}
    <li>{{username}}</li>
    {{/users}}
  </ul>
  </script>


// chat.js
const sidebarTemplate = document.querySelector("#sidebar-template").innerHTML;

 socket.on("roomData", ({ room, users }) => {
 console.log(sidebarTemplate);
 // Mustache.js를 사용해 동적으로 데이터 가져오기
 const html = Mustache.render(sidebarTemplate, {
  room,
users,
});

 document.querySelector("#sidebar").innerHTML = html;
});
6. Mustache를 이용해서 동적으로 환영메시지 보여주기 로직
6-1. 환영메시지 템플릿 만들기
   // chat.html
   <script id="message-template" type="text/html">
  <div class="message">
    <p>
      <span
        class="
      message_name"
        >{{username}}</span
      >
      <span class="message_mete">{{createdAt}}</span>
    </p>
    <p>{{message}}</p>
  </div>
</script>

6-2. 서버 socket에 데이터 받아오기
// chat.js
// moment.js를 이용해 동적으로 시간 가져오기
//   <script src="https://cdnjs.cloudflare.com/ajax/libs/moment.js/2.30.1/moment.min.js"></script>

// 유저 입장 시 환영메시지 템플릿
const messageTemplate =   document.querySelector("#message-template").innerHTML;
 const messages = document.querySelector("#messages");

socket.on("message", (message) => {
const html = Mustache.render(messageTemplate, {
username: message.username,
message: message.text,
createdAt: moment(message.createdAt).format("h:mm a"),
});

messages.insertAdjacentHTML("beforeend", html);
scrollToBottom();
 });

// 데이터가 위에 쌓이면 스코롤 올려주기
function scrollToBottom() {
 messages.scrollTop = messages.scrollHeight;
}
7. 메시지 전송 로직
  7-1. 메시지 전송버튼 누를 시 로직
  // 유저가 메시지 전송하기
  // chat.js
   const messageForm = document.querySelector("#message-form");
 const messageFormInput = messageForm.querySelector("input");
    const messageFormButton = messageForm.querySelector("button");

    messageForm.addEventListener("submit", (e) => {
     e.preventDefault(); // 페이지가 새로고침 안되게

   messageFormButton.setAttribute("disabled", "disabled");
   // 메시지가 정상적으로 전송되지 않으면 버튼을 못 누르게

   const message = e.target.elements.message.value;
   // input에 치는 value?
     socket.emit("sendMessage", message, (error) => {
      messageFormButton.removeAttribute("disabled");
         // setAttribute 다시 누를 수 있게
     messageFormInput.value = "";
       messageFormInput.focus();

    if (error) {
    return console.log(error);
        }
     });
    });

    7-2. 서버에서 메시지 전송 후 처리
      socket.on("sendMessage", (message, callback) =>      {
  // users 배열에 socket에 유저 정보가 담겨져있다.
  const user = getUser(socket.id);
  io.to(user.room).emit("message",  generateMessage(user.username, message));

  // chat.js socket.emit부분 호출
   callback();
   });
8. 채팅방 나갈 때 로직
 8-1. socket disconnect 이벤트가 발생할 때 이벤트 리스너 호출
    // index.js 서버에서 꺼지면 함수 실행
   socket.on("disconnect", () => {
    const user = removeUser(socket.id);

  // 만약 유저가 있다면 방을 나간 걸 보여주고 users의 정보를 새로고침해준다.
if (user) {
  io.to(user.room).emit(
    "message",
    generateMessage("Admin", `${user.username}가 방을 나갔습니다.`),
    io.to(user.room).emit("roomData", {
      room: user.room,
      users: getUsersInRoom(user.room),
    })
  );
}
});

// users.js
// 유저 나갈 때 방에서 삭제
 const removeUser = (id) => {
 // 지우려고 하는 유저가 있는지 찾기
 const index = users.findIndex((user) => {
  return user.id === id;
 });
 // 만약 있다면 지운다.
 if (index !== -1) {
  // [0]을 하면 지워진 정보가 return 된다.
  return users.splice(index, 1)[0];
}
};
소스 코드: 깃허브 소스코드

개발 경험치 쌓는 곳