
이론
Maven
메이븐(Maven)은 소프트웨어를 개발할 때 반복되는 작업을 자동화하는 빌드 도구.
메이븐을 사용하면 표준 프로젝트를 일관된 방식과 구조로 관리하고 배포하고 운영할 수 있다.
메이븐의 특징
- 정형화된 구조와 절차를 제공
- 메이븐은 컴파일(compile),패키징(package),테스트(test) 등의 작업 프로세스를 정형화하고 이를 준수하도록 장제
- 디펜던시 라이블러리 해결을 자동화
- 디펜던시 라이블러리 혹은 라이브러리 디펜던시는 라이브러리 의존성(혹은 종속성)을 의미한다. 애플리케이션을 실행하기 위해 필요한 라이브러리들과 그 라이브러리들이 필요로 하는 라이브러리들을 가리킨다.
- 라이브러리 관리가 용이
- 메이븐에서는 라이브러리 전용 저장소(repository)를 제공하므로, 통합 관리가 가능
- 라이프 사이클을 가짐
- 라이프 사이클에 따라서 연속적으로 단계를 설정
- 다양한 플러그인을 활용할 수 있음
- 플러그인으로 기능을 확장한다. 플러그인을 사용하면 IDE 프로젝트로 자동 변환, 데이터베이스 통합, 다양한 리포트 생성 등의 작업을 수행할 수 있다. 메이븐은 pom.xml 파일에 위의 내용을 기술한다.
디펜던시 관리
프로젝트에 포함된 디펜던시는 pom.xml 파일 안에 <dependencies> 요소를 사용하여 표현하며 POM의 일부로 메이븐에서 사용하게 된다. 프로젝트 디펜던시들은 저장소에 저장된다.
스프링 DI와 객체 관리
DI란
DI(Dependency Injection)은 의존 관계 주입이다. 오브젝트 사이의 의존 관계를 만드는 것이다. 오브젝트 사이의 의존 관계를 만든다는 말은 어떤 오브젝트의 프로퍼티(인스턴스 변수를 가리킴)에 그 오브젝트가 이용할 오브젝트를 설정하는 것이다. 이것을 학술적으로 말하면, 어떤 오브젝트가 의존(이용)할 오브젝트를 주입 혹은 인젝션(프로퍼티에 설정)한다는 것이다.
스프링 컨테이너
스프링은 객체를 관리하는 컨테이너를 제공. 스프링은 컨테이너에 객체를 담아 두고, 필요할 때에 컨테이너로부터 객체를 가져와 사용할 수 있도록 하고 있다.
- BeanFactory 인터페이스
org.springframework.beans.factory.BeanFactory 인터페이스는 빈 객체를 관리하고 각 빈 객체간의 의존 관계를 설정해 주는 기능을 제공하는 가장 단순한 컨테이너.
구현 클래스는 org.springframework.beans.factory.xml.XmlBeanFactory
빈(Bean) 생성과 의존 관계 설정
빈 객체 설정 및 컨테이너를 통한 빈 객체 사용
<bean id=”articleDao” class=”com.spring.chap02.MysqlArticleDao”></bean><bean name=”articleDao” class=”com.spring.chap02.MysqlArticleDao”></bean>- XmlBeanFactory 클래스를 이용해서 빈 객체를 가져와 사용하는 코드
Resource resource = new ClassPathResource("applicationContext.xml");
//스프링 컨테이너 생성
BeanFactory beanFactory = new XmlBeanFactory(resource);
//스프링 컨테이너로부터 빈 객체를 가져와 사용
WriteArticleService articleService = (WriteArticleService) beanFactory.getBean("writeArticleService");- 스프링 3 버전부터 타입 변환 대신 제네릭(Generic)을 이용해서 원하는 타입으로 빈을 구할 수 있는 getBean() 메서드 제공
ArticleDao articleDao = beanFactory.getBean("articleDao",ArticleDao.class);의존 관계 설정
- 생성자 방식
<bean name="writeArticleService" class="madvirus.spring.chap01.WriteArticleServiceImpl">
  <constructor-arg>
             <ref bean="articleDao" />
   </constructor-arg>
</bean>
<bean name="articleDao" class="madvirus.spring.chap01.MySQLArticleDao"></bean>- 프로퍼티 설정 방식
<bean name="writeArticleService" class="madvirus.spring.chap02.WriteArticleServiceImpl">
         <property name="articleDao">
      <ref bean="mysqlArticleDao" />
          </property>
</bean>
<bean name="mysqlArticleDao" class="madvirus.spring.chap02.MysqlArticleDao" />- XML 네임스페이스를 이용한 프로퍼티 설정
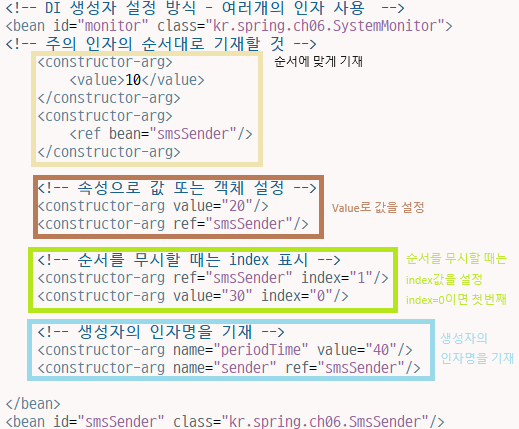
<bean id="monitor" class="madvirus.spring.chap02.SystemMonitor"
   	 p:periodTime="10" p:sender-ref="smsSender" />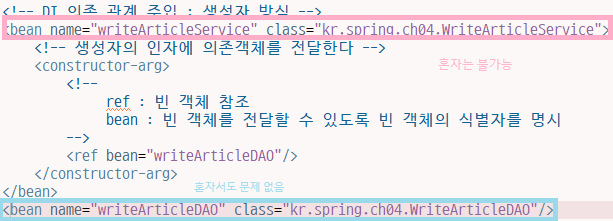
- 콜렉션 타입 프로퍼티 설정
| 태그 | 컬렉션 타입 | 설명 |
|---|---|---|
<list> | java.util.List (자바 배열) | List 타입이나 배열에 값 목록을 전달할 때 사용 |
<map> | java.util.Map | Map 타입에 <키,값> 목록을 전달할 때 사용 |
<set> | java.util.Set | Set 타입에 값 목록을 전달할 때 사용 |
<props> | java.util.Properties | Properties 타입에 <프로퍼티이름, 프로퍼티값> 목록을 전달할 때 사용 |
List 타입과 배열
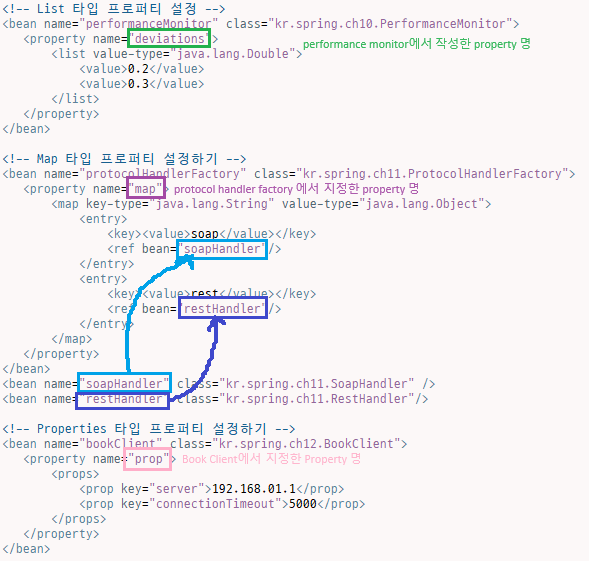
<bean name="performanceMonitor" class="madvirus.spring.chap02.PerformanceMonitor">
		<property name="deviations">
			<list>
				<value type="java.lang.Double">0.2</value>
				<value type="java.lang.Double">0.3</value>
			</list>
		</property>
	</bean>
Map 타입
<!-- Map 타입 프로퍼티 설정 -->
	<bean name="protocolHandlerFactory" class="kr.spring.ch10.ProtocolHandlerFactory">
		<!-- setMap 메서드를 찾아서 객체 전달 -->
		<property name="map">
			<!-- <map> -->
			 <map key-type="java.lang.String" value-type="java.lang.Object">
				<entry>
					<key><value>soap</value></key>
					<ref bean="soapHandler"/>
				</entry>
				<entry>
					<key><value>rest</value></key>
					<ref bean="restHandler"/>
				</entry>
			</map>
		</property>
	</bean>
Properties 타입
<!-- Properties 타입 프로퍼티 설정 -->
	<bean name="bookClient" class="kr.spring.ch11.BookClient">
		<property name="prop">
			<props>
				<prop key="server">192.168.0.1</prop>
				<prop key="connectionTimeout">5000</prop>
			</props>
		</property>
	</bean>
Set 타입
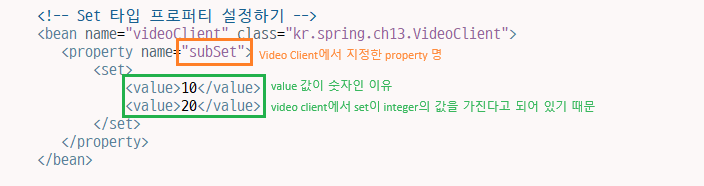
<!-- Set 타입 프로퍼티 설정 -->
	<bean name="bookClient2" class="kr.spring.ch12.BookClient">
		<property name="subSet">
			<set>
				<value>10</value>
				<value>20</value>
			</set>
		</property>
	</bean>
-
의존 관계 자동 설정
byName 프로퍼티의 이름과 같은 이름을 갖는 빈 객체를 설정 byType 프로퍼티의 타입과 같은 타입을 갖는 빈 객체를 설정 constructor 생성자 파라미터 타입과 같은 타입을 갖는 빈 객체를 생성자에 전달
어노테이션 기반 설정
@Autowired 어노테이션을 이용한 자동 설정
org.springframework.beans.factory.annotation 패키지에 위치한 @Autowired 어노테이션은 의존 관계를 자동으로 설정할 때 사용
- @Autowired 어노테이션 적용 프로퍼티의 필수 여부 지정
@Autowired(required=false)@Qualifier 어노테이션을 이용한 자동 설정 제한
@Autowired
@Qualifier(“main”)
private Recorder recorder;

<bean id=”recorder” class=”com.spring.ch04.homecontrol.Recorder”>
     <qualifier value=”main”/>
</bean>
@Resource 어노테이션을 이용한 프로퍼티 설정
@Resource(name = “camera1”)
private Camera camera1;

@Resource(name = “camera2”)
private Camera camera2;
@PostConstruct 어노테이션 및 @PreDestroy 어노테이션과 라이프 사이클
@PostConstruct 어노테이션과 @PreDestory 어노테이션은 javax.annotation 패키지에 위치하며, @Resource 어노테이션과 마찬가지로 자바 6 및 JEE 5에 추가된 어노테이션으로서 라이프 사이클의 초기화 및 제거 과정을 제공한다.
@PostConstruct
public void init(){
    //초기화 처리
}
@PreDestroy
public void close(){
    //자원 반환 등 종료 처리
    }
스프링 AOP
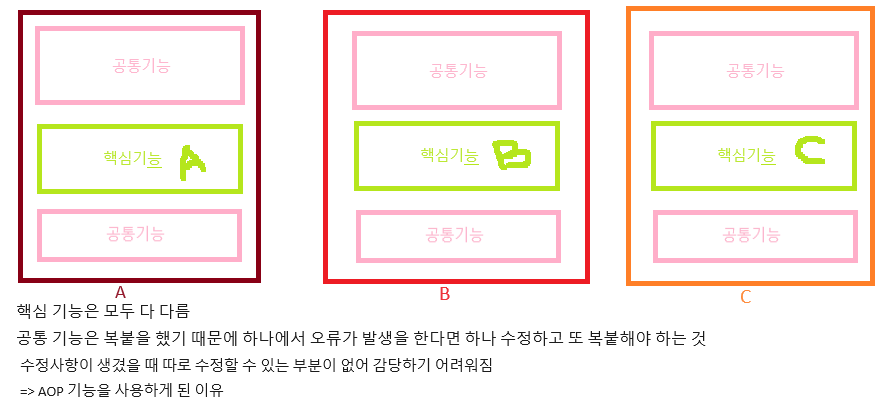
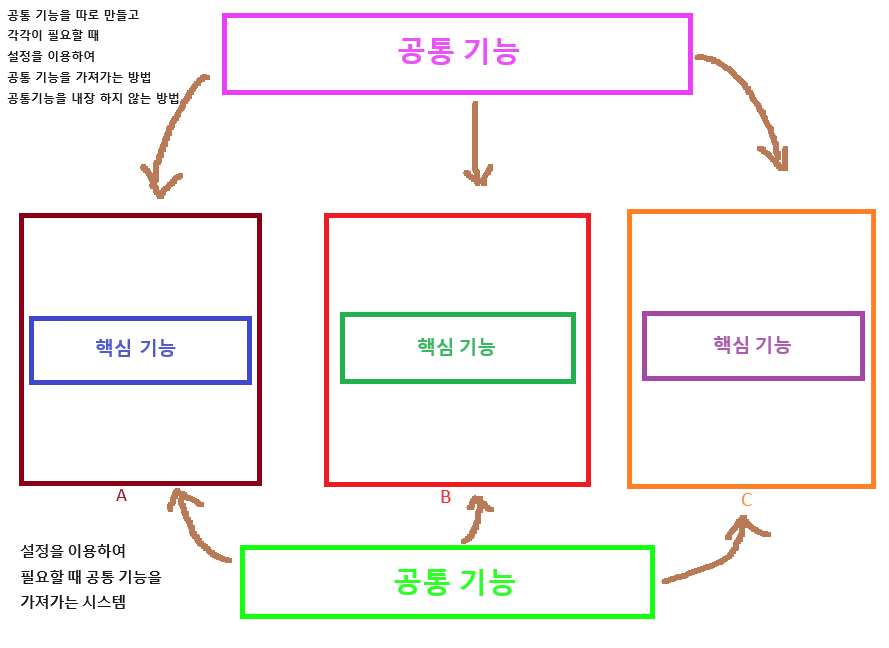
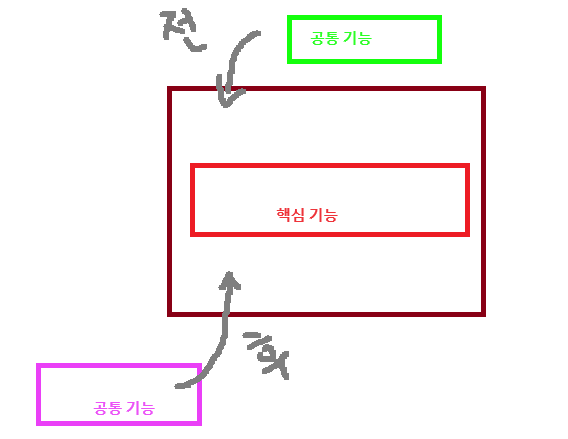
AOP(Aspect Oriented Programming)는 로깅과 같은 기본적인 기능에서부터 트랜잭션이나 보안과 같은 기능에 이르기까지 어플리케이션 전반에 걸쳐 적용되는 공통기능을 핵심 기능과 분리해서 모듈로 구현한 뒤 핵심 기능이 수행될 때 필요로 하는 곳에 공통기능이 적용되게 하는 기능이다. 공통의 관심사항을 적용해서 발생하는 의존 관계의 복잡성과 코드 중복을 해소해 주는 프로그래밍 기법이다.
AOP 소개
AOP(Aspect Oriented Programming)는 문제를 바라보는 관점을 기준으로 프로그래밍하는 기법. 공통 관심 사항을 구현한 코드를 핵심 로직을 구현한 코드 안에 삽입하는 것을 의미.
AOP 사용하지 않았을 때 사진
AOP 설명 사진
AOP 용어
| 용어 | 설명 |
|---|---|
| Advice | 언제 공통 관심 기능을 핵심 로직에 적용할 지를 정의. |
| Joinpoint | Advice를 적용 가능한 지점을 의미. 메서드 호출, 필드 값 변경 등이 Joinpoint에 해당 |
| Pointcut | Joinpoint의 부분 집합으로서 실제로 Advice가 적용되는 Joinpoint를 나타냄. |
| Weaving | Advice를 핵심 로직 코드에 적용하는 것을 weaving이라고 함. |
| Aspect | 여러 객체에 공통으로 적용되는 공통 관심 사항 |
세 가지 Weaving 방식
- 컴파일 시점에 코드에 공통 기능을 추가하는 방법(스프링 기본 지원이 아니며 AspectJ와 같이 AOP를 위한 전용 도구를 사용해야 함)
- 클래스 로딩 시점에 바이트 코드에 공통 기능을 추가하는 방법(스프링 기본 지원이 아니며 AspectJ와 같이 AOP를 위한 전용 도구를 사용해야 함)
- 런타임에 프록시 객체를 생성해서 공통 기능을 추가하는 방법(스프링이 제공하는 AOP 방식)
스프링에서의 AOP
- XML 스키마 기반의 POJO 클래스를 이용한 AOP 구현
- @Aspect 어노테이션 기반의 AOP 구현
실습
close는 자원 정리의 개념
registerShutdownHook
- java의 셧다운후크 기능을 사용해서, JVM이 종료될 때 스프링 컨테이너 종료 과정을 실행하도록 만든다. 예기치 않은 이유로 JVM이 종료되었을 때 더 안정적으로 컨테이너를 종료할 수 있다.
kr.spring.ch08
Email Sender
source -> generate toString
package kr.spring.ch08;

public class EmailSender {

	@Override
	public String toString() {
		return "EmailSender [getClass()=" + getClass() + ", hashCode()=" + hashCode() + ", toString()="
				+ super.toString() + "]";
	}

}
Work Controller
source -> generate Setters
-> generate ToString
package kr.spring.ch08;

public class WorkController {
	private long periodTime;
	private EmailSender email;
	public void setPeriodTime(long periodTime) {
		this.periodTime = periodTime;
	}
	public void setEmail(EmailSender email) {
		this.email = email;
	}
	@Override
	public String toString() {
		return "WorkController [periodTime=" + periodTime + ", email=" + email + "]";
	}
}
Application Context2 xml
<!-- 내가 작성해본 코드 -->
<bean name="workController" class="kr.spring.ch08.WorkController">
		<property name="periodTime" value="10"></property>
		<property name="emailSender">
			<ref bean="emailSender"/>
		</property>
	</bean>
	<bean name="emailSender" class="kr.spring.ch08.EmailSender"/>

	 <!-- DI 프로퍼티 설정 방식 - 여러 개의 프로퍼티 -->
	 <!-- id : 빈(bean) 객체를 식별할 때 사용할 이름 -->
	 <bean id="work" class="kr.spring.ch08.WorkController">
	 	<property name="periodTime" value="10"></property>
	 	<!-- name은 property 이름, ref는 빈의 id  -->
	 	<property name="email" ref="email"></property>
	 </bean>
	 <bean id="email" class="kr.spring.ch08.EmailSender"/>
Spring Main
package kr.spring.ch08;

import org.springframework.context.support.AbstractApplicationContext;
import org.springframework.context.support.ClassPathXmlApplicationContext;


public class SpringMain {
	public static void main(String[] args) {
		// applicationcontext2.xml 설정파일을 읽어들여 스프링 컨테이너를 생성
		AbstractApplicationContext context = new ClassPathXmlApplicationContext("applicationContext2.xml");
		//JVM 종료될 때 ApplicationContext를 종료하는 작업을 수행하도록 등록
		context.registerShutdownHook();

		WorkController work = (WorkController)context.getBean("work");
		System.out.println(work);

		context.close(); //어플리케이션 종료시 컨테이너에 존재하는 모든 빈(객체)를 종료
	}
}
kr.spring.ch09
Image Sender
package kr.spring.ch09;

public class ImageSender {

	@Override
	public String toString() {
		return "ImageSender 호출합니다";
	}

}
Upload Controller
package kr.spring.ch09;

public class UploadController {
	private long timeout;
	private ImageSender image;
	public void setTimeout(long timeout) {
		this.timeout = timeout;
	}
	public void setImage(ImageSender image) {
		this.image = image;
	}
	@Override
	public String toString() {
		return "UploadController [timeout=" + timeout + ", image=" + image + "]";
	}
}
Application Context 2 XML

<!-- 내가 작성한 코드 -->
<bean id="upload" class="kr.spring.ch09.UploadController">
	 	<property name="timeout" value="30"></property>
	 	<property name="image" ref="image"></property>
	 </bean>
<bean id="image" class="kr.spring.ch09.ImageSender"/>

<!-- XML 네임 스페이스를 이용한 프로퍼티 설정 -->
	 <bean id="upload" class="kr.spring.ch09.UploadController"
	 		p:timeout="50" p:image-ref="image" />
	 <bean id="image" class="kr.spring.ch09.ImageSender"/>
Spring Main
package kr.spring.ch09;

import org.springframework.context.support.AbstractApplicationContext;
import org.springframework.context.support.ClassPathXmlApplicationContext;


public class SpringMain {
	public static void main(String[] args) {
		// applicationcontext2.xml 설정파일을 읽어들여 스프링 컨테이너를 생성
		AbstractApplicationContext context = new ClassPathXmlApplicationContext("applicationContext2.xml");
		//JVM 종료될 때 ApplicationContext를 종료하는 작업을 수행하도록 등록
		context.registerShutdownHook();

		// DI - XML 네임 스페이스를 이용한 프로퍼티 설정
		UploadController upload = (UploadController)context.getBean("upload");
		System.out.println(upload);

		context.close(); //어플리케이션 종료시 컨테이너에 존재하는 모든 빈(객체)를 종료
	}
}
kr.spring.ch10
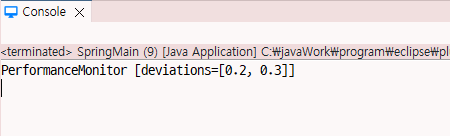
Performance Monitor
package kr.spring.ch10;

import java.util.List;

public class PerformanceMonitor {

	// Property
	private List<Double> deviations;
										// 설정해서 주입해주면 된다.

	public void setDeviations(List<Double> deviations) {
		this.deviations = deviations;
	}

	@Override
	public String toString() {
		return "PerformanceMonitor [deviations=" + deviations + "]";
	}
}
Application Context 2 XML
value-type는 생략 가능하다
<!-- List 타입 프로퍼티 설정 -->
	 <bean name="performanceMonitor" class="kr.spring.ch10.PerformanceMonitor">
	 	<property name="deviations">
			<list value-type="java.lang.Double">
				<value>0.2</value>
				<value>0.3</value>
			</list>
	 	</property>
	 </bean>
Spring Main
package kr.spring.ch10;

import org.springframework.context.support.AbstractApplicationContext;
import org.springframework.context.support.ClassPathXmlApplicationContext;


public class SpringMain {
	public static void main(String[] args) {
		// applicationcontext2.xml 설정파일을 읽어들여 스프링 컨테이너를 생성
		AbstractApplicationContext context = new ClassPathXmlApplicationContext("applicationContext2.xml");
		//JVM 종료될 때 ApplicationContext를 종료하는 작업을 수행하도록 등록
		context.registerShutdownHook();

		PerformanceMonitor monitor = (PerformanceMonitor)context.getBean("performanceMonitor");
		System.out.println(monitor);

		context.close(); //어플리케이션 종료시 컨테이너에 존재하는 모든 빈(객체)를 종료
	}
}
kr.spring.ch11
Soap Handler
package kr.spring.ch11;

public class SoapHandler {

}
Rest Handler
package kr.spring.ch11;

public class RestHandler {

}
ProtocolHandler Factory
package kr.spring.ch11;

import java.util.Map;

public class ProtocolHandlerFactory {
	// Proeprty
	private Map<String, Object> map;

	public void setMap(Map<String, Object> map) {
		this.map = map;
	}

	@Override
	public String toString() {
		return "ProtocolHandlerFactory [map=" + map + "]";
	}
}
Application Context 2 XML
<!-- Map 타입 프로퍼티 설정하기 -->
	 <bean name="protocolHandlerFactory" class="kr.spring.ch11.ProtocolHandlerFactory">
	 	<property name="map">
	 		<map key-type="java.lang.String" value-type="java.lang.Object">
	 			<entry>
	 				<key><value>soap</value></key>
	 				<ref bean="soapHandler"/>
	 			</entry>
	 			<entry>
	 				<key><value>rest</value></key>
	 				<ref bean="restHandler"/>
	 			</entry>
	 		</map>
	 	</property>
	 </bean>
	 <bean name="soapHandler" class="kr.spring.ch11.SoapHandler" />
	 <bean name="restHandler" class="kr.spring.ch11.RestHandler"/>
Spring Main
package kr.spring.ch11;

import org.springframework.context.support.AbstractApplicationContext;
import org.springframework.context.support.ClassPathXmlApplicationContext;


public class SpringMain {
	public static void main(String[] args) {
		// applicationcontext2.xml 설정파일을 읽어들여 스프링 컨테이너를 생성
		AbstractApplicationContext context = new ClassPathXmlApplicationContext("applicationContext2.xml");
		//JVM 종료될 때 ApplicationContext를 종료하는 작업을 수행하도록 등록
		context.registerShutdownHook();

		ProtocolHandlerFactory protocol = (ProtocolHandlerFactory)context.getBean("protocolHandlerFactory");
		System.out.println(protocol);

		context.close(); //어플리케이션 종료시 컨테이너에 존재하는 모든 빈(객체)를 종료
	}
}
kr.spring.ch12
Book Client
properties는 무조건 String으로만 가능
package kr.spring.ch12;

import java.util.Properties;

public class BookClient {

	// Property
	private Properties prop;

	public void setProp(Properties prop) {
		this.prop = prop;
	}

	@Override
	public String toString() {
		return "BookClient [prop=" + prop + "]";
	}
}
Application Context 2 XML
 <!-- Properties 타입 프로퍼티 설정하기 -->
	 <bean name="bookClient" class="kr.spring.ch12.BookClient">
	 	<property name="prop">
	 		<props>
	 			<prop key="server">192.168.01.1</prop>
	 			<prop key="connectionTimeout">5000</prop>
	 		</props>
	 	</property>
	 </bean>
Spring Main
package kr.spring.ch12;

import org.springframework.context.support.AbstractApplicationContext;
import org.springframework.context.support.ClassPathXmlApplicationContext;


public class SpringMain {
	public static void main(String[] args) {
		// applicationcontext2.xml 설정파일을 읽어들여 스프링 컨테이너를 생성
		AbstractApplicationContext context = new ClassPathXmlApplicationContext("applicationContext2.xml");
		//JVM 종료될 때 ApplicationContext를 종료하는 작업을 수행하도록 등록
		context.registerShutdownHook();

		BookClient bookClient = (BookClient)context.getBean("bookClient");
		System.out.println(bookClient);

		context.close(); //어플리케이션 종료시 컨테이너에 존재하는 모든 빈(객체)를 종료
	}
}
kr.spring.ch13
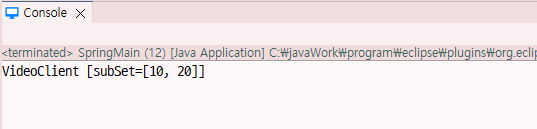
Video Client
package kr.spring.ch13;

import java.util.Set;

public class VideoClient {
	// property
	private Set<Integer> subSet;

	public void setSubSet(Set<Integer> subSet) {
		this.subSet = subSet;
	}

	@Override
	public String toString() {
		return "VideoClient [subSet=" + subSet + "]";
	}
}
Application context2 XML
 <!-- Set 타입 프로퍼티 설정하기 -->
	 <bean name="videoClient" class="kr.spring.ch13.VideoClient">
	 	<property name="subSet">
	 		<set>
	 			<value>10</value>
	 			<value>20</value>
	 		</set>
	 	</property>
	 </bean>
Spring Main
package kr.spring.ch13;

import org.springframework.context.support.AbstractApplicationContext;
import org.springframework.context.support.ClassPathXmlApplicationContext;


public class SpringMain {
	public static void main(String[] args) {
		// applicationcontext2.xml 설정파일을 읽어들여 스프링 컨테이너를 생성
		AbstractApplicationContext context = new ClassPathXmlApplicationContext("applicationContext2.xml");
		//JVM 종료될 때 ApplicationContext를 종료하는 작업을 수행하도록 등록
		context.registerShutdownHook();

		VideoClient videoClient = (VideoClient)context.getBean("videoClient");
		System.out.println(videoClient);

		context.close(); //어플리케이션 종료시 컨테이너에 존재하는 모든 빈(객체)를 종료
	}
}
application context2.xml 정리 내용
kr.spring.ch14
Write Article DAO
package kr.spring.ch14;

public class WriteArticleDAO {

	public void insert() {
		System.out.println("WriteArticleDAO의 insert() 메서드 실행");
	}
}
Write Article Service
package kr.spring.ch14;

public class WriteArticleService {
	// property
	private WriteArticleDAO writeArticleDAO;

	public void setWriteArticleDAO(WriteArticleDAO writeArticleDAO) {
		this.writeArticleDAO = writeArticleDAO;
	}

	@Override
	public String toString() {
		return "WriteArticleService [writeArticleDAO=" + writeArticleDAO + "]";
	}

	public void write() {
		System.out.println("WriteArticleService의 write() 메소드 실행");
		writeArticleDAO.insert();
	}
}
Application context 3 XML

   <!-- 프로퍼티 이름을 이용한 의존 관계 자동 설정
   		(프로퍼티 이름과 빈의 이름이 일치하면 의존 관계 설정) -->
	<bean id="writeArticleService" class="kr.spring.ch14.WriteArticleService"
		autowire="byName" />
	<bean id="writeArticleDAO" class="kr.spring.ch14.WriteArticleDAO" />
Spring Main
byName: 프로퍼티의 이름과 같은 이름을 갖는 빈 객체를 설정
byType : 프로퍼티의 타입과 같은 타입을 갖는 빈 객체를 설정
constructor : 생성자 파라미터 타입과 같은 타입을 갖는 빈 객체를 생성자에 전달
package kr.spring.ch14;

import org.springframework.context.support.AbstractApplicationContext;
import org.springframework.context.support.ClassPathXmlApplicationContext;


public class SpringMain {
	public static void main(String[] args) {
		// applicationcontext2.xml 설정파일을 읽어들여 스프링 컨테이너를 생성
		AbstractApplicationContext context = new ClassPathXmlApplicationContext("applicationContext3.xml");
		//JVM 종료될 때 ApplicationContext를 종료하는 작업을 수행하도록 등록
		context.registerShutdownHook();

		/*
		 * 빈 객체의 타입이나 이름을 이용하여 의존 관계를 자동으로 설정할 수 있는 기능
		 * bean 태그의 autowire 속성에 지정할 수 있는 값
		 */

		WriteArticleService writeArticleService = (WriteArticleService)context.getBean("writeArticleService");
		writeArticleService.write();

		context.close(); //어플리케이션 종료시 컨테이너에 존재하는 모든 빈(객체)를 종료
	}
}
kr.spring.ch15
Phone Call
package kr.spring.ch15;

public class PhoneCall {

}
System Monitor
package kr.spring.ch15;

public class SystemMonitor {

	private PhoneCall call;

	public void setCall(PhoneCall call) {
		this.call = call;
	}

	@Override
	public String toString() {
		return "SystemMonitor [call=" + call + "]";
	}
}
Application Context 3 XML
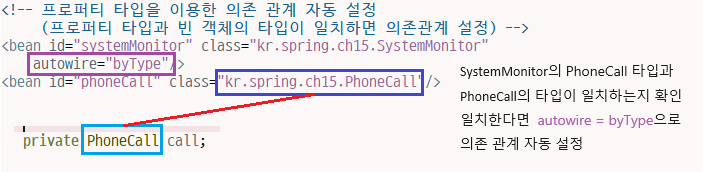
<!-- 프로퍼티 타입을 이용한 의존 관계 자동 설정
		 (프로퍼티 타입과 빈 객체의 타입이 일치하면 의존관계 설정) -->
	<bean id="systemMonitor" class="kr.spring.ch15.SystemMonitor"
		autowire="byType"/>
	<bean id="phoneCall" class="kr.spring.ch15.PhoneCall"/>
Spring Main
package kr.spring.ch15;
import org.springframework.context.support.AbstractApplicationContext;
import org.springframework.context.support.ClassPathXmlApplicationContext;
public class SpringMain {
public static void main(String[] args) {
// applicationcontext2.xml 설정파일을 읽어들여 스프링 컨테이너를 생성
AbstractApplicationContext context = new ClassPathXmlApplicationContext("applicationContext3.xml");
//JVM 종료될 때 ApplicationContext를 종료하는 작업을 수행하도록 등록
context.registerShutdownHook();
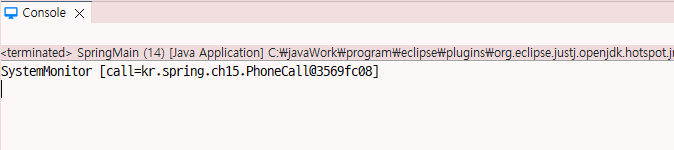
SystemMonitor systemMonitor = (SystemMonitor)context.getBean("systemMonitor");
System.out.println(systemMonitor);
context.close(); //어플리케이션 종료시 컨테이너에 존재하는 모든 빈(객체)를 종료
}
}
kr.spring.ch16
Sms Sender
package kr.spring.ch16;

public class SmsSender {

}
System Monitor
@Autowired
- 생성자, 필드, 메서드에 지정 가능 메서드에 지정할 때는 setXXX뿐만 아니라 일반메서드에도 적용 가능함
@Autowired 어노테이션은 타입을 이용해서 자동적으로 프로퍼티 값을 설정하기 때문에 해당 타입의 빈 객체가 존재하지 않거나 또는 빈 객체가 두 개 이상 존재할 경우 스프링은 @Autowired 어노테이션이 적용된 빈 객체를 생성할 때 예외를 발생
@Autowired(required = false)로 지정하면 해당 타입의 빈 객체가 존재하지 않아도 스프링은 예외를 발생하지 않음 기본값은 @Autowired(required=true)
package kr.spring.ch16;
import org.springframework.beans.factory.annotation.Autowired;
public class SystemMonitor {
// Property
private int periodTime;
private SmsSender sender;
public void setPeriodTime(int periodTime) {
this.periodTime = periodTime;
}
@Autowired
public void setSender(SmsSender sender) {
this.sender = sender;
}
@Override
public String toString() {
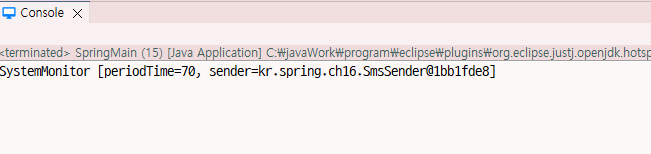
return "SystemMonitor [periodTime=" + periodTime + ", sender=" + sender + "]";
}
}Application Context Annot XML
sender는 알아서 @Autowired로 자동 의존 관계가 만들어지기 때문에 설정에서 연결 시켜줄 필요가 없다.
<!-- @Autowired, @Resource, @Qualifier 사용시 아래 설정 추가  -->
<!-- 내가 쓴 코드 -->
	<context:annotation-config/>
	<bean id="systemMonitor" class="kr.spring.ch16.SystemMonitor"
		p:periodTime="20" />
	<bean id="sender" class="kr.spring.ch16.SmsSender"/>

<!-- 강사님 코드 -->
    <context:annotation-config/>
	<bean id="systemMonitor" class="kr.spring.ch16.SystemMonitor">
		<property name="periodTime">
			<value>70</value>
		</property>
	</bean>
	<bean id="sender" class="kr.spring.ch16.SmsSender"/>
Spring Main
package kr.spring.ch16;

import org.springframework.context.support.AbstractApplicationContext;
import org.springframework.context.support.ClassPathXmlApplicationContext;


public class SpringMain {
	public static void main(String[] args) {
		// applicationcontext2.xml 설정파일을 읽어들여 스프링 컨테이너를 생성
		AbstractApplicationContext context = new ClassPathXmlApplicationContext("applicationContextAnnot.xml");
		//JVM 종료될 때 ApplicationContext를 종료하는 작업을 수행하도록 등록
		context.registerShutdownHook();

		SystemMonitor systemMonitor = (SystemMonitor)context.getBean("systemMonitor");
		System.out.println(systemMonitor);

		context.close(); //어플리케이션 종료시 컨테이너에 존재하는 모든 빈(객체)를 종료
	}
}
kr.spring.ch17
Recorder
package kr.spring.ch17;

public class Recorder {

}
System Monitor 2
package kr.spring.ch17;

import org.springframework.beans.factory.annotation.Autowired;

public class SystemMonitor2 {

//	property
	@Autowired
	private Recorder recorder;

	public Recorder getRecorder() {
		return recorder;
	}

	public void setRecorder(Recorder recorder) {
		this.recorder = recorder;
	}

}
Application Context Annot XML
<bean id="systemMonitor" class="kr.spring.ch17.SystemMonitor2"/>
<bean id="recorder1" class="kr.spring.ch17.Recorder"/>
Spring Main
package kr.spring.ch17;
import org.springframework.context.support.AbstractApplicationContext;
import org.springframework.context.support.ClassPathXmlApplicationContext;
public class SpringMain {
public static void main(String[] args) {
// applicationcontext2.xml 설정파일을 읽어들여 스프링 컨테이너를 생성
AbstractApplicationContext context = new ClassPathXmlApplicationContext("applicationContextAnnot.xml");
//JVM 종료될 때 ApplicationContext를 종료하는 작업을 수행하도록 등록
context.registerShutdownHook();
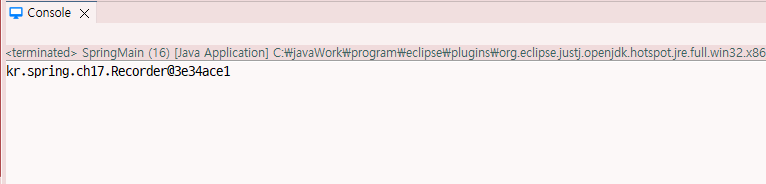
SystemMonitor2 monitor = (SystemMonitor2)context.getBean("systemMonitor");
System.out.println(monitor.getRecorder());
context.close(); //어플리케이션 종료시 컨테이너에 존재하는 모든 빈(객체)를 종료
}
}
@Qualifier 사용해보기
그냥 넣게 되면 오류가 발생함

System Monitor 2
package kr.spring.ch17;

import org.springframework.beans.factory.annotation.Autowired;
import org.springframework.beans.factory.annotation.Qualifier;

public class SystemMonitor2 {

//	property
	@Autowired
    // @Qualifier를 이용한 자동 설정 제한
	@Qualifier("main")
	private Recorder recorder;

	public Recorder getRecorder() {
		return recorder;
	}

	public void setRecorder(Recorder recorder) {
		this.recorder = recorder;
	}

}
Application Context Annot XML
부가 식별자를 넣어서 한정하여 출력시킴
<!-- @Qualifier 어노테이션을 이용한 자동 설정 제한 -->
	<bean id="systemMonitor" class="kr.spring.ch17.SystemMonitor2"/>
	<bean id="recorder1" class="kr.spring.ch17.Recorder">
		<qualifier value="main"/>
	</bean>
	<bean id="recorder2" class="kr.spring.ch17.Recorder"/>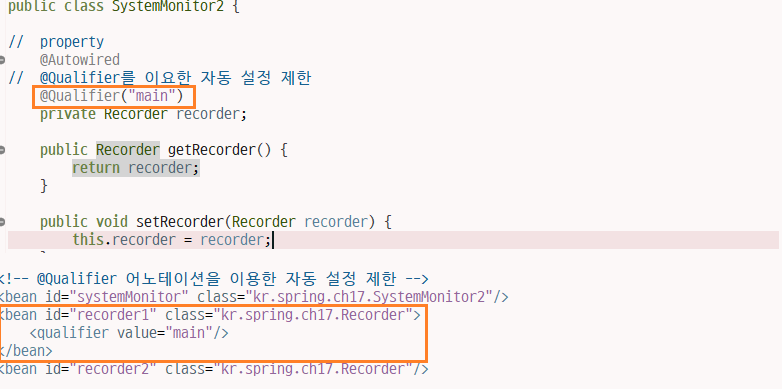
kr.spring.ch18
Camera
package kr.spring.ch18;

public class Camera {
	private int number;

	public void setNumber(int number) {
		this.number = number;
	}

	@Override
	public String toString() {
		return "Camera [number=" + number + "]";
	}

}
Home Controller
package kr.spring.ch18;

import javax.annotation.Resource;

public class HomeController {

	// 빈의 이름과 프로퍼티 명이 일치하면 의존 관계를 설정
	@Resource
	private Camera camera1;

	private Camera camera2;
	private Camera camera3;

	public void setCamera1(Camera camera1) {
		this.camera1 = camera1;
	}
	public void setCamera2(Camera camera2) {
		this.camera2 = camera2;
	}
	public void setCamera3(Camera camera3) {
		this.camera3 = camera3;
	}
	@Override
	public String toString() {
		return "HomeController [camera1=" + camera1 + ", camera2=" + camera2 + ", camera3=" + camera3 + "]";
	}


}
Application Context Annot XML
	<!-- @Resource 어노테이션을 이용한 자동 설정
		 (빈 객체의 이름과 프로퍼티명이 일치하면 의존 관계 설정) -->
	<bean id="homeController" class="kr.spring.ch18.HomeController"/>
	<bean id="camera1" class="kr.spring.ch18.Camera" p:number="1" />
Spring Main
package kr.spring.ch18;

import org.springframework.context.support.AbstractApplicationContext;
import org.springframework.context.support.ClassPathXmlApplicationContext;


public class SpringMain {
	public static void main(String[] args) {
		// applicationcontext2.xml 설정파일을 읽어들여 스프링 컨테이너를 생성
		AbstractApplicationContext context = new ClassPathXmlApplicationContext("applicationContextAnnot.xml");
		//JVM 종료될 때 ApplicationContext를 종료하는 작업을 수행하도록 등록
		context.registerShutdownHook();

		HomeController homeController = (HomeController)context.getBean("homeController");
		System.out.println(homeController);

		context.close(); //어플리케이션 종료시 컨테이너에 존재하는 모든 빈(객체)를 종료
	}
}
모든 값에 @Resources를 준다면
Home Controller
package kr.spring.ch18;

import javax.annotation.Resource;

public class HomeController {

	// 빈의 이름과 프로퍼티 명이 일치하면 의존 관계를 설정
	@Resource
	private Camera camera1;
	// @Resource(name="빈 객체의 이름") 빈 객체의 이름 지정
	@Resource(name="camera2")
	private Camera camera2;
	@Resource(name = "cameraz")
	private Camera camera3;

	public void setCamera1(Camera camera1) {
		this.camera1 = camera1;
	}
	public void setCamera2(Camera camera2) {
		this.camera2 = camera2;
	}
	public void setCamera3(Camera camera3) {
		this.camera3 = camera3;
	}
	@Override
	public String toString() {
		return "HomeController [camera1=" + camera1 + ", camera2=" + camera2 + ", camera3=" + camera3 + "]";
	}


}
Application Context Annot XML
	<bean id="homeController" class="kr.spring.ch18.HomeController"/>
	<bean id="camera1" class="kr.spring.ch18.Camera" p:number="1" />
	<bean id="camera2" class="kr.spring.ch18.Camera" p:number="2" />
	<bean id="cameraz" class="kr.spring.ch18.Camera" p:number="3" />
kr.spring.ch19
Camera
package kr.spring.ch19;

import org.springframework.stereotype.Component;

@Component
public class Camera {

}
Home Controller
<context:component-scan> 태그를 추가하려면 스프링은 지정한 패키지에서
@Component 어노테이션이 적용된 클래스를 검색하여 빈으로 등록
자동 등록된 빈의 아이디는 클래스 이름의 첫 글자를 소문자로 바꿔서 사용한다
예) HomeController -> homeController로 빈의 이름 지정
빈의 이름을 지정하고 싶으면 @Component("home")와 같이 명시함 또는
@Component
@Named("home")
package kr.spring.ch19;
import javax.inject.Named;
import org.springframework.beans.factory.annotation.Autowired;
import org.springframework.stereotype.Component;
@Component
@Named("home")
public class HomeController {
@Autowired
private Camera camera;
public void setCamera(Camera camera) {
this.camera = camera;
}
@Override
public String toString() {
return "HomeController [camera=" + camera + "]";
}
}Application Context Annot XML
<!-- 어노테이션을 이용한 자동 스캔
		 (컨테이너에 빈을 등록하기 위해서 검색할 패키지 지정) -->
		 <context:component-scan base-package="kr.spring.ch19"/>
Spring Main
package kr.spring.ch19;

import org.springframework.context.support.AbstractApplicationContext;
import org.springframework.context.support.ClassPathXmlApplicationContext;


public class SpringMain {
	public static void main(String[] args) {
		AbstractApplicationContext context = new ClassPathXmlApplicationContext("applicationContextScan.xml");
		//JVM 종료될 때 ApplicationContext를 종료하는 작업을 수행하도록 등록
		context.registerShutdownHook();

		HomeController home = (HomeController)context.getBean("home");
		System.out.println(home);

		context.close(); //어플리케이션 종료시 컨테이너에 존재하는 모든 빈(객체)를 종료
	}
}
kr.spring.product
Product
package kr.spring.product;

public class Product {
	// 핵심 기능 수행
	public String launch() {
		System.out.println("launch() 메서드 출력하기");

		return "[상품 출시]";
	}

}
kr.spring.ch20.pojo
My First Advice
구현 가능한 Advice(언제 공통 기능을 핵심 기능에 적용할지를 정의) 종류
| 종류 | 설명 |
|---|---|
| Before Advice | 대상 객체의 메서드 호출 전에 공통 기능을 실행 |
| After Returning Advice | 대상 객체의 메서드가 예외 없이 실행한 이후에 공통 기능을 실행 |
| After Throwing Advice | 대상 객체의 메서드를 실행하는 도중 예외가 발생한 경우에 공통 기능을 실행 |
| After Advice | 대상 객체의 메서드를 실행하는 도중 예외가 발생했는지의 여부와 상관 없이 메서드 실행 후 공통 기능을 실행 (try-catch-finally의 finally 블럭과 유사함) |
| Around Advice | 대상 객체의 메서드 실행 전, 후 또는 예외 발생 시점에 공통 기능을 실행함 |
package kr.spring.ch20.pojo;

public class MyFirstAdvice {
	public void before() {
		// 메서드 시작 직전에 동작하는 어드바이스
		System.out.println("Hello Before! ** 메서드가 호출되기 전에 나온다!");
	}
}
Application Context AOP XML
<?xml version="1.0" encoding="UTF-8"?>
<beans xmlns="http://www.springframework.org/schema/beans"
	xmlns:xsi="http://www.w3.org/2001/XMLSchema-instance"
	xmlns:aop="http://www.springframework.org/schema/aop"
	xmlns:context="http://www.springframework.org/schema/context"
	xmlns:p="http://www.springframework.org/schema/p"
	xsi:schemaLocation="http://www.springframework.org/schema/beans https://www.springframework.org/schema/beans/spring-beans.xsd
		http://www.springframework.org/schema/aop http://www.springframework.org/schema/aop/spring-aop.xsd
		http://www.springframework.org/schema/context http://www.springframework.org/schema/context/spring-context.xsd">


	<!--
		AspectJ 의 Pointcut 표현식

		execution(Integer kr.spring.ch01..WriteArticleService.write(..))
		리턴 타입이 Integer인 WriteArticleService의 파라미터가 0개 이상인 write() 메서드

		execution(public void set*(..))
		리턴 타입이 void이고 메서드 이름이 set으로 시작하고, 파라미터가 0개 이상인 메서드를 호출

	 -->
	<!-- 공통 기능을 갖고 있는 클래스 빈 객체 설정 -->
	<bean id="myFirstAdvice" class="kr.spring.ch20.pojp.MyFirstAdvice"/>
	<!-- 핵심 기능을 구현한 클래스 빈 객체 설정 -->
	<bean id="product" class="kr.spring.product.Product"/>


</beans>