1. Spring Boot Starter Data JPA 추가하고, H2 데이터베이스 준비하기
TodoService코드를 보면, 데이터베이스를 사용하지 않고, 3개의 임의의 값만 미리 저장해둔 것을 확인할 수 있었음
static {

	todos.add(new Todo(++todosCount, "minjiki2", "Learn springboot",
	LocalDate.now().plusYears(1), false));

	todos.add(new Todo(++todosCount, "minjiki2", "Learn db",
	LocalDate.now().plusYears(1), false));

	todos.add(new Todo(++todosCount, "minjiki2", "Learn algorithm",
	LocalDate.now().plusYears(2), false));

}
하지만 이제는 H2 DB를 사용해 보자.
H2 DB 사용 준비
1. pom.xml - jpa, H2 DB 추가
<dependency>
    <groupId>org.springframework.boot</groupId>
    <artifactId>spring-boot-starter-data-jpa</artifactId>
</dependency>

<dependency>
    <groupId>com.h2database</groupId>
    <artifactId>h2</artifactId>
    <scope>runtime</scope>
</dependency>
콘솔창 실행시키면, 다음과 같은 H2 콘솔이 제공된 것을 확인할 수 있었다.

2. localhost:8080/h2-console 기본 URL 접속
3. H2 console URL을 constant하게 만들자
어플리케이션을 재실행할 때마다, 1번의 콘솔창 url이 계속 바뀌는데, 이 url 값을 간단하게 고정시키고 싶다. 변하지 않게.
// application.properties
spring.datasource.url=jdbc:h2:mem:testdb
콘솔창을 보니, 잘 실행된 것을 알 수 있었다.

4. localhost:8080/h2-console 재접속
application.properties에서 설정한 jdbc url을 그대로 입력하자
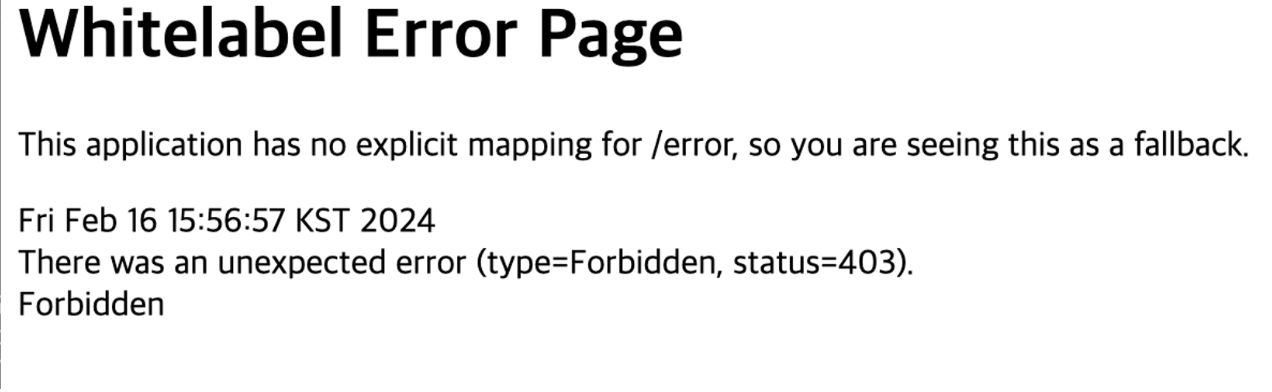
but, 에러남!
에러의 원인은 Spring Security의 특수한 설정 때문이다. 아래에서 코드를 수정해 에러를 고치자.
2. H2 콘솔을 사용하기 위해 Spring Security 설정하기
H2 데이터베이스 접근을 위한 설정을 추가해야 한다.
설정할 것들 나열 - 4가지
-
Spring Security가 기본적으로 제공해주는 2가지 기능
- 모든 URL이 보호된다. (All URLs are protected)
- 승인되지 않은 요청에 대해서는, 항상 로그인 양식이 표시된다. (A login form is shown for unauthorized requests)
-
Spring Security에 추가할 설정 2가지
- 우리가 H2 콘솔에 엑세스하려면, 사이트 간 요청 위조, 즉 CSRF라는 것을 비활성화해야 한다.
- Html에서 사용하는 Frames와 같이, H2 웹사이트에서도 프레임을 사용한다. 하지만 Spring Security는 기본값으로 프레임을 허용하지 않으니, 우리도 프레임을 허용해줘야 한다.
이 4가지 설정을 SpringFilterChain 클래스를 오버라이딩해줄 것이다!
SpringFilterChain 클래스 오버라이딩
SpringFilterChain 클래스
public interface SecurityFilterChain {
	boolean matches(HttpServletRequest request);
	List<Filter> getFilters();
}- SpringFilterChain = “Defines a filter chain matched against every request”
- 해당 클래스 정의문을 보니, HttpServletRequest에 매칭될 수 있는 필터 체인을 정의한다. 즉, 웹 요청이 들어오면 언제나 이 체인이 먼저 처리된다.
- '필터' 위치는 Dispatcher Servlet보다 먼저 위치하기에, 어떤 url이 오든지 제일 '필터'에 와야 한다. 그러니까 항상 어떤 url이 오든 로그인부터 하라고 했던 이유는, Spring Security가 필터에 위치하기 때문이었다!
SpringFilterChain클래스 오버라이딩
	@Bean
	public SecurityFilterChain filterChain(HttpSecurity http) throws Exception {

		// All URLs are protected
		http.authorizeHttpRequests(
				// 모든 request에 대한 권한 보호 - 람다함수
				auth -> auth.anyRequest().authenticated());

		// A login form is shown for unauthorized requests
		http.formLogin(withDefaults());

		// CSRF disable
		http.csrf().disable();

		// Frames
		http.headers().frameOptions().disable();
		return http.build();

	}
앞서 말했던 설정들을 모두 설정했다. 흐름만 이해하고 넘어가도 충분하다.
이 설정을 마치고, h2 console 창에 들어가서 다시 connect하면
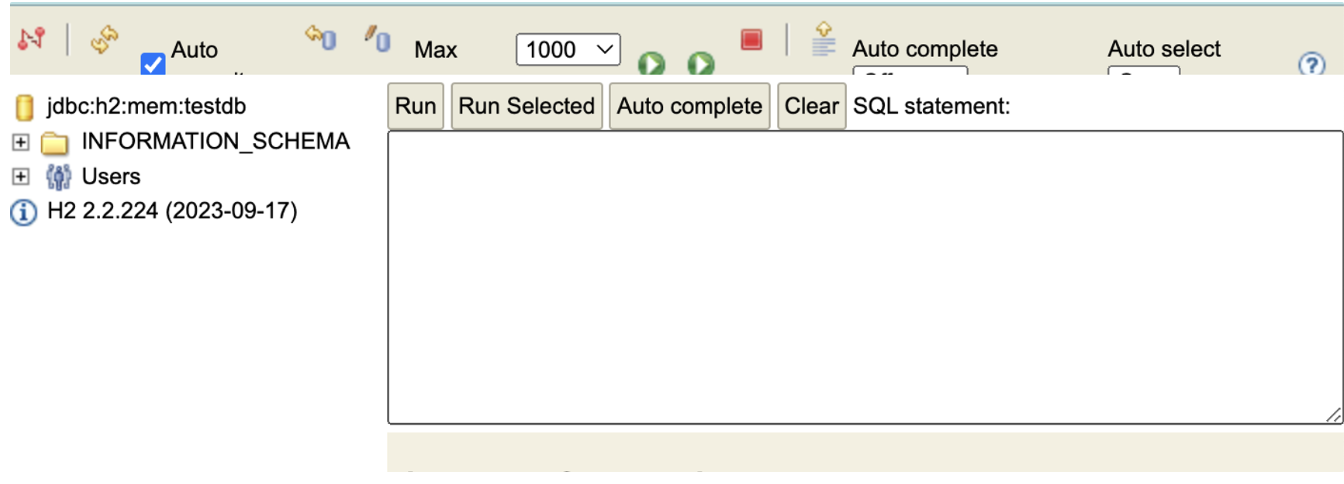
드디어 h2 데이터베이스를 사용할 준비를 마쳤다!
참고 및 출처
이 시리즈는 Udemy 강의의 내용을 정리한 것입니다.
https://www.udemy.com/course/spring-boot-and-spring-framework-korean/