모던 자바스크립트
개요
- ECMAScript: ECMA international에서 관리하는 자바스크립트 표준으로, ECMA-262라는 이름의 문서로 관리한다. 2015년에 제작된 ECMAScript6가 가장 유명하다.
- Modern JavaScript: 현 시점에 사용하기 적합한 범위 내에서 최신 버전의 표준을 준수하는 자바스크립트
- JavaScript는 프로그래밍 언어인 반면, ECMAScript는 프로그래밍 언어의 표준이다.
자바스크립트의 동작 원리
- 데이터타입의 종류

파이썬 등 다른 언어와 달리Float가 없음!! - Symbol 설명
const user = Symbol(); # 선언

const user = Symbol('this is a user'); # 설명을 붙여서 선언

# 어떤 값과 비교해도 true가 될 수 없는 고유한 변수가 됨
const user = Symbol('this is a user');

user === 'this is user'; // false
user === 'user'; // false
user === 'Symbol'; // false
user === true; // false
user === false; // false
user === 123; // false
user === 0; // false
user === null; // false
user === undefined; // false...

# 똑같은 설명을 붙인 심볼을 만들어도 두 값을 비교하면 false 반환
const symbolA = Symbol('this is Symbol');
const symbolB = Symbol('this is Symbol');

console.log(symbolA === symbolB); // false- BigInt
- JS의 안전한 정수 표현의 한계 범위: -(253 - 1) ~ 253 - 1 → 약 -9,000조 ~ 9,000조
자바스크립트에서 이 숫자 범위를 초과하는 정숫값을 사용하려고 하면 연산에 미세한 오류가 발생함 - 특징
소수표현에 사용 불가 (사용 시 소수점 아래부분은 버림)
BigInt 타입끼리만 연산 가능
# 오류 발생 예시
console.log(9007199254740991 + 1 === 9007199254740991 + 2); // true
console.log(9007199254740991 + 2); /// 9007199254740992
console.log(9007199254740993); /// 9007199254740992

# BigInt 선언 예시
console.log(9007199254740993n); // 9007199254740993n
console.log(BigInt('9007199254740993')); // 9007199254740993n- typeof 연산자
typeof 'Codeit'; // string
typeof Symbol(); // symbol
typeof {}; // object
typeof []; // object
typeof true; // boolean
typeof(false); // boolean
typeof(123); // number
typeof(NaN); // number
typeof(456n); // bigint
typeof(undefined); // undefined

# 특별히 알아둘 사항들
typeof null; // object

function sayHi() {
  console.log('Hi!?');
}

typeof sayHi; // function
# 형변환 예시
const x = "3";
const y = 5;
console.log(x * y);Truthy, Falsy
- False로 평가되는 값: false, null, undefined, NaN, 0, ''
- True로 평가되는 값: 나머지 전부, [], {} ←
Boolean(평가하고자 하는 값) # True, False 중 하나로 나옴논리연산자
- 자바스크립트에서는 '선택'의 역할을 함
- AND: 왼쪽값이
true이면 오른쪽값 리턴, 왼쪽값이false이면 그대로 왼쪽 리턴 - OR: 왼쪽값이
true이면 왼쪽값 리턴, 왼쪽값이false이면 오른쪽 리턴
# AND
console.log('Codeit' && 'Javascript');
# OR
console.log('Codeit'||'Javascript');
# 예시들
console.log(null && undefined); // null
console.log(0 || true); // true
console.log('0' && NaN); // NaN
console.log({} || 123); // {}- 전달값이 없는 경우(falsy)를 검사하도록 하는 코드를 단순하게 작성할 수 있음.
AND, OR연산자의 연산 우선순위
- AND 연산자가 더 높음!! (그러나 가독성을 높히기 위해 괄호 사용을 권장함)
null 병합 연산자
??연산자를 이용해서 null, undefined 값을 가려내는 연산자??연산자의 왼쪽의 값이 null이나 undefined라면 연산자 오른쪽의 값이 리턴됨??연산자 왼쪽의 값이 null이나 undefined가 아니라면 연산자 왼쪽의 값이 리턴됨 (OR과 비슷)
변수 선언
var title = 'codeit'; # 기존 방식

//바뀐 방식:
let // 값의 재할당 필요
const // 값의 재할당 필요하지 않음- var의 특징들:
- 선언되기 전에도 사용이 가능함, 이 때 undefined로 값만 할당되지 않은 것처럼 나옴 (실제로는 선언조차 되지 않은 상태임에도) ← 호이스팅 때문!
- 중복선언 가능
- 지역변수(블록 안에서 선언된 변수는 블록 밖에서 선언이 불가한 변수)를 만들 수 없음 (전부 다 전역변수) - var는 함수 스코프를, let과 const는 블록 스코프를 가짐
- let, const의 특징들: ← ES2015에서 등장함
- 변수 이름 중복선언 불가 (SyntaxError 발생)
- 변수 선언 전에 사용 불가 (ReferenceError 발생)
- 블록 스코프
function sayHi() {
  var userName = 'codeit';
  console.log(`Hi ${userName}!`);
}

console.log(userName); // ReferenceError

for (var i = 0; i < 5; i++) {
  console.log(i);
}

console.log(i); // 5

function sayHi() {
  const userName = 'codeit';
  console.log(`Hi ${userName}!`);
}

for (let i = 0; i < 5; i++) {
  console.log(i);
}

{
  let language = 'JavaScript';
}

console.log(userName); // ReferenceError
console.log(i); // ReferenceError
console.log(language); // ReferenceError
함수 다루기
- 함수를 만드는 법: ← 하나로 통일해서 일관성있게 사용할 것
- 함수 선언 (function declaration) 기존에 알던 방식)
function 함수이름() { // function 키워드 사용
	동작;
    return 리턴값;
};
// 함수 선언
function sayHi() {
console.log('Hi!');
}- 함수 표현식: 선언된 함수를 값처럼 활용, 변수에 할당, 블록스코프를 가짐
// 함수 표현식
const sayHi = function () {
  console.log('Hi!');
};
예시: sayHi함수는 블록스코프를 가져서 블록 밖에서는 사용이 불가하므로 오류가 발생함. 이 때 만약 함수선언 방식으로 선언되었다면 오류가 발생하지 않는다.
# 오류가 발생함
{
  let sayHi = function () {
    console.log('Hi!');
  };
}

sayHi();- 다양한 함수의 형태
// 변수에 할당해서 활용
const printJS = function () {
  console.log('JavaScript');
};

// 객체의 메소드로 활용
const codeit = {
  printTitle: function () {
    console.log('Codeit');
  }
}

// 콜백 함수로 활용
myBtn.addEventListener('click', function () {
  console.log('button is clicked!');
});

// 고차 함수로 활용
function myFunction() {
  return function () {
    console.log('Hi!?');
  };
};- Named Function Expression(기명 함수 표현식)
const sayHi = function () {
  console.log('Hi');
};

console.log(sayHi.name); // sayHi

const sayHi = function printHiInConsole() {
  console.log('Hi');
};

console.log(sayHi.name); // printHiInConsole

# 이 이름은 외부에서 함수를 호출할 때는 사용되지 않음
const sayHi = function printHiInConsole() {
  console.log('Hi');
};

printHiInConsole(); // ReferenceError- IIFE(즉시 실행 함수)
일반적으로 프로그램 초기화, 일회성 동작 구현 등에 사용됨
(function () {
  console.log('Hi!');
})(); # 선언과 동시에 실행됨

(function (x, y) {
  console.log(x + y);
})(3, 5);

# 이름을 지어주더라도 외부에서 재호출할 수는 없음
(function sayHi() {
  console.log('Hi!');
})();

sayHi(); // ReferenceError

# 따라서 대부분은 이름을 짓지 않으나, 재귀호출을 구현하고자 할 때는 이름이 필요함
(function countdown(n) {
  console.log(n);
  if (n === 0) {
    console.log('End!');
  } else {
    countdown(n - 1);
  }
})(5);- 값으로서의 함수: 배열의 요소로 선언/배열의 요소에 접근해서 호출 가능, 다른 함수의 파라미터로도 호출 가능(이 때 파라미터에 들어간 함수를 콜백함수라고 부름), return값으로도 사용 가능(함수를 리턴하는 함수는 고차함수라고 불림)
# 코드 실행 결과가 다른 하나
const sayCodeit = function () {
  console.log('Codeit');
};

sayCodeit();

const codeit = {
  title: 'codeit',
  printTitle: function () {
    console.log('Codeit');
  },
};

codeit.printTitle();

const codeit = [
  function () {
    console.log('Codeit');
  },
];

codeit[0]();

// 여기까지 전부 같음
// 마지막 코드만 다름
function getFunction() {
  return function () {
    console.log('Codeit');
  }
}

const printCodeit = getFunction; // getFunction()로 수정해야 같아짐
printCodeit();
- 파라미터: 선언 부분에서 사용됨
arguement: 호출 부분에서 사용됨
기본값을 사용하기 위해 undefined(null은 불가함!!)를 argument로 사용하는 것도 방법임
function sayHi(name = 'Codeit') {
  console.log(`Hi! ${name}`);
}

sayHi('JavaScript'); // Hi! JavaScript
sayHi(); // Hi! Codeitarguments객체
유사배열이라서 배열의 메소드를 사용하기 어려움
arguments.length # 입력값 개수 확인
arguments[0] # 인덱싱으로 접근 가능
for (const arg of arguments){
  console.log(arg);
}; # 반복문 실행
// 실습
function firstWords() {
let word = '';
// 여기에 코드를 작성하세요
arg_length = arguments.length;
for (i=0; i<arg_length; i++){
word += arguments[i][0]
}
console.log(word);
}
firstWords('나만', '없어', '고양이');
firstWords('아니', '바나나말고', '라면먹어');
firstWords('만두', '반으로', '잘라먹네', '부지런하다');
firstWords('결국', '자바스크립트가', '해피한', '지름길');
firstWords('빨간색', '주황색', '노란색', '초록색', '파란색', '남색', '보라색');- rest parameter: 함수 선언 시 파라미터 앞에
...붙이기 → 배열이므로 배열의 메소드들(splice(시작인덱스, 끝인덱스)) 등 사용 가능
function printArguments(...args) {
  // args 객체의 요소들을 하나씩 출력
  for (const arg of args) {
    console.log(arg);
  }
}

printArguments('Young', 'Mark', 'Koby');
function ignoreFirst(first_params, ...rest_params){
// console.log(rest_params)
for (i=0; i<rest_params.length; i++){
console.log(rest_params[i]);
}
}
ignoreFirst('1세대', '2세대', '3세대');
ignoreFirst('곰팡이', '강아지', '고양이');
ignoreFirst(20, 9, 18, 19, 30, 34, 40);- Arrow Function: 함수 선언 방식 단순화
const sayHi = (파라미터) => { // 파라미터가 하나일 때는 소괄호 생략 가능
  명령문;
};
// 화살표 함수 정의
const getTwice = (number) => {
return number * 2;
};
// 콜백 함수로 활용
myBtn.addEventListener('click', () => {
console.log('button is clicked!');
});
// 1. 함수의 파라미터가 하나 뿐일 때
const getTwice = (number) => {
return number * 2;
};
// 파라미터를 감싸는 소괄호 생략 가능
const getTwice = number => {
return number * 2;
};
// 2. 함수 동작 부분이 return문만 있을 때
const sum = (a, b) => {
return a + b;
};
// return문과 중괄호 생략 가능
const sum = (a, b) => a + b;
arguments 객체가 존재하지 않음
- this 객체:
웹브라우저에서 사용될 때: 전역객체, Window 객체를 가짐
객체의 메소드를 정의하기 위한 함수 안에서: 메소드를 호출한 객체를 가리킴
const user = {
  firstName: 'Tess',
  lastName: 'Jang',
  getFullName: function () {
    return `${this.firstName} ${this.lastName}`;
  },
};

console.log(user.getFullName()); // getFullName 안에서의 this는 getFullName을 호출한 user객체가 담긴다!
function printThisTitle() {
console.log(this.title);
}
const courseA = {
title: '프로그래밍 기초 in JavaScript',
printTitle: printThisTitle,
};
const courseB = {
title: '컴퓨터 개론',
printTitle: courseA.printTitle,
};
const courseC = {
title: '웹 퍼블리싱',
printTitle: courseB.printTitle,
};
courseA.printTitle();
courseB.printTitle();
courseC.printTitle();
//프로그래밍 기초 in JavaScript
//컴퓨터 개론
//웹 퍼블리싱const getFullName = () => `${this.firstName} ${this.lastName}`;
const user = {
firstName: 'Ted',
lastName: 'Chang',
getFullName: getFullName,
};
console.log(user.getFullName());
/*
getFullName에서 this는 window 객체를 가리키기 때문에 이 코드는 undefined undefined가 콘솔에 출력될 거야.
Arrow Function에서 this는 일반함수와 다르게 함수가 호출될 때 호출한 객체를 가리키지 않아.
메소드를 만들 때 그 메소드를 품은 객체를 this 로 가리키고 싶다면 Arrow Function 보다는 일반 함수를 사용하는 게 좋아.
틀린선지: Ted Chang이 출력됨
동환: this를 활용한 메소드를 객체 내부에서 선언하면 항상 그 객체를 가리키기 때문에, 만약 다른 객체의 메소드로도 활용할 거라면 객체 외부에서 전역 스코프를 가지는 함수로 선언해야 해.
this를 활용한 메소드를 다른 여러 객체에 활용한다고 해서 반드시 전역 스코프를 가지는 함수를 만들 필요는 없습니다. 일반함수로 this를 활용한 메소드를 객체 내부에서 선언하고 다른 객체에서 그 메소드를 참조하더라도 this는 항상 그 메소드를 호출한 객체를 가리키게 됩니다. (동환: X)
*/자바스크립트의 문법과 표현
-
문장(statements) vs. 표현식(expressions)
문장: 어떤 동작이 일어나도록 작성된 최소한의 코드 덩어리
표현식: 결과적으로 하나의 값이 되는 모든 코드 -
조건을 다루는 표현식
기존:if,switch
조건연산자(삼항연산자):조건 ? truthy할때표현식 : falsy할때표현식←?,:이케 두개의 연산자 사용, 자바스크립트에서 세 개의 피연산자를 가지는 유일한 연산자
장점: 간단한 조건식의 경우에는 if문 보다 훨씬 더 간결하게 표현할 수 있음
단점: 내부에 변수나 함수를 선언한다거나 반복문 같은 표현식이 아닌 문장은 작성할 수 없다는 한계가 있어서 if문을 완벽하게 대체할 수는 없음
const cutOff = 80;

const passChecker = (score) => score > cutOff ? '합격입니다!' : '불합격입니다!';

console.log(passChecker(75));
const msg = speed > 50 ? '[주의!]과속주행 중입니다.' : '정속주행 중입니다.';
//if문 -> 조건연산자
// if문
let msg = '';
if (x > 3) {
msg = 'x는 3보다 크다.';
} else {
msg = 'x는 3보다 크지 않다.';
}
//조건연산자
let msg = x > 3 ? 'x는 3보다 크다.' : 'x는 3보다 크지 않다.';- Spread 구문
여러 개의 값을 묶어놓은 배열이나 객체와 같은 값은 바로 앞에 마침표 세 개를 붙여서 펼치기 → 배열이름 앞에...를 붙여서 실행함
배열은 객체로 펼칠 수 있지만 객체는 배열로 펼칠 수 없다
[1, 2, 3] → 1 2 3
const webPublishing = ['HTML', 'CSS'];
const interactiveWeb = [...webPublishing, 'JavaScript'];

console.log(webPublishing);
console.log(interactiveWeb);

const arr1 = [1, 2, 3];
const arr2 = [4, 5, 6];

const arr3 = [...arr1, ...arr2];
console.log(arr3);
const members = ['태호', '종훈', '우재'];
const newObject = { ...members };

console.log(newObject); // {0: "태호", 1: "종훈", 2: "우재"}

const topic = {
  name: '모던 자바스크립트',
  language: 'JavaScript',
}
const newArray = [...topic]; // TypeError!
const codeit = {
name: 'codeit',
};
const codeitClone = {
...codeit, // spread 문법!
};
console.log(codeit); // {name: "codeit"}
console.log(codeitClone); // {name: "codeit"}const latte = {
esspresso: '30ml',
milk: '150ml'
};
const cafeMocha = {
...latte,
chocolate: '20ml',
}
console.log(latte); // {esspresso: "30ml", milk: "150ml"}
console.log(cafeMocha); // {esspresso: "30ml", milk: "150ml", chocolate: "20ml"}const latte = {
esspresso: '30ml',
milk: '150ml'
};
const cafeMocha = {
...latte,
chocolate: '20ml',
}
[...latte]; // Error
(function (...args) {
for (const arg of args) {
console.log(arg);
}
})(...cafeMocha); // Errorconst snacks = ['원카칩', '꿀버터칩', '헛스윙칩', '태양칩', '야채시간'];
const drinks = ['사이다', '콜라', '우유', '물', '커피', '레몬에이드'];
function printArguments(...args) {
for (const arg of args) {
console.log(arg);
}
}
// 1. Spread 구문을 활용해서 snacks와 drinks 배열을 각각 mySnacks와 myDrinks 변수에 복사해 주세요
const mySnacks = [...snacks]
const myDrinks = [...drinks]
mySnacks.splice(2, 3);
myDrinks.splice(1);
// 2. Spread 구문을 활용해서 mySnacks와 myDrinks 순서로 두 배열을 합쳐서 myChoice 변수에 할당해 주세요
const myChoice = [...mySnacks, ...myDrinks]
// 3. Spread 구문을 활용해서 myChoice의 각 요소들을 printArguments 함수의 아규먼트로 전달해 주세요
printArguments(...myChoice);- 프로퍼티 표기법 (축약, 생략 등 간단화 ver.)
// 프로퍼티 네임과 변수나 함수 이름이 같아서 축약
function sayHi() {
  console.log('Hi!');
}

const title = 'codeit';
const birth = 2017;
const job = '프로그래밍 강사';

const user = {
  title,
  birth,
  job,
  sayHi,
};

console.log(user); // {title: "codeit", birth: 2017, job: "프로그래밍 강사", sayHi: ƒ}
// 메소드에서 function 키워드 생략
const user = {
firstName: 'Tess',
lastName: 'Jang',
getFullName() {
return `${this.firstName} ${this.lastName}`;
},
};
console.log(user.getFullName()); // Tess Jang
- 객체의 프로퍼티네임을 작성할 때,
['hi' + '이름변수']:값이런식의 표현도 가능
const propertyName = 'birth';
const getJob = () => 'job';

const codeit = {
  ['topic' + 'Name']: 'Modern JavaScript',
  [propertyName]: 2017,
  [getJob()]: '프로그래밍 강사',
};
// 접근법
codeit.topicName;
codeit[propertyName];
codeit[getJob()];
codeit.job;
codeit.birth;- 구조 분해(Destructuring)
배열의 요소나 객체의 프로퍼티 값들을 개별적인 변수에 따로 따로 할당 가능
// Array Destructuring
const members = ['코딩하는효준', '글쓰는유나', '편집하는민환'];
const [macbook, ipad, coupon] = members;

console.log(macbook); // 코딩하는효준
console.log(ipad); // 글쓰는유나
console.log(coupon); // 편집하는민환

// Object Destructuring
const macbookPro = {
  title: '맥북 프로 16형',
  price: 3690000,
};

const { title, price } = macbookPro;

console.log(title); // 맥북 프로 16형
console.log(price); // 3690000
// Array Destructuring: 기본값, rest 문법 활용
const members = ['코딩하는효준', '글쓰는유나', undefined, '편집하는민환', '촬영하는재하'];
const [macbook, ipad, airpod = '녹음하는규식', ...coupon] = members;
console.log(macbook); // 코딩하는효준
console.log(ipad); // 글쓰는유나
console.log(airpod); // 녹음하는규식
console.log(coupon); // (2) ["편집하는민환", "촬영하는재하"]
// Object Destructuring
const macbookPro = {
title: '맥북 프로 16형',
price: 3690000,
memory: '16 GB 2667 MHz DDR4',
storage: '1TB SSD 저장 장치',
};
const { title, price, color = 'silver', ...rest } = macbookPro;
console.log(title); // 맥북 프로 16형
console.log(price); // 3690000
console.log(color); // silver
console.log(rest); // {memory: "16 GB 2667 MHz DDR4", storage: "1TB SSD 저장 장치"}
- 프로퍼티 접근법: 옵셔널 체이닝 (Optional Chaining)
중첩객체를 다룰 때 때로는 우리가 예상한 프로퍼티를 가지고 있지 않을 수도 있음 → 아래 코드의printCatName과 같이 중첩된 객체의 프로퍼티를 다룰 때는user.cat.name에 접근하기 전에user.cat이null혹은undefined가 아니라는 것을 검증하고 접근해야 에러를 방지할 수 있음
function printCatName(user) {
  console.log(user.cat.name);
}

const user1 = {
  name: 'Captain',
  cat: {
    name: 'Crew',
    breed: 'British Shorthair',
  }
}

printCatName(user1); // Crew
// 검증방법1: and 연산자
function printCatName(user) {
  console.log(user.cat && user.cat.name);
}
// 검증방법2: 옵셔널 체이닝
function printCatName(user) {
  console.log(user.cat?.name);
}
/*만약 옵셔널 체이닝 연산자 왼편의 프로퍼티 값이
undefined 또는 null이 아니라면 그 다음 프로퍼티 값을 리턴하고
그렇지 않은 경우에는 undefined를 반환*/
// 같은 연산을 삼항연산자를 통해 구현
function printCatName(user) {
  console.log((user.cat === null || user.cat === undefined) ? undefined : user.cat.name);
}
//응용
function printCatName(user) {
  console.log(user.cat?.name ?? '함께 지내는 고양이가 없습니다.');
}

const user2 = {
  name: 'Young',
}

printCatName(user2); // 함께 지내는 고양이가 없습니다.- 구조분해
배열, 객체에 각각 다르게 적용됨
배열:
// 1. Destructuring 문법을 활용해서 numbers 배열의 각 요소를 one, two, three라는 변수에 할당해보세요
const numbers = [1, 2, 3];
const [one, two, three] = numbers;

// 2. Destructuring 문법을 활용해서 TV는 livingRoom, 나머지 요소들(배열)은 kitchen 변수에 할당해 주세요
const products = ['TV', '식탁', '냉장고', '전기밥솥', '전자레인지', '오븐', '식기세척기'];
const [livingRoom, ...kitchen] = products;

// 3. Destructuring 문법을 활용해서 두 변수의 값을 서로 바꿔주세요
let firstName = 'Kang';
let lastName = 'Young';

[firstName, lastName] = [lastName, firstName];

// 테스트 코드
console.log(one);
console.log(two);
console.log(three);
console.log(livingRoom);
console.log(kitchen[1]);
console.log(firstName);
console.log(lastName);
객체:
// 1. Destructuring 문법을 사용해서 title, artist, year, medium 변수에 myBestArt 객체의 각 프로퍼티를 할당해 주세요
const myBestArt = {
	title: '별이 빛나는 밤에',
	artist: '빈센트 반 고흐',
	year: 1889,
	medium: '유화',
};

const {title, artist, year, medium} = myBestArt;

// 2. Destructuring 문법을 활용해서 myBestSong의 프로퍼티 중 title과 artist는 각각 songName과 singer라는 변수에, 나머지는 rest라는 변수에 객체로 할당해 주세요
const myBestSong = {
	title: '무릎',
	artist: '아이유(IU)',
	release: '2015.10.23.',
	lyrics: '모두 잠드는 밤에...'
};

// const {songName, singer, ...rest} = myBestSong;
const {title: songName, artist: singer, ...rest} = myBestSong;

// 3. printMenu 함수 안에 잘못 작성된 Destructuring 코드를 수정해 주세요
const menu1 = { name: '아메리카노' };
const menu2 = { name: '바닐라 라떼', ice: true };
const menu3 = { name: '카페 모카', ice: false };

function printMenu(menu) {
	//  menu 파라미터로 전달되는 객체에 ice 프로퍼티가 없을 경우 기본값은 true여야 합니다
	const {name, ice = true} = menu;

	console.log(`주문하신 메뉴는 '${ice ? '아이스' : '따뜻한'} ${name}'입니다.`);
}
const numbers = [5, undefined, null, 3, 1, 7, 0];
const [a, b = 4, c = 2, ...d] = numbers;
console.log(a); // 5
console.log(b); // 4
console.log(c); // null
console.log(d[2]); // 7
console.log(d[4]); // undefined// 아래 코드들이 정상적으로 동작하려면 printFavoritSong 함수를 어떻게 선언해야 할까요?
function printFavoritSong(name, music){
console.log(`최근 '${name}'님이 즐겨듣는 노래는 '${music.singer}'의 '${music.title}'이라는 노래입니다.`);
};
/* alternative functions:
function printFavoritSong(name, music) {
const { singer, title } = music;
console.log(`최근 '${name}'님이 즐겨듣는 노래는 '${singer}'의 '${title}'이라는 노래입니다.`);
}
function printFavoritSong(name, { title, singer }) {
console.log(`최근 '${name}'님이 즐겨듣는 노래는 '${singer}'의 '${title}'이라는 노래입니다.`);
}
*/
const music1 = { title: '난치병', singer: '하림' };
const music2 = { title: '너의 모든 순간', singer: '성시경' };
const music3 = { title: '무릎', singer: '아이유' };
const music4 = { title: '옛사랑', singer: '이문세' };
const music5 = { title: '한숨', singer: '이하이' };
const music6 = { title: '추억의 책장을 넘기면', singer: '이선희' };
printFavoritSong('영훈', music4);
printFavoritSong('동욱', music1);
printFavoritSong('대위', music3);
printFavoritSong('소원', music2);
printFavoritSong('우재', music5);
printFavoritSong('영준', music6);- 자바스크립트에서 에러가 발생하면 벌어지는 일들:
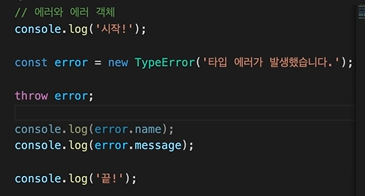
- 발생하자마자 프로그램 자체가 멈춰버리고 이후의 코드가 동작하지 않음
- 에러에 대한 정보를 name과 message라는 프로퍼티로 담고 있는 에러 객체(대표적으로 SyntaxError, ReferenceError, TypeError)가 만들어짐
- 에러객체 직접 만들기
new 키워드와 에러 객체 이름을 딴 함수를 통해 에러 객체를 만들고, throw 키워드로 에러를 발생시킬 수 있음
// 에러 객체 직접 만드는 코드
throw new TypeError('타입 에러가 발생했습니다.');- 에러 핸들링: try-catch 문
try{
  코드; // 오류 발생 시점 이후의 코드는 실행되지 않음
}catch(error){ // error 대신 err, e 등 자유롭게 작명 가능
  코드; // 오류 발생 후 실행되는 코드
  console.log(error.name); // 콘솔창에 출력하기
  console.log(error.message);
  console.error(error) // 진짜 에러 메세지처럼 빨간색으로 출력
}- try...catch + finally (return문을 만나더라도 실행됨)
try {
  // 실행할 코드
} catch (err) {
  // 에러가 발생했을 때 실행할 코드
} finally {
  // 에러 발생 여부와 무관하게 항상 실행할 코드
}
자바스크립트의 유용한 내부 기능
- sort 메소드
기본적으로 유니코드 값 기준으로 오름차순/내림차순으로 정렬되므로 만약 다르게 정렬할 필요가 있다면 콜백함수를 파라미터 자리에 넣어주면 됨
메소드를 실행하는 원본 배열의 요소들을 정렬하므로 한 번 정렬하고 나면 정렬하기 전의 순서로 다시 되돌릴 수 없음 ← 만약 복구가 필요한 경우라면 미리 다른 변수에 복사해둬야 함
// 기본 유니코드 방식 정렬
const letters = ['D', 'C', 'E', 'B', 'A'];
const numbers = [1, 10, 4, 21, 36000];

letters.sort();
numbers.sort();

console.log(letters); // (5) ["A", "B", "C", "D", "E"]
console.log(numbers); // (5) [1, 10, 21, 36000, 4]
// 다른 정렬 정의하기
const numbers = [1, 10, 4, 21, 36000];

// 오름차순 정렬
numbers.sort((a, b) => a - b);
console.log(numbers); // (5) [1, 4, 10, 21, 36000]

// 내림차순 정렬
numbers.sort((a, b) => b - a);
console.log(numbers); // (5) [36000, 21, 10, 4, 1]
- reverse 메소드: 파라미터 없음, 원본배열 수정함
const letters = ['a', 'c', 'b'];
const numbers = [421, 721, 353];

letters.reverse();
numbers.reverse();

console.log(letters); // (3) ["b", "c", "a"]
console.log(numbers); // (3) [353, 721, 421]-
map & set
객체는 property name을 통해 이름이 있는 여러 값들을 묶을 때 활용할 수 있고, 배열은 index를 통해 순서가 있는 여러 값들을 묶을 때 유용하게 활용할 수 있음
→ ES2015에서 객체와 비슷한 Map과 배열과 비슷한 Set이라는 데이터 구조가 새롭게 등장 -
Map
객체와 비슷한 점: 이름이 있는 데이터를 저장
객체와 다른 점:
- 메소드를 통해 값을 추가하고 접근할 수 있음 ← 객체는 할당연산자를 통해 값을 추가하고 점 표기법이나 대괄호 표기법으로 접근
- 다양한 자료형을 key로 활용 가능 (why? 메소드를 통해 값을 다루므로!) ← 객체는 문자열과 심볼 값만 key(프로퍼티 네임)로 사용 가능
map의 메소드들
map.set(key, value): key를 이용해 value를 추가하는 메소드.
map.get(key): key에 해당하는 값을 얻는 메소드. key가 존재하지 않으면 undefined를 반환.
map.has(key): key가 존재하면 true, 존재하지 않으면 false를 반환하는 메소드.
map.delete(key): key에 해당하는 값을 삭제하는 메소드.
map.clear(): Map 안의 모든 요소를 제거하는 메소드.
map.size: 요소의 개수를 반환하는 프로퍼티. (메소드가 아닌 점 주의! 배열의 length 프로퍼티와 같은 역할)
// Map 생성: new 키워드
const codeit = new Map();

// set 메소드
codeit.set('title', '문자열 key');
codeit.set(2017, '숫자형 key');
codeit.set(true, '불린형 key');

// get 메소드
console.log(codeit.get(2017)); // 숫자형 key
console.log(codeit.get(true)); // 불린형 key
console.log(codeit.get('title')); // 문자열 key

// has 메소드
console.log(codeit.has('title')); // true
console.log(codeit.has('name')); // false

// size 프로퍼티
console.log(codeit.size); // 3

// delete 메소드
codeit.delete(true);
console.log(codeit.get(true)); // undefined
console.log(codeit.size); // 2

// clear 메소드
codeit.clear();
console.log(codeit.get(2017)); // undefined
console.log(codeit.size); // 0- Set
여러 개의 값을 순서대로 저장함 (배열과 비슷한 부분!)
배열의 메소드는 활용 불가
개별값 접근 불가 (객체는 프로퍼티 네임으로, map은 get 메소드로, 배열은 index로 접근 가능) → 중복을 허용하지 않는 값들을 모을 때, 최초에 추가된 순서를 유지하면서 나중에 중복된 값을 추가하려고 하면 그 값은 무시하는 특징이 있음 (중복을 제거한 값들의 묶음 생성시 유용하게 사용 가능!)
set.add(value): 값을 추가하는 메소드. (메소드를 호출한 자리에는 추가된 값을 가진 Set 자신을 반환.)
set.has(value): Set 안에 값이 존재하면 true, 아니면 false를 반환하는 메소드.
set.delete(value): 값을 제거하는 메소드. (메소드를 호출한 자리에는 셋 내에 값이 있어서 제거에 성공하면 true, 아니면 false를 반환.)
set.clear(): Set 안의 모든 요소를 제거하는 메소드.
set.size: 요소의 개수를 반환하는 프로퍼티. (메소드가 아닌 점 주의! 배열의 length 프로퍼티와 같은 역할)
// Set 생성
const members = new Set();

// add 메소드
members.add('영훈'); // Set(1) {"영훈"}
members.add('윤수'); // Set(2) {"영훈", "윤수"}
members.add('동욱'); // Set(3) {"영훈", "윤수", "동욱"}
members.add('태호'); // Set(4) {"영훈", "윤수", "동욱", "태호"}

// has 메소드
console.log(members.has('동욱')); // true
console.log(members.has('현승')); // false

// size 프로퍼티
console.log(members.size); // 4

// delete 메소드
members.delete('종훈'); // false
console.log(members.size); // 4
members.delete('태호'); // true
console.log(members.size); // 3

// clear 메소드
members.clear();
console.log(members.size); // 0

/* 개별값 접근 불가*/
const members = new Set();
// add 메소드
members.add('영훈'); // Set(1) {"영훈"}
members.add('윤수'); // Set(2) {"영훈", "윤수"}
members.add('동욱'); // Set(3) {"영훈", "윤수", "동욱"}
members.add('태호'); // Set(4) {"영훈", "윤수", "동욱", "태호"}

for (const member of members) {
  console.log(member); // 영훈, 윤수, 동욱, 태호가 순서대로 한 줄 씩 콘솔에 출력됨.
}
/* 중복 제거*/
const numbers = [1, 3, 4, 3, 3, 3, 2, 1, 1, 1, 5, 5, 3, 2, 1, 4];
const uniqNumbers = new Set(numbers);

console.log(uniqNumbers); // Set(5) {1, 3, 4, 2, 5}- forEach 메소드: 배열의 요소를 하나씩 살펴보면서 반복 작업을 함
첫 번째 아규먼트로 콜백 함수를 전달받음 → 콜백 함수의 파라미터에는 각각 배열의 요소, index, 메소드를 호출한 배열이 전달됩니다. (index와 array는 생략가능)
const numbers = [1, 2, 3];

numbers.forEach((element, index, array) => {
  console.log(element); // 순서대로 콘솔에 1, 2, 3이 한 줄씩 출력됨.
});-
forEach 메소드 등을 사용할 때 배열의 길이를 증가시켜도 실행횟수에는 차이가 없지만 배열의 길이를 감소시키면 횟수가 줄어듦
-
map 메소드
forEach와 비슷하게 배열의 요소를 하나씩 살펴보면서 반복 작업을 하는 메소드
첫 번째 아규먼트로 전달하는 콜백 함수가 매번 리턴하는 값들을 모아서 새로운 배열을 만들어 리턴하는 특징이 있습니다.
const numbers = [1, 2, 3];
const twiceNumbers = numbers.map((element, index, array) => {
  return element * 2;
});

console.log(twiceNumbers); // (3) [2, 4, 6]
- Filter
리턴값: 배열 ← 그러나 메소드를 find메소드로 바꿔서 사용하면 값을 리턴함
const 새로생성할_배열이름 = 필터링할_배열.filter((el) => el.배열의키값 == “apple”)const devices = [
{name: 'GalaxyNote', brand: 'Samsung'},
{name: 'MacbookPro', brand: 'Apple'},
{name: 'Gram', brand: 'LG'},
{name: 'SurfacePro', brand: 'Microsoft'},
{name: 'ZenBook', brand: 'Asus'},
{name: 'MacbookAir', brand: 'Apple'},
];
const apples = devices.filter((element, index, array) => {
return element.brand === 'Apple';
});
console.log(apples); // (2) [{name: "MacbookPro", brand: "Apple"}, {name: "MacbookAir", brand: "Apple"}]- find 메소드
find 메소드는 filter 메소드와 비슷하게 동작하지만, 배열의 요소들을 반복하는 중에 콜백함수가 리턴하는 조건과 일치하는 가장 첫번째 요소를 리턴하고 반복을 종료하는 메소드
const devices = [
  {name: 'GalaxyNote', brand: 'Samsung'},
  {name: 'MacbookPro', brand: 'Apple'},
  {name: 'Gram', brand: 'LG'},
  {name: 'SurfacePro', brand: 'Microsoft'},
  {name: 'ZenBook', brand: 'Asus'},
  {name: 'MacbookAir', brand: 'Apple'},
];

const myLaptop = devices.find((element, index, array) => {
  console.log(index); // 콘솔에는 0, 1, 2까지만 출력됨.
  return element.name === 'Gram';
});

console.log(myLaptop); // {name: "Gram", brand: "LG"}- Some, every 메소드
빈배열에 대해 실행하는 경우, Some: false, every: true
const numbers = [1, 3, 5, 7, 9];

// some: 조건을 만족하는 요소가 1개 이상 있는지
const someReturn = numbers.some((element, index, array) => {
  console.log(index); // 콘솔에는 0, 1, 2, 3까지만 출력됨.
  return element > 5;
});

console.log(someReturn); // true;

const numbers = [1, 3, 5, 7, 9];

// every: 조건을 만족하지 않는 요소가 1개 이상 있는지
const everyReturn = numbers.every((element, index, array) => {
  console.log(index); // 콘솔에는 0까지만 출력됨.
  return element > 5;
});

console.log(everyReturn); // false;- reduce 메소드
용도: 누적값 계산
일반적으로 두 개의 파라미터를 활용:
- 반복동작할 콜백함수: 매번 실행되는 콜백함수의 리턴값이 다음에 동작할 콜백함수의 첫번째 파라미터로 전달되고, 결과적으로 마지막 콜백함수가 리턴하는 값이 reduce 메소드의 최종 리턴값이 됨
- 이 때 reduce 메소드의 두 번째 파라미터로 전달한 초기값이 첫 번째로 실행될 콜백함수의 가장 첫 번째 파라미터로 전달됨.
const numbers = [1, 2, 3, 4];

// reduce
const sumAll = numbers.reduce((accumulator, element, index, array) => {
  return accumulator + element;
}, 0);

console.log(sumAll); // 10- 연습문제들
- 꼼꼼하기로 소문난 태순이는 하루를 시작하기 전에 그 날 해야할 일들을 정리하는 것을 좋아합니다.
처음에는 다이어리에 작성하다가 할 일 정리 프로그램을 만들어 보기로 했는데요.
일단은 배열 안의 객체의 형태로 오늘 해야 할 일들을 정리해두고 화면에 그려보는 기능부터 개발하려고 합니다.
태순이를 도와서 HTML DOM 메소드와 forEach 메소드를 통해 data 변수에 담긴 할 일들을 화면에 띄워보세요.
단, 아래의 조건들을 잘 지켜주셔야 합니다.
forEach 메소드를 활용해주세요.
할 일들은 li태그로 만들어 주세요.
할 일들은 기본적으로 item 이라는 클래스를 가지고 있어야 합니다.
할 일 중에서 isClear 프로퍼티가 true인 할 일은 done 이라는 클래스도 추가해 주세요.
할 일들에 1부터 시작하는 번호를 매겨주세요. (ex) 1. 게임하기 2. 쇼핑하기 3. ...)
할 일들은 <ul class="list"></ul>태그 안에 넣어주세요.
const list = document.querySelector('.list');
const data = [{
    title: '자바스크립트 공부하기',
    isClear: true,
  }, {
    title: '쓰레기 분리수거',
    isClear: false,
  }, {
    title: '고양이 밥주기',
    isClear: true,
  }, {
    title: '독서하기',
    isClear: false,
  }, {
    title: '영어 공부하기',
    isClear: false,
  }
];

// 여기에 코드를 작성해 주세요.
data.forEach((todo, i) => { // 1번 조건
  const li = document.createElement('li'); // 2번 조건

  if (todo.isClear) {
    li.classList.add('item', 'done'); // 4번 조건
  } else {
    li.classList.add('item'); // 3번 조건
  }

  li.textContent = `${i + 1}. ${todo.title}`; // 5번 조건
  list.appendChild(li); // 6번 조건
});- 오늘 코드잇 커뮤니티 게시판에 아래의 배열 안에 숨겨진 인물을 찾으라는 퀴즈가 올라왔습니다.
['YUMMY', 'COUNT', 'ABUSE', 'SOUND', 'SWING']
평소 추리 소설을 좋아하는 종훈이는 잠깐의 고민으로 이 속에 YOUNG (강영훈의 닉네임)이 숨겨져 있다는 걸 찾아냈는데요.
템플릿에 주어진 배열의 map 메소드를 활용해서 'Y', 'O', 'U', 'N', 'G'을 추출한 새로운 배열을 answer 변수에 담아주세요.
const quiz = ['YUMMY', 'COUNT', 'ABUSE', 'SOUND', 'SWING'];
// 여기에 코드를 작성하세요
const answer = quiz.map((element, index) => {
  return element[index];
});

// 테스트 코드
console.log(answer);- 주소도 이름도 모르고 무턱대고 막연하게 사람을 찾아가는 경우를 비유적으로 서울 (가서) 김 서방 찾는다[찾기]라고 합니다.
대한민국의 주요 성씨 중 김씨 성을 가진 사람들이 가장 많기 때문인데요. 주어진 템플릿 속의 변수 seoul에도 김씨 성을 가진 사람들이 참 많습니다.
filter 메소드를 활용해서 김씨 성을 갖지 않은 사람들을 추려낸 다음 notKims 변수에 담아주세요.
const seoul = ['김영훈', '김윤수', '김동욱', '강대위', '김영준',
  '김규식', '김태호', '김효신', '손효준', '김현승', '김재하', '김유나',
  '김재훈', '김혜선', '김민환', '김규리', '김소원', '김우재', '최영준',
  '김태순', '김종훈', '김성환', '김승용', '김지혜', '이승욱', '김도현',
  '김승규', '윤하은', '김유진', '김정민', '김혜정', '김예진', '김여진',
  '김성희', '김혜수', '김인선', '김상필', '김혜진', '서상원', '김상혜',
  '김민기', '김그루', '김희지'];

// 여기에 코드를 작성해 주세요.
const notKims = seoul.filter((element, index) => {
  return element[0] != '김';
})

// 테스트 코드
console.log(notKims);- 주어진 템플릿 속의 data 변수에는 '주식회사 고두잇'의 유저 정보가 담겨 있는데요.
유저 이름과 전화번호를 입력하면, 해당하는 유저의 이메일을 찾아주는 기능을 만들고자 합니다.
find 메소드를 활용해서 입력받은 유저 이름과 전화번호가 일치하는 객체를 찾아 user 변수에 할당해 주세요!
findEmail 함수가 제대로 완성된다면, 각 input 태그에 적절한 값을 입력했을 때 해당하는 이메일을 잘 찾아줄 겁니다!
const nameInput = document.querySelector('#user-name');
const phoneInput = document.querySelector('#phone-number');
const findBtn = document.querySelector('#find');

const data = [
  { userName: '막대기', phoneNumber: '01012341111', email: 'stick@go_do_it.kr' },
  { userName: 'young', phoneNumber: '01012342222', email: 'kang@go_do_it.kr' },
  { userName: '코린이', phoneNumber: '01012343333', email: 'corin2@go_do_it.kr' },
  { userName: 'captain', phoneNumber: '01012344444', email: 'crew@go_do_it.kr' },
  { userName: 'YH', phoneNumber: '01012345555', email: 'whyH@go_do_it.kr' },
  { userName: '망고쥬스', phoneNumber: '01012346666', email: 'drinkMango@go_do_it.kr' },
  { userName: 'nemoming', phoneNumber: '01012347777', email: 'ractAngle@go_do_it.kr' },
  { userName: '강그루', phoneNumber: '01012348888', email: 'riverTree@go_do_it.kr' },
  { userName: '개룩발룩', phoneNumber: '01012349999', email: 'checkShirts@go_do_it.kr' },
  { userName: '오렌지쥬스', phoneNumber: '01012341010', email: 'delmonte@go_do_it.kr' },
];

function findEmail() {
  const nameValue = nameInput.value;
  const phoneValue = phoneInput.value;

  // 여기에 코드를 작성하세요
  const user = data.find((element, index) => {
    if ((element.phoneNumber == phoneValue)&&(element.userName == nameValue)){
      return element.email;
    }
  });


  const message = user
    ? `${user.userName}님의 이메일은 ${user.email} 입니다.`
    : '이메일을 찾을 수 없습니다. 입력 정보를 다시 확인해 주세요.';

  alert(message);
}

findBtn.addEventListener('click', findEmail);- 스파이 요원을 전문적으로 파견하는 기업인 스파잇에는 총 6개의 팀이 있습니다.
스파잇의 대표 영수는 어느 날 기업 내에 이중 스파이가 있다는 사실을 알게 되었어요.
아래의 조건을 참고하여 각 팀의 멤버들 중에 순수 스파이가 아닌 사람이 있는지 확인하는 checkSpy 함수를 완성해 주세요.
스파잇의 직원들은 모두 '스파이'로 불리고, 이중 스파이는 '스파이와 비슷한 이름'을 갖고 있습니다.
checkSpy 함수의 첫번째 파라미터에는 하나의 팀을 표현하는 객체를 아규먼트로 전달받게 됩니다.
checkSpy 함수는 내부에서 some 혹은 every 메소드를 활용합니다.
checkSpy 함수는 최종적으로 message 변수에 담긴 값을 출력하게 됩니다.
아래 출력 결과를 참고하여 message 변수를 선언하고, 각 팀의 멤버들을 확인한 뒤 적절한 문구를 담아 주세요!
const spait = [
  { codeName: 'ApplePie', members: ['스파이', '스파이', '스파이', '스파이', '스파이'] },
  { codeName: 'BigBoss', members: ['스파이', '스파이', '스과이', '스파이', '스파이'] },
  { codeName: 'CEO', members: ['스파이', '스파이', '스파이', '습하이', '스파이'] },
  { codeName: 'DeathNote', members: ['스파이', '스파이', '스파이', '스파이', '스파이'] },
  { codeName: 'EarlyBird', members: ['스파이', '스마이', '스파이', '스파이', '스파이'] },
  { codeName: 'Faker', members: ['스파이', '스파이', '스파이', '스파이', '스파이'] },
];

function checkSpy(team) {
  // 여기에 코드를 작성하세요
  const everyReturn = team.members.every((element, index) => {
    return element == '스파이';
  });
  //console.log(everyReturn);
  if (everyReturn == true){
    message = `팀 ${team.codeName} 에는 이중 스파이가 없습니다.`
  } else {
    message = `[주의!] 팀 ${team.codeName} 에 이중 스파이가 있습니다!`
  }
	console.log(message);
}

// 테스트 코드
spait.forEach((team) => checkSpy(team));
- reduce 메소드를 활용해서 상원이가 일한 경력(개월 수)을 합산한 값을 totalCareer 변수에 담아주세요.
const data = [
  { company: 'Naber', month: 3 },
	{ company: 'Amajohn', month: 12 },
	{ company: 'Coogle', month: 10 },
  { company: 'Ittel', month: 6 },
  { company: 'Sasung', month: 4 },
  { company: 'CaCao', month: 3 },
	{ company: 'Microhard', month: 17 },
];

// 여기에 코드를 작성하세요
const totalCareer = data.reduce((accum, element) => {
  return accum + element.month;
}, 0);

console.log(`상원이의 경력은 총 ${totalCareer}개월입니다.`);
자바스크립트 모듈
-
모듈이란? 공통된 기능에 따라 하나의 프로그램을 여러개의 파일로 모듈화한 하나의 파일
코드를 좀 더 효율적으로 관리할 수 있고,비슷한 기능이 필요할 때 다른 프로그램에서 재사용 할 수도 있다는 장점이 있습니다. -
모듈 파일의 조건
- 모듈파일은 모듈스코프를 가져야 함: 모듈파일 안에서 선언한 변수나 함수는 파일 내에서만 사용가능해야함 → 파일 밖에서도 사용 가능하면 이름이 같은 변수나 함수들끼리의 혼동이 발생하기 때문.
<body>
  <script type="module" src="index.js"></script>
</body>- Live Server 설치하기 → golive 클릭
- export, import 사용해서 모듈스코프 밖에서도 사용가능
- 모듈 문법
// export
export function addMenu(data) {
  // 함수 body
};
// import
import {addMenu} from './add.js';
import {title as printerTitle, print } from './printer.js'; // as 키워드로 이름 변경
// printer.js
export const title = 'CodeitPrinter';
export function print(value) {
console.log(value);
};
// change name
import { title as printerTitle, print, printArr } from './printer.js';
import { title, data as members } from './members.js';
printer(title);
arrPrinter(members);
// all at once
import * as printerJS from './printer.js';
console.log(printerJS.title); // CodeitPrinter
console.log(printerJS.print); // ƒ print(value) { console.log(value); }
// default
import { default as printerJS } from './printer.js';
console.log(printerJS.title); // CodeitPrinter
console.log(printerJS.print); // ƒ print(value) { console.log(value); }
// orr
import printerJS from './printer.js';
console.log(printerJS.title); // CodeitPrinter
console.log(printerJS.print); // ƒ print(value) { console.log(value); }
// export: index.js
import { title, print } from './printer.js';
print(title);
// all at once
const title = 'CodeitPrinter';
function print(value) {
console.log(value);
}
function printArr(arr) {
arr.forEach((el, i) => {
console.log(`${i + 1}. ${el}`);
});
}
export { title as printerTitle, print, printArr };
// default
const title = 'CodeitPrinter';
function print(value) {
console.log(value);
}
export default print;-
export하는 모든 대상을 import하는 방법:
import * as printerJS from './printer.js'
*는 와일드카드 문자라고 불림
한번에 export하기:export {minji as mini},export {minji, zuzana} -
default export
export default 'codeit';등 하나의 대상만을 export함.
import codeit으로 import 가능
default는 한 모듈파일 안에서 한번만 붙일 수 있음
자바스크립트 객체지향 기본기
객체와 클래스
- 객체지향이란? 객체간의 상호작용을 중심으로 하는 프로그래밍 - 반의어로 절차지향프로그래밍이 있음.
- 객체란? 변수(객체의 상태를 나타냄, 프로퍼티), 함수(객체의 행동을 나타냄, 메소드)로 이루어짐
- 객체를 만드는 법 1: Object-Literal
중괄호 안에 프로퍼티와 메소드를 정의하는 것만으로도 객체를 생성
const user = {
  email: 'minzikx@gmail.com', // 프로퍼티들
  birthdate: '20030419',
  buy(item) { // 메소드
    console.log(`${this.email} buys ${item.name}`);
  }, // this는 현재 속해있는 전체 객체 (즉, user)를 나타냄
}- 객체를 만드는 법 2: Factory function
객체를 하나 추가할 때마다 코드의 양이 지나치게 길어지는 것을 방지하고자 함
객체를 생성하는 동작을 함수로 작성해서 생성하고자 할 때마다 함수를 호출하고, 프로퍼티값을 넘겨주며 생성할 수 있음! ← 객체의 형태가 동일할 때 사용 가능
function createUser(email, birthdate) {
  const user = {
    email,
    birthdate,
    buy(item) {
      console.log(`${this.email} buys ${item.name}`);
    },
  };
  return user;
}

const user1 = createUser('chris123@google.com', '19920321');
const user2 = createUser('jerry99@google.com', '19950719');
const user3 = createUser('alice@google.com', '19931224');
- 객체를 만드는 법 3: Constructor function
new를 붙여서 호출해야 함
함수 이름 중 첫번째 알파벳을 대문자로 작성함
function User(email, birthdate) {
  this.email = email;
  this.birthdate = birthdate;
  this.buy = function (item) {
    console.log(`${this.email} buys ${item.name}`);
  };
}

const user1 = new User('chris123@google.com', '1992-03-21');
const user2 = new User('jerry99@google.com', '1995-07-19');
const user3 = new User('alice@google.com', '1993-12-24');- 객체를 만드는 법 4: Class ⭐
class 키워드를 추가하고 그 안에 constructor 부분 두기 → constructor 안에 프로퍼티를 정의하고, 그 밖에 메소드를 정의하기
class User {
  constructor(email, birthdate) {
    this.email = email;
    this.birthdate = birthdate;
  }

  buy(item) {
    console.log(`${this.email} buys ${item.name}`);
  }
}

const user1 = new User('chris123@google.com', '1992-03-21');
const user2 = new User('jerry99@google.com', '1995-07-19');
const user3 = new User('alice@google.com', '1993-12-24');
예제
class Car {
  constructor(color, speed) {
    this.color = color;
    this.speed = speed;
  }

  run() {
    console.log(`Runs at ${this.speed}`);
  }
}

const car1 = new Car('blue', '100km/h');

car1.run();- 객체 지향 프로그래밍이 가능한 언어들의 종류 2가지:
클래스 기반의 객체 지향 언어 → Java
프로토타입 기반의 객체 지향 언어 → JavaScript
객체지향프로그래밍의 4개의 기둥
- 추상화(Abstraction)
주의점: 클래스, 프로퍼티, 메소드의 이름을 잘 작명하고 코멘트나 설명문서 작성하기
class BankAccount {
  constructor(name, money) {
    this.holder = name;
    this.balance = money;
  }

  deposit(money) {
    this.balance += money;
  }

  withdraw(money) {
    if (this.balance - money < 0) {
      console.log('Insufficient balance');
    } else {
      this.balance -= money;
    }
  }

  transfer(money, anotherAccount) {
    const account = anotherAccount;
    if (this.balance - money < 0) {
      console.log('Insufficient balance');
    } else {
      this.balance -= money;
      account.balance += money;
    }
  }
}
class User {
constructor(email, birthdate) {
// 사용자의 이메일 주소
this.email = email;
// 사용자의 생일
this.birthdate = birthdate;
}
// 물건 구매하기
buy(item) {
console.log(`${this.email} buys ${item.name}`);
}
}
- 캡슐화(Encapsulation): 객체의 특정 프로퍼티에 직접 접근하지 못하도록 막는 것
아래의 코드에서_email프로퍼티에 직접 접근하지 말고 email이라는 getter/setter 메소드로만 접근해야 함.
class User {
  constructor(email, birthdate) {
    this.email = email;
    this.birthdate = birthdate;
  }

  buy(item) {
    console.log(`${this.email} buys ${item.name}`);
  }

  get email() {
    return this._email;
  }

  set email(address) {
    if (address.includes('@')) {
      this._email = address;
    } else {
      throw new Error('invalid email address');
    }
  }
}

const user1 = new User('chris123@google.com', '1992-03-21');
user1.email = 'newChris123@google.com';
console.log(user1.email);
그러나 위의 코드조차 완벽히 캡슐화가 된 상태는 아님
보호하려는 프로퍼티 _email에 아래와 같이 접근이 가능하기 때문
console.log(user1._email);
user1._email = 'chris robert';
사실 자바스크립트에는 캡슐화를 자체적으로 지원하는 문법이 아직 없음(Java는 private이라는 키워드가 있어서 언어의 문법 차원에서 캡슐화를 지원)
- JavaScript에서 우회를 통해 완벽한 캡슐화를 하는 방법: 클로저(Closure) 개념 응용
function createUser(email, birthdate) { // Factory function
  let _email = email;

  const user = {
    birthdate,

    get email() {
      return _email;
    },

    set email(address) {
      if (address.includes('@')) {
        _email = address;
      } else {
        throw new Error('invalid email address');
      }
    },
  };

  return user;
}

const user1 = createUser('chris123@google.com', '19920321');
console.log(user1.email);
지금 마지막 부분에서 createUser라는 Factory function으로 user1이라는 객체를 생성하고, user1 객체의 email getter 메소드를 호출했는데요. 이 코드의 실행 결과를 확인해보면, _email 변수의 값이 잘 출력됩니다. 함수 안의 변수의 값을 이미 리턴된 객체에서 읽은 건데요. 어떻게 이게 가능한 걸까요? 이것은 자바스크립트의 클로저(Closure)라고 하는 것 덕분에 가능합니다.
클로저: 자바스크립트에서 어떤 함수와 그 함수가 참조할 수 있는 값들로 이루어진 환경을 하나로 묶은 것
예를 들어, 지금 createUser 함수가 실행되는 시점에 email이라는 getter/setter 메소드는 _email 이라는 변수의 값에 접근할 수 있는 상태이고, email getter/setter 메소드들은 메소드를 갖고 있는 객체가 리턴된 이후더라도 여전히 _email에 접근하는 것이 가능하다
바로 이렇게 함수가 정의된 당시에 참조할 수 있었던 변수들을 계속 참조할 수 있는 상태의 함수를 클로저라고 한다
- 메소드의 캡슐화 예시:
function createUser(email, birthdate) {
  const _email = email;
  let _point = 0;

  function increasePoint() {
    _point += 1;
  }

  const user = {
    birthdate,

    get email() {
      return _email;
    },

    get point() {
      return _point;
    },

    buy(item) {
      console.log(`${this.email} buys ${item.name}`);
      increasePoint();
    },
  };

  return user;
}

const item = {
  name: '스웨터',
  price: 30000,
};

const user1 = createUser('chris123@google.com', '19920321');
user1.buy(item);
user1.buy(item);
user1.buy(item);
console.log(user1.point);
- 상속(Inheritance): 하나의 객체가 다른 객체의 프로퍼티와 메소드를 물려받는 현상
class PremiumUser extends User {
- super: 자식클래스로 객체를 만들기 위해서는 반드시 그 생성자 함수(constructor) 안에서 super를 호출해서 부모클래스의 생성자들을 먼저 호출해줘야함
class PremiumUser extends User {
  constructor(email, birthdate, level) {
    super(email, birthdate); // 부모클래스의 생성자들 호출!
    this.level = level;
  }
};
class User {
constructor(email, birthdate) {
this.email = email;
this.birthdate = birthdate;
}
buy(item) {
console.log(`${this.email} buys ${item.name}`);
}
}
class PremiumUser extends User {
constructor(email, birthdate, level) {
super(email, birthdate);
this.level = level;
}
streamMusicForFree() {
console.log(`Free music streaming for ${this.email}`);
}
}
- 다형성(Polymorphism): 많은 형태를 가지고 있는 성질
오버라이딩(overriding)이 발생함
class User {
  constructor(email, birthdate) {
    this.email = email;
    this.birthdate = birthdate;
  }

  buy(item) {
    console.log(`${this.email} buys ${item.name}`);
  }
}

class PremiumUser extends User {
  constructor(email, birthdate, level) {
    super(email, birthdate);
    this.level = level;
  }

  buy(item) {
    console.log(`${this.email} buys ${item.name} with a 5% discount`);
  }

  streamMusicForFree() {
    console.log(`Free music streaming for ${this.email}`);
  }
}

const item = {
  name: '스웨터',
  price: 30000,
};

const user1 = new User('chris123@google.com', '19920321');
const user2 = new User('rachel@google.com', '19880516');
const user3 = new User('brian@google.com', '20051125');
const pUser1 = new PremiumUser('niceguy@google.com', '19891207', 3);
const pUser2 = new PremiumUser('helloMike@google.com', '19900915', 2);
const pUser3 = new PremiumUser('aliceKim@google.com', '20010722', 5);

const users = [user1, pUser1, user2, pUser2, user3, pUser3];

users.forEach((user) => {
  user.buy(item);
});
- 예제:
class BankAccount {
  constructor(name, money) {
    this.holder = name;
    this.balance = money;
  }

  get balance() {
    return this._balance;
  }

  set balance(money) {
    if (money >= 0) {
      this._balance = money;
    } else {
      console.log('Not valid');
    }
  }

  deposit(money) {
    this.balance += money;
  }

  withdraw(money) {
    if (this.balance - money < 0) {
      console.log('Insufficient balance');
    } else {
      this.balance -= money;
    }
  }

  transfer(money, anotherAccount) {
    const account = anotherAccount;
    if (this.balance - money < 0) {
      console.log('Insufficient balance');
    } else {
      this.balance -= money;
      account.balance += money;
    }
  }
}

class SavingsAccount extends BankAccount {
  constructor(name, money){
    super(name, money);
    this.years = 0;
  }

  addInterest(rate) {
    this.balance *= (1 + (rate * this.years));
  }

  transfer(money, anotherAccount) {
    super.transfer(money, anotherAccount);
    this.balance -= money * 0.005;
  }
}

class DonationAccount extends BankAccount {
  constructor(name, money, rate) {
    super(name, money);
    this.rate = rate;
  }

  donate(rate) {
    this.balance *= (1 - this.rate);
  }

  transfer(money, anotherAccount) {
    super.transfer(money, anotherAccount);
    this.balance -= money * 0.002;
  }
}

const ba1 = new BankAccount('Tom', 20000000);
const sa1 = new SavingsAccount('Jerry', 10000000);
const da1 = new DonationAccount('Kate', 30000000);
const sa2 = new SavingsAccount('Alice', 9000000);

const accountForVacation = new BankAccount('Vacation', 0);

const accounts = [ba1, sa1, da1, sa2];

for(account of accounts) {
  account.transfer(800000, accountForVacation);
}

console.log(ba1.balance);
console.log(sa1.balance);
console.log(da1.balance);
console.log(sa2.balance);
console.log(accountForVacation.balance);
-
instanceof :
[A 클래스로 만든 객체] instanceof [A 클래스]를 하면 true가 리턴된다.
[자식 클래스로 만든 객체] instanceof [부모 클래스]를 하면 false가 리턴된다
→ 어느 클래스가 생성한 객체인지 확인 가능 (이 때, 자식클래스로 만든 객체는 부모클래스로 만든 객체로도 인정됨) -
static 프로퍼티, static 메소드: 클래스에 직접적으로 딸려있는 프로퍼티와 메소드 (객체가 아닌 클래스로 접근!)
예: date, math 등 -
예제와는 달리 실무에서는 각 클래스를 개별파일에 하나씩 작성하는 것이 더 보편적임
자바스크립트 웹 개발 기본기
웹 기초 다지기
-
fetch 함수
call-back 함수: 서버의 리스폰스가 오는 등 나중에 어떤 조건이 만족되었을 때 실행되는 함수,then메소드 사용, 프로미스 객체 생성 -
response 객체
fetch('https://www.google.com')
  .then((response) => response.text())
  .then((result) => { console.log(result); });
fetch 함수의 실행 원리: fetch 함수는 Promise 객체를 리턴함
이 객체의 then 메소드로, '리스폰스가 왔을 때 실행할 콜백'을 등록할 수 있음
이렇게 등록된 콜백들은 then 메소드로 등록한 순서대로 실행되고, 이때 이전 콜백의 리턴값을 이후 콜백이 넘겨받아서 사용이 가능함
-
개발자 도구
구글 제공 공식 설명 링크: https://developers.google.com/web/tools/chrome-devtools
개발자도구 실행 단축키: Ctrl 키 + Shift 키 + 알파벳 i 키 -
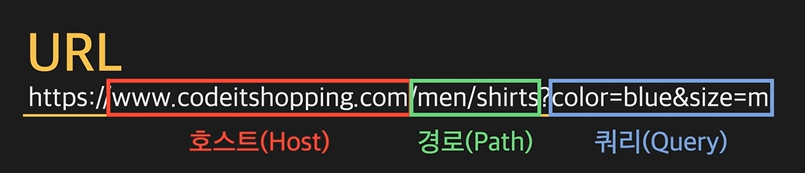
URL(Uniform Resource Locator)
-
HTTP

Web API 배우기
- JSON(JavaScript Object Notation): 서버가 보내주는 리스폰스의 종류
- JSON vs. Javascript
- JSON에는 프로퍼티의 이름과 값을 표현하는 방식에 제한이 있습니다.
(1) JSON에서는 각 프로퍼티의 이름을 반드시 큰따옴표(")로 감싸줘야 합니다.
// member 객체 생성
const member = {
  name: 'Michael Kim',
  height: 180,
  weight: 70,
  hobbies: ['Basketball', 'Listening to music']
};
자바스크립트에는 객체를 생성할 수 있는 여러 가지 방법이 있는데요. 그중 한 가지는 이런 식으로 중괄호('{ }') 안에 객체의 프로퍼티의 이름(키)과 값(밸류)쌍을 순서대로 나열해서 생성하는 방법입니다. 지금 보이는 표기를 Object Literal이라고 하는데요. Object Literal을 쓸 때는 문법에 약간의 유연함이 있습니다. 저는 지금 member 객체의 각 프로퍼티의 이름인 name, height, weight, hobbies에 큰따옴표를 붙이지 않았는데요. Object Literal에서는 이렇게 프로퍼티의 이름에 큰따옴표를 붙이지 않아도 되고,
const member = {
  "name": 'Michael Kim',
  "height": 180,
  "weight": 70,
  "hobbies": ['Basketball', 'Listening to music']
};
이렇게 큰따옴표를 붙여도 됩니다.
하지만 JSON의 경우에는 프로퍼티의 이름에 반드시 큰따옴표를 붙여줘야만 합니다.
{
   "name":"Michael Kim",
   "height":180,
   "weight":70,
   "hobbies":["Basketball", "Listening to music"]
}
지금 각 프로퍼티의 이름이 모두 큰따옴표로 둘러싸여 있죠? 이렇게 JSON에서는 각 프로퍼티의 이름을 반드시 큰따옴표로 감싸주어야 합니다. 큰따옴표로 감싸주지 않으면 JSON을 처리하려고 할 때 에러가 납니다.
(2) JSON에서는 값이 문자열인 경우 큰따옴표(")를 사용해야 합니다.
const member = {
  "name": 'Michael Kim',
  "height": 180,
  "weight": 70,
  "hobbies": ['Basketball', 'Listening to music']
};
잠깐 member 객체를 다시 볼게요. 지금 name 프로퍼티의 값으로 'Michael Kim'이라는 문자열이 들어가 있죠? 자바스크립트에서는 문자열을 나타낼 때, 이렇게 작은따옴표(')를 써도 되고, 큰따옴표(")를 써서 "Michael Kim"이라고 써도 됩니다.
하지만 JSON에서는 문자열 값을
{
   "name":"Michael Kim",
   "height":180,
   "weight":70,
   "hobbies":["Basketball", "Listening to music"]
}
지금 보이는 "Michael Kim", "Basketball", "Listening to music"처럼 항상 큰따옴표로 감싸서 적어줘야만 합니다.
-
JSON에서는 표현할 수 없는 값들이 있습니다.
자바스크립트에서는 프로퍼티의 값으로 사용할 수 있는 undefined, NaN, Infinity 등을 JSON에서는 사용할 수 없습니다. 참고로, JSON은 비록 자바스크립트로부터 비롯된 데이터 포맷이지만, 그 탄생 목적은 언어나 환경에 종속되지 않고, 언제 어디서든 사용할 수 있는 데이터 포맷이 되는 것이었습니다. 따라서 자바스크립트의 문법에서만 유효한 개념을 JSON에서는 나타낼 수 없다는 것은 어찌 보면 당연한 결과입니다. -
JSON에는 주석을 추가할 수 없습니다.
JSON은 코드가 아니라 데이터 포맷이기 때문에 그 안에 주석을 포함시킬 수 없습니다.
- JSON 데이터를 객체로 변환하기: JSON이라는 객체의 parse라는 메소드를 사용해서 String 타입의 JSON 데이터를 자바스크립트 객체로 변환 가능하다
- 반대의 경우: stringify
{ const users = JSON.parse(result) }-
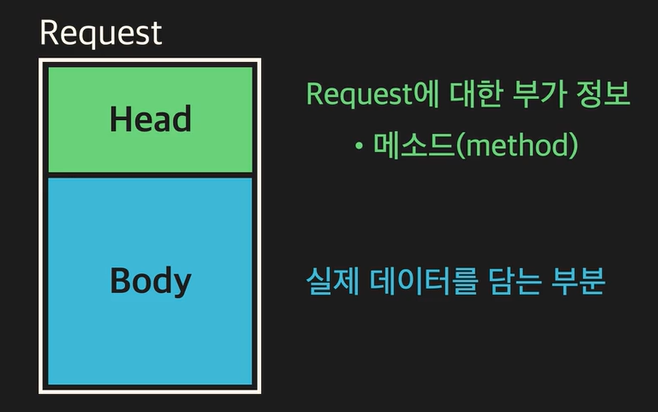
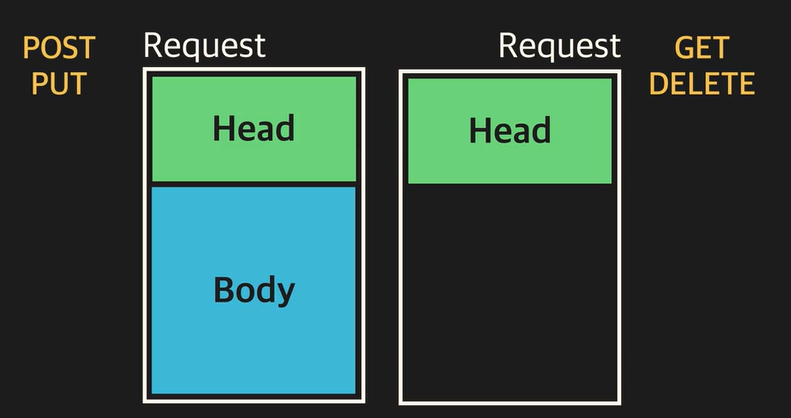
Request의 Head와 Body

-
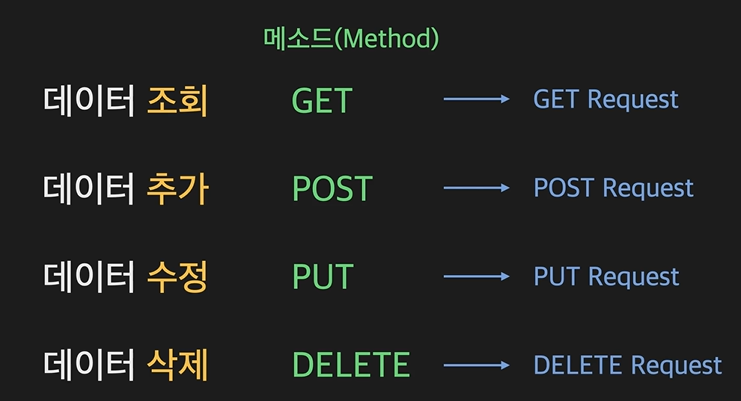
POST request, PUT request
새 데이터를 추가하는 리퀘스트 - POST
기존 데이터를 수정하는 리퀘스트 - PUT -
GET request, Delete request
기존 데이터를 조회하는 리퀘스트 - GET
기존 데이터를 삭제하는 리퀘스트 - DELETE -
Web API, REST API
https://www.codeit.kr/topics/basics-of-js-web-dev/lessons/4353
https://www.codeit.kr/topics/basics-of-js-web-dev/lessons/4355 -
Status Code: response의 head 부분
각각의 상태 코드에는 대응되는 상태 메시지가 있고, 100번대부터 500번대까지 각 100 단위로 응답의 종류가 다름.
예: 200번은 OK, 404번은 Not Found
// status로 Status Code 출력 가능
fetch('https://www.google.com')
  .then((response) => {
    console.log(response.status);
});- Content-type 헤더: 현재 리퀘스트 또는 리스폰스의 바디에 들어 있는 데이터가 어떤 타입인지를 나타내는 헤더
- Content-type 설정해보기
const newMember = {
  name: 'Jerry',
  email: 'jerry@codeit.kr',
  department: 'engineering',
};

fetch('https://learn.codeit.kr/api/members', {
  method: 'POST',
  headers: { // 추가된 부분
    'Content-Type': 'application/json',
  },
  body: JSON.stringify(newMember),
})
  .then((response) => response.text())
  .then((result) => { console.log(result); });
https://www.codeit.kr/topics/basics-of-js-web-dev/lessons/4361
https://www.codeit.kr/topics/basics-of-js-web-dev/lessons/4362
비동기 실행과 Promise 객체
- fetch함수의
.then들은 가장 마지막에 실행됨
console.log('Start!');

fetch('https://www.google.com')
  .then((response) => response.text()) // 콜백
  .then((result) => { console.log(result); }); // 콜백

console.log('End'); - 동기실행과 비동기 실행
동기 실행: 한번 시작한 작업을 완료하기 전까지 코드의 실행 흐름이 절대 그 다음 코드로 넘어가지 않아, 코드가 보이는 순서대로 실행됨
비동기 실행: 한번 작업을 시작해두고 그 작업이 완료되기 전이더라도 콜백만 등록해두고 코드의 실행 흐름이 바로 그 다음 코드로 넘어간 후에 특정 조건이 만족되면 콜백이 실행됨으로써 해당 작업을 완료하므로 코드가 꼭 등장하는 순서대로 실행되는 것은 아님
비동기 실행의 존재 이유: response를 기다리는 시간을 낭비하지 않기 위해

- 비동기 실행 함수들
- setTimeout 함수: 특정 함수의 실행을 원하는 시간만큼 뒤로 미루기 위해 사용
console.log('a');
setTimeout(() => { console.log('b'); }, 2000);
console.log('c');
위의 코드에서, () ⇒ { console.log('b'); },를 2000밀리세컨드(=2초) 미룸
2. setInterval 함수: 특정 콜백을 일정한 시간 간격으로 실행하도록 등록하는 함수 (Interval는 '간격'이라는 뜻!)
console.log('a');
setInterval(() => { console.log('b'); }, 2000);
console.log('c');
- addEventListener 메소드
만약 사용자가 웹 페이지에서 어떤 버튼 등을 클릭했을 때, 실행하고 싶은 함수가 있다면
(1) 해당 DOM 객체의 onclick 속성에 그 함수를 설정하거나,
(2) 해당 DOM 객체의 addEventListener 메소드의 파라미터로 전달할 수 있음
// onclick
...

btn.onclick = function (e) { // 해당 이벤트 객체가 파라미터 e로 넘어옵니다.
  console.log('Hello Codeit!');
};

// 또는 arrow function 형식으로 이렇게 나타낼 수도 있습니다.
btn.onclick = (e) => {
  console.log('Hello Codeit!');
};

// addEventListener
...

btn.addEventListener('click', function (e) { // 해당 이벤트 객체가 파라미터 e로 넘어옵니다.
  console.log('Hello Codeit!');
});

// 또는 arrow function 형식으로 이렇게 나타낼 수도 있습니다.
btn.addEventListener('click', (e) => {
  console.log('Hello Codeit!');
});- 비동기 실행함수 정리:
setTimeout(콜백, 시간)
setInterval(콜백, 시간)
addEventListener(이벤트 이름, 콜백)
fetch('https://www.google.com')
  .then((response) => response.text()) // fetch 함수가 리턴하는 객체의 then 메소드를 사용해서 콜백을 등록
// 작업 성공 결과가 response에 담김
  .then((result) => { console.log(result); });
왜 fetch함수만 사용 형식이 다를까? Promise 객체를 리턴하기 때문!
-
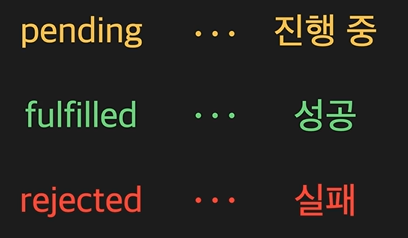
Promise 객체: 작업에 관한 상태정보를 가지고 있는 객체
.then은 promise 객체가 pending에서 fulfilled 상태가 될 때 실행할 콜백을 등록하는 메소드, fetch 함수는 promise 객체를 리턴함 -
promise 객체의 3가지 상태

fulfilled 상태에서 promise 객체는 해당 작업의 성공 결과도 함께 가짐. fetch 함수의 경우에는 서버가 보내준 리스펀스가 작업 성공 결과에 해당함.
rejected 상태에서 promise 객체는 해당 작업 실패 이유에 관한 정보를 함께 가짐. -
Promise Chaining: promise 객체에 then 메소드를 연속적으로 붙여서 연결해나가는 것
then 메소드는 새로운 promise 객체를 리턴하므로 가능함 (이 때 fulfilled, rejected는 첫 fetch함수와 일치함) -
text, JSON 메소드도 Promise 객체를 리턴함
- text 메소드: fetch 함수로 리스폰스를 잘 받으면 response 객체의 text 메소드는 fulfilled 상태이면서 리스폰스의 바디에 있는 내용을 string 타입으로 변환한 값을 '작업 성공 결과'로 가진 Promise 객체를 리턴하며, 이 때 작업 성공 결과는 string 타입
만약 JSON 데이터라면JSON.parse(result);처리해주기 - json 메소드: fetch 함수로 리스폰스를 잘 받으면 response 객체의 json 메소드는 fulfilled 상태이면서 리스폰스의 바디에 있는 JSON 데이터를 자바스크립트 객체로 Deserialize해서 생겨난 객체를 '작업 성공 결과'로 가진 Promise 객체를 리턴함. 이 때 만약 리스폰스의 바디에 있는 내용이 JSON 타입이 아니라면 에러가 발생하고 Promise 객체는 rejected 상태가 되면서 그 '작업 실패 정보'를 가지게 됨
- Promise Chaining의 필요성: 비동기 작업을 순차적으로 시행해야 할 때 전체 코드를 좀 더 깔끔하게 나타내기 위해서 사용함
/*
기존 직원 정보에 신입 직원들의 정보를 추가한 다음, 모든 직원들의 명단을 출력할 것. 이 때,
두 번째 then 메소드에서 interviewee의 result가 pass인 직원 정보를 담은 newMembers를 return
세 번째 then 메소드에서 fetch 메소드의 body에 새로운 직원 정보를 직렬화하여 추가하는 리퀘스트를 보냈다.
네 번째 then 메소드에서 새로운 직원 정보의 추가가 잘 되었을 때 모든 직원 정보를 가져오는 리퀘스트를 보냈다.
총 직원 수와 모든 직원의 정보가 올바르게 출력된다.
*/
fetch('https://learn.codeit.kr/api/interviews/summer')
  .then((response) => response.json())
  .then((interviewResult) => {
    const { interviewees } = interviewResult;
    const newMembers = interviewees.filter((interviewee) => interviewee.result === 'pass');
    return newMembers;
  })
  .then((newMembers) => fetch('https://learn.codeit.kr/api/members', {
    method: 'POST',
    body: JSON.stringify(newMembers),
  }))
  .then((response) => {
    if (response.status === 200) {
      return fetch('https://learn.codeit.kr/api/members');
    } else {
      throw new Error('New members not added');
    }
  })
  .then((response) => response.json())
  .then((members) => {
    console.log(`총 직원 수: ${members.length}`);
    console.log(members);
});- Promise 객체가 rejected 상태가 되면 실행할 콜백:
.then(fulfilled 상태에서 실행할 콜백, rejected 상태에서 실행할 콜백)→ 각각 작업 실행 결과, 작업 실패 정보가 파라미터로 return됨const successCallback = function () { }; const errorCallback = function () { };
fetch('https://jsonplaceholder.typicode.com/users') // Promise-A
.then(successCallback, errorCallback); // Promise-B
- fetch 함수의 작업이 성공해서 Promise-A 객체가 fulfilled 상태가 된 경우: then 메소드 안의 "첫 번째" 콜백인 successCallback이 실행되고 결과로 작업 성공 결과를 가짐
- fetch 함수의 작업이 실패해서 Promise-A 객체가 rejected 상태가 된 경우: then 메소드 안의 "두 번째" 콜백인 errorCallback이 실행되고 결과로 작업 실패 정보를 가짐
```js
/*
Case(1) : 콜백에서 Promise 객체를 리턴
Case(2) : 콜백에서 Promise 객체가 아닌 일반적인 값을 리턴
Case(3) : 콜백에서 아무것도 리턴하지 않음
Case(4) : 콜백 실행 중 에러 발생
Case(5) : 콜백이 실행되지 않음
*/
fetch('https://jsonplaceholder.typicode.com/users')
  .then((response) => {
    // return response.json(); // <- Case(1)
    // return 10; // <- Case(2)
    // // <- Case(3)
    // throw new Error('failed'); // <- Case(4)
})
  .then((result) => {
    console.log(result);
  });

// 존재하지 않는 URL
/* fetch('https://jsonplaceholder.typicode.commmmmm/users')
  .then((response) => response.json()) // <- Case(5)
  .then((result) => { }, (error) => { console.log(error) }); */
콜백에서 문자열 'Success' 리턴 ⇒ A는 fulfilled 상태가 되고, 문자열 'Success'를 작업 성공 결과로 갖는다.
콜백에서 pending 상태의 Promise 객체(B)를 리턴 ⇒ A는 B가 나중에 갖게되는 상태과 결과를 그대로 따라서 갖게 된다.
콜백에서 에러가 발생했을 때 ⇒ A는 rejected 상태가 되고, 해당 에러 객체를 작업 실패 정보로 갖게 된다.
아무런 콜백도 실행되지 않을 때 ⇒ A는, 호출된 then 메소드를 갖고 있는 이전 Promise 객체와 동일한 상태와 결과를 갖게 된다.
자바스크립트에서는 함수가 아무것도 리턴하지 않으면, undefined를 리턴한 것으로 봅니다. 따라서 콜백에서 아무것도 리턴하지 않아도 undefined를 리턴한 것으로 보아서, A는 fulfilled 상태가 되고, 작업 성공 결과로 undefined를 갖게 됩니다.
- catch 메소드를 이용해서 rejected 상태에서 실행할 콜백을 등록하기
catch 메소드는 사실 then 메소드의 첫 번째 인자로 undefined을 넣은 것과 같다
// Internet Disconnected

fetch('https://jsonplaceholder.typicode.com/users')
  .then((response) => response.text())
  .catch((error) => { console.log(error); })
.then((result) => { console.log(result); });-
catch 메소드를 가장 마지막에 적어야 fetch 메소드의 작업이 실패해서 발생하는 오류와 인위적으로 발생시키는 오류(인터넷이슈, URL 부정확)들에 모두 대응할 수 있음
.catch(callback)==.then(undefined, callback) -
finally 메소드: 만약 어떤 작업의 성공과 실패여부에 무관하게, 즉, promise 객체가 fulfilled 상태이건 rejected 상태이건 상관없이 실행하고자 하는 콜백을 등록하는 메소드로, 파라미터가 필요하지 않음
-
Promise 객체의 등장 이유
- 아래의 코드와 같이 함수에 콜백을 직접 넣는 형식은 콜백 헬(callback hell)이라고 하는 문제를 일으킬 수도 있기 때문
- Promise 객체 문법에는 pending, fulfilled, rejected 상태, 작업 성공 결과 및 작업 실패 정보(이유), then, catch, finally 메소드 등과 같은 비동기 작업에 관한 보다 정교한 설계가 문법 자체에 반영
setTimeout(callback, milliseconds);
addEventListener(eventname, callback);
fetch('https://first.com', callback)- 직접 만드는 promise 객체(promisify)의 용도
- 전통적인 형식의 비동기 실행 함수를 사용하는 코드를, Promise 기반의 코드로 변환하기 위해 주로 사용
- 콜백 헬(콜백 지옥, callback hell) 현상: 콜백을 바로 파라미터에 집어넣는 전통적인 형식의 비동기 실행 함수들에서 발생하는 문제로 순차적으로 비동기 실행 함수들을 실행하려고 하면 콜백 안에 또 콜백이 있고, 그 안에 또 콜백이 있는 현상 ← 해결책!
-
직접 만든 promise 객체로 대체가 가능한 함수: 기존의 비동기 실행 함수들 중에서도 그 콜백을 한번만 실행하는 것들(setTimeout, readFile 등)만 Promisify해서 사용해도 괜찮음
-
직접 만든 promise 객체로 대체가 불가능한 함수:콜백을 여러 번 실행하는 함수들(setInterval, addEventListener 등) - 이유: Promise 객체는 한번 pending 상태에서 fulfilled 또는 rejected 상태가 되고나면 그 뒤로는 그 상태와 결과가 바뀌지 않기 때문
// new로 객체를 만듦
const p = new Promise((resolve, reject) => {
// executor 함수
// resolve: 생성될 promise 객체를 fulfilled 상태로 만들 수 있는 함수가 연결됨
// reject: 생성될 promise 객체를 rejected 상태로 만들 수 있는 함수가 연결됨
});
- 이미 상태가 결정된 Promise 객체 만들기
pending 상태에 있다가 fulfilled 상태 또는 rejected 상태가 되는 Promise 객체가 아닌, 아예 처음부터 바로 fulfilled 상태이거나 rejected 상태인 Promise 객체 만들기
// fulfilled 상태의 Promise 객체 만들기
const p = Promise.resolve('success');
// rejected 상태의 Promise 객체 만들기
const p = Promise.reject(new Error('fail'));- 여러 promise 객체를 다룰 때 사용되는 promise의 메소드
- All 메소드: all 메소드는 then 메소드처럼 새로운 Promise 객체를 리턴하고 이렇게 아규먼트로 들어온 배열 안에 있는 모든 Promise 객체가 pending 상태에서 fulfilled 상태가 될 때까지 기다린 후 각 Promise 객체의 작업 성공 결과들로 이루어진 배열을 그 작업 성공 결과로 갖게 됨
// 1번 직원 정보
const p1 = fetch('https://learn.codeit.kr/api/members/1').then((res) => res.json());
// 2번 직원 정보
const p2 = fetch('https://learn.codeit.kr/api/members/2').then((res) => res.json());
// 3번 직원 정보
const p3 = fetch('https://learn.codeit.kr/api/members/3').then((res) => res.json());

Promise
  .all([p1, p2, p3])
  .then((results) => {
    console.log(results); // Array : [1번 직원 정보, 2번 직원 정보, 3번 직원 정보]
  });
- Race 메소드
race 메소드는 all 메소드와 마찬가지로 여러 Promise 객체들이 있는 배열을 아규먼트로 받고 all 메소드처럼 Promise 객체를 리턴하지만 그 적용 원리가 다름
race 메소드가 리턴한 Promise 객체는 아규먼트로 들어온 배열의 여러 Promise 객체들 중에서
가장 먼저 fulfilled 상태 또는 rejected 상태가 된 Promise 객체와 동일한 상태와 결과를 갖게 됨
-
allSettled 메소드 : 배열 내의 모든 Promise 객체가 fulfilled 또는 rejected 상태가 되기까지 기다리고, pending 상태의 Promise 객체가 하나도 없게 되면, 리턴한 Promise 객체의 상태값은 fulfilled 상태가 되고 그 작업 성공 결과로, 하나의 배열을 갖게 됨
-
any 메소드 : 여러 Promise 객체들 중에서 가장 먼저 fulfilled 상태가 된 Promise 객체의 상태와 결과가 리턴한 Promise 객체에도 똑같이 반영됩니다. 만약 모든 Promise 객체가 rejected 상태가 되어버리면 AggregateError라고 하는 에러를 작업 실패 정보로 갖고 rejected 상태가 됩니다. any라는 단어의 뜻처럼 배열 속의 Promise 객체 중 단 하나라도 fulfilled 상태가 되면 되는 겁니다.
- Axios
fetch 함수가 아닌, axios 라고 하는 외부 패키지를 사용해서 Ajax 통신 가능
// axios 패키지에서 제공하는 axios 객체를 사용해서 GET 리퀘스트를 보내고 그 리스폰스를 받는 코드
axios
  .get('https://jsonplaceholder.typicode.com/users')
  .then((response) => {
    console.log(response);
  })
  .catch((error) => {
    console.log(error);
}); // fetch 함수처럼 promise 객체를 리턴- fetch 함수에는 없는 axios만의 기능 및 장점들:
- 모든 리퀘스트, 리스폰스에 대한 공통 설정 및 공통된 전처리 함수 삽입 가능
- serialization, deserialization을 자동으로 수행
- 특정 리퀘스트에 대해 얼마나 오랫동안 리스폰스가 오지 않으면 리퀘스트를 취소할지 설정 가능(request timeout)
- 업로드 시 진행 상태 정보를 얻을 수 있음
- 리퀘스트 취소 기능 지원
- 단점: 별도의 다운로드가 필요한 패키지임
fetch 함수는 웹 브라우저에서 바로 지원되는 함수이기 때문에 별도로 패키지를 다운로드받지 않아도 되지만, axios는 별도로 패키지를 다운로드해줘야 함
→ 따라서 axios에서 제공하는 추가 기능이 필요한 경우에는 axios를 쓰고, 그런 기능이 필요하지 않고 별도의 패키지 다운로드를 원하지 않는 경우에는 fetch 함수를 사용
async/await을 활용한 세련된 비동기 코드
-
async/await 구문
async는 함수 안에 비동기적으로 실행할 부분이 있다는 뜻으로, 이 부분을 지칭하는 것이await임
await는 뒤에 있는 코드를 실행하고 그것이 리턴하는 promise 객체가 fulfilled 상태가 될 때까지 기다린 후 작업 성공 결과를 추출해서 리턴하기.
await키워드는async함수 안에서만 사용이 가능함 -
동기코드처럼 생긴 비동기 실행코드 ,,,,
(1) 개발자가 더 편하게 작성할 수 있도록 하고
(2) 코드의 가독성을 높이기 위해서
/* fetch('https://www.google.com')
    .then((response) => response.text())
    .then((result) => { console.log(result); }); */

async function fetchAndPrint() {
  console.log(2);
  const response = await fetch('https://jsonplaceholder.typicode.com/users');
  console.log(7);
  const result = await response.text();
  console.log(result);
}

console.log(1);
fetchAndPrint();
console.log(3);
console.log(4);
console.log(5);
console.log(6);
// promising Chaining
async function getTheLastPostOfTheLastUser() {
  const usersJSON = await fetch("https://jsonplaceholder.typicode.com/users");
  const users = await usersJSON.json();
  const lastUser = users[users.length - 1];
  const { id } = lastUser;
  const postsJSON = await fetch(`https://jsonplaceholder.typicode.com/posts?userId=${id}`);
  const posts = await postsJSON.json();
  const lastPost = posts[posts.length - 1];
  return lastPost;
}

getTheLastPostOfTheLastUser().then((lastPost) => {
  console.log(lastPost);
});
// async/await
fetch("https://jsonplaceholder.typicode.com/users")
  .then((response) => response.json())
  .then((users) => {
    const lastUser = users[users.length - 1];
    return lastUser.id;
  })
  .then((id) => fetch(`https://jsonplaceholder.typicode.com/posts?userId=${id}`))
  .then((response) => response.json())
  .then((posts) => {
    const lastPost = posts[posts.length - 1];
    console.log(lastPost);
  });

async function getTheLastPostOfTheLastUser() {
  const usersJSON = await fetch("https://jsonplaceholder.typicode.com/users");
  const users = await usersJSON.json();
  const lastUser = users[users.length - 1];
  const { id } = lastUser;
  const postsJSON = await fetch(`https://jsonplaceholder.typicode.com/posts?userId=${id}`);
  const posts = await postsJSON.json();
  const lastPost = posts[posts.length - 1];
  return lastPost;
}

getTheLastPostOfTheLastUser().then((lastPost) => {
  console.log(lastPost);
});
const p1 = fetch('https://jsonplaceholder.typicode.com/users?id=1')
.then((response) => response.text());
const p2 = new Promise((resolve, reject) => {
setTimeout(() => { resolve('hello'); }, 2000);
});
const p3 = Promise.resolve('Success');
// const p4 = Promise.reject(new Error('Fail'));
async function test() {
console.log(await p1);
console.log(await p2);
console.log(await p3);
// console.log(await p4);
}
console.log('----Start----');
test();
console.log('-----End----');- 퀴즈
// 출력: Start, End, response 내용
async function fetchAndPrint() {
  const response = await fetch('https://www.google.com');
  const result = await response.text();
  console.log(result);
}

console.log('Start');
fetchAndPrint();
console.log('End');
// 출력: JavaScript - Programming - success - fail - last
async function test1() {
const result = await Promise.resolve('success');
console.log(result);
}
async function test2() {
try {
const p = new Promise((resolve, reject) => {
setTimeout(() => { resolve('last'); }, 3000);
});
const result = await p;
console.log(result);
} catch (e) {
console.log(e);
}
}
async function test3() {
try {
const result = await Promise.reject('fail');
console.log(result);
} catch (e) {
console.log(e);
}
}
test1();
console.log('JavaScript');
test2();
console.log('Programming');
test3();try, catch, finally문
- try, catch, finally문의 위치
async function fetchAndPrint()
{
  try {
    const response = await fetch('https://google.com');
    const result = await response.text();
    console.log(result);
  } catch (error) {
    console.log(error);
  }
}
async함수가 리턴하는 promise 객체
- return값 O
(1) Promise 객체를 리턴하는 경우: async 함수 안에서 Promise 객체를 리턴하는 경우에는 해당 Promise 객체와 동일한 상태와 작업 성공 결과(or 작업 실패 정보)를 가진 Promise 객체를 리턴
async function fetchAndPrint() {
  return new Promise((resolve, reject)=> {
    setTimeout(() => { resolve('abc'); }, 4000);
  });
}

fetchAndPrint();
(2) Promise 객체 이외의 값을 리턴하는 경우: async 함수 내부에서 Promise 객체 이외에 숫자나 문자열, 일반 객체 등을 리턴하는 경우에는fulfilled 상태이면서 리턴된 값을 작업 성공 결과로 가진 Promise 객체를 리턴
async function fetchAndPrint() {
  return 3;
}

fetchAndPrint();- return값 X: 함수에서 아무런 값도 리턴하지 않으면 undefined를 리턴한 것으로 간주함
async function fetchAndPrint() {
  console.log('Hello Programming!');
}

fetchAndPrint();- async 함수 내부에서 에러가 발생했을 때: rejected 상태이면서, 해당 에러 객체를 작업 실패 정보로 가진 Promise 객체가 리턴
async function fetchAndPrint() {
  throw new Error('Fail');
}

fetchAndPrint();
async를 붙이는 위치
- 자바스크립트의 함수 표현법
- Function Declaration(함수 선언식)
- Function Expression(함수 표현식)
2-1. 함수에 이름이 붙어있는 Named Function Expression
2-2. 함수에 이름이 없는 Anonymous Function Expression - Arrow Function(화살표 함수)
함수 내부의 내용에 따라 더 축약(shorten)해서 나타낼 수도 있음
// 1) Function Declaration
async function example1(a, b) {
  return a + b;
}

// 2-1) Function Expression(Named)
const example2_1= async function add(a, b) {
  return a + b;
};

// 2-2) Function Expression(Anonymous)
const example2_2 = async function(a, b) {
  return a + b;
};

// 3-1) Arrow Function
const example3_1 = async (a, b) => {
  return a + b;
};

// 3-2) Arrow Function(shortened)
const example3_2 = async (a, b) => a + b;- 즉시실행함수(Immediately-invoked function expression, IIFE): 함수 정의와 동시에 실행
(async function print(sentence) {
  console.log(sentence);
  return sentence;
}('I love JavaScript! well...'));

(async function (a, b) {
  return a + b;
}(1, 2));

(async (a, b) => {
  return a + b;
})(1, 2);

(async (a, b) => a + b)(1, 2);
https://www.codeit.kr/topics/basics-of-js-web-dev/lessons/4114
https://www.codeit.kr/topics/basics-of-js-web-dev/lessons/4399