Console 객체
- 브라우저의 디버깅 콘솔에 접근할 수 있는 메소드들을 제공하는 객체
console.log("hey JavaScript"); // hey JavaScript
var name = 'minji';
console.log(name); // minji

// 로그 vs 테이블
console.log({name: "minji", age: 22})
// {name: "minji", age: 22}
console.table({name: "minji", age: 22})
// (index) | Value
// name    | "minji"
// age     | 22

colsole.error('Error'); // 오류 알림 (빨간색 엑스)
console.warn('warning'); // 워닝 알림 (노란색 느낌표)

console.time('samevalue');
console.log(1);
console.log(2);
console.log(3);
console.log(4);
console.timeEnd('samevalue'); // time~timeEnd까지의 소요시간이 출력됨
// samevalue: 0.234242347981ms → 이런 형태!

console.clear(); // 콘솔창 지우기- VsCode의 GoLive server를 활용해서 웹페이지로 확인하고, 개발자도구의 콘솔로 들어가서 콘솔객체의 출력들을 확인함
var, let, const
- JavaScript에서 변수를 선언하는 방식: var, let, const
- scope: 변수의 참조 범위
- 호이스팅 (Hoisting): 코드가 실행되기 전에 변수 및 함수 선언(이름)이 로컬 범위의 맨 위로 들어올려지거나 끌어올려지는 경우
⁕ Hoist: 무언가를 들어올리거나 끌어올리는 동작 - 그렇다면 만약 함수로 호이스팅 테스트를 해본다면?
func(); // 정상적으로 hoisting test가 출력됨

function func() {
  console.log('hoisting test');
}| 변수 선언 방식 | 중복 선언 | 재할당 | 변수의 참조 범위 | 호이스팅 |
|---|---|---|---|---|
var | O | O | 함수 레벨 스코프 | Undefined |
let (ES6) | X | O | 블록 레벨 스코프 | Error |
const (ES6) | X | X | 블록 레벨 스코프 | Error |
var
- 중복 선언 & 재할당: 마지막에 할당된 값이 변수에 저장됨, 자율성 확보
↪ 소스코드가 복잡해질 경우 기존에 선언해둔 변수를 잊고 다시 선언하거나 재할당을 해서 어떤 부분에서 값이 변경되는지 파악하기 힘들어질수도 있음
var greeting = 'hello';
console.log(greeting);

var greeting = 'guten morgen'; // 중복선언 O
console.log(greeting);

greeting = 'hola'; // 재할당 O
console.log(greeting);- 변수의 참조 범위: 함수 내에서 선언된 변수는 함수 내에서만 유효하며, 함수 외부에서는 참조할 수 없음
function func() {
  if (true) {
    var a = 'a';
    console.log(a); // 'a'
  }
  console.log(a); // 'a'
}

func();
console.log(a); // 함수 외부 호출 - 오류 발생- 호이스팅: 오류가 발생하는 대신 Undefined를 반환하는 이유? JS는 변수 생성의 선언과 할당 단계를 분할하는데, 이 때 선언 부분은 코드가 실행되기 전 현재 범위의 맨 위로 호이스팅되고
var는 선언단계에서 Undefined 값이 할당되고 할당단계에서 실제값이 할당되기 때문!
console.log(greeting); // Undefined
var greeting = 'hello';
let
- 중복 선언 & 재할당
let greeting = 'hello';
console.log(greeting);

let greeting = 'guten morgen'; // 중복선언 X: 오류발생
console.log(greeting);

greeting = 'hola'; // 재할당 O
console.log(greeting);- 호이스팅:
let,const의 경우, 선언 단계에서 Undefined 값이 할당되지 않으므로var과 달리 오류가 발생함
console.log(greeting); // Error: 초기화 전에 접근했으므로 참조오류 발생
let greeting = 'hello'; // const로 변경해도 동일한 결과 발생const: constant의 약자
- 중복 선언 & 재할당
const greeting = 'hello';
console.log(greeting);

const greeting = 'guten morgen'; // 중복선언 X: 오류발생
console.log(greeting);

greeting = 'hola'; // 재할당 X: 오류발생
console.log(greeting);- 변수의 참조 범위: 블록 내부에서 참조된 변수는 블록 내부에서만 유효함
⁕ 블록: if문, while문 등{}로 둘러싸인 부분
function func() {
  if (true) {
    const a = 'a'; // let으로 바꿔도 동일한 결과 발생
    console.log(a); // 'a'
  }
  console.log(a); // 불록 외부 호출 - 오류 발생
}

func();
console.log(a); // 불록 외부 호출 - 오류 발생
✨ const가 가장 권장되며, 만약 재할당이 필수적으로 필요한 경우에는 let을 사용함. var의 사용은 지양함.
자바스크립트 타입
- 자바스크립트는 느슨한 타입(loosely typed)의 동적(dynamic) 언어이다.
변수는 어떤 특정 타입과 연결되지 않으며, 모든 타입의 값으로 할당 및 재할당이 가능함 → 같은 변수가 여러개의 타입을 가질 수 있음, 타입을 명시하지 않아도 됨.
let foo = 42;
console.log(typeof foo) // number
foo = 'bar';
console.log(typeof foo) // string
foo = true;
console.log(typeof foo) // boolean
타입의 종류:
- 원시 타입:
boolean,string,number,null,undefined,symbol
↪ call stack에 저장됨 - 참조 타입:
object,array
↪ (데이터의 크기가 정해지지 않은 채) 주소는 call stack에, 실제 내용값은 heap에 저장됨
// Numbers:
let length = 16;
let weight = 7.5;

// Strings:
let color = "Yellow";
let lastName = "Johnson";

// Booleans
let x = true;
let y = false;


// Object:
const person = {firstName:"John", lastName:"Doe"};

// Array object:
const cars = ["Saab", "Volvo", "BMW"];

// Object vs Array: 배열인지 아닌지 확인할 때에는 typeof 사용 X, Array.isArray() 사용
console.log(Array.isArray(cars)); // true

// Date object:
const date = new Date("2022-03-25");
자바스크립트 타입 변환
- 함수 사용, 명시적 변환:
String()... - JS 자체에 의해 자동으로 변환
자바스크립트 연산 및 Math Object
// Math Object
val = Math.PI // PI
val = Math.round(2.4) // 반올림
val = Math.ceil(2.4) // 올림
val = Math.floor(2.4) // 내림
val = Math.abs(-2) // 절댓값
val = Math.sqrt(64) // 루트
val = Math.min(2, 3, 5, 7, 8, -1) // 가장 가까운 정수 반환
val = Math.max(2, 3, 5, 7, 8, -1) // 가장 가까운 정수 반환
val = Math.random() // 0~1 사이의 랜덤한 수
Template Literals
- javascript에서 backtick 문자를 사용하여 문자열을 표현한 것.
↪ 줄 바꿈이 쉽고, 문자열 내부에 표현식으로 포함할 수 있게 되는 장점이 존재함
console.log('첫째줄
            둘째줄'); // 줄바꿈이 구현됨
const a = 5;
const b = 10;
// 표현식을 + 기호 없이 포함이 가능해짐
// 기존 방식: "문자열" + (표현식) + "문자열" + ...
console.log(`Fifteen is ${a + b} and not $2 * a + b}.`);Loops
- 용도: 코드 블록을 여러번 실행할 수 있도록 해줌
- 종류:
- for문
for ([초기문]; [조건문]; [증감문]){
  명령문
}- 예시
for (let i = 0; i < 10; i++) {
  if (i == 3) {
    console.log('it is three');
    continue;
  }

  if (i == 5) {
    console.log('it is five, stopping the loop');
    break;
  }
  console.log('number: ' + i);
}

// 출력
// number: 0
// number: 1
// number: 2
// it is three
// number: 4
// it is five, stopping the loop- for/in 문: 객체의 속성(property)를 따라 반복함
for (variable in object) {
  statements
}- 예시
const user = { // 객체 정의
  name: 'Minji',
  province: '경기도',
  city: '안양시'
}

for (let x in user) { // key : value
  console.log(`${x} : ${user[x]}`);
}- while문: 조건문이 true인 동안 코드블록을 반복함
while (조건문){
  명령문
}- 예시
let i = 0;

while (i < 10) {
  console.log('number : ' + i);
  i++;
}- do/while 문: while loop의 변형으로, 조건이 true인지 검사하기 전에 코드블록을 1회 실행하고 조건이 true인 동안 루프를 반복함
do 문장 // 무조건 1회는 실행
while (조건문);- 예시
let i = 0;

do {
  console.log('number: ' + i);
  i++;
}

while (i < 10);-
배열을 loop로 컨트롤해주기
const locations = ['germany', 'france', 'spain', 'mexico'];

for (let i = 0; i < locations.length; i++) {
  console.log(locations[i]);
}

// 출력결과: 하단의 이미지
locations.forEach(function (location, index, array) {
  console.log(`${index} : ${location}`);
  console.log(array);
});

locations.map(function (location) {
  console.log(location);
});
- for vs forEach
| for | forEach |
|---|---|
| 기존 방식 | 새로운 방식 |
| break 문 사용 가능 | break 문 사용 불가 |
| await 사용 가능 | await 완벽히 작동 X |
| 속도 상대적으로 빠름 | 속도 상대적으로 느림 |
Window 객체
- window 객체: 브라우저에 의해 자동으로 생성되며, 웹 브라우저의 창을 나타냄. 브라우저의 객체이지 엄연히 말해 JavaScript의 객체는 아님.
브라우저에서 window라고 입력하면 window 객체를 펼쳐볼 수 있음
용도:
1. 브라우저의 창에 대한 정보를 알 수 있고, 창을 제어할 수도 있음
예: window.innerWidth라고 입력하면 창 내부의 너비를 알 수 있으며, 창을 축소하거나 확장함에 따라 해당 수치는 변경됨
↪ 이외에도 window.outerHeight 등이 있음
2. var 키워드로 변수를 선언하거나 함수를 선언하면 window 객체의 property가 됨
var A = 1;
console.log(window.A) // 1
let val;
val = window.scrollY; // 스크롤 했을 때 페이지 상단부터 스크롤한 부분까지의 거리
val = window.scrollX;
console.log(val);
// location object
val = window.location; // location 객체: 아래에서 확인할 수 있듯, host, hostname, port, href, search 등의 정보들을 가지고 있는 객체
val = window.location.hostname;
val = window.location.port;
val = window.location.href;
val = window.location.search;
// redirect
window.location.href = 'http://google.com'; // 페이지를 실행하자마자 해당 링크로 이동시킴
// reload
window.reload();
// history object
window.history.go(-2); // history 객체에는 사용자가 브라우저 창에서 방문한 url이 저장됨
val= window.history.length;
window.history.forward() // 윈도우바 위에 있는 이전으로 가기 화살표와 같은 역할
// navigator object
val = window.navigator;
val = window.navigator.userAgent;
val = window.navigator.language;
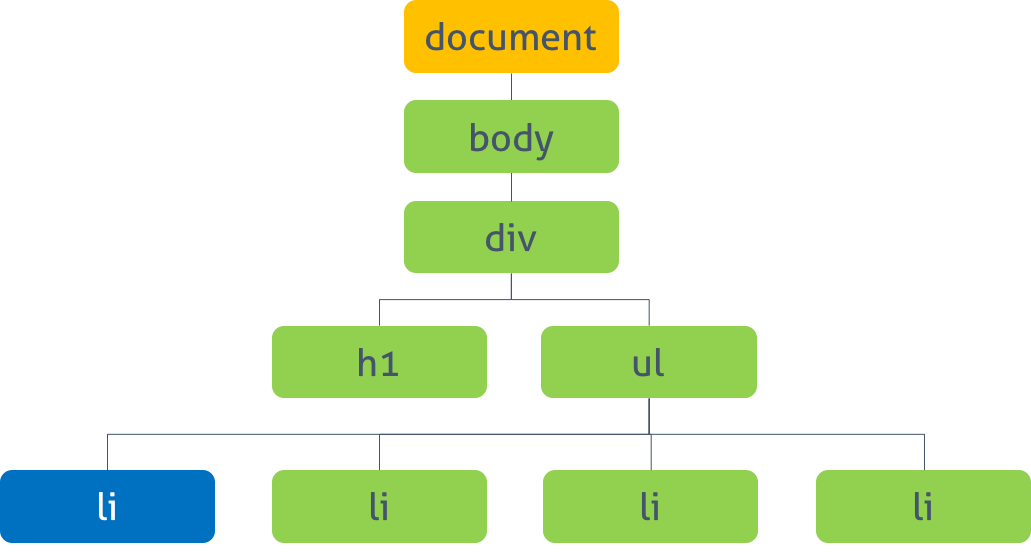
console.log(val);DOM(Document Object Model)이란?
-
정의: 메모리에 웹페이지 문서구조를 트리구조로 표현한 모델
-
용도: 웹브라우저가 HTML 페이지를 인식하게 해주고, 자바스크립트가 웹페이지를 이루는 요소들을 이용할 수 있도록 해줌
-
돔 조작: DOM에서 제공하는 API를 사용해서 DOM 구조에 접근하거나 원하는 요소를 수정/삭제할 수 있음
<button class="button"> Click Mee </button>// dom 구조 (button이라는 이름을 가진 요소) 에 접근
var button = document.querySelector('.button');
// dom 요소를 수정: 스타일 변경
button.onclick = function () {
this.style.backgroundColor = "red";
}- CRP (웹페이지 빌드 과정, Critical Rendering Path) : 브라우저가 서버에서 페이지에 대한 HTML 응답을 받고 화면에 표시하기 전에 거치는 단계들로, 웹 브라우저가 HTML 문서를 읽고, 스타일을 적용해서 뷰포트에 표시하는 과정임
(HTML→DOM) and (CSS→CSSOM) →RenderTree로 결합(DOM(html) +CSSOM(css)) →Layout(✨ 비용이 많이 드는 부분... react에서는 virtual DOM으로 이 부분의 비용을 단축하려고 노력함) →paint
Document Object 이용해보기
-
Document Object: window 객체가 브라우저 창이라고 하면, document 객체는 브라우저 내에서 콘텐츠를 보여주는 웹페이지 자체임
-
css의 프레임워크인
bootstrap을 활용한 예시에 document object를 사용해서 접근 및 수정, 삭제를 시도해봄 -
요소에 접근하는 방법:
getElementById,getElementByName,querySelector
// 파라미터로 전달한 ID를 가진 태그를 반환
document.getElementById(요소아이디);

// 파라미터로 전달한 name 속성을 가진 태그를 반환
document.getElementByName(name속성값);

// 파라미터로 전달한 선택자에 맞는 첫번째 태그를 반환
// 선택자 자리에 class가 오면 #을, id가 오면 .을 붙여서 작성
document.querySelector(선택자); - 하나를 선택해서 수정하는 예시
// 접근
const headContainer = document.getElementById('header-container');

// 스타일링 변경
headContainer.style.fontSize = '10px';
headContainer.style.display = 'none';- 여러개에 접근해서 수정하는 예시
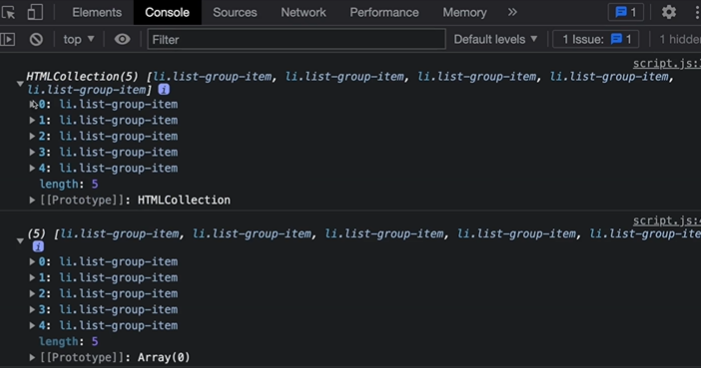
// class 이름으로 접근해서 수정해보기
const items = document.getElementsByClassName('list-group-item');
console.log(items);

items[0].style.color = 'blue';
items[3].textContent = 'hey';

// 태그 이름으로 접근해서 수정해보기
let tagItems = document.getElementsByTagName('li');
console.log(tagItems); // collection 상태
// forEach로 순회 시도: 오류
tagItems.forEach((tagItem) => {
  console.log(tagItem); // ERROR: forEach is not a function in list !!
})

Array.from(tagItems); // collection -> array로 바뀜
console.log(tagItems); // array 상태
// forEach로 순회 시도: 성공 ~
tagItems.forEach((tagItem, index) => {
  // console.log(tagItem);
  list.textContent = `${index}. List `;
})

// 그렇다면 <li> 태그 중 홀수번째 태그의 내용들만 선택하려면?
const liOdd = document.querySelectorAll('li: nth-child(odd)');
liOdd.forEach((li) => {
  li.style.background = 'pink';
});
createElement
document.createElement(태그이름):태그이름을 가진 요소를 생성할 수 있음
const li = document.createElement('li'); // 요소 생성
li.className = 'list-group-item'; // 클래스명 부여
li.id = 'new-item'; // id 부여요소.setAttribute: 속성 추가
li.setAttribute('name', 'New list item');- link element 생성하기
const link = document.createElement('a') // a 태그를 가진 요소 생성
document.querySelector'ul.list-group').appendChild(li);
link.className = 'alarm-item';
link.innerHTML = 'hi'; // '<i class="bi-alarm"></i>'
li.appendChild(link);요소.appendChild():요소를 특정 부모 요소의 자식요소 리스트 중 마지막 자식으로 붙임
document.querySelector('ul.list-group').appendChild(li);removeChild & replaceChild
// 부모요소 불러오기
const listParent = document.querySelector('ul');
// 자식요소들 불러오기
const list = document.querySelectorAll('li');부모노드.removeChild(자식노드);: 하나의 자식노드 삭제
// 0번째 자식요소 삭제
listParent.removeChild(list[0]);
부모노드.replaceChild(새노드, 이전노드);: 이전노드를 삭제하고 새노드로 교체함
// 이전노드 (변경해야 할 노드) 선정하기
const oldElement = document.getElementById('A');
// 새 노드 생성하기
const newElement = document.createElement('span');
newElement.textContent = 'hi';
// 요소 교체하기
oldElement.parentNode.replaceChild(newElement, oldElement);
Event Listener
-
어떤 버튼을 클릭했을 때 지정한 엑션이 발생하도록 하려면 어떻게 해야할까? ✨ 정말 자주 쓰이는 기능... ✨
-
onclick메소드 사용
var button =
    document.querySelector('.button');

button.onclick = function() {
  this.style.backgroundColor = 'red';
};addEventListener메소드 사용
↪요소.addEventListener(이벤트명, 실행할 함수명(listener), 옵션);
- 자바스크립트
// js
window.onload = function () { // 문서가 로드 될 때 실행
  // 아이디가 'text'인 요소 반환
  let text = document.getElementById('text');
  text.innerHTML = 'HTML 문서 loaded'; // innerText도 사용가능
}- html
<button onclick="alert('버튼이 클릭됐습니다.')"> Click Me </button>- 자바스크립트
const aElement = document.querySelector('a');
aElement.addEventListener('click', () => {
  alert('a element clicked');
});
Event 객체
- 이벤트가 호출되었을 때 이벤트 객체를 가져올 수 있음
const buttonElement document.querySelector('.btn2');

buttonElement.addEventListener('click', (event) => {
  let val;
  val = event.target;
  val = event.target.id;
  val = event.target.className;
  val = event.target.classList;
  val = event.type;
  val = event.clientY;
  val = event.offset;

  console.log(val);
});
Event 종류
- UI 이벤트
load: 문서나 객체가 로드 완료되었을 때 발생함change: 객체의 내용이 변동되거나 focus를 잃었을 때 발생함resize: 객체의 크기가 바뀌었을 때 발생scroll: 스크롤바를 조작할 때 발생error: 에러가 발생했을 때 발생
- 키보드 이벤트
keydown: 키를 눌렀을 때 발생keyup: 키를 눌렀다가 땠을 때 발생keypress: 사용자가 눌렀던 키의 문자가 입력되었을 때 발생
- 마우스 이벤트
click: 객체를 클릭했을 때 발생dblclick: 객체를 더블클릭했을 때 발생mousedown: 마우스를 클릭했을 때 발생mouseout: 마우스가 특정 객체 밖으로 나갔을 때 발생mouseover: 마우스가 특정 객체 위로 올려졌을 때 발생mousemove: 마우스가 움직였을 때 발생mouseup: 마우스에서 손을 떼어내면 발생
✨ 팁: VSCode 자동완성? Tabnine AI extention 사용
const submitBtn = document.querySelector('.submit-btn');
const form = document.querySelector('form');
const title = document.querySelector('h2');

// 이벤트 종류별 시도: click event
submitBtn.addEventListener('click', handleEvent);
submitBtn.addEventListener('dblclick', handleEvent);
submitBtn.addEventListener('mousedown', handleEvent);
submitBtn.addEventListener('mouseup', handleEvent);
submitBtn.addEventListener('mouseenter', handleEvent);
submitBtn.addEventListener('mouseleave', handleEvent);
submitBtn.addEventListener('mousemove', handleEvent);

function handleEvent(e) {
  e.preventDefault();
  console.log(`Event Type: ${e.type}`);
  title.textContent = `MouseX: ${e.offsetX} MouseY: ${e.offsetY}`;
}
// form event
const form = document.querySelector('form');
const emailInput = document.getElementById('email');
const title = document.querySelector('h2');
form.addEventListener('submit', handleEvent);
emailInput.addEventListener('keydown', handleEvent);
emailInput.addEventListener('keyup', handleEvent);
emailInput.addEventListener('keypress', handleEvent);
emailInput.addEventListener('focus', handleEvent);
emailInput.addEventListener('blur', handleEvent);
emailInput.addEventListener('paste', handleEvent);
function handleEvent(e) {
if (e.type === 'submit') {
e.preventDefault();
}
console.log(`Event Type: ${e.type}`);
title.textContent = e.target.value;
}Event Bubbling
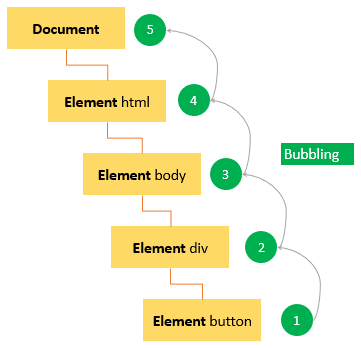
- 정의: 가장 깊게 중첩된 요소에 이벤트가 발생했을 때 이벤트가 위로 전달 (bubble up) 되는 것을 의미함
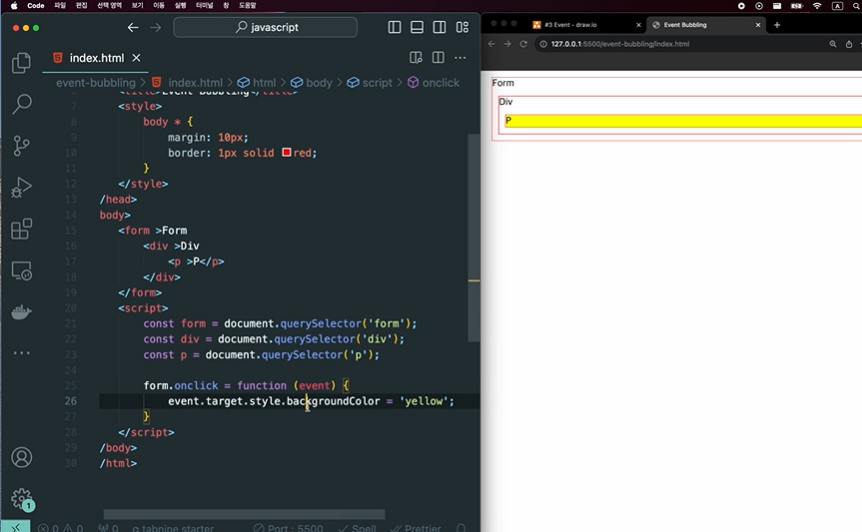
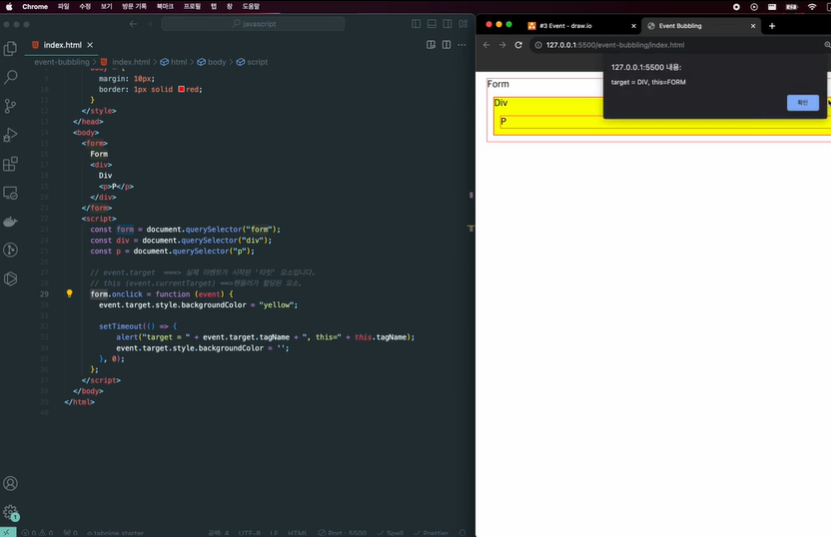
- bubbling을 중단시키려면,
<p>P</p>
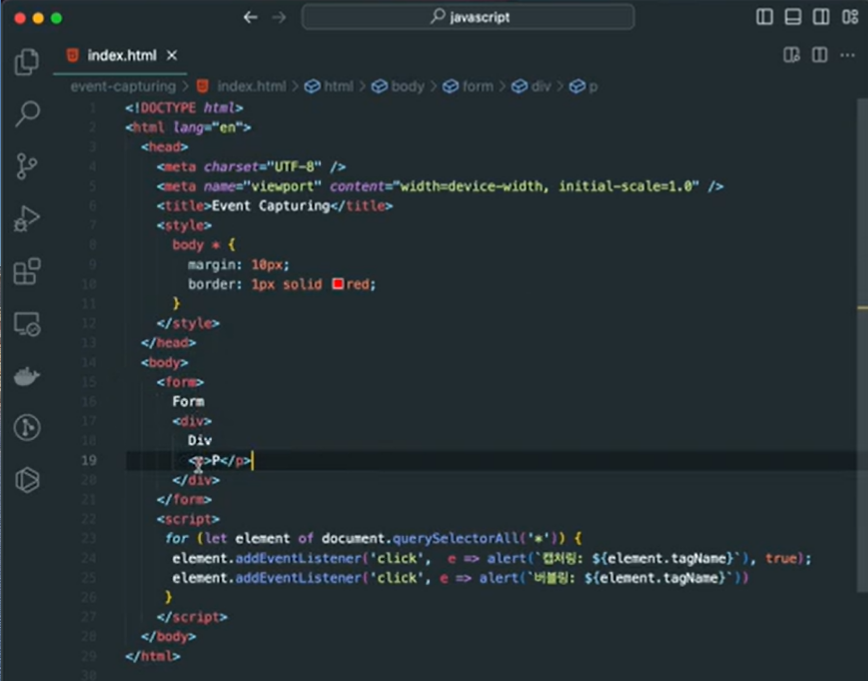
Event Capturing
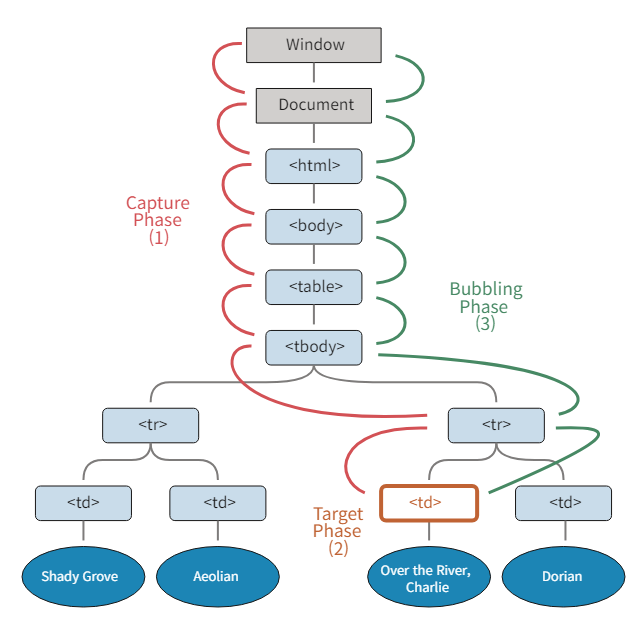
- 캡처링: 이벤트가 하위 요소로 전파되는 단계
- 타깃: 이벤트가 실제 타깃 요소에 전달되는 단계
- 버블링: 이벤트가 상위요소로 전파되는 단계
Event Delegation (이벤트 위임)
- 하위 요소의 이벤트를 상위에서 제어함
this 키워드
- Lexical this: 다양한 개념을 가리킴
- method에서
this호출 → 해당 객체 참조
const audio = {
  title: 'a',
  play() {
    console.log('play this', this);
  }
}

audio.play(); // {title: 'a', play: f} 처럼 해당 객체를 출력

audio.stop = function() {
  console.log('stop this', this)
}

// 객체에 stop() { console.log('stop this', this); } 가 더해진 상태
audio.stop() // {title: 'a', play: f, stop: f} - 함수에서
this호출 → window 객체 참조
function playAudio() {
  console.log(this);
}

playAudio(); // 윈도우 객체 출력: window {window: Window, self: Window, ...}- constructor function (생성자 함수: 첫 문자가 대문자로 시작)에서
this호출 → 빈 객체를 가리킴
function Audio(title){
  this.title = title;
  console.log(this); // Audio {title: 'a'}가 출력됨
}

const audio = new Audio('a'); - 아래의 코드에서
title: undefined인 이유? 함수 안의this는 window 객체를 가리키는데 window 객체에는 당연하게도 title이 정의되어있지않으므로! forEach(콜백함수, thisArg)에서 thisArg 부분에 넣는 것을 콜백함수에서 this로 참조할 수 있으므로 아래와 같이 수정하면 원래의 의도대로 동작 가능
📍 또는,{title: 'audio'}를this로 대체해도 같은 결과가 나옴
const audio = {
  title: 'audio',
  categories: ['rock', 'pop', 'hiphop'],
  displayCategories() {
    this.categories.forEach(function(category) {
      console.log(`title: ${this.title}, category: ${category}`);
      // title: undefined, category: rock
      // title: undefined, category: pop
      // title: undefined, category: hiphop
    })
  }
}

// 원래의 의도대로 수정하기 1
const audio = {
  title: 'audio',
  categories: ['rock', 'pop', 'hiphop'],
  displayCategories() {
    this.categories.forEach(function(category) {
      console.log(`title: ${this.title}, category: ${category}`);
    }, {title: 'audio'}) // 또는 {title: 'audio'}를 this로 대체해도 됨
  }
}
✨ 생성자 함수 vs 객체
- constructor function(생성자 함수): 유사한 인수와 메소드를 가진 객체들을 생성하기 위한 설계도로,
new키워드로 호출됨
function Person(name, age) {
    this.name = name;
    this.age = age;
}

const person1 = new Person('Alice', 25);  // Creates a new object with name 'Alice' and age 25
const person2 = new Person('Bob', 30); // Creates a new object with name 'Bob' and age 30- 객체: 자바스크립트의 객체는 단순히
key: value형태이며,.으로 불러와서 사용 가능
const person = {
    name: 'Alice',
    age: 25,
    greet: function() {
        console.log(`Hello, my name is ${this.name}`);
    }
};

person.greet(); // Outputs: "Hello, my name is Alice"- 화살표 함수에서
this호출 → 항상 상위 스코프의this를 가리킴
- 위 3번의 코드를 화살표함수로 바꾸어도 같은 동작을 하게 만들 수 있음
// 원래의 의도대로 수정하기 2
const audio = {
  title: 'audio',
  categories: ['rock', 'pop', 'hiphop'],
  displayCategories() {
    this.categories.forEach(function(category) => {
      console.log(`title: ${this.title}, category: ${category}`);
    })
  }
}
bind, call, apply
- 함수에서
this를 사용하면 window 객체를 가리키게 됨 → 참조 대상을 바꿀 수는 없을까?
- call 메소드: call 메소드는 함수를 호출하는 함수이며, 첫번째 매개변수로 객체를 전달해주면 호출되는 함수의 this 안에 window 객체가 아닌 전달받은 객체를 받게 됨
fullName.call(person1);로 호출했으므로fullName함수 내의this들이 더 이상 window 객체가 아닌,person1객체를 참조하게 됨
const fullName = function() {
  console.log(this.firstName + " " + this.lastName);
  // Minji Kim
}

const person1 = {
  firstName: "Minji",
  lastName: "Kim"
}

fullName.call(person1);
불러올함수.call(참조할 객체, 인수A, 인수B)를불러올함수(인수a, 인수b)로 받아와서 함수 내에서 사용할 수 있음!
const fullName = function(city, country) {
  console.log(this.firstName + " " + this.lastName);
  // Minji Kim
  console.log("Lives in " + city, country);
  // Lives in Seoul South Korea
}

const person1 = {
  firstName: "Minji",
  lastName: "Kim"
}

fullName.call(person1, "Seoul", "South Korea");- Apply 메소드
- 객체만 넣어줄 때에는 call 메소드와 완전히 동일하게 사용 가능하고, 뒤에 추가적인 인수를 넣을 경우 배열 형태로 입력받음
const fullName = function(city, country) {
  console.log(this.firstName + " " + this.lastName);
  // Minji Kim
  console.log("Lives in " + city, country);
  // Lives in Seoul South Korea
}

const person1 = {
  firstName: "Minji",
  lastName: "Kim"
}

fullName.apply(person1, ["Seoul", "South Korea"]);- bind 메소드
func.bind(greeting);는 func 함수 내의 this에 greeting이라는 객체를 binding만 시켜주는 것이므로 실행하기 위해서는const boundFunc로 담아서 따로 호출해줘야 함
function func(language) {
  if(language == "kor") {
    console.log(`language: ${this.korGreeting}`);
  } else {
    console.log(`language: ${this.engGreeting}`);
  }
}

const greeting = {
  korGreeting: '안녕',
  engGreeting: 'Hello',
}

const boundFunc = func.bind(greeting);
boundFunc('kor');
조건부 삼항 연산자 (Conditional Operator)
// 기존의 조건문
if (a) {
  a = "a";
} else {
  a = "b";
}

// 삼항연산자
a ? a = "a" : a = "b";
Event Loop
setTimeout(호출될함수, 지연시간ms): 전역 메소드인setTimeout()메소드는 만료된 후 함수나 지정한 코드 조각을 실행하는 타이머를 설정함
→ 두번째 매개변수인 ms(밀리초) 단위가 지난 후 첫번째 매개변수인 콜백함수가 호출됨
// 동기(Synchronous, 시간을 맞춤. 순차적으로 진행되어야 함)
console.log('1');

// 비동기(Asynchronous, 시간을 맞추지 않음, 동시다발적으로 진행 가능)
setTimeout(() => {
  console.log('2');
}, 3000);

// 동기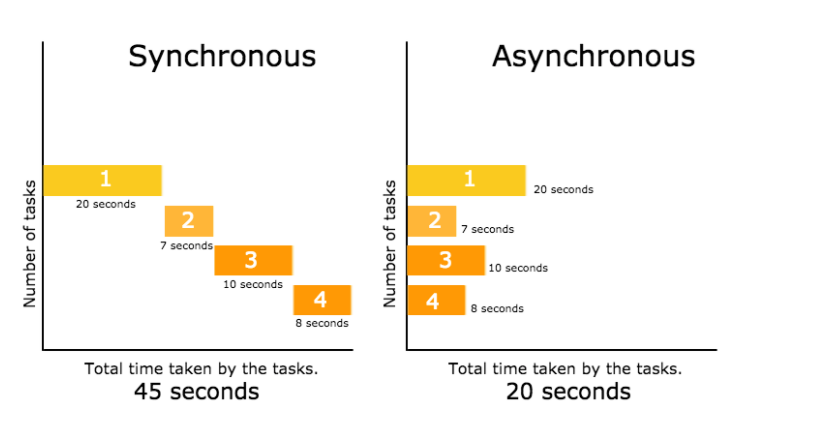
console.log('3');-
동기(Synchronous) vs 비동기(Asynchronous): 동기는 순차적으로 진행되어야하며, 앞의 일을 끝내지 못하면 그 다음 단계의 일을 수행할 수 없지만, 비동기는 동시다발적으로 여러 일을 진행할 수 있음
-
자바스크립트는 동기 언어이므로 비동기 부분을 실행할 때에는 브라우저의 api를 활용하게 됨
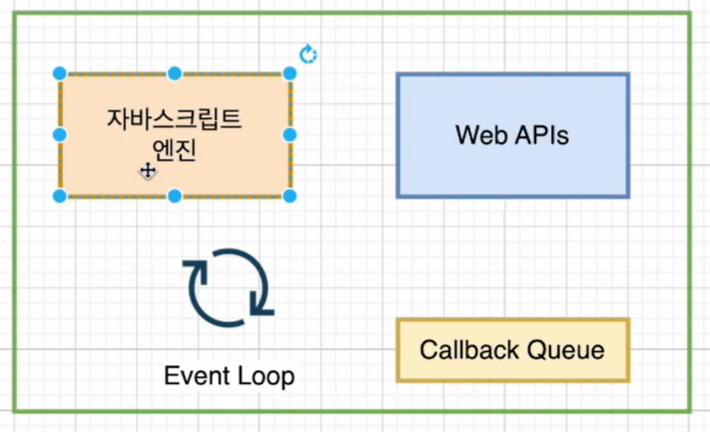
-
자바스크립트 엔진: 메모리힙 + 호출스택
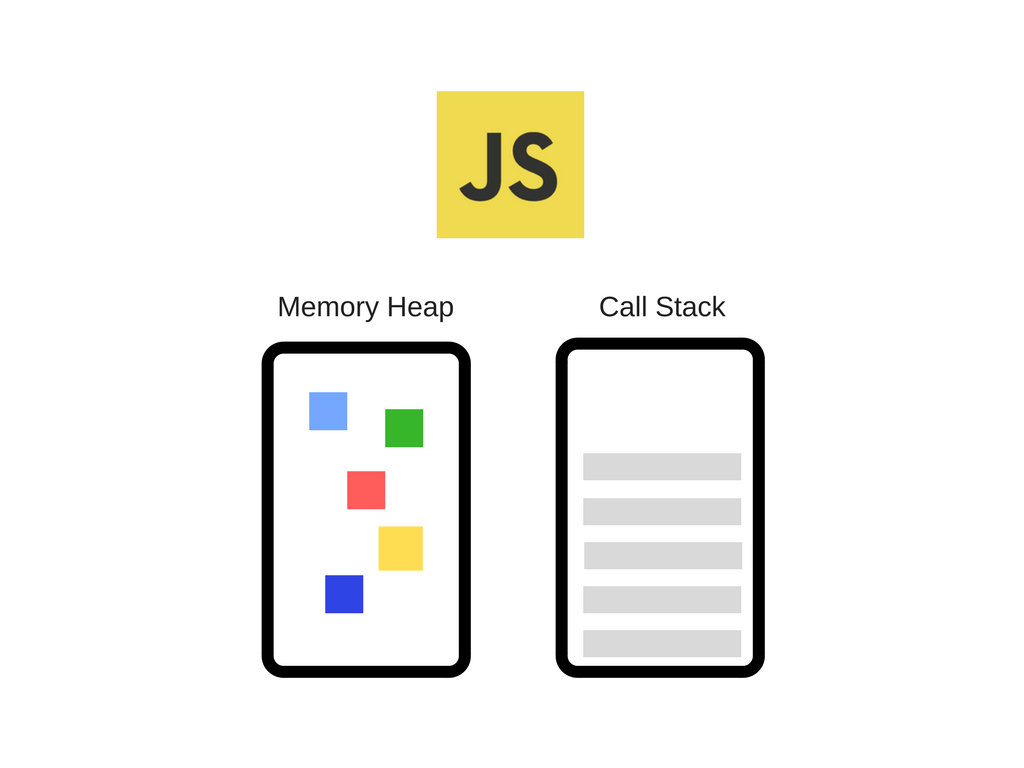
(1) 메모리힙: 메모리 할당이 발생하는 곳으로, 변수를 정의하면 저장이 되는 창고
(2) 호출 스택: 코드가 실행될 때 스택들이 이곳에 쌓이게 됨 -
call stack의 작동 살펴보기
function B() {
  setTimeout(function () {
    console.log('B-1...');
  }, 1500);
}

function A() {
  console.log('A-1...');
  B();
  console.log('A-2...');
}

A();

// 실행결과
// A-1...
// A-2...
// B-1...- 이 사이트에서 확인 가능: https://kamronbekshodmonov.github.io/JELoop-Visualizer/
-
만약
setTimeout(f, 0)의 지연시간이 0이라면 0초 후에 (즉, 즉시실행) 실행되는 것을 보장할까?
아님. 0초 이후에setTimeout함수가 호출되는 것을 보장하는거지 콜백함수f가 0초 이후에 호출되는 것을 보장하는 것은 아님 -
Call stack size exceeded: 재귀함수 호출이 계속해서 일어날 때 발생하는 오류
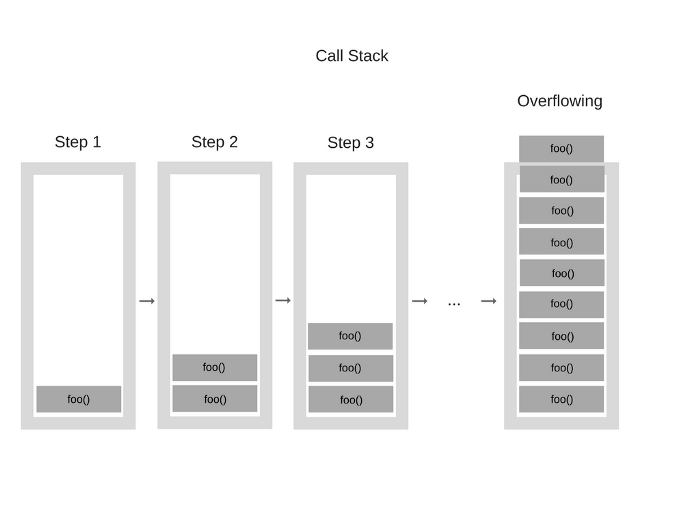
function foo() {
  foo();
}
foo();
Closure
- 정의: 다른 함수 내부에 정의된 함수
innerFunction가 있는 경우 외부 함수outerFunction가 실행을 완료하고 해당 변수가 해당 함수 외부에서 더 이상 엑세스 할 수 없는 경우에도 해당 함수 내부 함수는 외부 함수의 변수 및 범위에 엑세스할 수 있음
function outerFunction(outerVariable) {
  return function innerFunction(innerVariable) {
    console.log('Outer Variable: ' + outerVariable);
    console.log('Inner Variable: ' + innerVariable);
  }
}

const newFunction = outerFunction('outside'); // outerFunction 호출은 이미 여기에서 끝났어야 함
newFunction('inside'); // 그러나 이 부분에서도 outside는 유지됨outerFunction('outside')는 변수const newFunction에 할당 되는 즉시 호출됨
그래서console.log(newFunction)으로 찍어보면 아래의 return 문이 그대로 출력됨
return function innerFunction(innerVariable) {
    console.log('Outer Variable: ' + outerVariable);
    // Outer Variable: outside
    console.log('Inner Variable: ' + innerVariable);
    // Inner Variable: inside
}- 호출되면
outerFunction은outerFunction(outerVariable)대신innerFunction(innerVariable)을 반환함 - 그런 후
newFunction('inside')를 호출함. 이 때,innerFunction은 원래outerFunction('outside')로 설정한outerVariable매개변수를 기억하고 접근할 수 있음.
따라서'inside'로만 호출되었다고 하더라고'outside'과'inside'를 모두 출력할 수 있음
- 추가 예시
// 1. 아무 문제 X
let a = 'a';

function functionA() {
  let b = 'b';
  console.log(a, b);
}

functionA(); // a b
// 2. 오류!!
let a = 'a';
function functionB() {
let c = 'c'
console.log(a, b, c); // b is not defined 오류!!!
}
function functionA() {
let b = 'b';
console.log(a, b);
functionB();
}
functionA();- scope(변수 선언 범위) 종류: script (해당 파일 내에서 자유롭게 사용 가능), local(해당 블록/함수 안에서만 가능)
// 3. 2의 문제 closure를 사용해서 해결하기
// functionB를 functionA 안으로 이동시키기~
let a = 'a';
function functionA() {
  function functionB() {
    let c = 'c';
    console.log(a, b, c);
  }
  let b = 'b';
  console.log(a, b);
  functionB();
}

functionA();
구조분해할당 (Destructuring)
- 정의: 배열이나 객체의 속성을 해체하여 그 값을 개별 변수에 담을 수 있도록 하는 자바스크립트 표현식
- 객체
function animal (data) {
  let name = data.name,
      color = data.color,
      legNum = data.legNum,
}

let animal (data) {
  let {name, color, legNum} = data;
}
let person = {
  name: "Minji",
  age: 22,
  phone: "12315",
  address: {
    zipcode: 1234,
    street: "manfred borner strase",
    number: 58
  }
}

let {address: {zipcode, street, number}} = person;

console.log(zipcode, street, number); // 1234 manfred borner strase 58- 배열
let a, b, rest;
[a, b] = [10, 20];

console.log(a); // 10
console.log(b); // 20

[a, b, ...rest] = [10, 20, 30, 40, 50];

console.log(rest); // [30, 40, 50]

// 전부 받아오는 것이 아닌 선택적으로 받아오고 싶을 때

const numbers = [1, 2, 3, 4, 5, 6];

const [,,three,,five] = numbers;
전개 연산자 (Spread Operator)
- 정의: ECMAScript6에서 새롭게 추가된 기능으로, 특정 객체 혹은 배열의 값을 다른 객체, 배열로 복제하거나 옮길 때 사용함.
...의 형태임.
let arr1 = [1, 2, 3];
let arr2 = [4, ...arr1, 5, 6]; // 4, 1, 2, 3, 5, 6이 출력
let obj1 = {
  a:1,
  b:2,
};
let obj2 = {
  ...obj1, // a:obj1.a, b:obj1.b 이렇게 쓰는 것과 동일
  c:3,
  d:4,
};
function funcA(p1, p2, p3) {
  console.log(p1, p2, p3);
};
funcA(...arr1); // 이런 식으로 매개변수도 배열을 풀어서 전달 가능
Map, Filter, Reduce
- Map 메소드:
map()메소드는 배열 내의 모든 요소 각각에 대하여 주어진 함수를 호출한 결과를 모아 새로운 배열을 반환함
const arr = [1, 4, 9, 16];
const map1 = arr.map(x => x * 2);

console.log(map1); // [2, 8, 18, 32]
arr.map(콜백함수, thisArg)로도 사용가능
const map2 = arr.map(function (item, index, array) {
  console.log(item, index, array, this)
  return (item * 2)
}, {a : 'a'});

console.log(map2);- Filter 메소드:
filter()메소드는 주어진 함수의 테스트를 통과하는 모든 요소를 모아 새로운 배열로 반환함
const words = ['apple', 'orange', 'banana', 'lime', 'blueberry', 'grape'];
const result = words.filter(word => word.length > 5);

console.log(result);
arr.filter(콜백함수, thisArg)
const words = ['apple', 'orange', 'banana', 'lime', 'blueberry', 'grape'];
const result = words.filter(function (word, index, array) {
  console.log(word, index, array, this);
  return word.length > 5
}, {a : 'a'});

console.log(result);- Reduce 메소드:
reduce()메소드는 배열의 각 요소에 대해 주어진 reducer 함수를 실행하고 하나의 결과값을 반환함. 주로 값의 합산에서 많이 사용됨.
arr.reduce(reducer함수(accumulator, currentValue, currentIndex, array), initialValue)
accumulator: 누산기
// 기본값이 없을 때
[0, 1, 2, 3, 4].reduce(function (accumulator, currentValue, currentIndex, array) {
  return accumulator + currentValue;
});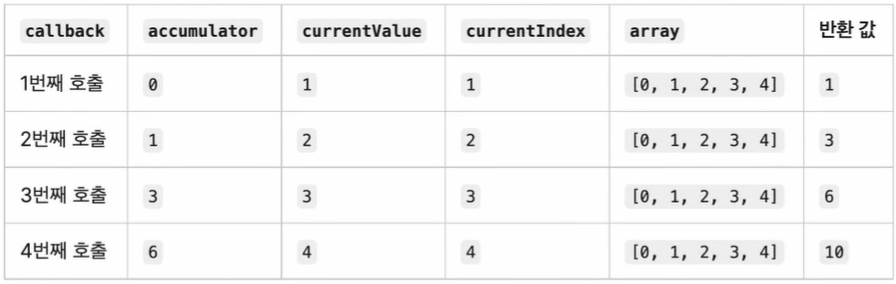
// 기본값 = 10
[0, 1, 2, 3, 4].reduce(function (accumulator, currentValue, currentIndex, array) {
  return accumulator + currentValue;
}, 10);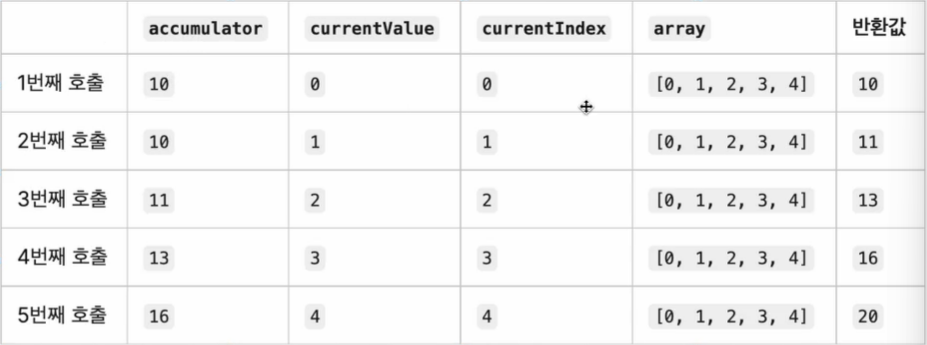
함수 표현식 vs 함수 선언문
- 함수 선언문: 함수를 만들고 이름을 지정함.
호이스팅에 영향을 받음 - 함수 표현식: 함수를 만들고 변수에 할당함. 함수는 익명이므로 이름이 없음.
호이스팅에 영향을 받지 않음
IIFE (즉시 호출 함수 표현식)
- IIFE(Immediately Invoked Function Expression): 정의되자마자 즉시 실행되는 함수
( // 첫번째 소괄호
  function () {
    // Where magic happens
  }
)() // 두번째 소괄호- 첫번째 소괄호: 전역 선언을 막고, IIFE 내부 안으로 다른 변수가 접근하는 것을 막음 ← 주 사용 목적이기도 함!
- 두번째 소괄호: 즉시 실행 함수를 생성하는 괄호로, 자바스크립트 엔진은 함수를 즉시 해석 및 실행할 수 있음
(
  function () {
    var aName = 'Barry';
    // IIFE 내부에서 생성된 변수이므로 외부에서는 접근불가
  }
)();

console.log(aName); // ReferenceError: aName is not defined.
var result = (function() {
var name = "minji";
return name;
})();
console.log(result); // minji
// 함수 호출 없이도 바로 실행- 함수 리터럴: 함수를 정의하는 표현식으로, 예약어
function, 함수 이름(선택)name, 매개변수 집합(a, b), 함수 본문return a - b;등으로 구성됨.
function name (a, b) { // 함수의 이름(name)이 없어도 됨
  // 단, 아래의 두가지 조건을 충족해야 함
  return a - b; // 함수 본문
}- 함수의 이름이 없어도 되는 조건: (1) 해당 함수를 할당받을 변수를 지정해야 함 orr (2) 해당 함수를 즉시 호출해야 함
// (1) 해당 함수를 할당받을 변수를 지정해야 함
const minus = function(a, b) {
  return a - b;
}

// (2) 해당 함수를 즉시 호출해야 함
(function (a, b) {
  return a - b;
})(1, 2);- IIFE 앞에 연산자 붙이기
!function() { return console.log("hi") }()
void function() { return console.log("hi") }()
+function() { return console.log("hi") }()
-function() { return console.log("hi") }()
~function() { return console.log("hi") }()
*function() { return console.log("hi") }()
^function() { return console.log("hi") }()
&function() { return console.log("hi") }()- 즉시실행함수 사용X 예시 1:
const score = () => {
  let count = 0;
  return {
    current: () => { return count },
    increment: () => { count++ },
    reset: () => { count = 0 }
  }
}

console.log(typeof score); // function
console.log(score);
/*() => {
  let count = 0;
  return {
    current: () => { return count },
    increment: () => { count++ },
    reset: () => { count = 0 }
  }
}*/
console.log(score().current()); // 0
score().increment(); // count++를 계산
console.log(score().current()); // 0: 1로 증가할 줄 알았는데 여전히 0!
// 호출할 때마다 count=0;으로 초기화되기 때문
// 그렇다면 1로 증가시키려면 어떻게 해야할까?- 즉시실행함수 사용 예시 1:
const score = (() => {
  let count = 0;
  return {
    current: () => { return count },
    increment: () => { count++ },
    reset: () => { count = 0 }
  }
})() // 괄호로 묶어서 즉시실행함수로 변경해줌

console.log(score().current()); // 0
score().increment(); // count++를 계산
console.log(score().current()); // 1로 변경됨! :>- 즉시실행함수 사용X 예시 2:
const increment = () => {
  let counter = 0;
  console.log(counter);
  const number = (num) => {
    console.log(`It is ${num} number`);
  }
  return () => { counter++; number(counter); }
}

increment();
increment();- 즉시실행함수 사용 예시 2:
const increment = (() => {
  let counter = 0;
  console.log(counter);
  const number = (num) => {
    console.log(`It is ${num} number`);
  }
  return () => { counter++; number(counter); }
})() // 괄호를 씌워서 즉시실행함수로 만듦

increment(); // It is 1 number
increment(); // It is 2 number
Intersection Observer
-
기본적으로 브라우저 viewport와 설정한 요소의 교차점을 관찰하며, 요소가 viewport에 포함되는지 포함되지 않는지, 즉 사용자 화면에 지금 보이는 요소인지 아닌지를 구별하는 기능을 제공함
-
비동기적으로 실행되는 기능이므로 scroll 같은 이벤트 기반의 요소 관찰에서 발생하는 렌더링 성능이나 이벤트 연속 호출 같은 문제 없이 사용 가능
-
주로 무한스크롤 (instagram feed) 등을 구현할 때 사용됨
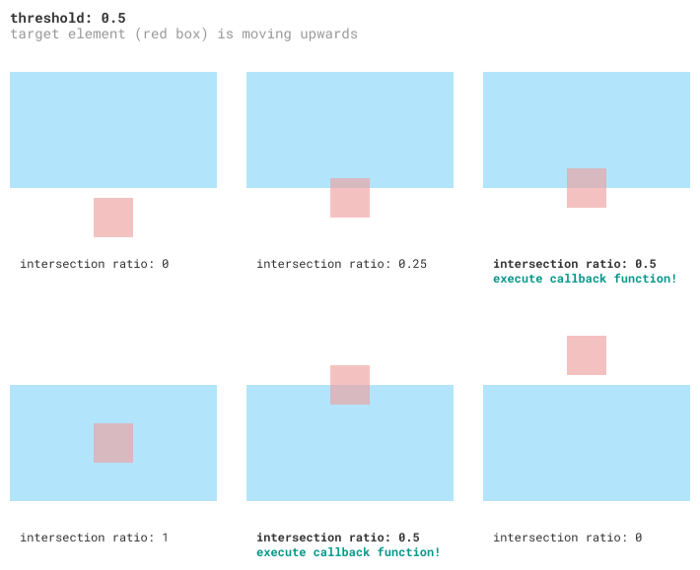
-
예를 들어서, 스크롤을 아래방향으로 내려서 4번째 사각형에 도달하면 가지고 있는 더 많은 내용들을 불러와서 보여주는 방식
-
디폴트 js 코드 형태
// script.js
const observer = new IntersectionObserver(
  function (entries, observer) {
    if (entry.isIntersecting) {
          // 타깃요소와 루트요소가 교차할 때 실행하고자 하는 일을 서술
    }
  },
  {
    root: null,
    threshold: 1,
  }
);
cong imgs = document.querySelectorAll('img')
observer.observe(관찰대상)- 첫번째 예시: 무한스크롤
<!--html-->
<head>
  <style>
    .item {
      text-align: center;
      padding: 20px 0px;
      margin: 0px;
    }

    .item:nth-child(even) {
      background-color: lightcoral;
    }
  </style>
</head>

<body>
  <div class="list"></div>
  <p class="end"></p> <!--관찰될 p태그!-->
  <script src="script.js"></script>
</body>
// script.js
const count = 20 // 한번에 추가되는 새로운 item의 개수
let itemIndex = 0 // item의 index
let observer = new IntersectionObserver(entries => { // 콜백함수!!
entries.forEach(entry => {
const list = document.querySelector('.list')
// 타겟 요소와 루트 요소가 교차함 → inIntersecting = true
if (entry.isIntersecting) { // entry는 한 개 (p태그)
for (let i = itemIndex; i < itemIndex + count; i++){
// item을 count 숫자만큼 생성하고 list에 추가하기
let item = document.createElement('p')
item.textContent = i;
item.className += 'item';
list.appendChild(item)
}
// itemIndex를 +count 해서 갱신
itemIndex = itemIndex + count
}
})
}, { root: null, threshold: 0.1 })
// null을 설정하거나 무엇도 설정하지 않으면 브라우저 viewport가 기준이 됨
// threshold 0.1은 타겟요소의 10%가 루트요소와 겹치면 콜백을 실행한다는 의미
// list의 끝부분을 알려주는 p타겟요소 관찰 시작
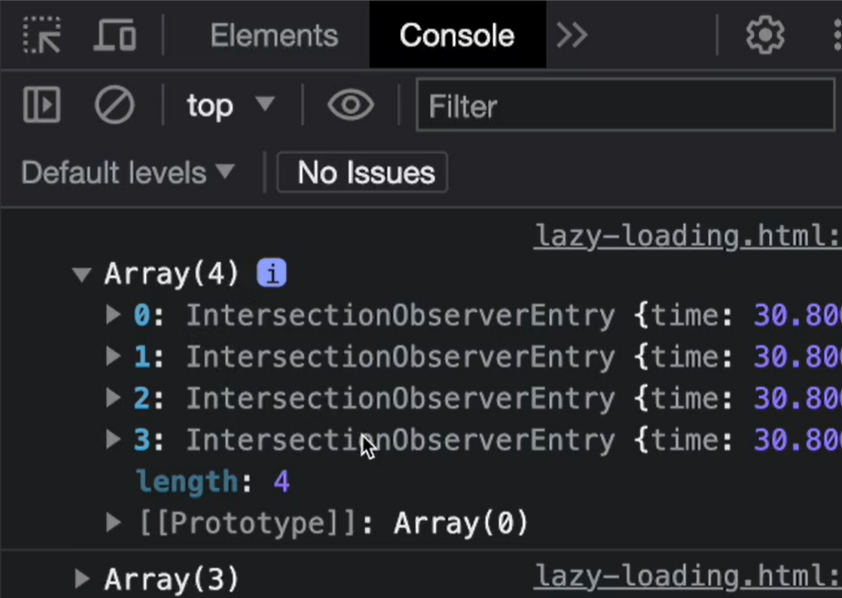
observer.observe(document.querySelector('.end'))-
entries를 콘솔창에 찍어보면 아래와 같은 화면이 나옴

-
두번째 예시: 모든 이미지를 고해상도로 보여주기에는 지나친 자원이 필요하므로, 화면 밖의 이미지들은 400X300 등의 미리보기로 표현하고, 이미지들이 viewport 내로 들어오게 되면 그때부터 고해상도 원본을 표시하고자 한다.
<!--html-->
<head>
  <style>
    .img {
      width: 400px;
      height: 300px;
      display: block;
      margin: 10px auto;
    }
  </style>
</head>

<body>
  <img
       src="https://via.placeholder.com/400x300"
       data-src="https://ik.imagekit.io/demo/img/image4.jpeg?tr=w-400,h-300"
  />
  <img
       src="https://via.placeholder.com/400x300"
       data-src="https://ik.imagekit.io/demo/img/image4.jpeg?tr=w-400,h-300"
  />
  <img
       src="https://via.placeholder.com/400x300"
       data-src="https://ik.imagekit.io/demo/img/image4.jpeg?tr=w-400,h-300"
  />
  <img
       src="https://via.placeholder.com/400x300"
       data-src="https://ik.imagekit.io/demo/img/image4.jpeg?tr=w-400,h-300"
  />
  <script src="script.js"></script>
</body>
// script.js
const observer = new IntersectionObserver(
function (entries, observer) {
entries.forEach(entry => { // entries는 4개짜리 배열임 (img 태그가 현재 4개이므로!)
if (entry.isIntersecting) {
entry.target.src = entry.target.dataset.src
// 고화질원본이미지로 바꿔준 후에는 더이상 관찰할 필요 없음
// 관찰 중단
observer.unobserve(entry.target)
}
})
},
{
threshold: 1,
}
);
const imgs = document.querySelectorAll('img')
imgs.forEach(img) => { // 각각의 img 태그를 모두 관찰
observer.observe(img)
})entries를 화면에 찍어보면 다음과 같은 화면이 나옴
순수 함수 (pure function)
- 함수형 프로그래밍 패러다임의 한 부분이며, 다음과 같은 두가지 규칙이 있음
- 같은 입력값이 주어졌을 때 항상 같은 결과값을 리턴함
same input, same output
const add = (x, y) => x + y;
console.log(add(10, 20));

const fullName = (first, last) => `${first} ${last}`;
console.log(fullName('Minji', 'kim');- 사이드 이벡트를 만들지 않는다
no side effects
const z = 1;
// sum 함수는 함수 바깥의 scope에 접근하고 있으므로 impure 함수이다
const sum = (x, y) => x + y + z;
console.log(sum(10, 20));- 사용하는 이유:
- 클린코드를 위해
- 테스트를 쉽게 하기 위해
- 디버깅을 쉽게 하기 위해
- 독립적인 코드를 위해
Curry Function (커링)
-
함수와 함께 사용되는 고급기술로, 자바스크립트 뿐만 아니라 다른 언어에도 존재함.
-
f(a, b, c)처럼 단일 호출로 처리하는 함수를f(a)(b)(c)처럼 각각의 인수가 호출 가능한 프로세스로 호출된 후 병합될 수 있게 변환하는 것
즉, 함수를 호출하는 것이 아닌 변환하는 것임 -
예시 1
// this method is cleaner
const sum = (x, y) => x + y;
const curriedSum = x => y => x + y;

console.log(sum(10, 20)); // 30
console.log(curriedSum(10)); // y => x + y
console.log(curriedSum(10)(20)); // 30- 예시 2
// 예시 2
const makeFood = (ingred1) => {
  return (ingred2) => {
    return (ingred3) => {
      return `${ingred1} + ${ingred2} + ${ingred3}`
    }
  }
}

const hamburger = makeFood("bread")("meat")("lettuce");
console.log(hamburger) // bread + meat + lettuce- 예시 3
// non-curry
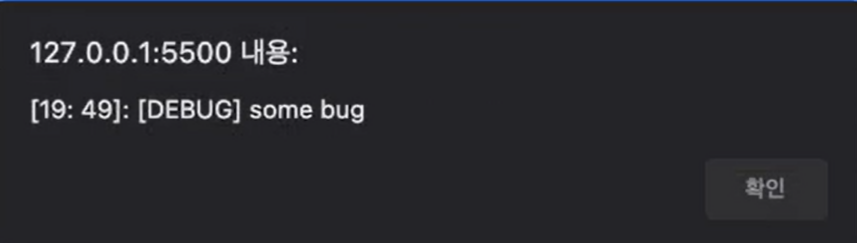
function log(date, importance, message) {
alert(`[${date.getHours()}: ${date.getMinutes()}]: [${importance}] ${message}`);
}
log(new Date(), "DEBUG", "some bug");// currying function
function curry(f) {
return function (a) {
return function (b) {
return function (c) {
return f(a, b, c);
}
}
}
}
const curriedLog = curry(log);
// calling curried log function
curriedLog(new Date())("DEBUG")("some bug");- 그러나 위의 curring function은 매개변수의 개수에 맞춰서 return문을 추가해야 하므로 dynamic하지 못한 단점이 있음
// currying function dynamic ver.
function curry(func) {
return function curried(...args) {
if (args.length >= func.length) {
return func.apply(this, args);
else {
return function (...args2) {
return curried.apply(this, args.concat(args2));
}
}
}
}
// 사용 예시
const sum = (x, y, z, j) => x + y + z + j;
const curriedSum = curry(sum);
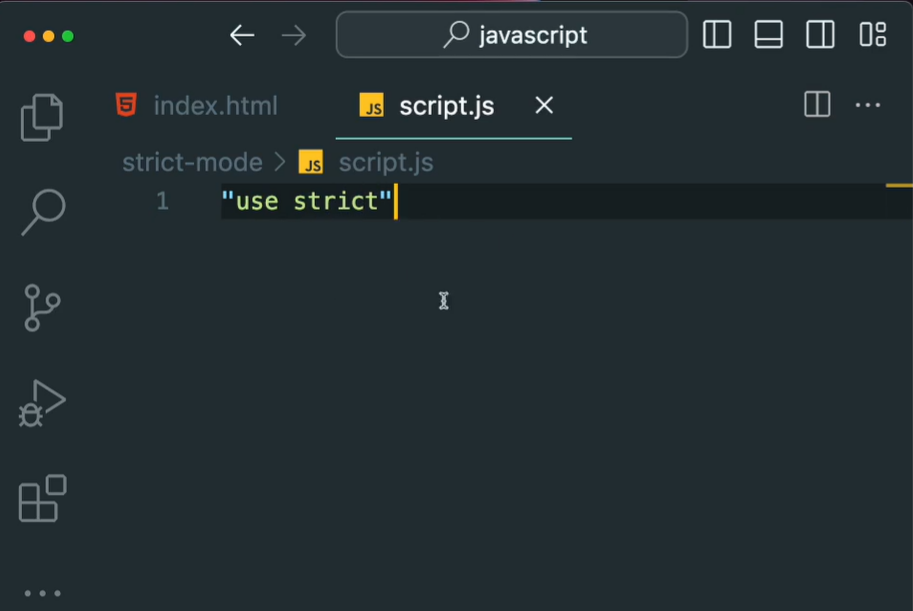
console.log(curriedSum(1)(2)(3)(4)); // 10Strict Mode
- ECMAScript5에서 소개된 JS의 strictmode는 제한된 버전을 선택하여 암묵적 느슨한 모드(sloppy mode)를 해제하기 위한 방법임.
- 기존의 느슨한 모드(default)와의 차이점:
- 기존에 조용히 무시되던 에러들을 throwing함
- JS 엔진의 최적화작업을 어렵게 만드는 실수들을 바로잡음
- strict mode 적용 방법
-
"use strict"지시자 입력: 만약 특정 함수 내부에 작성하면 해당 함수만 strict mode가 됨!
-
class를 생성하면 자동으로 strict 모드로 바뀜 -
script 로드 시
type="module"을 작성하면 자동으로 strict 모드로 바뀜
<script src="script.js" type="module"></script>OOP?
- OOP(Object Oriented Programming, 객체지향프로그래밍) : Java, C++를 비롯한 많은 프로그래밍 언어의 기본이 되는 프로그래밍 패러다임
여러개의 독립된 단위 객체들의 모임 - 절차지향프로그래밍: 객체지향프로그래밍이 도입되기 전에 명령어의 목록을 나열하는 기능구현목적의 코드를 작성하곤 했었음
class Car {
  constructor() { ... }
  method1() { ... }
  method2() { ... }
}

class Animal {
  constructor() { ... }
  method1() { ... }
  method2() { ... }
}- OOP의 특징: Polymorphism, Inheritance, Abstraction, Encapsulation
-
Abstraction(자료 추상화) : 불필요한 정보는 숨기고 중요한 정보만을 표현함으로서 프로그램을 간단히 만드는 것 → 객체 안의 자세한 내용은 몰라도 중요 정보를 이용해서 객체를 간단히 사용 가능
예: 커피머신의 작동원리는 몰라도 커피머신을 이용할 수는 있음 -
Inheritance(상속): 새로운 클래스가 기존의 클래스의 자료와 연산을 이용할 수있게 하는 기능
상속을 받는 새로운 클래스를 파생클래스, 하위클래스, 자식클래스라고 하며, 종속관계를 형성함 -
Polymorphism(다형성): poly는 많은, morph는 형태라는 뜻으로 다양한 형태를 가질 수 있다는 개념임
같은 메소드라도 각 인스턴스에 의해 다양한 형태를 가질 수 있다는 개념 -
Encapsulation(캡슐화): 클래스 안에 관련 메소드, 변수 등을 하나로 묶어주고, 이를 이용해서 바깥으로부터의 접근을 막아 보안이 강화되고 잘 관리되는 코드를 제공
다형성(Polymorphism)?
- 어떤 한 요소에 여러 개념을 넣어두는 것으로, 같은 메소드라도 각 인스턴스에 의해 다양한 형태를 가짐
class PaymentGateway {
  constructor() {
    this.connect();
  }
  connect() {
    // 결제 제공업체에 연결
  }
  pay(amount) {
    //...
  }
  refund(amount) {
    //...
  }
}

class Paypal extends PaymentGateway {
  pay(amount) {
    // paypal 전용 로직 구현
  }
}

class Visa extends PaymentGateway {
  pay(amount) {
    // Visa 전용 로직 구현
  }
}

class Customer {
  makePayment(gateway, amount) {
    return gateway.pay(amount)
  }

  // 만약 다형성이 없다면 여기서 메소드들을 생성해야 함
  // payByPaypal(amount) {}
  // payByVisa(amount) {}

  getRefund(gateway, amount) {
    return gateway.refund(amount)
  }
}
// 하지만 다형성에 의해서, customer class는 수정하지 않아도 됨! 즉, 새로운 결제방식이 생길때마다 기존의 class를 수정하는 방식이 아닌, 새 class를 만드는 방식으로 작동함

const john = new Customer();
const paypal = new Paypal();
const visaCard = new Visa();

john.makePayment(paypal, 100);
john.makePayment(visaCard, 100);
Javascript Prototype
let user = {
  name: "minji",
  age: 22,
  email: "minzikx@gmail.com",
}

console.log(user.name); // minji
console.log(user.hasOwnProperty("email")); // true-
hasOwnProperty?
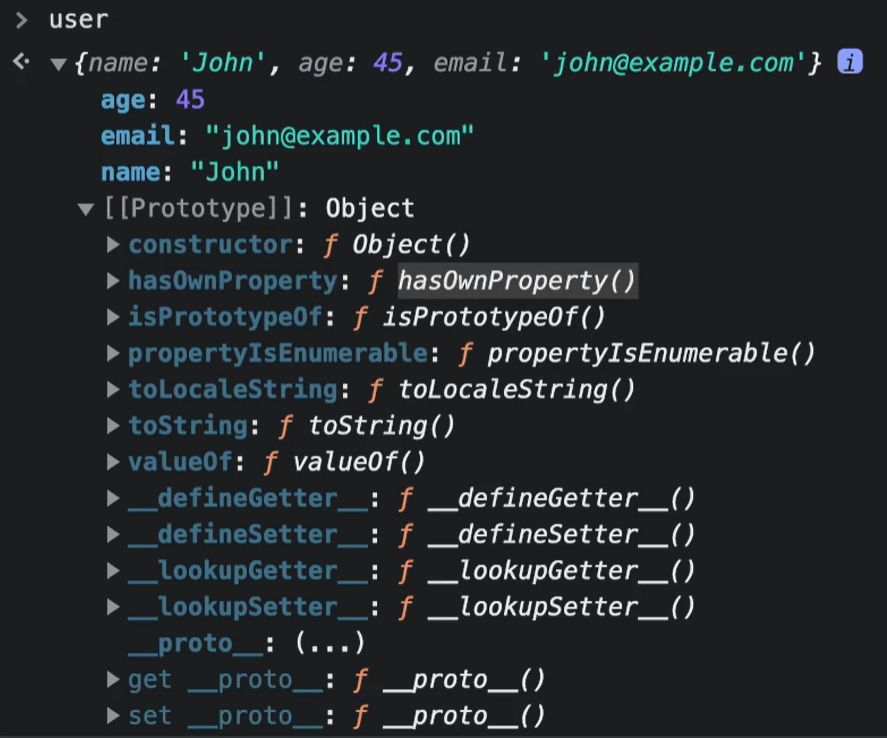
-
prototype? : 프로토타입은 자바스크립트 객체가 다른 객체로부터 메소드와 속성을 상속받는 메커니즘을 말함
// 생성자 함수 작성
function Person(name, age, birthday) {
  this.name = name;
  this.age = age;
  this.birthday = new Date(birthday);
  this.calculateAge = function() {
    const diff = Date.now() = this.birthday.getTime();
    const ageDate = new Date(diff);
    return Math.abs(ageDate.getUTCFullYear() - 1970);
  }
}

// 객체 생성
const minji = new Person('minji', 22, '4-19-03');

console.log(minji);minji던john이던birthday,age,name의 값은 모두 다르겠지만calculateAge프로퍼티의 값은 같음
→ 프로토타입에 넣어주는 것이 더 효율적
생성자함수.prototype.메소드
// 프로토타입에 넣어주기 방법 1
Person.prototype.calculateAge = function() {
  const diff = Date.now() = this.birthday.getTime();
    const ageDate = new Date(diff);
    return Math.abs(ageDate.getUTCFullYear() - 1970);
}
Object.create()
function Person(name, age, birthday) {
  let person = Object.create(personsPrototype); // 새 객체를 만듦
  person.name = name;
  person.age = age;
  person.birthday = new Date(birthday);
  return person;
}

const personsPrototype = {
  calculateAge() {
    const diff = Date.now() = this.birthday.getTime();
    const ageDate = new Date(diff);
    return Math.abs(ageDate.getUTCFullYear() - 1970);
  }
}
ES6 Classes
- 더 쉽게 OOP를 구현할 수 있음
class Person {
  constructor(name, age, birthday) {
    this.name = name;
    this.age = age;
    this.birthday = new Date(birthday);
  }
  .introduce() { // 프로토타입으로 들어감
    return `Hello my name is ${this.name}`;
  }
}

const minji = new Person('minji', 22, '4-19-03');static: 프로토타입이 아닌, 클래스 함수 자체에 메소드를 설정할 수도 있음. 이러한 메소드를 정적 메소드라고 부름.
this.name같은 것들을 사용하지 않는, 독립적인 것을 정의할 때 사용함
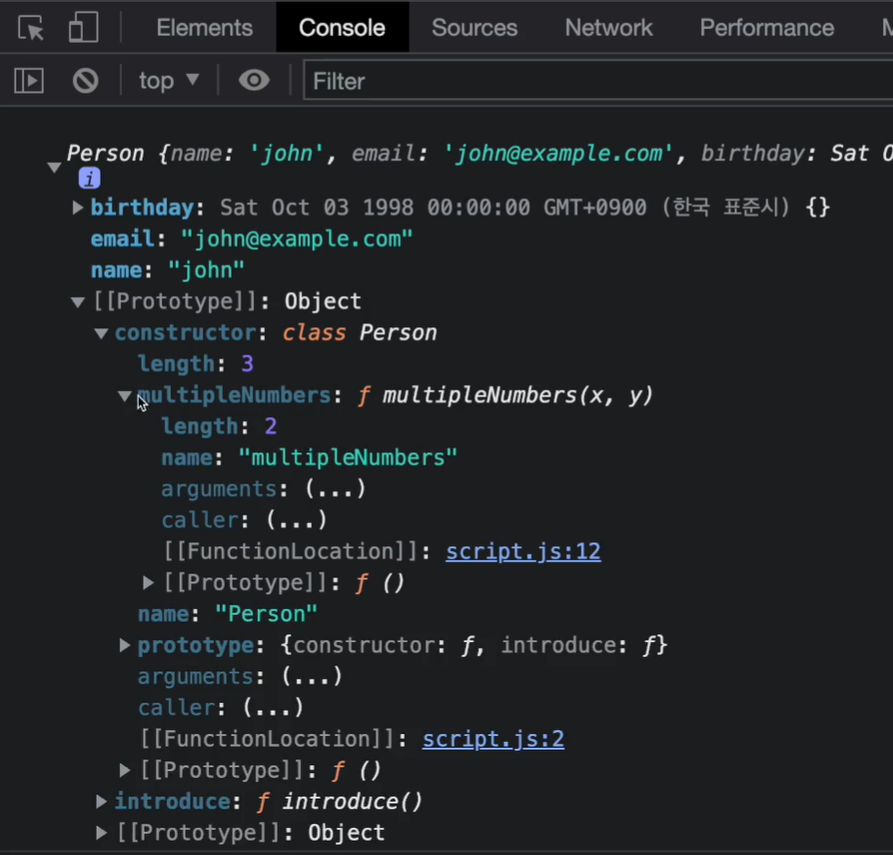
class Person {
constructor(name, age, birthday) {
this.name = name;
this.age = age;
this.birthday = new Date(birthday);
}
introduce() { // 프로토타입으로 들어감
return `Hello my name is ${this.name}`;
}
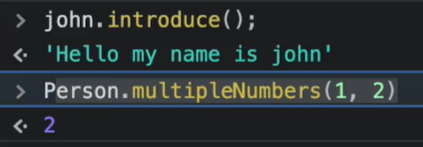
static multipleNumbers(x, y) {
return x * y;
}
}
console.log(Person.multipleNumbers(2, 9));- 사용법
Sub Class (Inheritance: 상속)
extends키워드를 사용해서 부모 클래스에 있던 기능을 토대로 자식 키워드를 만들어, 부모 클래스를 자식 클래스에 확장할 수 있음- 자식클래스에 부모클래스의 속성을 불러올 때에는
super()를 사용함
class Person {
  constructor(name, age) {
    this.name = name;
    this.age = age;
  }

  introduce() {
    return `Hello my name is ${this.name}`;
  }
}

class Client extends Person {
  constructor(name, email, phone, address) {
    super(name, email)

    this.phone = phone;
    this.address = address;
  }
}

const minji = new Client('minji', 22, '010-0000-1111', '서울');

console.log(minji.introduce) // Hello my name is minjiminji.introduce가 실행되는 순서
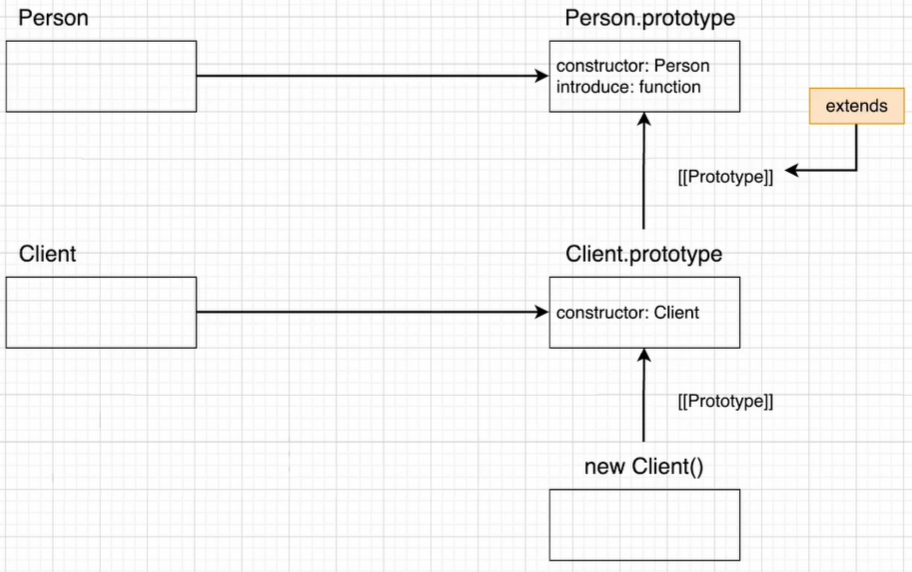
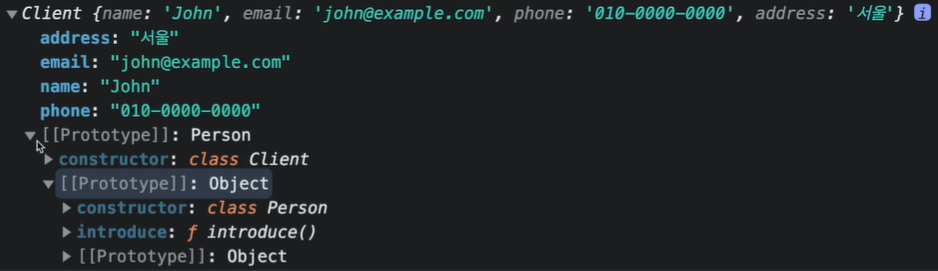
- client 객체에 client.introduce가 있는지 확인
- 없으므로 Client.prototype에 있는지도 확인 ▶ 없음
- extends를 통해 관계가 생성된 Client.prototype의 프로토타입인 Person.prototype에 메소드가 있는지 확인
▶ introduce가 있음! 이것을 사용.
super()
- Constructor(생성자)를 사용하면 인스턴스화 된 객체에서 다른 메소드를 호출하기 전에 수행해야하는 사용자 지정 초기화를 제공할 수 있음
클래스에new를 붙여서new User('minji')인스턴스 객체로 생성하면 넘겨받은 인수와 함께 constructor가 실행됨
이 때 넘겨받은 인수인'minji가this.name에 할당됨
class User {
  constructor(name) {
    this.name = name;
  }

  sayHi() {
    alert(this.name);
  }
}

let user = new User('minji');
user.sayHi();- JS에서
super(인수들): 자식 클래스Model내에서 부모 클래스의 생성자super(brand)/메소드super.present()를 호출할 때 사용됨
class Car {
  constructor(brand) { // 부모 클래스의 생성자
    this.carname = brand;
  }

  present() { // 부모 클래스의 메소드
    return `I have a ` + this.carname;
  }
}

class Model extends Car {
  constructor(brand, mod) {
    super(brand);
    this.model = mod;
  }
  show() {
    return super.present() + `, it is a ` + this.model;
  }
}

let mycar = new Model("Ford", "Mustang");
mycar.show();
자바스크립트의 비동기 작업
-
자바스크립트는 하나의 스레드로 이루어져 있음 ▷ 한번에 하나의 일밖에 못함
↪ 그런데 만약 이 하나의 일이 오래 걸리는 일이라면? UX가 굉장히 부정적이게 됨
-
위의 문제점을 해결하기 위해 비동기로 어떠한 일을 수행하게 됨
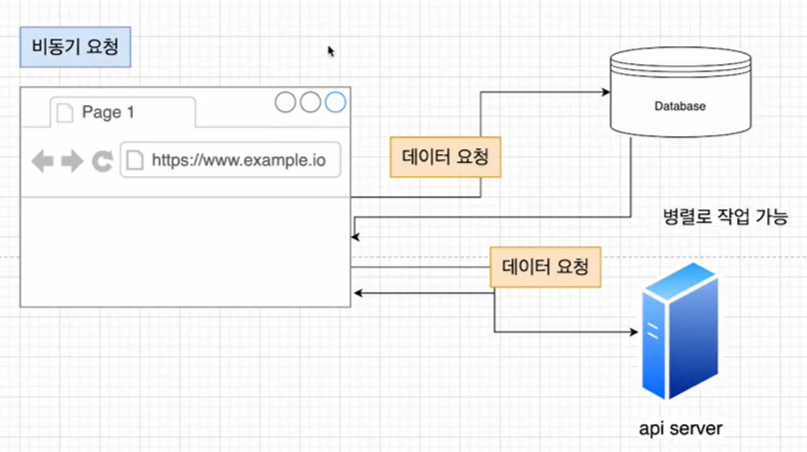
-
만약 아래의 코드와 같이, 비동기 요청이 여러개 있을 때 하나의 요청이 다른 요청의 결과에 의존한다면? 즉, 두번째 요청에 첫번째 요청의 결과가 필요하다면?
✨ 해결 방법: (1) Callback 함수 (2) promise (3) Async/Await
↪ 도입 순서대로 적혀있으며, 최근에는Async/Await를 가장 많이 사용하는 추세
// 1st response
const response1 = request('http://abc.com');

// 2nd response
const response2 = request('http://def.com', response1);
(1) Callback
- 단점: 가독성이 떨어지고, 에러처리시 모든 콜백에서 각각 해주어야 함
function firstFunction(parameters, callback) {
  const response1 = request(`http://abc.com?id=${parameters.id}`);// 요청
  callback(response1);
}

function secondFunction(response1, callback) {
  const response2 = request(`http://def.com`, response1);
  callback();
}

firstFunction(para, function(response1) {
  secondFunction(response1, function() {
    thirdFUnction(para, function() {
      //...
    })
  })
})
(2) ES6 Promise 객체
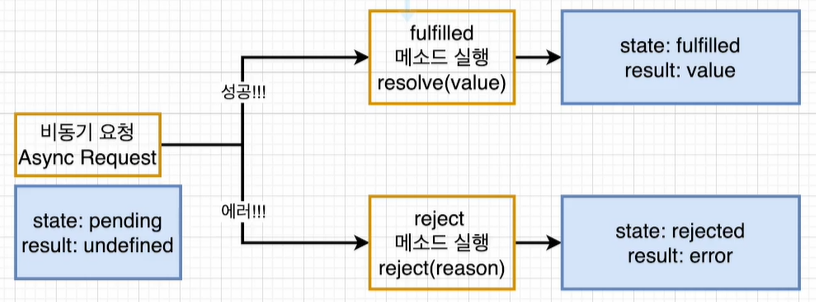
new키워드와 생성자를 사용해서 만듦promise객체는 비동기 작업이 맞이할 미래의 완료 or 실패와 그 결과값을 나타냄
const myFirstPromise = new Promise((resolve, reject) => {
  // resolve() : 비동기 작업을 성공적으로 완료해 결과를 값으로 반환할 때 호출
  // reject() : 작업이 실패해서 오류의 원인을 반환할 때 호출, 주로 오류객체를 받음
});- 예시
function fetchData() {
  return new Promise((resolve, reject) => {
    const success = true;
    if (sucess) {
      resolve('성공');
    } else {
      reject('실패');
    }
  })
}

fetchData()
  .then(function (result) {
    console.log(result);
  })
  .then(function (error) {
    console.log(error);
})- 실제로는, 아래의 코드와 같이 실패 케이스로는
catch를 사용함
myPromise
  .then((result) => {
    console.log(result);
  })
  .catch((err) => {
    console.log(err);
  })
  .finally(() => { // 이행이던 거부던 무조건 마무리는 여기로
    console.log('---every process ended---');
})-
promise객체는 대기(pending, 비동기 처리 로직이 아직 완료되지 않은 상태), 이행(fulfilled, 비동기 처리가 완료되어 promise가 결과값을 반환해준 상태), 거부(rejected, 비동기처리가 실패하거나 오류가 발생한 상태)의 세가지 상태 중 하나를 가짐!
-
promise()생성자는 promise를 지원하지 않는 함수를 감쌀때만 사용하므로fetch함수에는 사용하지 않음
// 자동으로 비동기로 받아오는 중
fetch('http://blahblah/1')
	.then(response1 => response1.json()) // 받아와서 json으로 바꾸기
	.then(json1 => console.log(json1)); // json으로 받아오기
	// 요청이 끝난 후 다시 fetch를 하고 싶다면?
	.then(() => fetch('http://blah/2'));
	// 위와 동일한 방식으로 받아오기
	.catch((error) => {
       console.error(error);
    })
	.finally(() =>
       console.log('작업끝'); // 오류가 나도 실행됨
}) promise.all(): 해당 메소드는 array처럼 순회 가능한 객체에 주어진 모든 프로미스가 이행한 후 결과를 array로 반환함
array 안의 promise 중 하나라도 reject라면 해당 promise의 reject 이유를 반환함
const promise1 = Promise.resolve(3); // 만약 얘가 reject라면 실패한이유 반환
const promise2 = 42;
const promise3 = new Promise((resolve, reject) => {
  setTimeout(resolve, 100, 'foo');
});

Promise.all([promise1, promise2, promise3]).then((values) => {
  console.log(values);
});
// Expected output: Array [3, 42, "foo"]promise.race(): iterable 내의 프로미스 중 가장 먼저 완료된 것의 결괏값 하나만을 반환함
const promise1 = new Promise((resolve, reject) => {
  setTimeout(resolve, 500, 'one');
});

const promise2 = new Promise((resolve, reject) => {
  setTimeout(resolve, 100, 'two');
});

Promise.race([promise1, promise2]).then((value) => {
  console.log(value);
  // Both resolve, but promise2 is faster
});
// Expected output: "two"
(3) Async, Await
- 함수 전체를
async로 감싸고 fetch 앞에await을 붙여주는 형태
async function makeRequests() {
  try {
    const response1 = await fetch('http://blah.com');
    const jsonResponse1 = await response1.json();
    console.log(jsonResponse1);
  } catch (error) {
    console.error(error);
  } finally {
    console.log('---모든작업끝---');
Symbol
- symbol type이란? ES6에서 새로 추가된 원시타입으로, 유니크한 식별자를 만들기 위해 사용됨
const sym1 = Symbol();
const sym2 = Symbol();

console.log(sym1 === sym2); // false

const sym3 = Symbol("hi");
console.log(sym1); // Symbol()
console.log(sym3.description); // hisymbol은 언제 사용될까? 어떤 객체의 프로퍼티 내용들은 모른다고 가정하자. 이 때, 객체에 유니크한 값을 추가하고 싶은데 아무 프로퍼티명이나carA.id = 300같은 식으로 불러서 추가할 경우 이미 존재하는 속성값을 오버라이딩 (1 → 300) 하는 경우가 발생할 수 있음
let carA = {
  id: 1,
  name: 'morning',
  brand: 'kia',
  price: 1000
}

const idSym = Symbol('id');
carA[idSym] = 300;

console.log(carA);

// 심볼은 프로퍼티로 보여지지는 않음
console.log(Object.getOwnPropertyNames(carA))
// ['id', 'name', 'brand', 'price']

for (const key in carA) {
  console.log(key);
} // id name brand price

// 심볼을 확인하려면,
console.log(Object.getOwnPropertySymbols(carA)); // [Symbol(id)]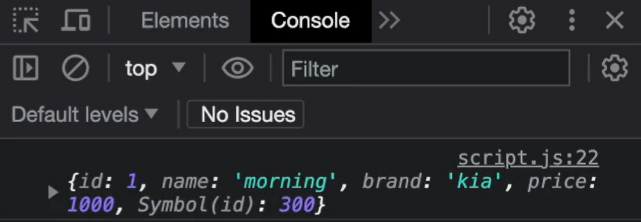
symbol.for()를 이용해서 전역심볼 만들기: 원래는 심볼로 값을 생성하면 심볼의 description이 같더라도 다 다른 값을 가지게 됨. 그러나symbol.for()를 이용하면 같은 description을 가졌을 때 같은 값을 가지며, 전역심볼이 되어서 다른 곳에서 description
console.log(Symbol('id') === Symbol('id')) // false
console.log(Symbol.for('id') === Symbol.for('id')) // trueSymbol.keyFor():symbol.for()를 이용해서 만든 전역심볼을 찾기 위해 description을 얻음
let sym = Symbol.for('id');
alert(Symbol.keyFor(sym)); // id- 활용
// 예시 1
const RED = 'red'; // Symbol('red')
const ORANGE = 'orange'; // Symbol('orange')
const YELLOW = 'yellow'; // Symbol('yellow')
const BLUE = 'blue'; // Symbol('blue')
const DOG = 'blue';
function getImportanceLevel(color) {
switch (color) {
case RED:
return 'very important';
case ORANGE:
return 'important';
case YELLOW:
return 'a bit important';
case BLUE:
return 'not so important';
default:
console.log(`${color} not included`);
}
}
console.log(getImportantLevel(BLUE)); // not important
console.log(getImportantLevel(dog)); // blue not included 이 나와야 하는데 not important가 나옴
// 위의 주석대로 symbol로 수정하기
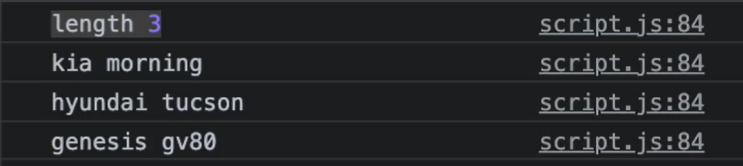
// 예시 2: 사진에서 length 3은 제외하고 출력하고 싶다면?
const length = Symbol('length'); // 심볼이 되면 프로퍼티에서 빠지니까 출력도 안됨
class Car {
consturctor() {
this[length] = 0; // []로 감싸줘야 함
}
add(brand, name) {
this[brand] = name;
this[length]++;
}
}
let myCars = new Car();
// adding cars
myCar.add('kia', 'morning');
myCar.add('hyundai', 'tuscon');
myCar.add('genesis', 'gv80');
for (const car in myCars) {
console.log(car, myCars[car]);
}
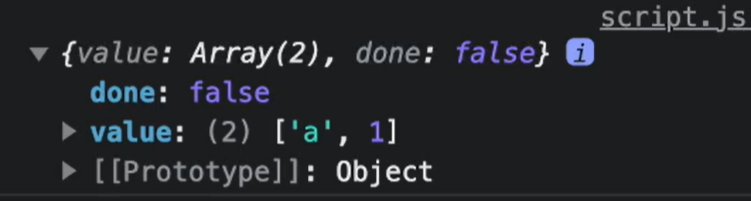
Iterator(반복기)
- iteratale: 배열과 같이 반복이 가능한 것.
for ... of를 사용할 수 있거나[Symbol.iterator]()가 값을 가지면 iteratable함 - iterator(반복자) :
next()를 호출해서{value: , done: }두개의 속성을 가지는 객체를 반환하는 객체
[Symbol.iterator]().next()?
// iterator 직접 생성해보기
function makeIterator(numbers) {
  let nextIndex = 0;

  return {
    next: function() {
      return nextIndex < numbers.length ?
        { value: numbers[nextIndex++], done:false }:
        { value: undefined, done: true }
    }
  }
}

const numbersArr[1, 2, 3]; // iteratable
const numbersIterator = makeIterator(numbersArr); // iterator

console.log(numbersIterator.next()); // {value: 1, done: false}
console.log(numbersIterator.next()); // {value: 2, done: false}
console.log(numbersIterator.next()); // {value: 3, done: false}
console.log(numbersIterator.next()); // {value: undefined, done: true}
// [Symbol.iterator]() 사용해보기
const numbersArr[1, 2, 3]; // iteratable
const numbersIterator = numbersArr[Symbol.iterator]()
console.log(numbersIterator.next()); // {value: 1, done: false}
console.log(numbersIterator.next()); // {value: 2, done: false}
console.log(numbersIterator.next()); // {value: 3, done: false}
console.log(numbersIterator.next()); // {value: undefined, done: true}- iterable O: 배열, set
- iterable X: 객체, map
Generator(생성기)
- generator function: 일반함수는 단 한번의 실행으로 함수 끝까지 실행되는 반면, generator function은 사용자의 요구에 따라 다른 시간 간격으로 여러 값을 반환할 수 있으며, 사용자의 요구에 따라 일시적으로 정지될 수도 있고 다시 시작할 수도 있음
yield는 함수를 일시적으로 멈춰줌.
// generator ex
function* sayNumbers(i) {
  yield 1; // yield* [1, 2, 3]; 과 같은 표현
  yield 2;
  yield 3;
}

const number = sayNumbers();

console.log(number.next().value); // 1
console.log(number.next().value); // 2
console.log(number.next().value); // 3- 활용방식: Lazy Evaluation, 계산의 결과값이 필요할 때까지 계산을 늦춰서 필요한 데이터를 필요한 순간에 생성함
function* createIds() {
  let index = 1;

  while (true) {
    yield index++;
  }
}

const gen = createIds();

console.log(gen.next().value);
console.log(gen.next().value);
console.log(gen.next().value);
JS Design pattern
- Singleton Pattern, Factory Pattern, Mediator Pattern, Observer Pattern, Module Pattern