.png)
⭐Back-end
JSP
아래 기능들을 구현하기 위해 전체 코드 중 주요하게 바뀌는 부분만 작성해보겠다
페이지 수 만큼만 페이저 구현하기
list.jsp
<nav class="pager mt-3">
	<h1 class="d-none">페이저</h1>
	<div class="button">이전</div>
	<ul>
		<%for(int i=0; i<5; i++) {%> <!-- 1. 횟수를 수정 -->
               		<!-- 2. lastPage보다 출력되는 게 클 경우 안 나오게 if문 조건처리 -->
			<%if(lastPage >= i+1)  {%>
				<li><a class="<%=page_ == i+1 ? "text-strong" : "" %>" href="list.jsp?p=<%=i+1 %>&f=<%=field %>&q=<%=query %>"><%=i+1 %></a></li> <!--이렇게 해서 사용자가 검색한 결과 내에서 paging 할 수 있게 하기-->
			<%} %>
		<%} %>
	<div class="button">다음</div>
</nav>
테이블 만들기
detail.jsp
<table border="1">
      <tr>
        <th>제목</th>  <!-- 컬럼 내에서의 제목: th -->
        <td colspan="3">HI</td> <!-- DB에 해당되는 내용 나오게 하기 -->
      </tr>
      <tr>
        <th>작성일</th>
        <td colspan="3">2021-03-25</td>
      </tr>
      <tr>
        <th>작성자</th>
        <td>admin</td>
        <th>조회수</th>
        <td>25</td>
      </tr>
      <tr>
        <th>첨부파일</th>
        <td colspan="3">test.zip</td>
      </tr>
      <tr>
        <td colspan="4">
          안녕하세요<br>
          인사 드립니다!<br>
        </td>
      </tr>
</table>
<div>
      <a href="list.jsp">목록</a>
</div>
게시글 상세 정보 나타내기
list.jsp
<td class="truncate text-align-left"><a href="detail.jsp?id=<%=n.getId()%>"><%=n.getTitle()%></a></td> <!--id를 querystring으로 함께 보내자-->NoticeService.java
public Notice get(int id) throws ClassNotFoundException, SQLException {

	String url = "jdbc:oracle:thin:@hi.namoolab.com:1521/xepdb1";
	String sql = "SELECT * FROM NOTICE WHERE ID = " + id; // 문자열 + 정수 -> 문자열 변환

	Class.forName("oracle.jdbc.OracleDriver");
	Connection con = DriverManager.getConnection(url, "NEWLEC", "11111"); // 서블릿 프로세스가 끝나면 연결이 끊어짐
	Statement st = con.createStatement();
	ResultSet rs = st.executeQuery(sql);

	Notice notice = null;

	if(rs.next()) {

		// Notice 데이터
		String title = rs.getString("title");
		String writerId = rs.getString("writer_id");
		String content = rs.getString("content");
		Date regDate = rs.getDate("regDate");
		int hit = rs.getInt("hit");
		String files = rs.getString("files");

		notice = new Notice();
		notice.setId(id);
		notice.setTitle(title);
		notice.setWriterId(writerId);
		notice.setContent(content);
		notice.setRegDate(regDate);
		notice.setHit(hit);
		notice.setFiles(files);
	}

	rs.close();
	st.close();
	con.close();

	return notice;
 }
detail.jsp
<%
	String id_ = request.getParameter("id"); // 사용자에게 아이디 받기
	int id = Integer.parseInt(id_); // 무조건 id 값이 오게 해서 id 값 념겨주기

	NoticeService noticeService = new NoticeService();
	Notice notice = noticeService.get(id); // 특정한 notice 관련 정보(단일 객체로 얻어오기)를 얻어와야하니까 where절에서 부르기 위한 id를 통해 notice 정보 달라고 하기
 	System.out.println(notice);
%> <table border="1">
<tr>
<th>제목</th> <!-- 컬럼 내에서의 제목: th -->
<td colspan="3"><%=notice.getTitle() %></td> <!-- NoticeService에서 구현한 코드로 notice에 채워진 값 가져오기 -->
</tr>
<tr>
<th>작성일</th>
<td colspan="3"><%=notice.getRegDate() %></td>
</tr>
<tr>
<th>작성자</th>
<td><%=notice.getWriterId() %></td>
<th>조회수</th>
<td><%=notice.getHit() %></td>
</tr>
<tr>
<th>첨부파일</th>
<td colspan="3">test.zip</td>
</tr>
<tr>
<td colspan="4">
<%=notice.getContent() %>
</td>
</tr>
</table>⭐Front-end
CSS
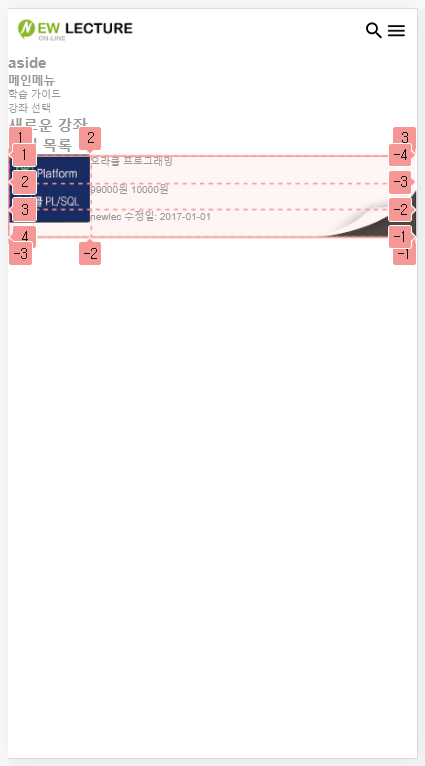
목록 Grid로 구현하기
list.html
<section class="open-lecture-content">
    <h1>강의 목록</h1>
      <ul> <!--박스를 a 태그가 감쌀 수 없음-->
          <li>
              <a class="title" href="">오라클 프로그래밍</a> <!--제목이 먼저 오게 하기 -->
              <img src="../images/lecture/img-oracle-sm.png">
              <span class="price">
                  <span>99000원</span>
                  <span><span>10000</span>원</span>
              </span>
              <span class="info">
                  <span>newlec</span>
                  <span>수정일: 2017-01-01</span>
              </span>
          </li>
      </ul>
</section>
style.css
.open-lecture-content li {
    display: grid;
    height: 90px;
    /*width: 100%; /*default*/
    grid-template-columns: 90px 1fr; /*grid 열*/
    grid-template-rows: repeat(3, 1fr); /*grid 행*/
    grid-template-areas:
    "img title"
    "img price"
    "img info";
    background: url(../images/lecture/bg-title-normal-box.png) no-repeat right bottom;
}

.open-lecture-content li>.title {
    grid-area: title;
}

.open-lecture-content li>img {
    /* float: left;  */
    grid-area: img;
    width: 100%;
}

.open-lecture-content li>.price {
    grid-area: price;
}

.open-lecture-content li>.info {
    grid-area: info;
}
결과 화면
AJAX
아래 기능을 구현하기 위해 전체 코드 중 주요하게 바뀌는 부분만 작성하였다
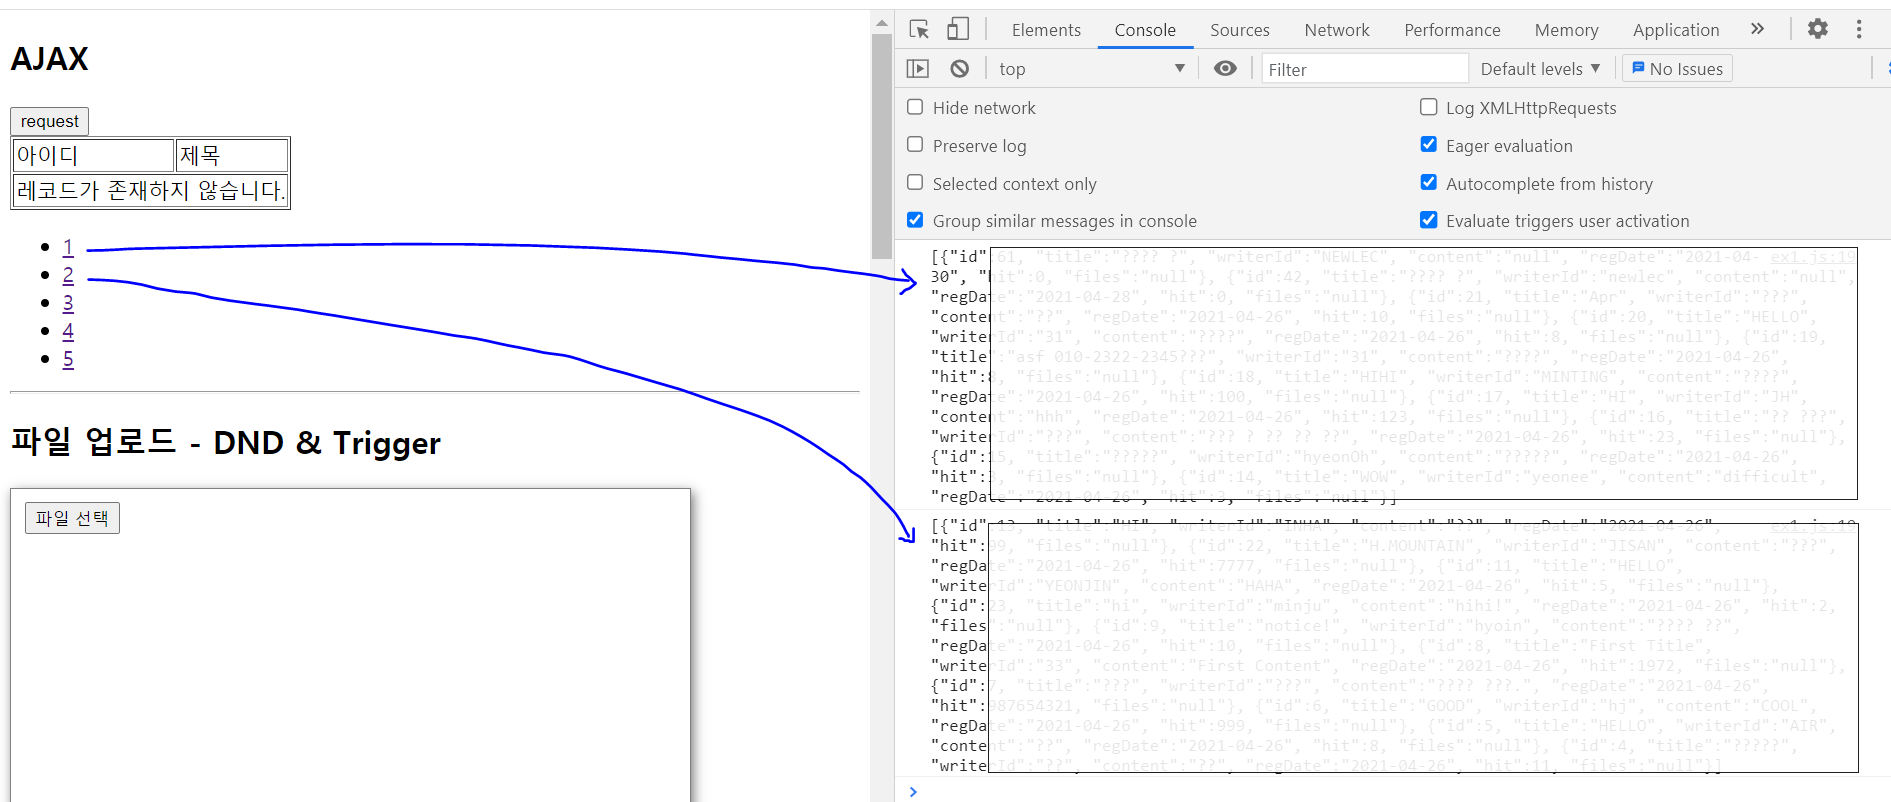
페이지 클릭 시 콘솔 창에 해당 페이지 게시글 정보 출력하기
ex1.html
 <div class="pager"> <!--페이저 구현을 위한 html 코드-->
     <ul>
         <li><a href="">1</a></li> <!-- a태그: 버튼 역할 -->
         <li><a href="">2</a></li>
         <li><a href="">3</a></li>
         <li><a href="">4</a></li>
         <li><a href="">5</a></li>
     </ul>
</div>
NoticeList.java
@WebServlet("/api/notice/list")
public class NoticeList extends HttpServlet {

	@Override
	protected void doGet(HttpServletRequest req, HttpServletResponse resp) throws ServletException, IOException {
		PrintWriter out = resp.getWriter();

		try {
			String p = req.getParameter("p"); // 사용자가 페이지 클릭 시 querystring으로 페이지 값 전달
			int page = 1; // 기본값 설정

			if(p != null && !p.equals(""))
				page = Integer.parseInt(p);

			NoticeService noticeService = new NoticeService();
			List<Notice> list = noticeService.getList(page, "title", "");

			out.println(list); // println이 알아서 toString()으로 변환해서 출력해줌

		} catch (ClassNotFoundException e) {
			e.printStackTrace();
		} catch (SQLException e) {
			e.printStackTrace();
		}

	}

}
ex1.js
window.addEventListener("load", function() {
    var section = document.querySelector("#ex10");
    var pager = section.querySelector(".pager");

	pager.onclick = function(e) {
		e.preventDefault();

      		// 사용자가 클릭한 것이 a 태그 엘리먼트가 아니라면 함수 동작X
		if(e.target.tagName != "A")
			return;

		// 클릭한 페이지 번호
		var page = e.target.innerText;

		var request = new /*window.*/XMLHttpRequest();
      	        // 사용자의 요청이 완료됐을 때 콘솔창에 응답 텍스트 출력
		request.onload = function(e) {
			console.log(request.responseText);
		};

		request.open("GET", `../api/notice/list?p=${page}`, true);
		request.send(null);
	}
});
결과 화면
콘솔 창에 출력된 내용은 DB에 임의로 넣은 데이터이긴 하지만, 개인정보가 들어있어 가려놓았다. 왼쪽 웹 브라우저에서 페이지를 클릭하면 해당 페이지에서 보여줄 게시글에 대한 정보가 오른쪽 콘솔 창에 출력되는 것을 확인할 수 있다!
🐥마무리
오늘도 어제처럼 JSP에서 DB 데이터를 이용해 페이지 안의 여러 기능들을 구현해보는 시간을 가졌다. 어제는 수업을 따라가기가 조금 벅찼는데, 어제 밤에 수업 흐름에 대해 한번 복습을 해서 그런지 오늘은 진도를 따라가기 좀 더 수월했다. 또 오후 시간에는 AJAX를 이용해 백단의 데이터를 가져와 화면에 출력해보는 연습을 했다.
몇 달 전, 웹 백엔드 개발에 대해 하나도 모르는 채로 유튜브 강의를 들으며 실습을 했던 적이 있다. 그 때 이해되지 않던 내용들이 학원 수업을 들으며 이해되는 것을 느낄 때가 많은데 이래서 반복학습이 중요하다고 하나 보다🙂 수업을 들으며 배운 내용들을 이제 팀프로젝트에 차근차근 적용해가며 실전 연습해보는 시간을 많이 가져야겠다.
.png)
Minju's Tech Blog