NestJS & Google OAuth2 with Passport ✍️
0. 개요 ✅
reference: https://www.youtube.com/watch?v=OitgkKTxht4&t=1036s
오늘은 Anson Foong(앤슨 풍?) 형님의 유튜브 강의를 찾아 들었습니다. 어디에 숨어있다가 이제서야 저에게 찾아온 건지,,, 참 감격스럽습니다.
위 영상 자료는 Google Cloud Console에서 프로젝트를 생성하고 OAuth 동의 화면을 구성하는 방법에 관한 설명부터 시작합니다.
이후, NestJS 애플리케이션에 대한 기본적인 설정, Google Strategy와 Google Auth Guard, 데이터베이스(TypeORM 및 MySQL 사용) 통합에 대한 설명을 진행합니다.
최종적으로 사용자의 인증 상태를 관리하기 위한 세션 직렬화 및 역직렬화를 구성하는 방법까지 다룹니다. Runnung Time 72분이 조금 호들갑을 떨자면 마치 7분 20초처럼 느껴지는 명강의였습니다. 함께 정리하시죠.
1. Google Cloud Console 설정 ✅
Google Cloud Console을 설정하는 부분에 대해서는 설명하지 않겠습니다.
이미 훌륭한 자료가 너무도 많거니와 자주 업데이트되는 항목이므로, 시간이 지나면 기존 정보가 부정확해질 수 있기 때문입니다. 다만 다른 글을 참고하더라도, 다음 두 가지 포인트는 주의해 주세요.
Redirection URI설정을 올바르게 할 것- 클라이언트 ID와 클라이언트 Secret는 하드 코딩하지 않고, 반드시
환경 변수로 다룰 것
나머지는 찾아보시면 누구나 쉽게 할 수 있습니다.
2. NestJS 프로젝트 생성 및 기본 설정 ✅
Nest CLI를 사용하여 새로운 NestJS 프로젝트를 생성합니다. 저의 경우 터미널에서 nest new google-oauth2-tutorial 명령어를 입력하여, 새로운 NestJS 프로젝트를 생성했습니다.
src/main.ts 파일에서, 포트와 컨트롤러 경로 prefix에 대한 설정을 진행했습니다.
import { NestFactory } from '@nestjs/core';
import { AppModule } from './app.module';

async function bootstrap() {
  const app = await NestFactory.create(AppModule);
  // 전체 라우팅 경로에 공통 접두사(/api)를 추가하는 역할
  app.setGlobalPrefix('api');
  // PORT: 3001로 설정
  await app.listen(3001);
}
bootstrap();
main.ts 파일은, NestJS 애플리케이션의 시작점에 해당합니다. NestFactory.create(AppModule)을 통해 전체 앱 인스턴스를 생성합니다.
app.setGlobalPrefix('api')은 모든 라우트 경로 앞에 /api라는 공통 접두사를 붙이는 역할을 합니다. 그리고 app.listen(3001)을 호출해서 서버를 로컬 3001번 포트에서 실행하도록 설정했습니다.
3. Auth Module, Controller 구현 ✅
Nest CLI를 사용하여 인증 관련 기능을 담당할 Auth Module을 생성합니다. nest g module auth 명령어를 터미널에 입력하시면 됩니다. 컨트롤러도 동일한 방식으로 생성합니다.
그다음 handleLogin과 handleRedirect 메서드를 생성하여 컨트롤러의 기본적인 형태를 만듭니다.
import { Controller, Get } from '@nestjs/common';

@Controller('auth')
export class AuthController {
  @Get('google/login')
  handleLogin() {
    return { msg: 'Google Authentication' };
  }

  // api/auth/google/redirect
  @Get('google/redirect')
  handleRedirect() {
    return { msg: 'OK' };
  }
}
이때, handleRedirect 메서드의 경로는 Google Cloud Console에 설정한 승인된 Redirection URI와 정확히 일치해야 합니다.
위 코드에 주석으로 표기한, api/auth/google/redirect 경로가 구글 콘솔에 반드시 등록되어 있어야 합니다.
4. Passport, Google Strategy 설치 및 설정 ✅
인증을 처리하기 위한 @nestjs/passport, passport, passport-google-oauth20 패키지를 설치합니다. 추가적으로, 타입 정의를 위해 @types/passport-google-oauth20 패키지도 설치합니다.
passport는 인증(authentication)과 인가(authorization) 관리를 목적으로 사용되는 라이브러리입니다. passport-google-oauth20의 경우, 특별히 구글 OAuth 2.0을 사용하여 passport에 google에 대한 인증 strategy를 추가해 주는 패키지입니다.
import { Injectable } from '@nestjs/common';
import { PassportStrategy } from '@nestjs/passport';
import { Profile, Strategy } from 'passport-google-oauth20';

@Injectable()
export class GoogleStrategy extends PassportStrategy(Strategy) {
  constructor() {
    super({
      clientID: 'your-client-id',
      clientSecret: 'your-client-secret',
      callbackURL: 'your-callback-url',
      scope: ['profile', 'email'],
    });
  }
  validate(accessToken: string, refreshToken: string, profile: Profile) {
    console.log(accessToken);
    console.log(refreshToken);
    console.log(profile);
  }
}PassportStrategy(Strategy)는 NestJS의 인증 틀(Passport 기반) 안에서 passport-google-oauth20의 Strategy(구글 전용 인증 방식)를 적용하겠다는 의미입니다.
즉, NestJS라는 공항의 입국 심사 시스템 안에서, 구글 여권 심사 방식을 사용하겠다는 뜻입니다. 그리고 그 방식의 구체적인 내용을 객체 형태로 super() 메서드를 통해 NestJS라는 공항의 입국 심사 시스템(PassportStrategy)으로 전달하는 모습을 확인할 수 있습니다.
validate는 실제로 사용자 정보 중 무엇을 검사하고, 어떤 유저로 인식할지를 정의하는 함수입니다. 예를 들어 구글이 넘겨준 이메일이나 이름 등을 기준으로, 우리 서비스에서 이 사용자가 기존 회원인지, 새 회원인지 판단하는 로직이 들어갑니다.
GoogleStrategy가 완성되었으니 Auth Module에 Provider로 등록합니다.
5. Auth Guard 구현 및 Controller에 적용 ✅
전략을 세웠으니, 그 전략을 실제로 활용할 인원(심사관)이 필요하겠죠. Guard는 입국 심사관에 해당합니다.
AuthGuard라는 상위 부서의 심사관이 있고, 그 직속 후임으로 GoogleAuthGuard라는 후배 심사관을 배치할 생각입니다.
import { ExecutionContext, Injectable } from '@nestjs/common';
import { AuthGuard } from '@nestjs/passport';
import { Request } from 'express';

@Injectable()
export class GoogleAuthGuard extends AuthGuard('google') {
  async canActivate(context: ExecutionContext): Promise<boolean> {
    const activate = (await super.canActivate(context)) as boolean;

    const request = context.switchToHttp().getRequest<Request>();
    await super.logIn(request);

    return activate;
  }
}
하위 부서에 속하는 구글 심사관은, 컨트롤러라는 야전에 배치되어 request에 대한 심사를 진행하는 주체입니다. 요청이 구글 심사관에게 도달하게 되면, 구글 심사관은 canActivate 함수를 실행하게 됩니다.
ExecutionContext는 현재 실행 중인 요청에 대한 전체 상황판인데요, super.canActivate(context)를 통해 상위 부서의 심사관에게 상황판을 전달합니다. 따라서 activate는 상위 심사관의 판단 결과, 즉 입국 가능 여부입니다.
심사관은 context.switchToHttp().getRequest<Request>();를 통해 상황판에서 입국자의 여권 정보를 확인하고 살펴보게 됩니다.
입국이 승인되었다면 await super.logIn(request);를 통해 여권 정보를 공식 시스템에 등록합니다. 최종적으로는 입국 심사를 통과했는지를 컨트롤러에 보고하게 되죠.
  @Get('google/login')
  @UseGuards(GoogleAuthGuard)
  handleLogin() {
    return { msg: 'Google Authentication' };
  }
컨트롤러 로직에서는 입국 심사가 통과되었으니, handleLogin() 메서드를 실행할 수 있게 됩니다.
6. 데이터베이스 설정 (TypeORM, Entity) ✅
App Module에서는 TypeOrmModule에 대한 설정을 진행합니다.
TypeORM은 DB 테이블을 클래스처럼 다룰 수 있게 해주는 도구입니다. SQL 문을 직접 장성하기 않고, TS를 기반으로 코드를 통해 Database를 조작하기 위해 사용하게 됩니다.
forRoot()는 이러한 TypeORM에 대한 초기 설정을 위해 활용하는 메서드입니다. 어떤 데이터베이스를 사용할지, DB 서버 위치는 어디인지 등에 대한 세부적인 정보를 등록하게 됩니다. 중앙 수도 벨브와 같아서 App Module에서 위 설정을 마치게 되면, 다른 모듈에도 물(DB)을 공급할 수 있게 됩니다. 서브 모듈에서 DB 연결이 필요할 때에는 forFeature()를 사용하게 되죠.
설정을 마쳤으니 실제 DB에서 활용할 엔터티를 설정하면 되겠습니다.
import { Column, Entity, PrimaryGeneratedColumn } from 'typeorm';

@Entity({ name: 'users' })
export class User {
  @PrimaryGeneratedColumn()
  id: number;

  @Column()
  email: string;

  @Column()
  displayName: string;
}
7. Auth Service (사용자 저장/조회 로직) ✅
export type UserDetails = {
  email: string;
  displayName: string;
};
import { Injectable } from '@nestjs/common';
import { InjectRepository } from '@nestjs/typeorm';
import { UserDetails } from 'src/utils/types';
import { User } from 'src/typeorm/entities/User';
import { Repository } from 'typeorm';
@Injectable()
export class AuthService {
constructor(
@InjectRepository(User) private readonly userRepository: Repository<User>,
) {}
async validateUser(details: UserDetails) {
console.log('AuthService');
console.log(details);
const user = await this.userRepository.findOneBy({ email: details.email });
console.log(user);
if (user) return user;
console.log('User not found. Creating...');
const newUser = this.userRepository.create(details);
return this.userRepository.save(newUser);
}
async findUser(id: number) {
const user = await this.userRepository.findOneBy({ id });
return user;
}
}validateUser 로직을 다른 곳에서 사용하게 되면 details라는 인수를 받게 됩니다. details는, email과 display로 구성된 타입임을 명시하고 있습니다. 이후 DB에서 유저 정보를 찾고, 없다면 신규 유저로 등록하게 됩니다.
findUser 로직은 id를 받아서, 해당 id를 보유한 유저가 repository에 존재하는지 찾는 역할을 수행한 뒤, 찾았다면 해당 유저 정보를 반환합니다.
8. Service를 Google Strategy에 주입 ✅
앞서 개발한 서비스 로직 중 validateUser 로직을 GoogleStrategy에 적용할 생각입니다.
  async validate(accessToken: string, refreshToken: string, profile: Profile) {
    console.log(accessToken);
    console.log(refreshToken);
    console.log(profile);
    const user = await this.authService.validateUser({
      email: profile.emails?.[0]?.value ?? '',
      displayName: profile.displayName,
    });
    console.log('Validate');
    console.log(user);
    return user || null;
  }
GoogleStrategy에 위치한 validate() 함수입니다.
구글에서 제공한 profile data에 있는 emails와 displayName을 객체 형태로 전달합니다. 그렇다면 서비스 로직에서는 details라는 이름의 인수로 해당 객체를 전달받게 될 것입니다. 사용자를 찾아보고, 신규 회원이라면 해당 정보를 repository에 저장하게 되죠.
9. 세션 관리 설정 ✅
이제 main.ts로 돌아와서 세션에 대한 설정을 합니다.
import { NestFactory } from '@nestjs/core';
import { AppModule } from './app.module';
import session from 'express-session';
import passport from 'passport';

async function bootstrap() {
  const app = await NestFactory.create(AppModule);

  // 전체 라우팅 경로에 공통 접두사(/api)를 추가하는 역할
  app.setGlobalPrefix('api');

  app.use(
    session({
      secret: 'dsfafsdafadsfweewrtq4w452345',
      resave: false,
      saveUninitialized: false,
      cookie: {
        maxAge: 60000,
      },
    }),
  );
  app.use(passport.initialize());

  app.use(passport.session());

  // PORT: 3001로 설정
  await app.listen(3001);
}
bootstrap();
세션 설정에 대한 설명은 넘어가겠습니다.
import { Inject, Injectable } from '@nestjs/common';
import { PassportSerializer } from '@nestjs/passport';
import { AuthService } from '../auth.service';
import { User } from 'src/typeorm/entities/User';

@Injectable()
export class SessionSerializer extends PassportSerializer {
  constructor(
    @Inject('AUTH_SERVICE') private readonly authService: AuthService,
  ) {
    super();
  }

  serializeUser(user: User, done: (err: any, id?: any) => void) {
    console.log('Serialize User');
    done(null, user);
  }

  async deserializeUser(
    payload: { id: number },
    done: (err: any, user?: any) => void,
  ) {
    console.log('Deserialize User');
    const user = await this.authService.findUser(payload.id);
    console.log(user);
    return user ? done(null, user) : done(null, null);
  }
}
검증을 통과한 유저가 로그인을 하게 되면, serializeUser() 함수가 실행되면서 세션 ID(sid)를 생성하고, 해당 정보를 쿠키에 담아 클라이언트로 전송하게 됩니다.
후술하게 될 인증 상태 확인 로직이 실행되면 쿠키가 서버로 전송되고, 서버는 해당 쿠키에 있는 세션 ID를 확인한 뒤, 역직렬화를 통해 실제 유저 정보를 반환하게 됩니다. 역직렬화 과정에서는 서비스 로직에서 구현한 findUser 로직을 사용하게 됩니다.
10. 인증 상태 확인 및 테스트 ✅
  @Get('status')
  user(@Req() request: Request) {
    console.log(request.user);
    if (request.user) {
      return { msg: 'Authenticated' };
    } else {
      return { msg: 'Not Authenticated' };
    }
컨트롤러에 위와 같은 로직을 추가하면, 인증 상태를 확인할 수 있습니다.
11. 결론 ✅
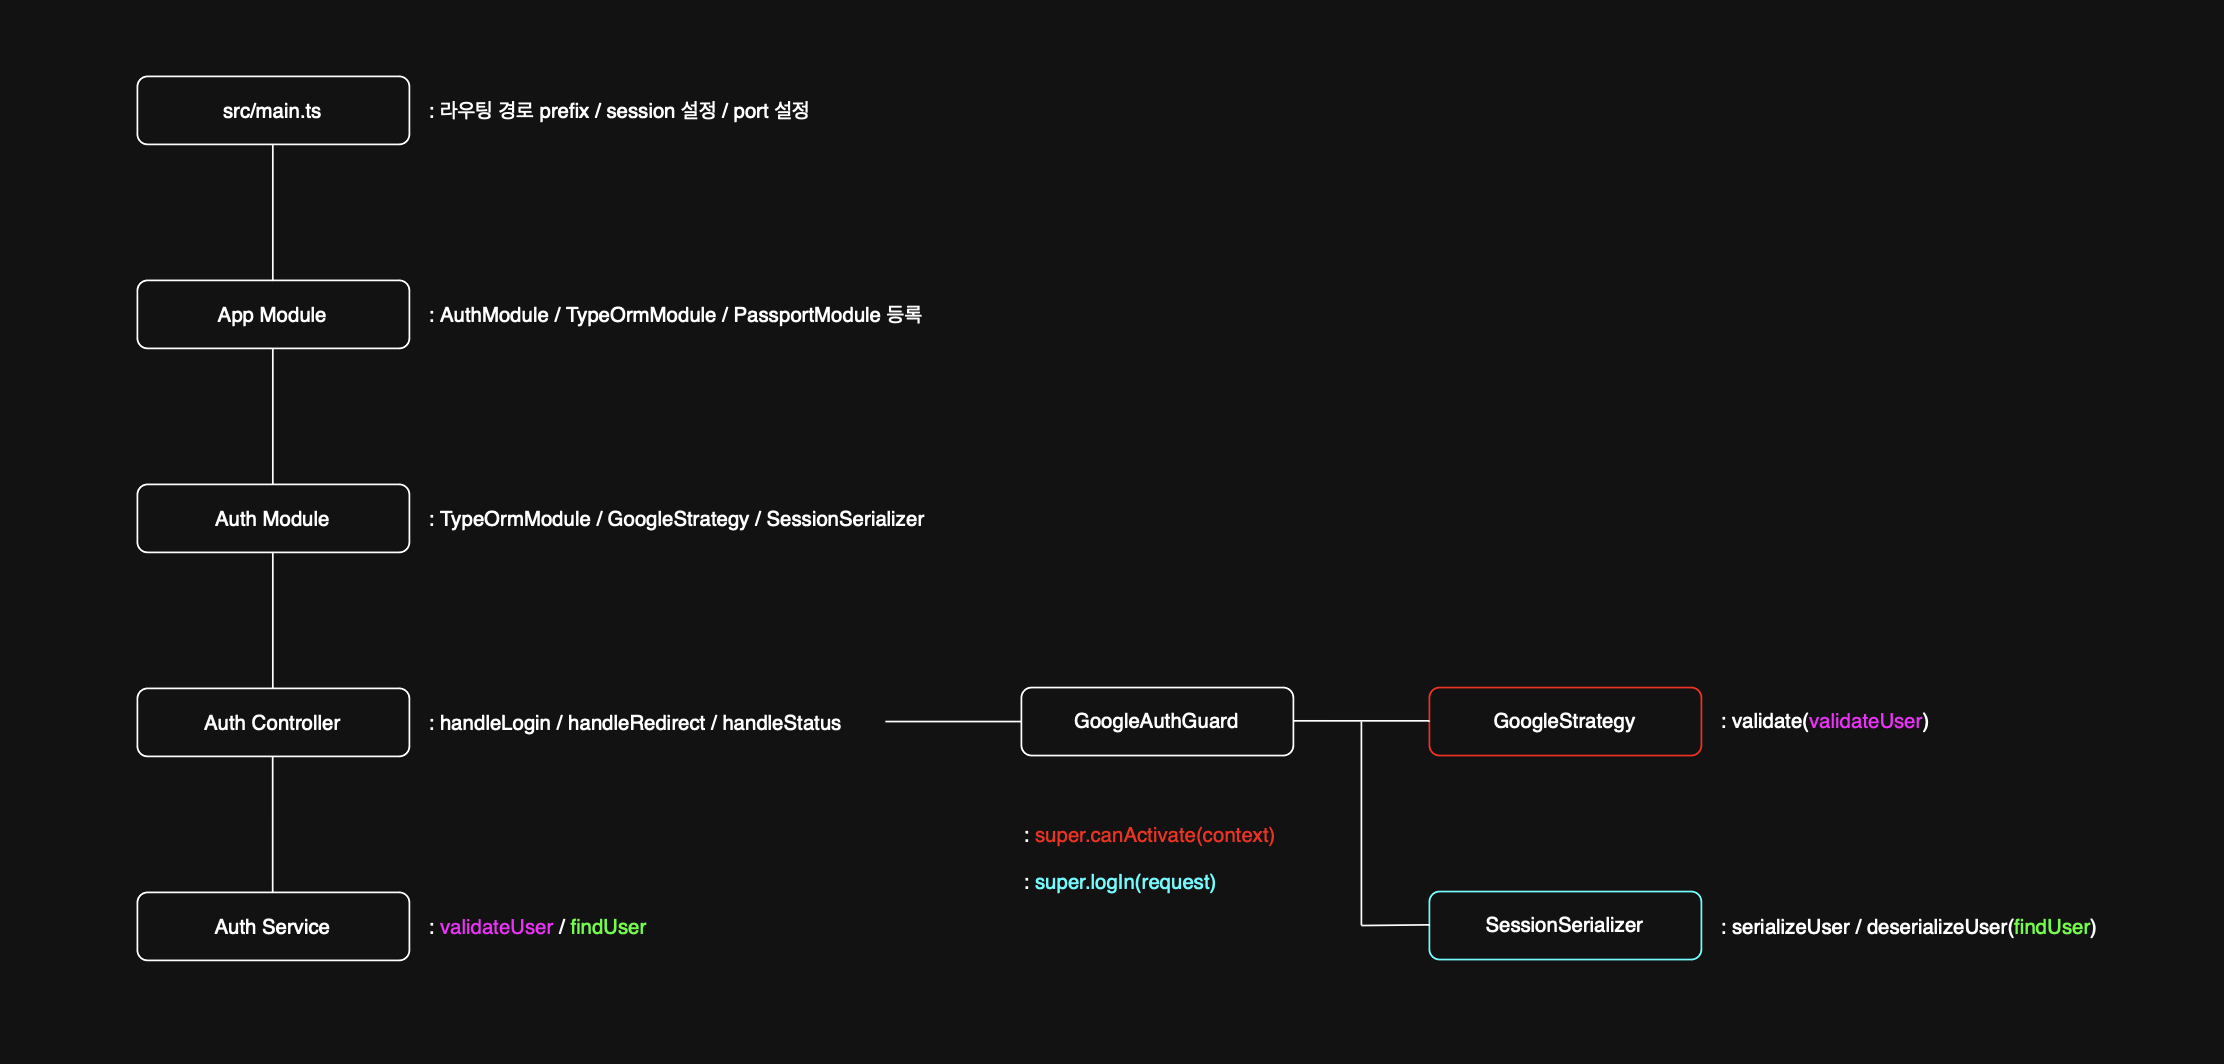
Auth Controller가 1)Authentication Module 내에서 사용자의 로그인 요청을 받고(handleLogin), 2)Google 인증 완료 후 Google로부터 redirection을 처리하며(handleRedirect), 3)Guard와 연동하여 Passport 인증 플로우를 트리거하고, 4)최종적으로 인증된 사용자의 상태를 확인하는(handleStatus 예시) 등 사용자와 애플리케이션 백엔드 사이의 주요 접점 역할을 하는 것을 알 수 있습니다.
컨트롤러 자체는 복잡한 인증 로직보다는 요청과 응답 처리에 집중하며, 실제 인증 처리는 Guard, Strategy, Service 등이 담당하는 역할 분담 구조를 따른다는 것을 확인할 수 있습니다.