Update
(2022-04-09) 데이터 삭제 시 index 범위 체크와 size가 1일 경우, index가 size와 같을 경우 로직 추가(2022-04-23) 데이터 삽입 시 index=0일 때 로직 추가. index 범위에 대한 예외 처리
구현하기에 앞서, LinkedList가 무엇이며 어떤 장점과 단점을 가지고 있는 자료구조인지 알아보자.
LinkedList
떨어진 곳에 존재하는 주소 공간을 가리켜 관리하는 데이터 구조
장점
- 배열처럼 크기를 미리 할당할 필요가 없다.
- 삭제 시 시간복잡도가 O(1)이다.
단점
- 연결을 위해 별도의 저장 공간이 필요하기 때문에 저장 효율이 높지 않다.
- 연결 정보를 찾으려면 O(n)의 시간복잡도가 든다.
- 중간 노드를 삭제 시, 이전 노드와 다음 노드 간 연결을 재구성해야 함.
관련 용어
- node: 데이터 저장 단위(데이터, 포인터)
- pointer: 이전 혹은 다음 노드를 가지는 주소 공간
LinkedList vs. Array
| LinkedList | Array | |
|---|---|---|
| 추가 | O(N) | O(1), O(N) |
| 삽입 | O(N) | O(N) |
| 삭제 | O(1) | O(N) |
| 검색 | O(N) | O(1) |
직접 구현하기
> class 구현
public class MyLinkedList<E> {

    private Node<E> head = null;

    private static class Node<E> {
    	E data;
       	Node<E> next = null;
    }

    public Node(E data) {
    	this.data = data;
    }
}
private Node<E> head = null;LinkedList에 담는 요소의 객체 타입을 지정하기 위해 제네릭 타입 <E>를 설정하고, 시작 노드 head를 아무 것도 가지지 않은 상태인 null로 초기화한다. Node 클래스의 멤버 변수로 data(데이터)와 next(포인터)를 선언한다.
> 데이터 추가
void add(E data) {
	if(head == null) {
		head = new Node<>(data);
	} else {
		Node<E> node = head;
		while (node.next != null)
			node = node.next;

	node.next = new Node<>(data);
	}
}
head가 null이면 아무것도 가지지 않은 상태이기 때문에 새로운 노드로 초기화한다. head에 값이 존재할 경우 node.next != null, 즉 현재 노드가 가리키는 다음 노드(pointer로 지목한 상태)가 null이 될 때까지(마지막 노드를 가리킬 때까지) 반복한다.
node = node.next 가 뜻하는 것은
node.next가 포인터이면서 다음 노드를 가리키기 때문에, 현재 node를 다음 노드로 지정하겠다는 뜻이다.
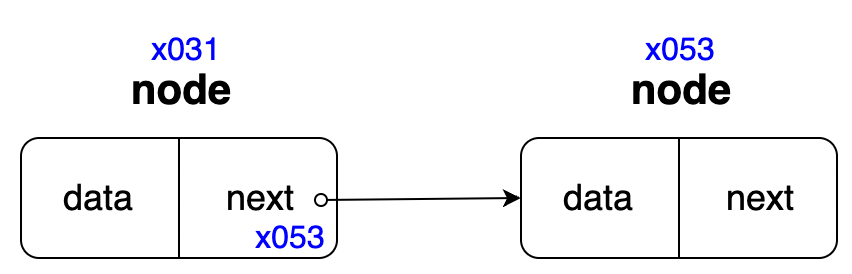
위의 사진을 참고하면 이해하기 수월할 것이다. node.next에 x053 주소를 가진 노드 정보를 담고 있으니 node = node.next로 node가 다음 노드로 할당된다.
> 데이터 삽입
void insert(E data, int index) {
    if (index < 0 || index >= size()) {
            throw new IndexOutOfBoundsException();
        }

        if (head == null) {
            head = new Node(data);
            return;
        }

        Node<E> newNode = new Node(data);

        if(index == 0) {
            newNode.next = head;
            head = newNode;
        } else {
            Node<E> node = head;
            int i = 0;
            while (i++ < index-1) {
                node = node.next;
            }
            Node<E> nextNode = node.next;
            node.next = newNode;
            newNode.next = nextNode;
        }
}
데이터를 삽입하고자 하는 위치에 넣도록 구현한 것이다.
while의 조건으로 i != index-1인 이유는 node = node.next로 인해 반복이 끝나게 되면 삽입하고자 하는 다음 노드를 가리키므로 index를 하나 차감해 원하는 위치에 데이터를 삽입할 수 있게 한다.
다음 아래의 코드를 하나씩 뜯어보자.
Node<E> newNode = new Node<>(data); : 삽입할 새로운 노드를 하나 생성한다.
Node<E> nextNode = node.next; : 현재 노드가 가리키는 다음 노드를 따로 할당해둔다. 만약 현재 노드의 next로 newNode를 가리킬 경우, 다음 노드로부터 존재하는 모든 노드들을 놓치게 된다.
node.next = newNode; : 현재 노드의 포인터에새로운 노드를 연결한다.
newNode.next = nextNode; : 새로운 노드의 포인터에 아까 미리 할당해뒀던 나머지 노드들을 연결한다.
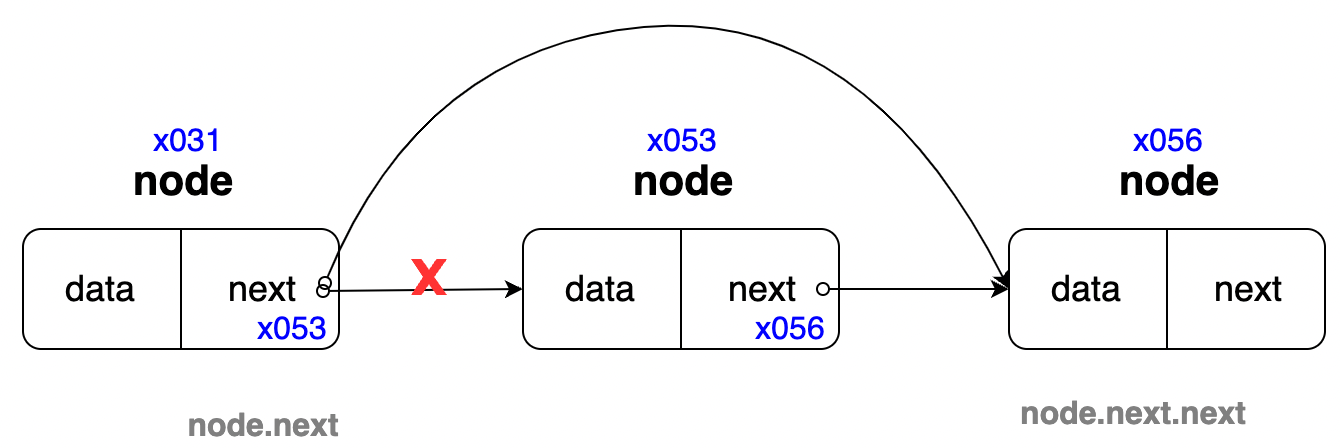
> 데이터 삭제
void delete(int index) {
    //1. head 노드 삭제
    if(index==0) {
       head = head.next;
    }
    //2. 중간 또는 leaf 노드 삭제
    int cnt = 0;
    Node<E> node = head;
    while (cnt != index-1) {
       node = node.next;
       cnt++;
    }
        node.next = node.next.next;
}
index 위치를 찾는 것은 데이터 삽입 방식과 동일하다.
node.next = node.next.next : 현재 노드가 가리키는 다음 노드(node.next)를 다음 노드가 가리키는 그 다음 노드(node.next.next)로 변경한다.
> 리스트 조회
void findAll() {
    Node<E> node = head;
    while (node != null) {
        System.out.print(node.data + " ");
        node = node.next;
    }
    System.out.println();
}
while (node != null) : 노드가 null이 아닐 때까지 node = node.next로 노드를 순차적으로 탐방한다. 데이터의 삽입이나 삭제처럼 node.next != null로 while 조건문을 걸면 마지막 노드의 포인터가 null이기 때문에 마지막 데이터를 출력할 수 없다.
> 리스트 크기
int size() {
    int count = 0;

    Node<E> node = head;
    while (node != null) {
        node = node.next;
        count++;
    }
    return count;
}
리스트 조회와 로직이 같다. node 수만큼 count를 증가시키고 return한다.
> 다음 글
- DoubleLinkedList 구현하기
