-
ubuntu
✅ 배포 전에 해야 할 작업
🔹 Certbot 설치 및 SSL 인증서 설정 준비
-
Certbot 설치
Certbot은 SSL 인증서를 발급하고 관리하는 도구입니다. 배포 전에 먼저 Certbot을 설치합니다.
bash 복사편집 sudo apt update sudo apt install certbot python3-certbot-nginx -
Nginx 설정 파일 환경 준비
기본적으로 Certbot은
/etc/nginx/sites-available과/etc/nginx/sites-enabled디렉터리에 설정 파일을 저장합니다. 하지만 여러분의 환경에서는 설정 파일을conf.d디렉터리에서 관리할 예정입니다. 그래서 이 디렉터리들을 삭제하고,nginx.conf에서 이들을 포함하지 않도록 수정합니다.- 설정 파일 이동
/etc/nginx/sites-available에 있던 설정 파일을conf.d*로 이동**합니다.- 예를 들어
default파일을 이동하려면:sudo mv /etc/nginx/sites-available/default /etc/nginx/conf.d/pin-up.conf
sites-available과sites-enabled디렉터리 삭제- 설정 파일을 이동한 후에는 더 이상 필요하지 않으므로 해당 디렉터리들을 삭제합니다.
sudo rm -rf /etc/nginx/sites-available
sudo rm -rf /etc/nginx/sites-enabled
- 설정 파일을 이동한 후에는 더 이상 필요하지 않으므로 해당 디렉터리들을 삭제합니다.
- 설정 파일 이동
-
/etc/nginx/nginx.conf수정nginx.conf파일에서sites-available*과sites-enabled*를 참조하는 라인을 삭제하거나 주석 처리합니다.#include /etc/nginx/sites-enabled/*;- 파일 맨아래 있음
- 그리고 *
conf.d를 포함하도록 설정합니다. 예시:include /etc/nginx/conf.d/*.conf;
-
Nginx 상태 확인
### 1. **Nginx 설정 파일 테스트**

Nginx의 설정 파일을 수정한 후에는 먼저 **설정 파일에 오류가 없는지** 확인해야 합니다. 이를 위해 `nginx -t` 명령어를 사용합니다.

```bash
bash
복사편집
sudo nginx -t

```

- 이 명령어를 실행했을 때, **"syntax is okay"**와 **"test is successful"**라는 메시지가 출력되면 설정 파일에 문제가 없는 것입니다.
- 만약 오류가 있다면, 출력된 오류 메시지를 보고 문제를 수정합니다.

예시 출력:

```bash
bash
복사편집
nginx: the configuration file /etc/nginx/nginx.conf syntax is okay
nginx: configuration file /etc/nginx/nginx.conf test is successful

```

### 2. **Nginx 재시작**

설정 파일에 문제가 없으면 Nginx를 재시작하여 변경 사항을 적용합니다:

```bash
bash
복사편집
sudo systemctl restart nginx

```

### 3. **Nginx 상태 확인**

Nginx가 정상적으로 작동하는지 확인하려면 서비스 상태를 확인합니다:

```bash
bash
복사편집
sudo systemctl status nginx

```

- 만약 **active (running)** 상태라면 Nginx가 정상적으로 실행되고 있다는 뜻입니다.
- 문제가 있을 경우, 상태 메시지나 로그를 확인하여 원인을 파악할 수 있습니다.
✅ 배포 당일에 해야 할 작업
-
도메인 연결 확인
SSL 인증서를 발급하려면 도메인(pin-up.co.kr)과 서버가 정상적으로 연결되어 있어야 합니다. 이 작업을 위해 Elastic IP를 사용하여 도메인과 서버를 연결합니다. 도메인과 서버의 연결이 정상적으로 이루어진 후에 인증서를 발급할 수 있습니다.
-
SSL 인증서 발급
도메인과 서버가 연결된 후, Certbot을 실행하여 SSL 인증서를 발급합니다. 이를 위해 다음 명령어를 사용합니다.
sudo certbot --nginx -d pin-up.co.krCertbot은 자동으로 Nginx 설정을 업데이트하고, SSL 인증서를 발급하여 HTTPS를 적용합니다.
-
SSL 인증서 자동 갱신 설정
SSL 인증서는 3개월마다 갱신해야 합니다. Certbot은 자동 갱신 기능을 제공하므로 이를 활성화하고, 갱신이 정상적으로 동작하는지 확인합니다.
갱신 테스트:
sudo certbot renew --dry-run -
HTTP에서 HTTPS로 리디렉션 설정
SSL 인증서가 적용된 후, HTTP로 접속하는 모든 트래픽을 HTTPS로 리디렉션할 수 있도록 설정합니다. 이를 위해
conf.d내의 Nginx 설정 파일에 리디렉션 설정을 추가합니다.server { listen 80; server_name pin-up.co.kr; location / { return 301 https://$host$request_uri; } } -
Nginx 설정 테스트 및 재시작
SSL 설정 및 리디렉션 설정이 완료되면, Nginx 설정을 테스트하고 서버를 재시작하여 변경 사항이 적용되도록 합니다.
sudo nginx -t sudo systemctl restart nginx -
로그 모니터링
배포 후, **Nginx**의 **error log**와 **access log**를 모니터링하여 문제가 발생하지 않는지 확인합니다.

```bash
sudo tail -f /var/log/nginx/error.log
sudo tail -f /var/log/nginx/access.log
```
🔹 기타 고려사항
-
SSL 보안 설정: SSL 인증서를 적용한 후에는 보안을 강화하기 위한 추가적인 설정을 고려할 수 있습니다. 예를 들어, 강력한 암호화 설정을 적용하고, HSTS (HTTP Strict Transport Security)를 활성화하여 보안을 더욱 강화할 수 있습니다.
-
방화벽 설정: 서버가 방화벽으로 보호되고 있다면, 443번 포트(HTTPS)를 허용하도록 방화벽 규칙을 설정해야 할 수도 있습니다.
1. Certbot 설치
-
목표: SSL 인증서 발급을 위한 Certbot 도구 설치
-
명령어:
dnf는 Amazon Linux 2023에서 사용하는 패키지 관리 도구입니다. Certbot을 이 명령어로 쉽게 설치할 수 있습니다.```bash bash 복사편집 sudo dnf install -y certbot ```2. Nginx 설정
-
목표: Nginx에 SSL 인증서를 적용할 수 있도록 설정
-
작업:
1. Nginx 설정 파일 열기:```bash bash 복사편집 sudo nano /etc/nginx/nginx.conf ``` 2. **HTTP -> HTTPS 리디렉션 설정 및 SSL 인증서 경로 추가**: Nginx 설정 파일에서 HTTP를 HTTPS로 리디렉션하고 SSL 인증서 경로를 추가해야 합니다. 예시 설정: ``` nginx 복사편집 server { listen 80; server_name example.com; # 자신의 도메인으로 변경 location / { return 301 https://$host$request_uri; } } server { listen 443 ssl; server_name example.com; # 자신의 도메인으로 변경 ssl_certificate /etc/letsencrypt/live/example.com/fullchain.pem; ssl_certificate_key /etc/letsencrypt/live/example.com/privkey.pem; ssl_protocols TLSv1.2 TLSv1.3; ssl_ciphers 'HIGH:!aNULL:!MD5'; location / { root /usr/share/nginx/html; index index.html index.htm; } } ```3. SSL 인증서 발급 (Certbot 사용)
-
목표: Certbot을 사용하여 SSL 인증서를 발급
-
작업:
1. Certbot 실행하여 인증서 발급:Certbot이 자동으로 도메인을 확인하고 SSL 인증서를 발급한 후 Nginx 설정을 업데이트합니다. 이 과정에서 인증서가 발급되고, Nginx 설정이 자동으로 업데이트됩니다. ```bash bash 복사편집 sudo certbot --nginx ```4. SSL 인증서 적용 및 확인
-
목표: 인증서가 제대로 적용되었는지 확인
-
작업:
1. 웹 브라우저에서 확인:
-https://example.com(자신의 도메인)으로 접속하여 SSL이 정상적으로 적용되었는지 확인합니다.
- 자물쇠 아이콘이 나타나고 HTTPS로 연결되면 인증서가 제대로 적용된 것입니다.5. 자동 갱신 설정
-
목표: 인증서 만료 전에 자동으로 갱신되도록 설정
-
작업:
-
Certbot 자동 갱신 서비스 활성화:
sudo systemctl enable --now certbot.timer -
자동 갱신 테스트:
위 명령어로 자동 갱신이 제대로 동작하는지 테스트할 수 있습니다.
-dry-run은 실제로 인증서를 갱신하지 않고 갱신 작업을 시뮬레이션합니다.```bash bash 복사편집 sudo certbot renew --dry-run ```
-
-
-
Amazon Linux 2003
✅ 배포 전에 해야 할 작업
🔹1. Certbot 및 필수 패키지 설치
참고 사이트 : https://repost.aws/articles/AR_doGU0cxQymwf5A1Gl97yA
Certbot과 Route53 DNS 플러그인, Nginx 플러그인을 설치합니다.
sudo dnf install -y certbot python3-certbot-dns-route53 python3-certbot-nginx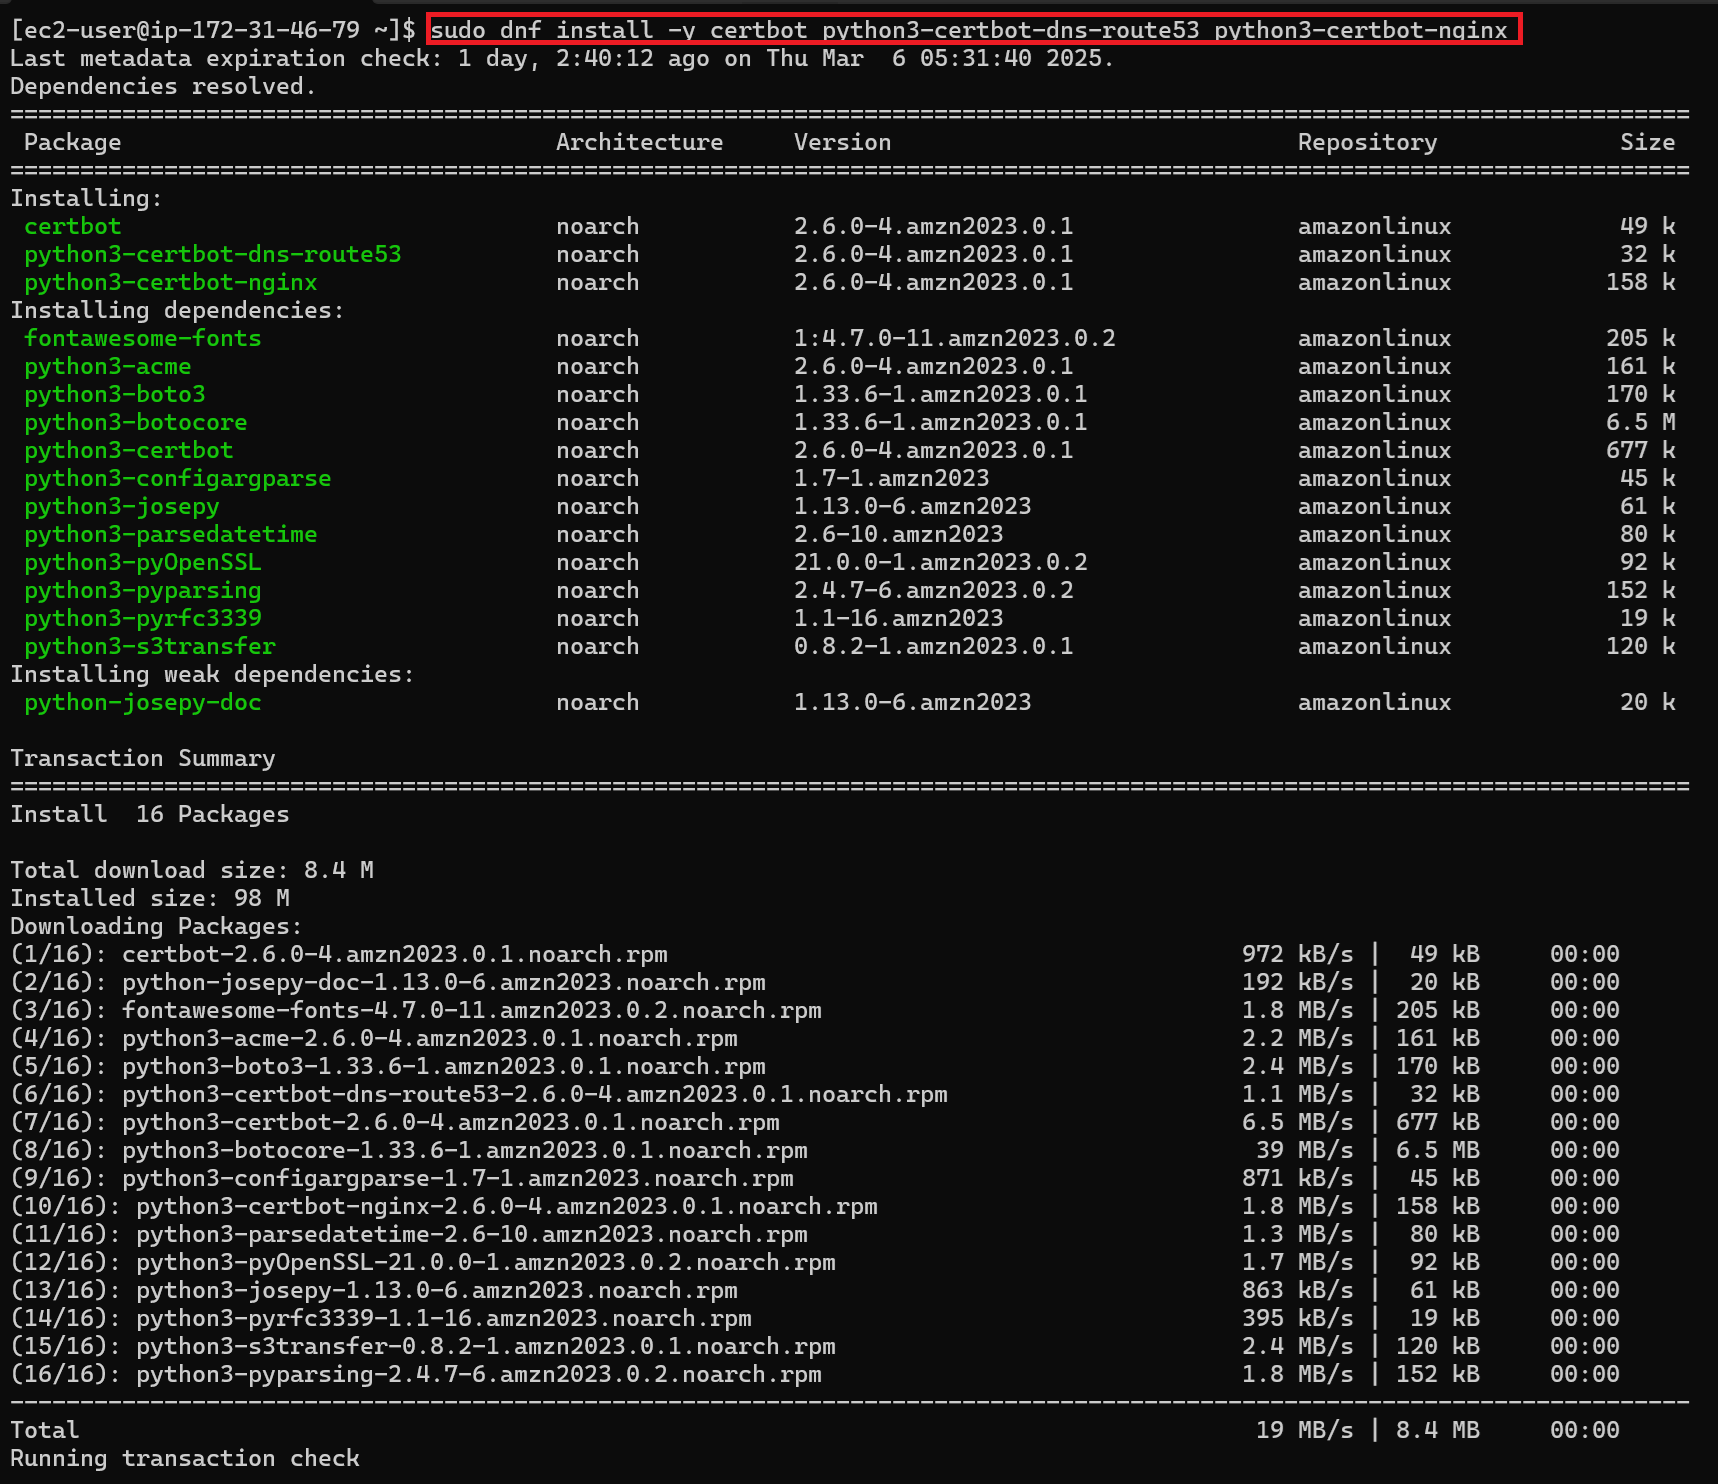
🔹2. Certbot 자동 갱신 타이머 설정
Certbot의 자동 갱신을 활성화합니다.
sudo systemctl daemon-reload
sudo systemctl enable --now certbot-renew.timer
🔹3. SSL 인증서 발급 및 자동 설정
Let's Encrypt 인증서를 발급하고, Nginx 설정을 자동으로 구성합니다.
sudo certbot --nginx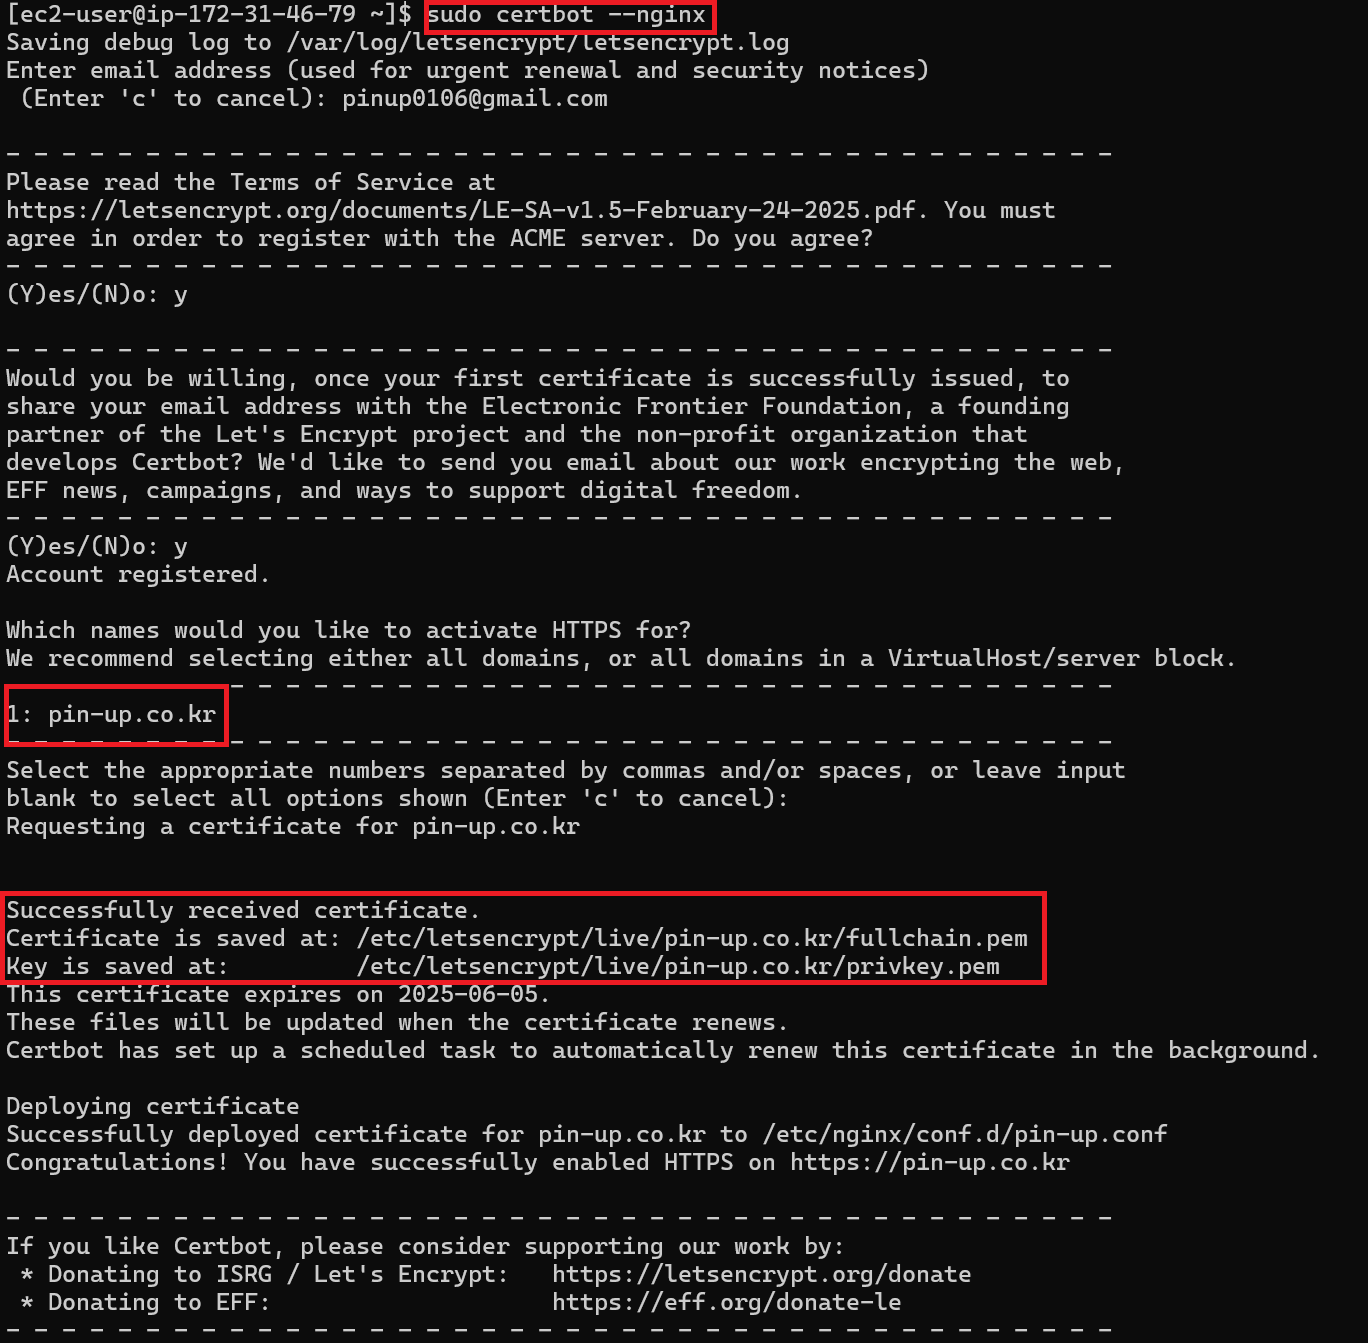
인증서를 발급할 도메인 입력 및 이메일 등록 후 인증이 완료되면, Certbot이 Nginx 설정을 자동으로 수정하여 HTTPS를 활성화합니다.
🔹4. 인증서 확인
발급된 인증서를 확인합니다.
sudo certbot certificates출력 예시:
Certificate Name: example.com
    Serial Number: ABCD1234567890
    Key Type: RSA
    Expiry Date: YYYY-MM-DD
    Certificate Path: /etc/letsencrypt/live/example.com/fullchain.pem
    Private Key Path: /etc/letsencrypt/live/example.com/privkey.pem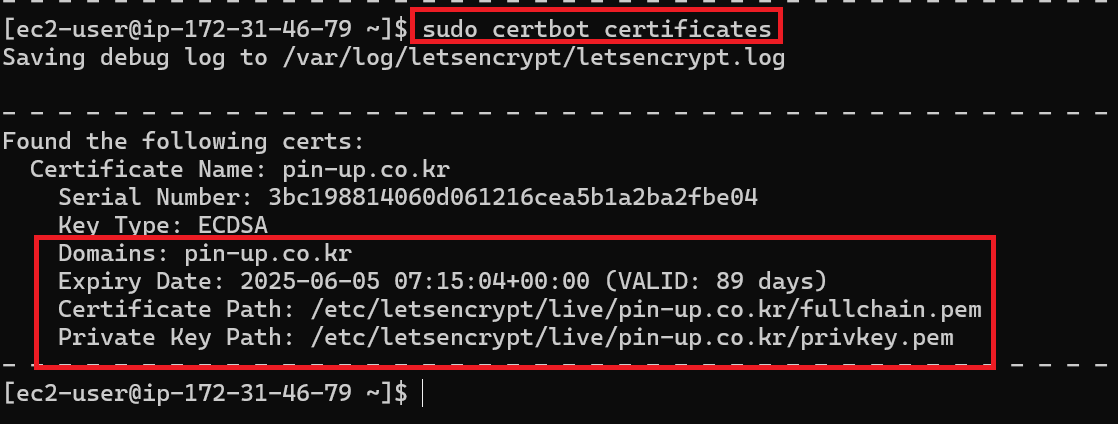
🔹5. Nginx 설정 확인
전체 설정 파일 확인
cat /etc/nginx/nginx.conf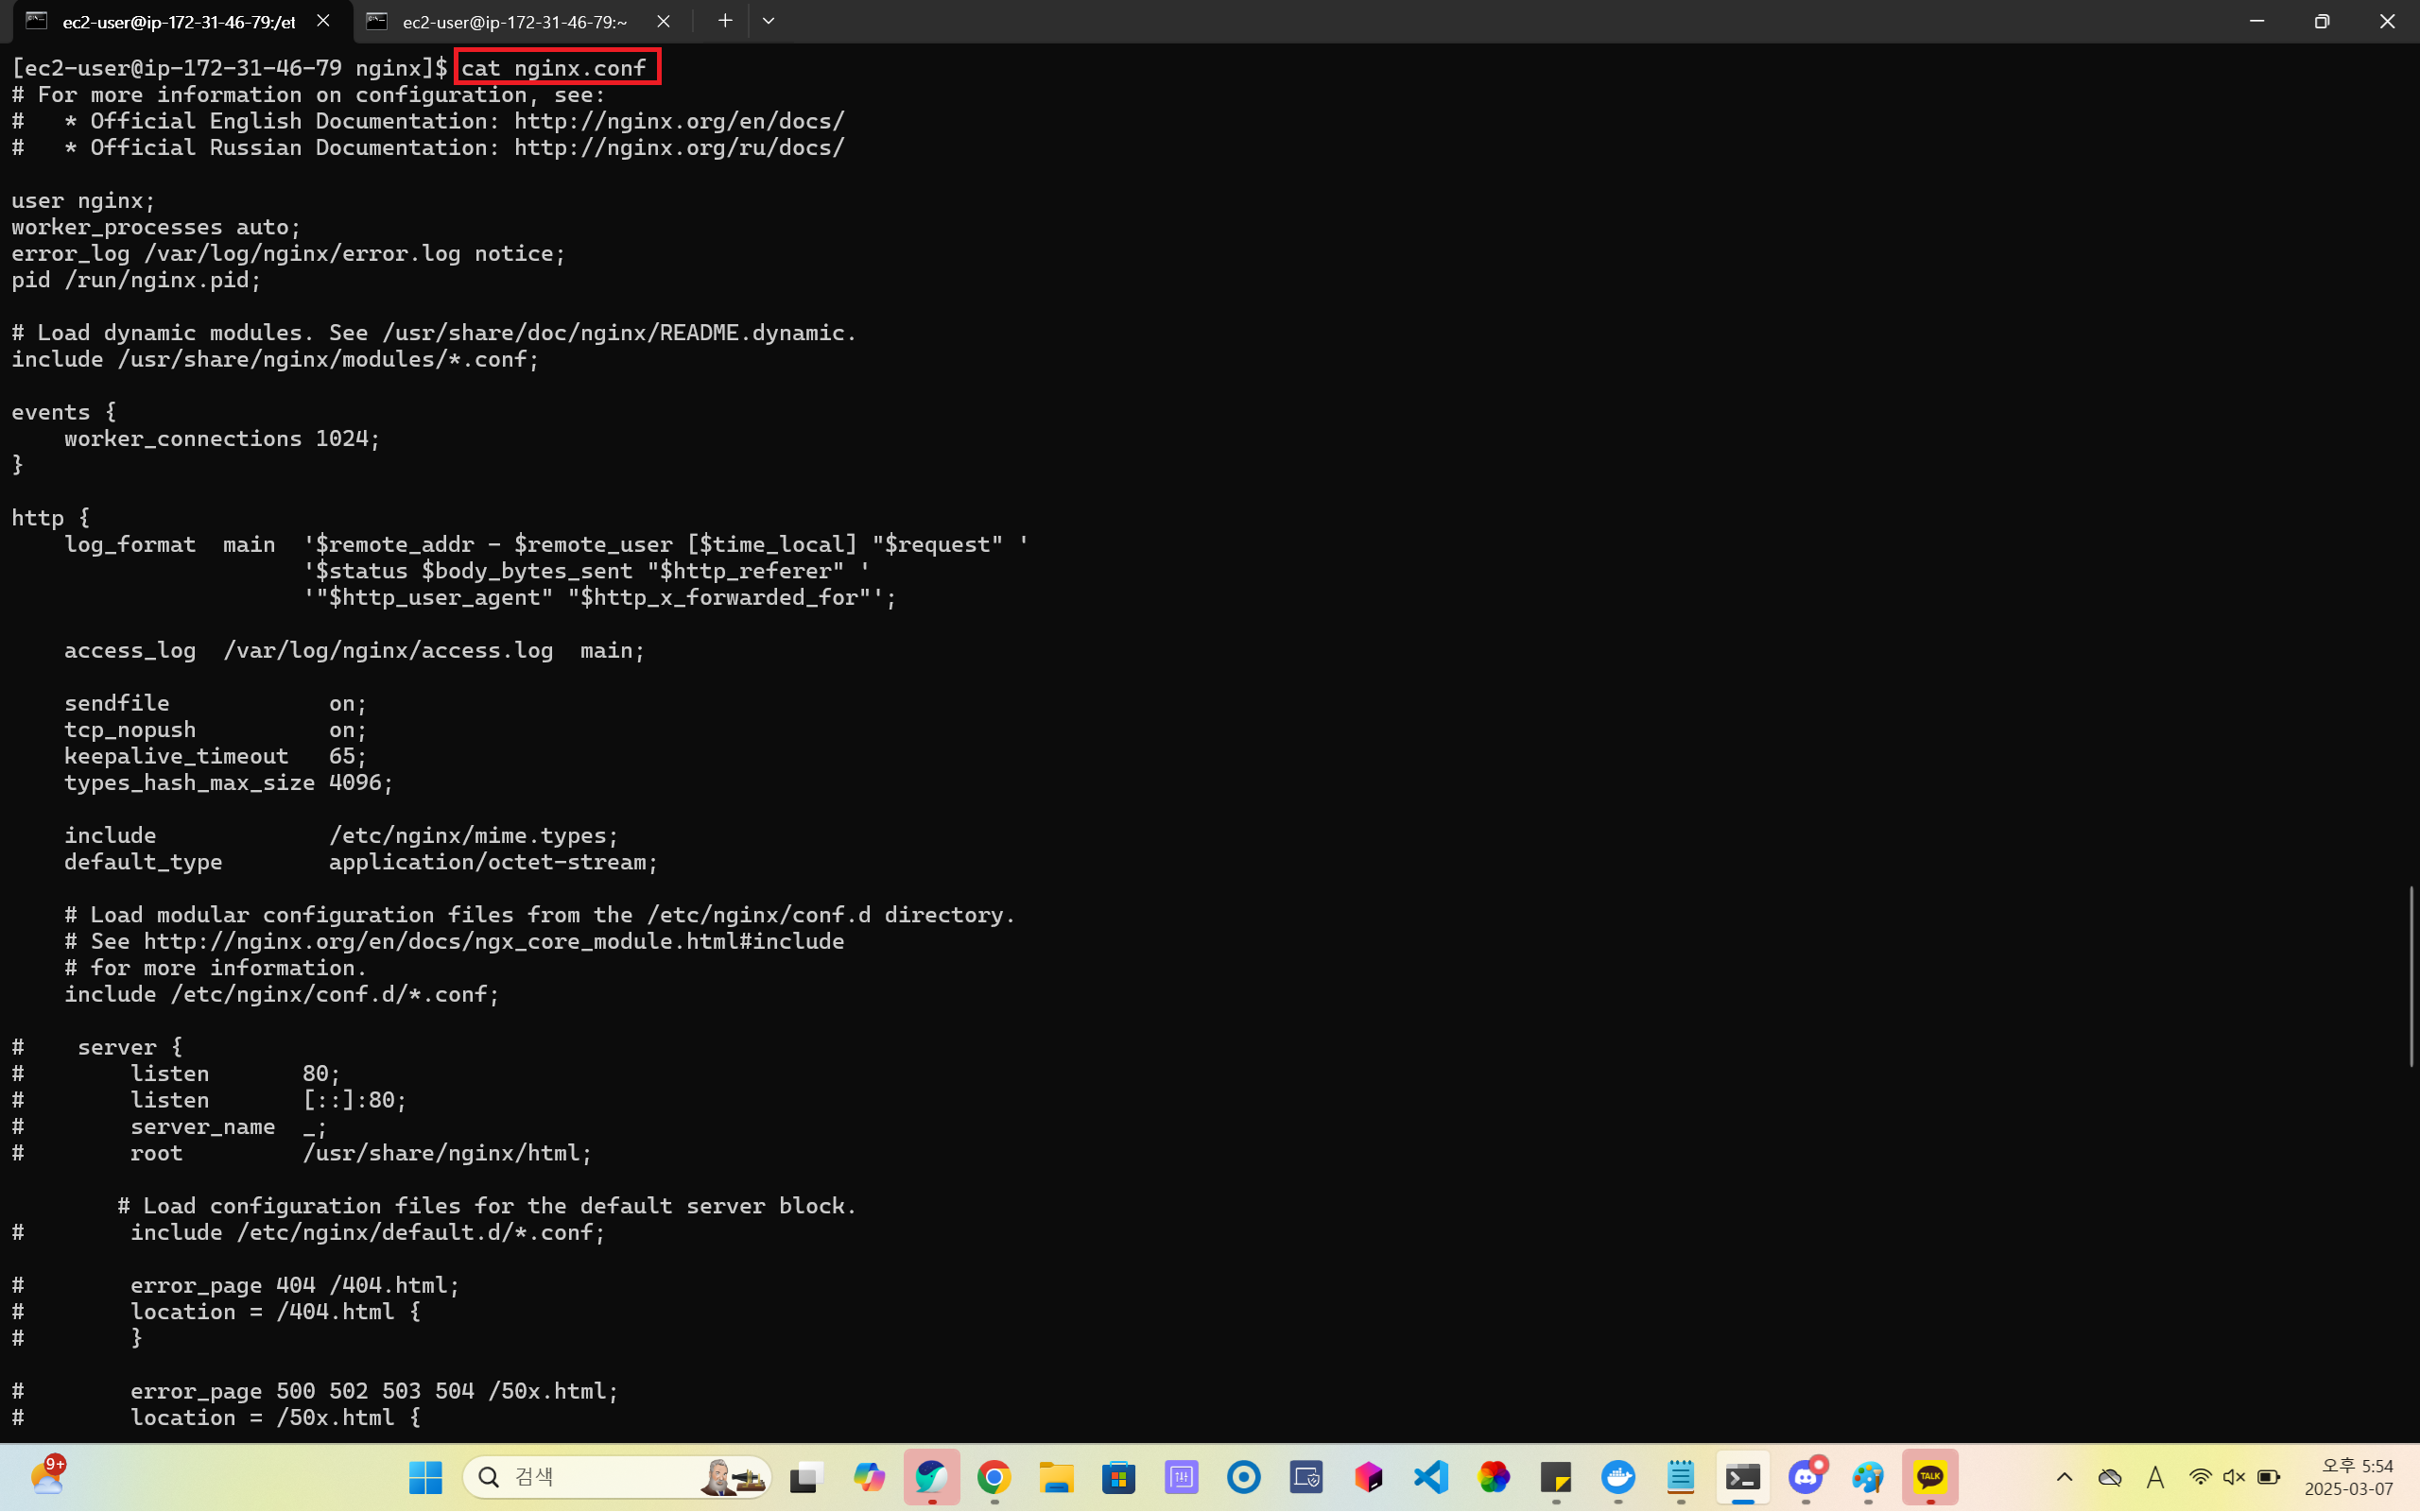
개별 사이트 설정 확인 (예:
pin-up.conf)cat /etc/nginx/conf.d/pin-up.conf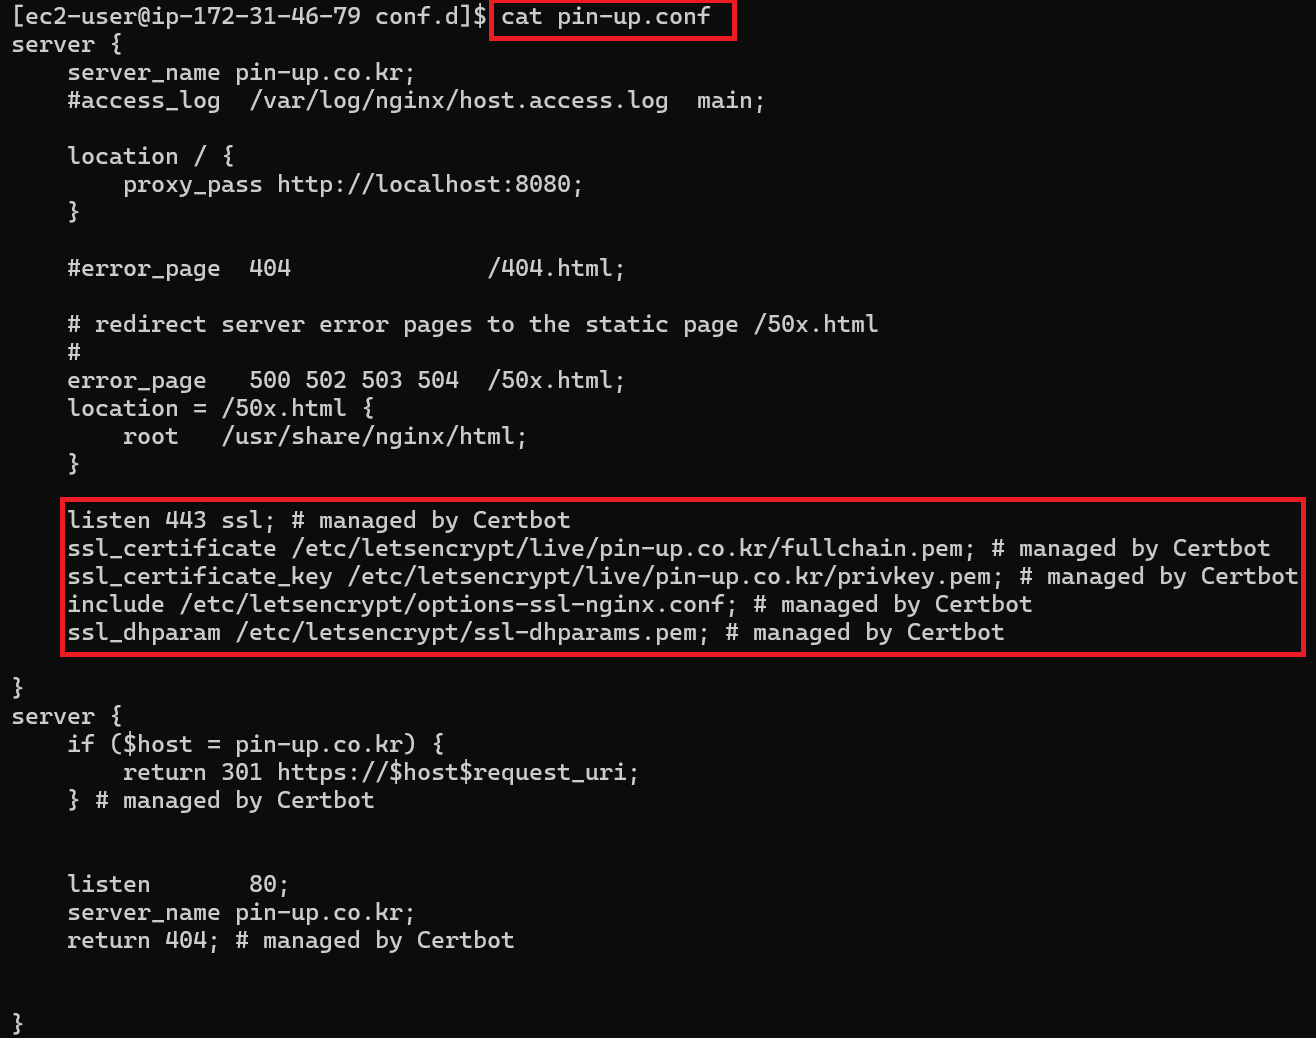
설정 파일에서
ssl_certificate및ssl_certificate_key경로가 Let's Encrypt 인증서 경로로 설정되었는지 확인합니다.🔹6. 인증서 갱신 테스트
Certbot 인증서 갱신이 정상적으로 작동하는지 테스트합니다.
sudo certbot renew --dry-run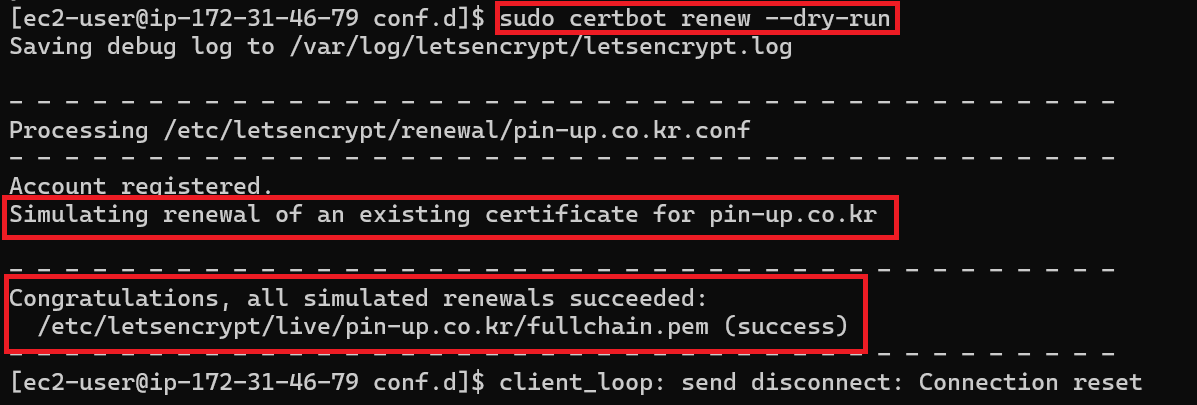
-
갱신 여부
## **갱신 안됨**

인증서가 아직 만료되지 않은 경우 출력에는 다음 텍스트 조각이 포함되어야 합니다.

```
Oct 08 11:26:10... systemd[1]: Starting certbot-renew.service - This service automatically renews any certbot certificates found...
Oct 08 11:26:11... certbot[279708]: Saving debug log to /var/log/letsencrypt/letsencrypt.log
Oct 08 11:26:11... certbot[279708]: - - - - - - - - - - - - - - - - - - - - - - - - - - - - - - - - - - - - - - - -
Oct 08 11:26:11... certbot[279708]: Processing /etc/letsencrypt/renewal/al2023.example.com.conf
Oct 08 11:26:11... certbot[279708]: - - - - - - - - - - - - - - - - - - - - - - - - - - - - - - - - - - - - - - - -
Oct 08 11:26:11... certbot[279708]: Certificate not yet due for renewal
Oct 08 11:26:11... certbot[279708]: - - - - - - - - - - - - - - - - - - - - - - - - - - - - - - - - - - - - - - - -
Oct 08 11:26:11... certbot[279708]: The following certificates are not due for renewal yet:
Oct 08 11:26:11... certbot[279708]:   /etc/letsencrypt/live/al2023.example.com/fullchain.pem expires on 2024-11-07 (skipped)
Oct 08 11:26:11... certbot[279708]: No renewals were attempted.
Oct 08 11:26:11... certbot[279708]: - - - - - - - - - - - - - - - - - - - - - - - - - - - - - - - - - - - - - - - -
Oct 08 11:26:12... systemd[1]: certbot-renew.service: Deactivated successfully.
Oct 08 11:26:12... systemd[1]: Finished certbot-renew.service - This service automatically renews any certbot certificates found.
```

## **갱신**

갱신되는 인증서의 경우

```
Oct 08 13:15:30... systemd[1]: Starting certbot-renew.service - This service automatically renews any certbot certificates found...
Oct 08 13:15:31... certbot[286750]: Saving debug log to /var/log/letsencrypt/letsencrypt.log
Oct 08 13:15:31... certbot[286750]: - - - - - - - - - - - - - - - - - - - - - - - - - - - - - - - - - - - - - - - -
Oct 08 13:15:31... certbot[286750]: Processing /etc/letsencrypt/renewal/al2023.example.com.conf
Oct 08 13:15:31... certbot[286750]: - - - - - - - - - - - - - - - - - - - - - - - - - - - - - - - - - - - - - - - -
Oct 08 13:15:32... certbot[286750]: Renewing an existing certificate for al2023.example.com
Oct 08 13:16:10... certbot[286750]: - - - - - - - - - - - - - - - - - - - - - - - - - - - - - - - - - - - - - - - -
Oct 08 13:16:10... certbot[286750]: Congratulations, all renewals succeeded:
Oct 08 13:16:10... certbot[286750]:   /etc/letsencrypt/live/al2023.example.com/fullchain.pem (success)
Oct 08 13:16:10... certbot[286750]: - - - - - - - - - - - - - - - - - - - - - - - - - - - - - - - - - - - - - - - -
Oct 08 13:16:11... systemd[1]: certbot-renew.service: Deactivated successfully.
Oct 08 13:16:11... systemd[1]: Finished certbot-renew.service - This service automatically renews any certbot certificates found.
Oct 08 13:16:11... systemd[1]: certbot-renew.service: Consumed 1.373s CPU time.
```
🔹7. 수동 인증서 갱신 (필요한 경우)
sudo certbot renew🔹8. Nginx 재시작 (설정 변경 후 필요 시 실행)
sudo systemctl restart nginx
✅ 배포 당일에 해야 할 작업 (Elastic IP 설정 및 배포 확인)
🔹 1. Elastic IP 할당 및 EC2 인스턴스에 연결
(1) Elastic IP 할당
-
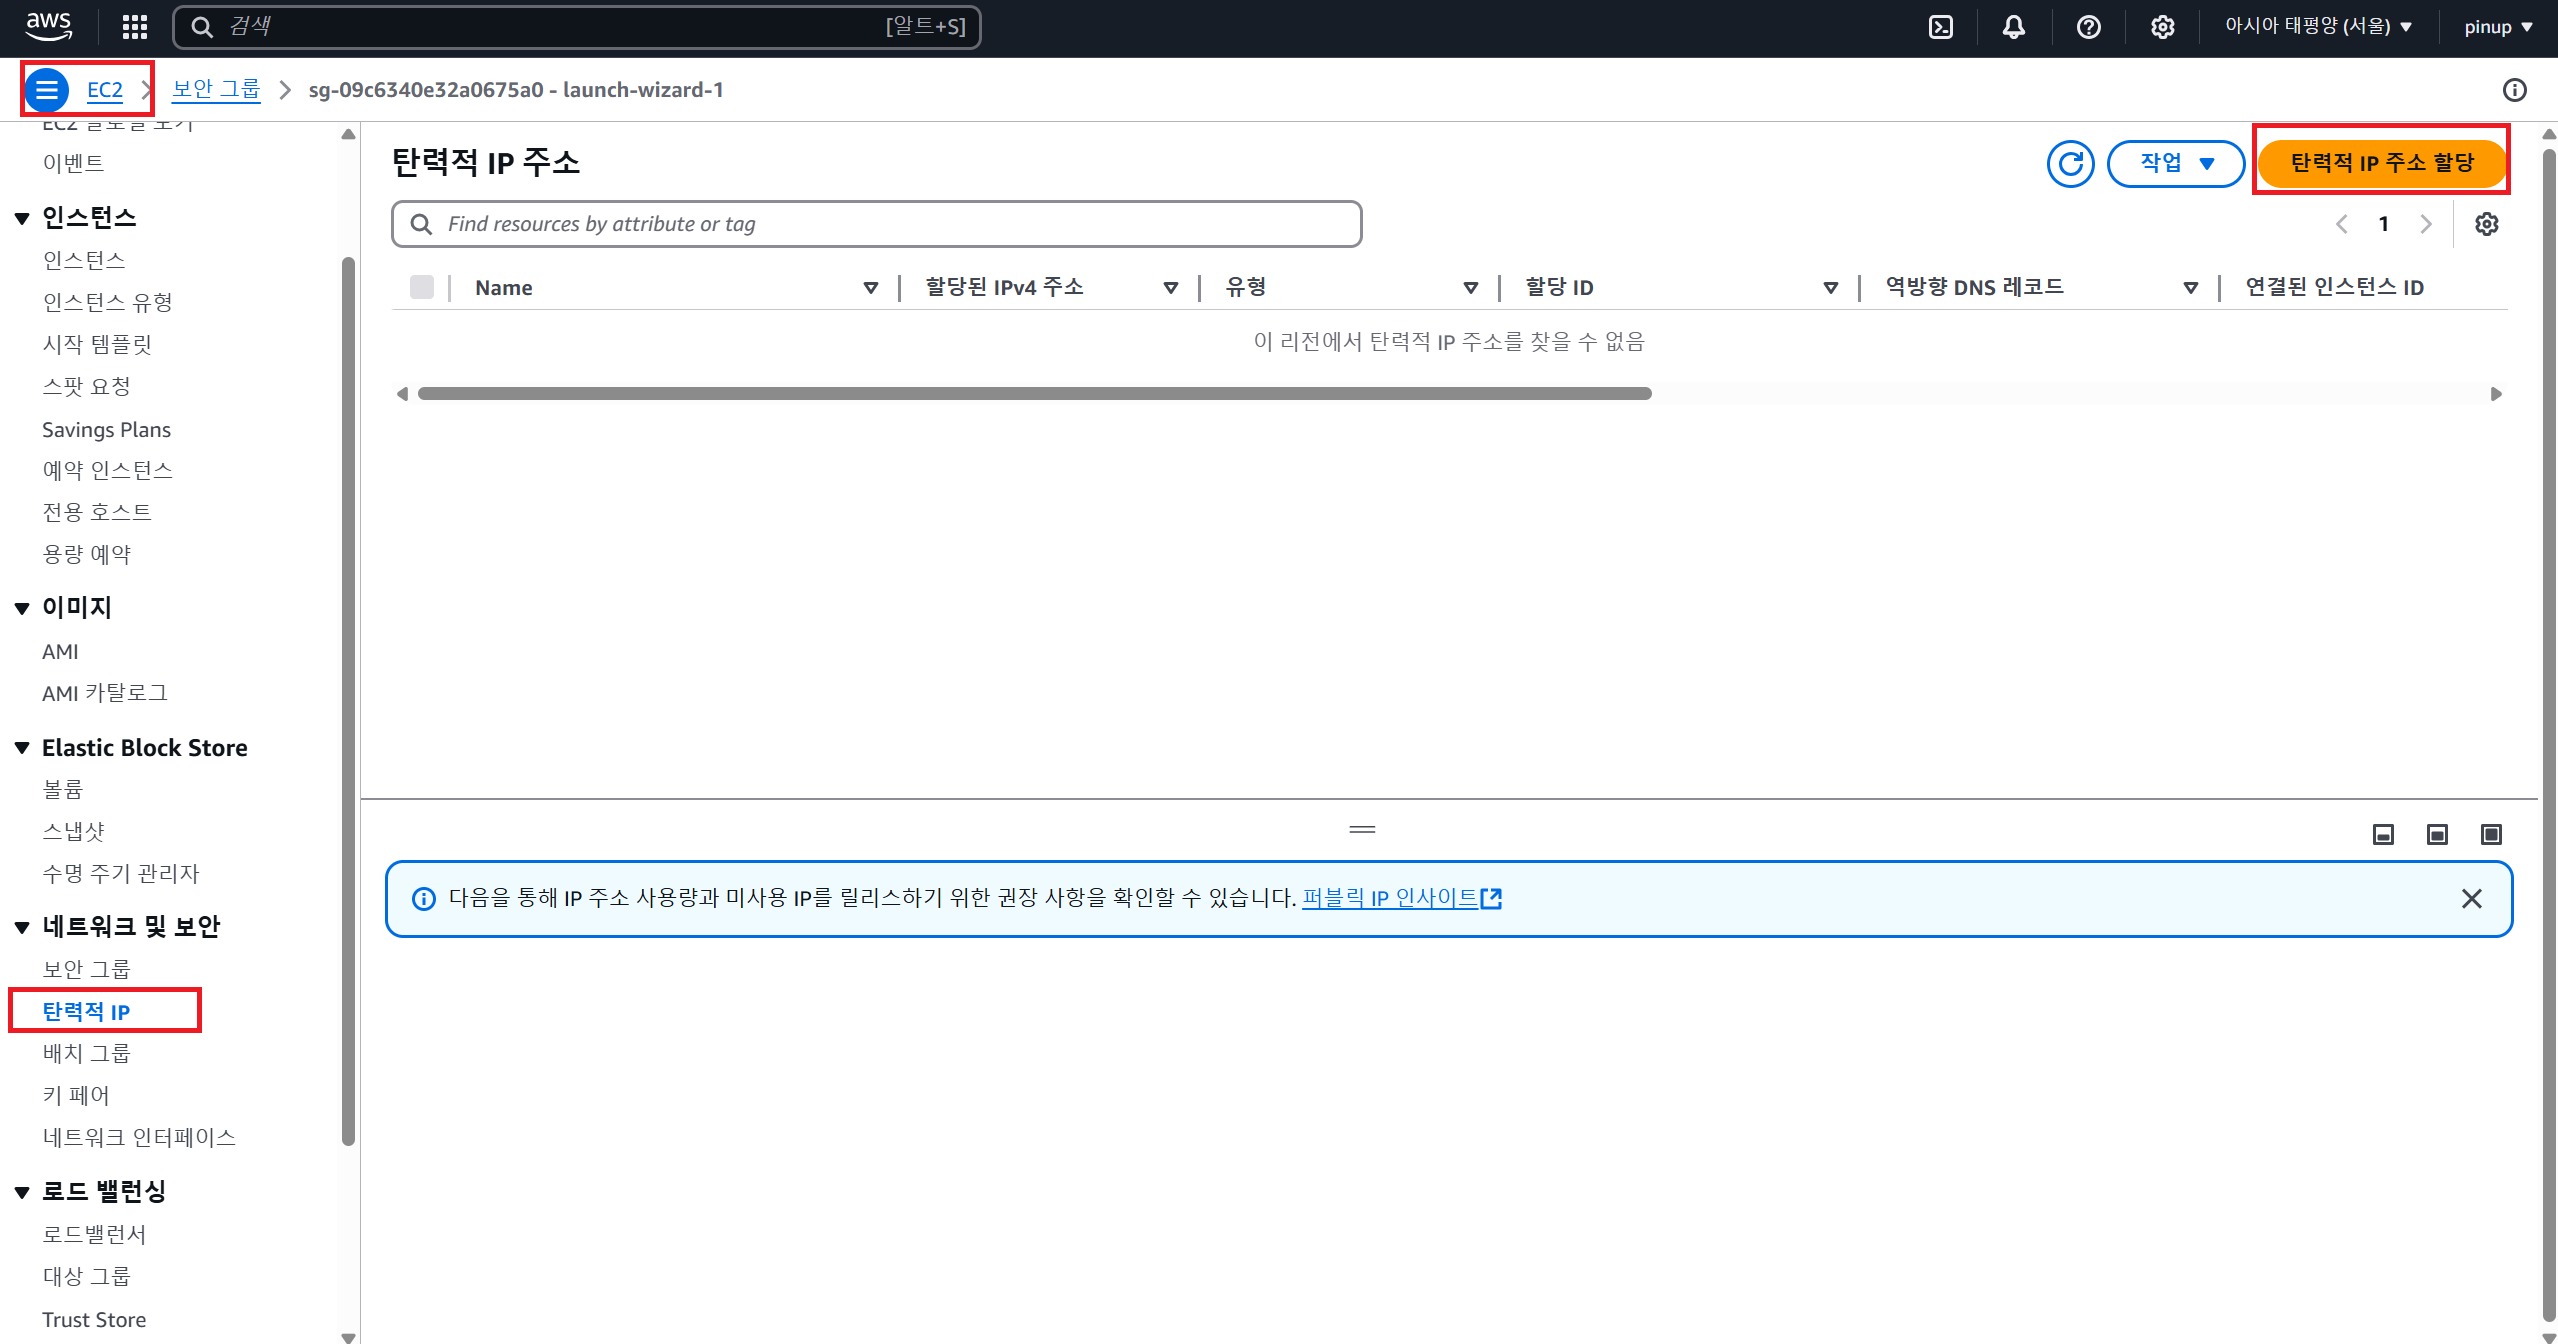
AWS EC2 콘솔 접속 → EC2 콘솔
-
왼쪽 메뉴에서
네트워크 및 보안→탄력적 IP클릭 -
탄력적 IP 주소 할당클릭
-
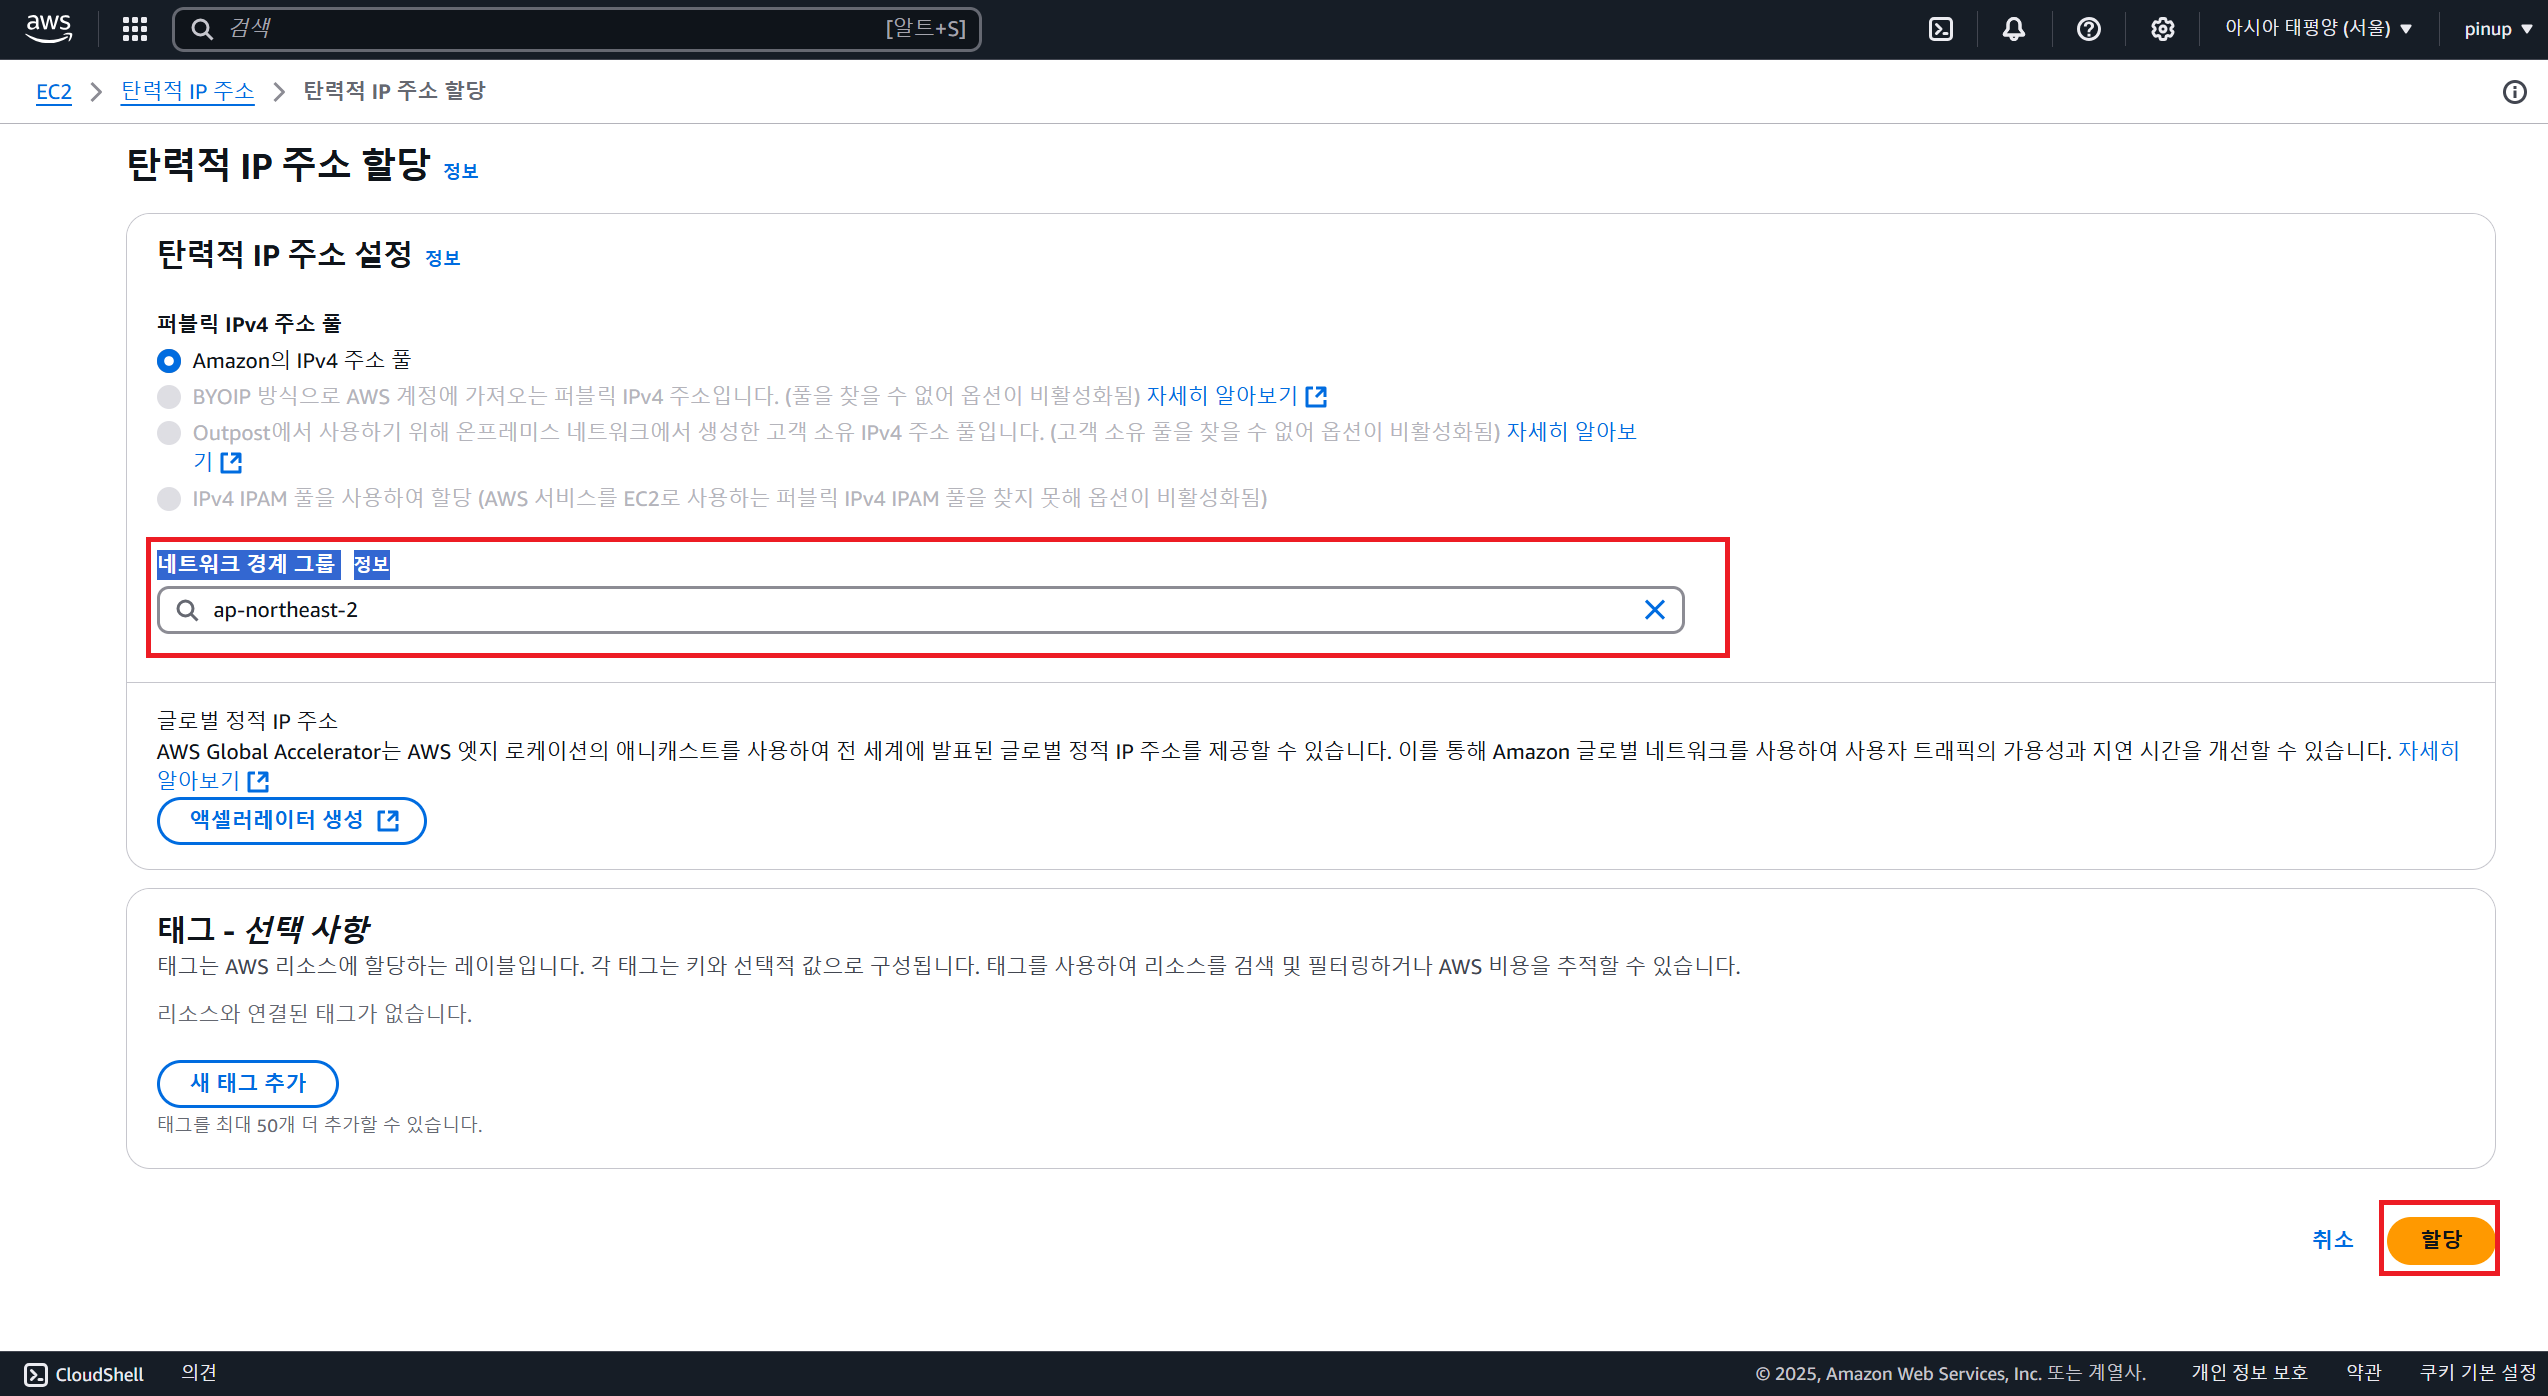
Public IPv4 Address Pool에서 Amazon의 IPv4 주소 풀 선택 -
할당(Allocate)버튼 클릭
(2) Elastic IP를 EC2 인스턴스에 연결
-
탄력적 IP목록에서 방금 만든 IP 선택 -
작업(Actions)→탄력적 IP 주소 연결(Associate Elastic IP address)클릭 -
설정 입력
리소스 유형(Resource type):Instance선택인스턴스(Instance):배포할 EC2 인스턴스 선택프라이빗 IP(Private IP):자동 선택
-
연결(Associate)버튼 클릭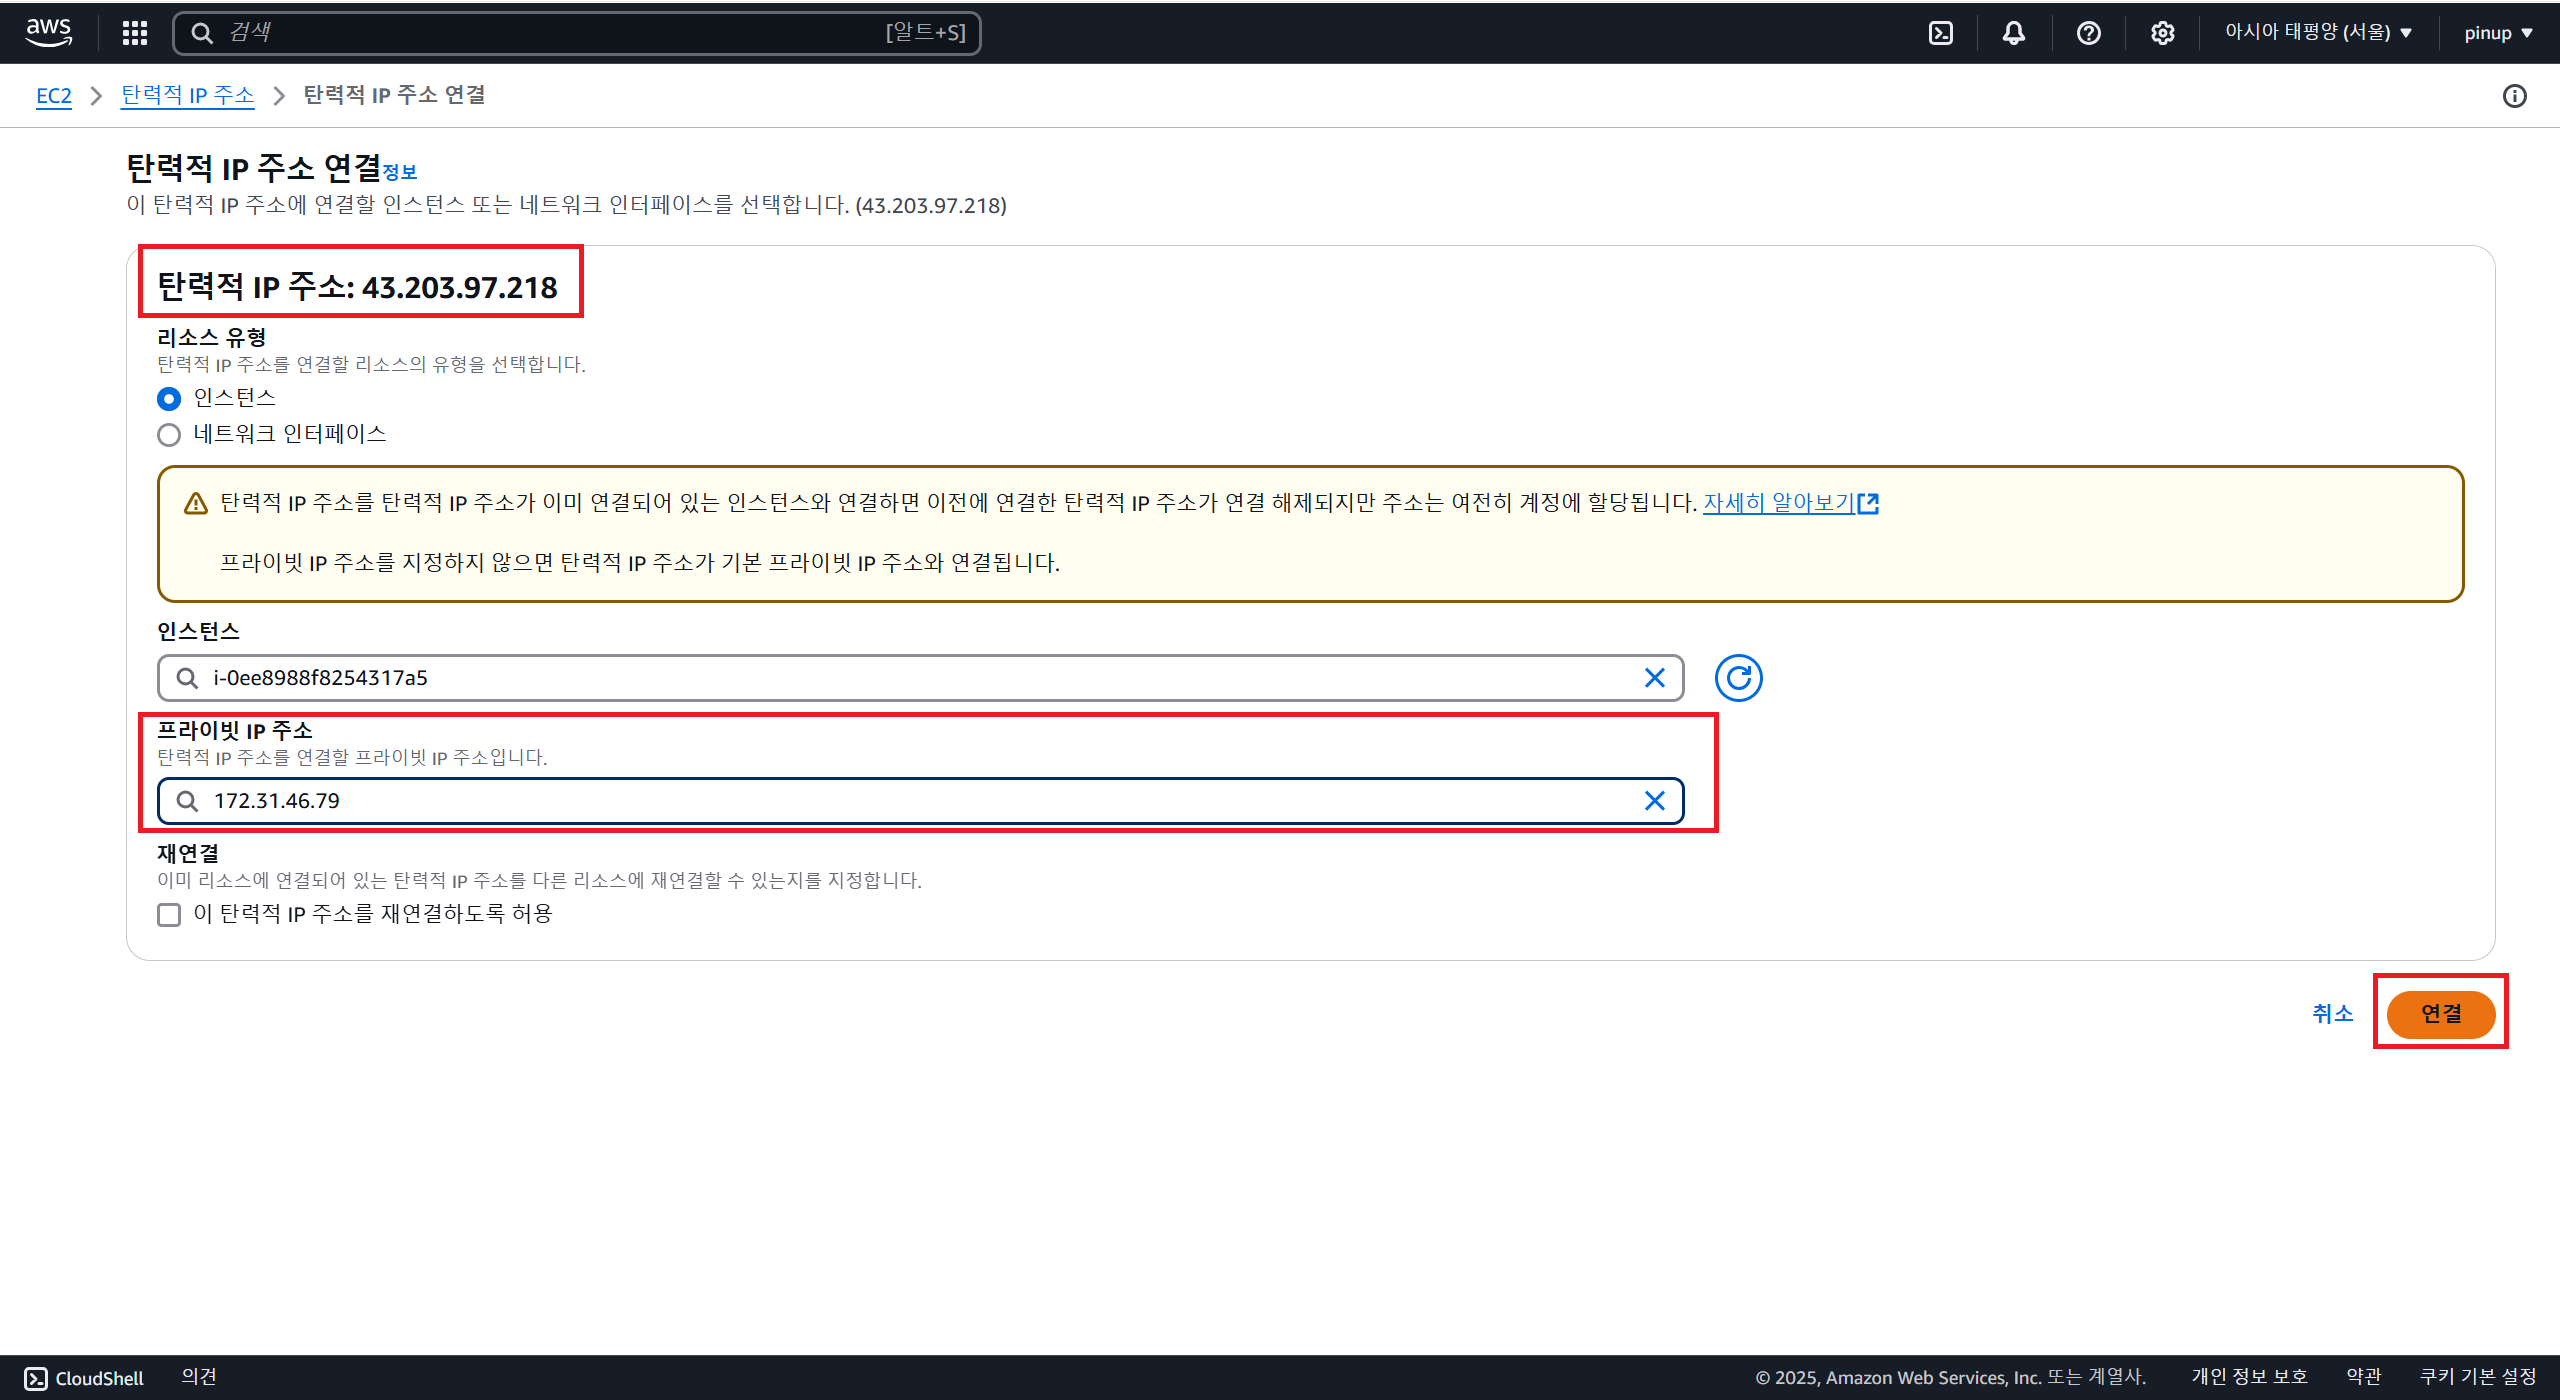
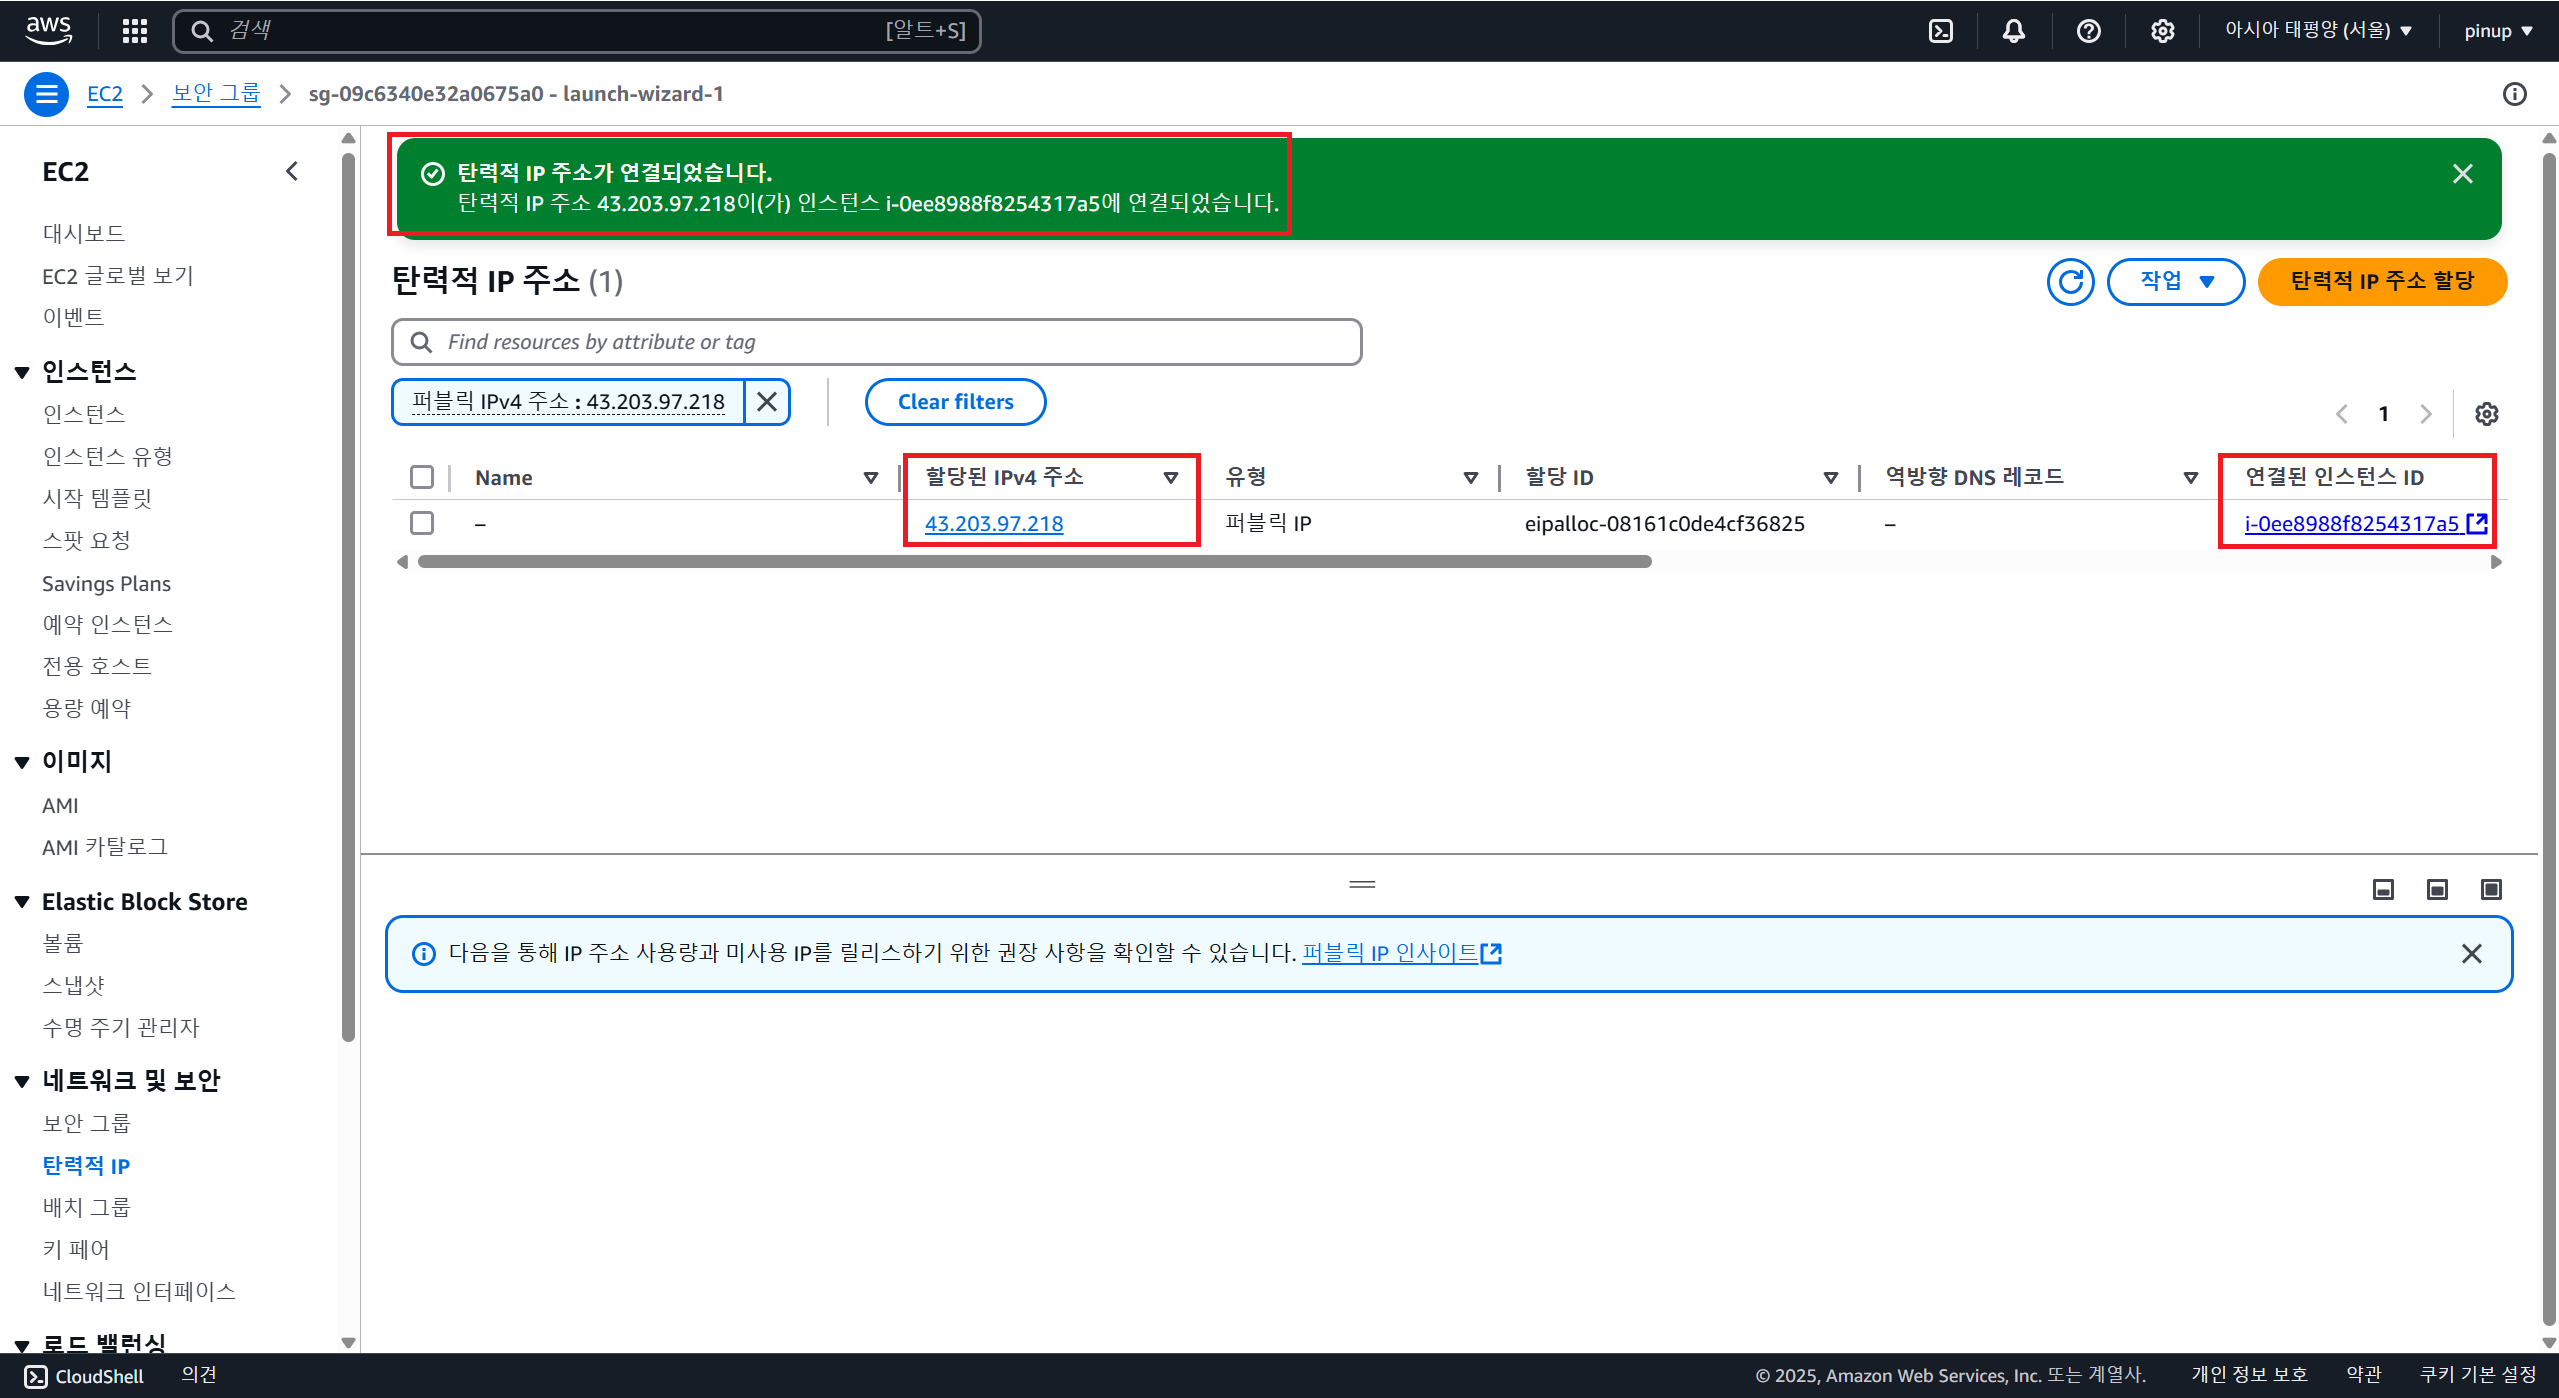
탄력적 IP 목록(Elastic IPs)에서연결된 인스턴스 ID(Associated instance ID)가 정상적으로 표시되는지 확인
-
연결 확인:
⚠️ 주의:
- 탄력적 IP를 할당하고 EC2 인스턴스에 연결하지 않으면 요금이 부과됨
- 반드시 연결 후 사용해야 함
-
Elastic IP 해제 (필요한 경우)
### **🔹  Elastic IP 해제 (필요한 경우)**

Elastic IP가 EC2 인스턴스에 연결되지 않은 상태로 남아 있으면 AWS에서 요금이 부과된다.

사용하지 않을 경우 반드시 해제해야 한다.

1. **AWS 콘솔** → `Elastic IPs` 이동
2. 해제할 Elastic IP 선택
3. `Actions` → `Disassociate Elastic IP address` 클릭
4. `Actions` → `Release Elastic IP address` 클릭

**✅ AWS CLI로 해제할 경우**

```
aws ec2 disassociate-address --public-ip 203.0.113.25
aws ec2 release-address --allocation-id eipalloc-12345678
```

## **🔹 Elastic IP 해제 및 삭제 방법**

### **1. 연결 해제**

1. `탄력적 IP` 목록에서 연결 해제할 IP 선택
2. `작업` → `탄력적 IP 주소 연결 해제` 클릭
3. `연결 해제` 버튼 클릭

### **2. Elastic IP 삭제**

1. `탄력적 IP` 목록에서 해제된 IP 선택
2. `작업` → `탄력적 IP 주소 릴리스` 클릭
3. 확인 후 삭제 완료
🔹 2. Elastic IP 연결 확인
(1) 서버에서 확인
SSH로 접속한 후 Public IP 확인
curl ifconfig.me -
출력된 IP가 할당한 Elastic IP와 동일해야 함
🔹 3. Route 53 도메인 레코드 업데이트
-
AWS Route 53 콘솔 접속
-
왼쪽 메뉴에서
호스팅 영역(Hosted Zones)선택 -
배포할 도메인 선택
-
A 레코드(이전 IP가 설정된 레코드) 클릭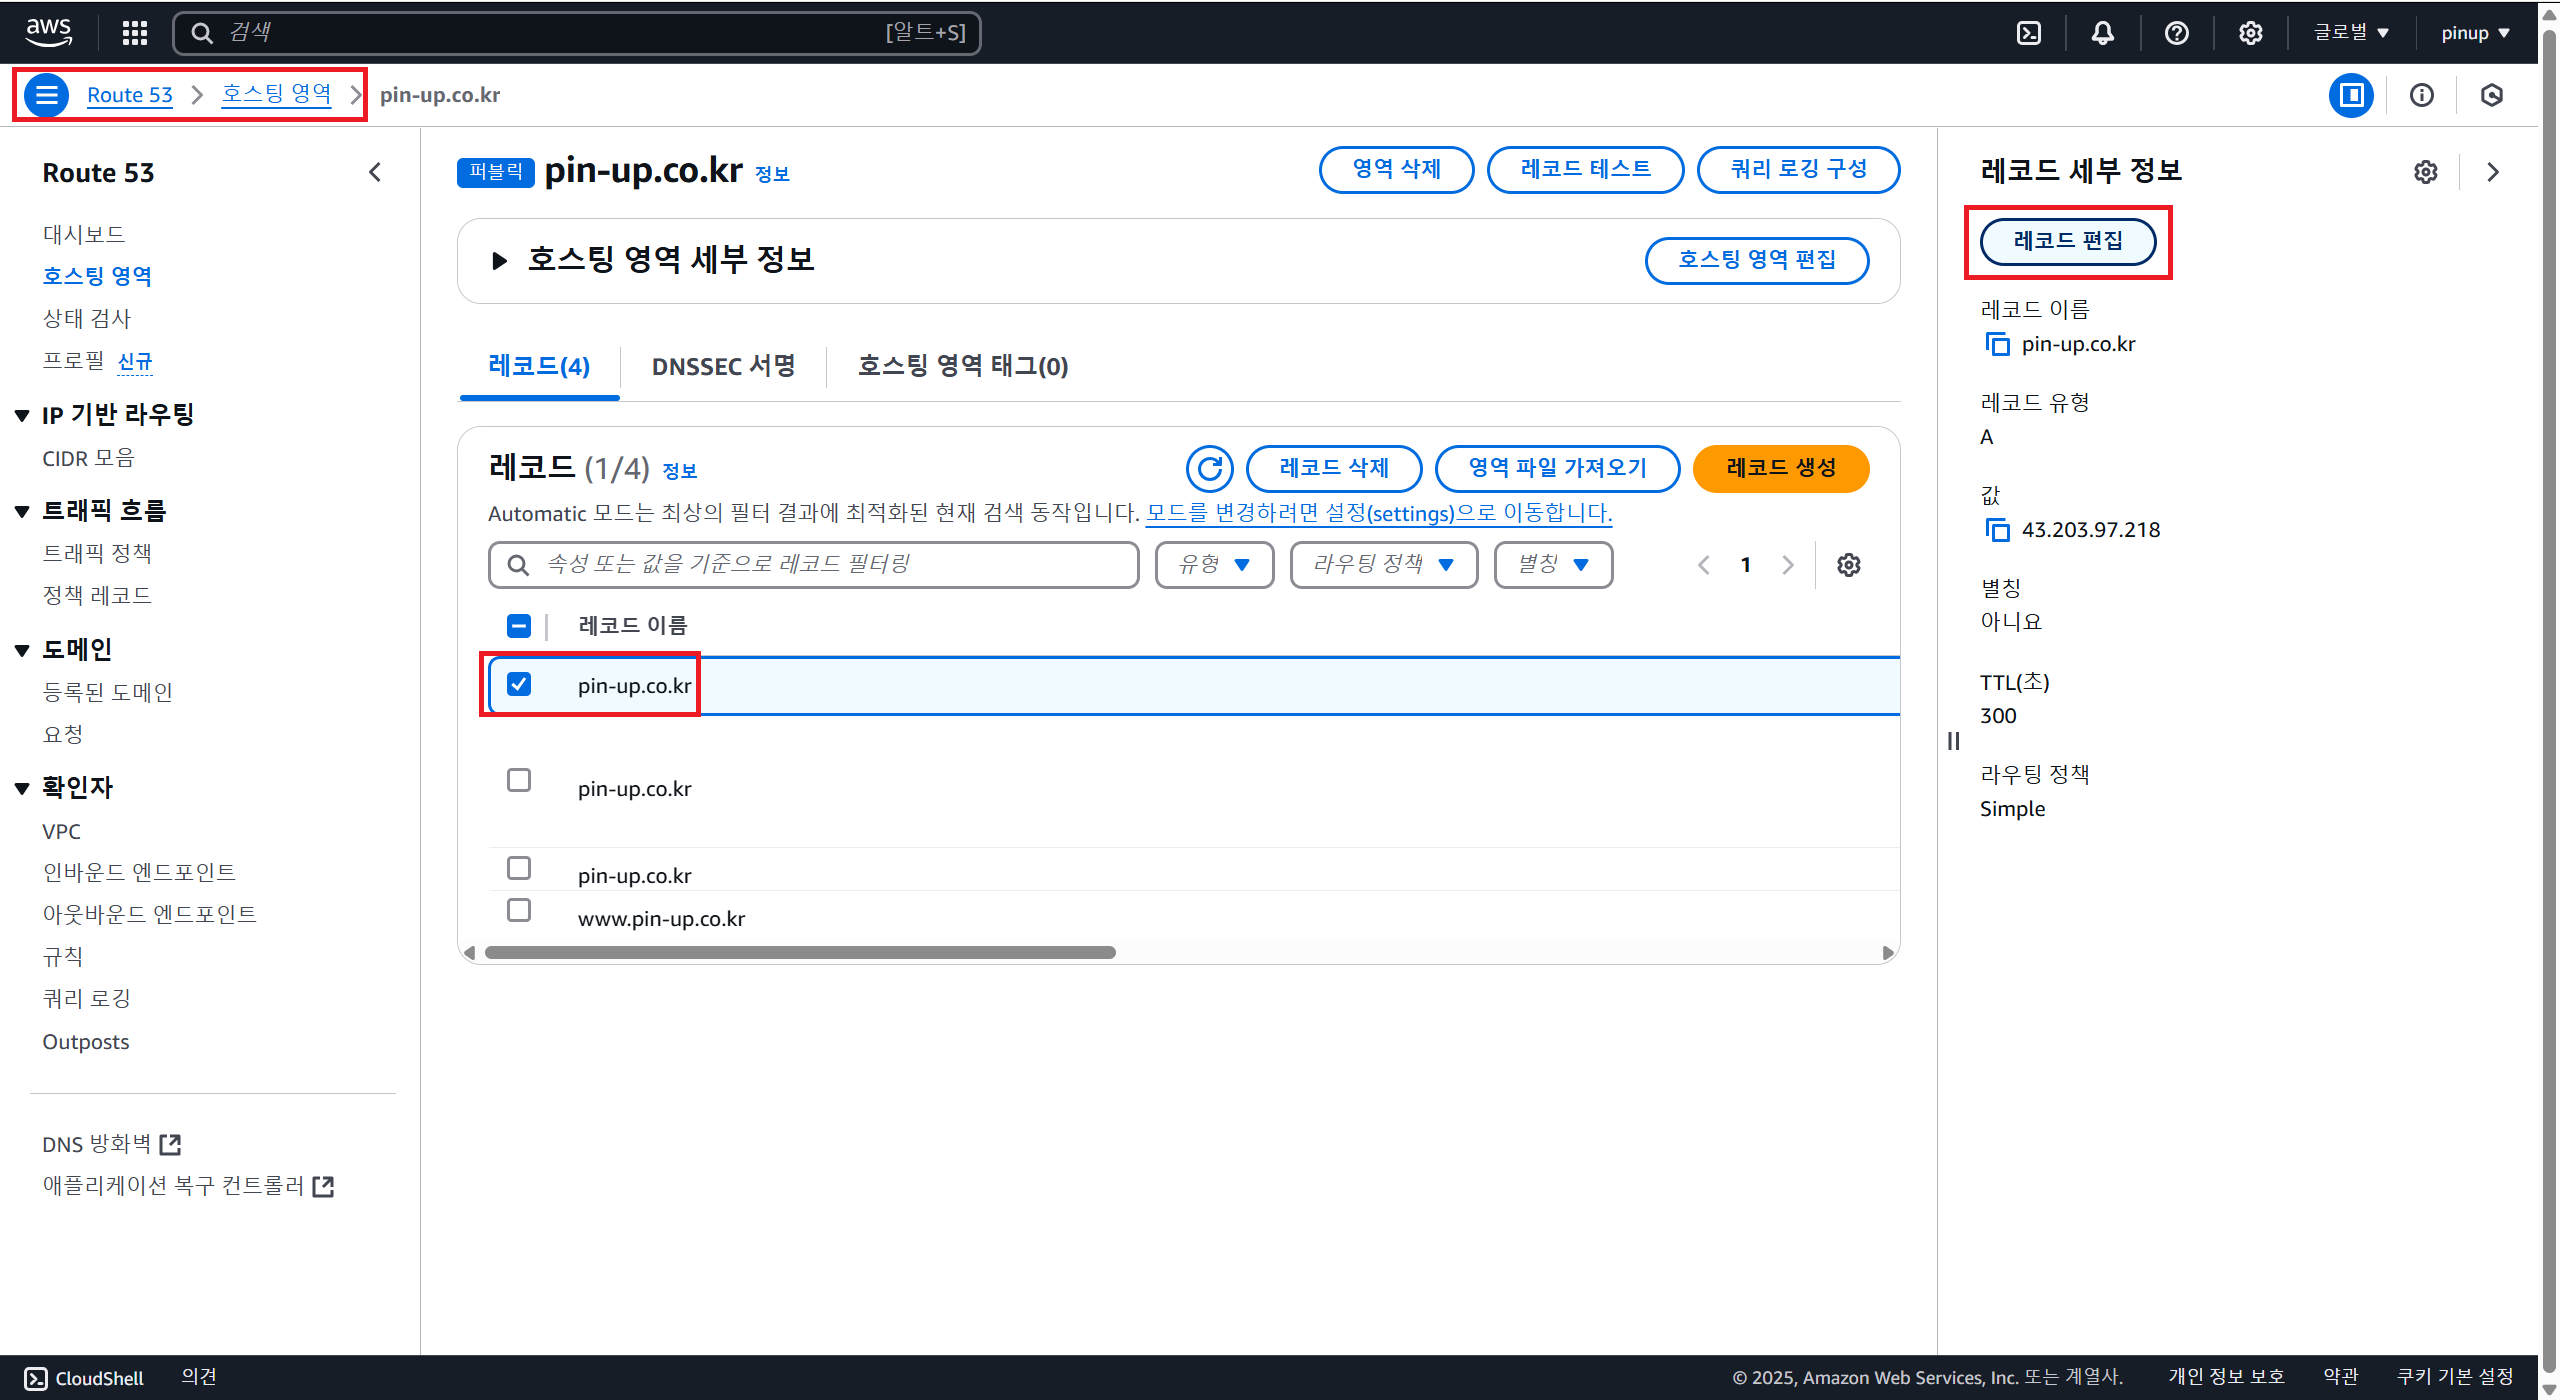
-
값(Value)을 새로 할당한 Elastic IP로 변경 후 저장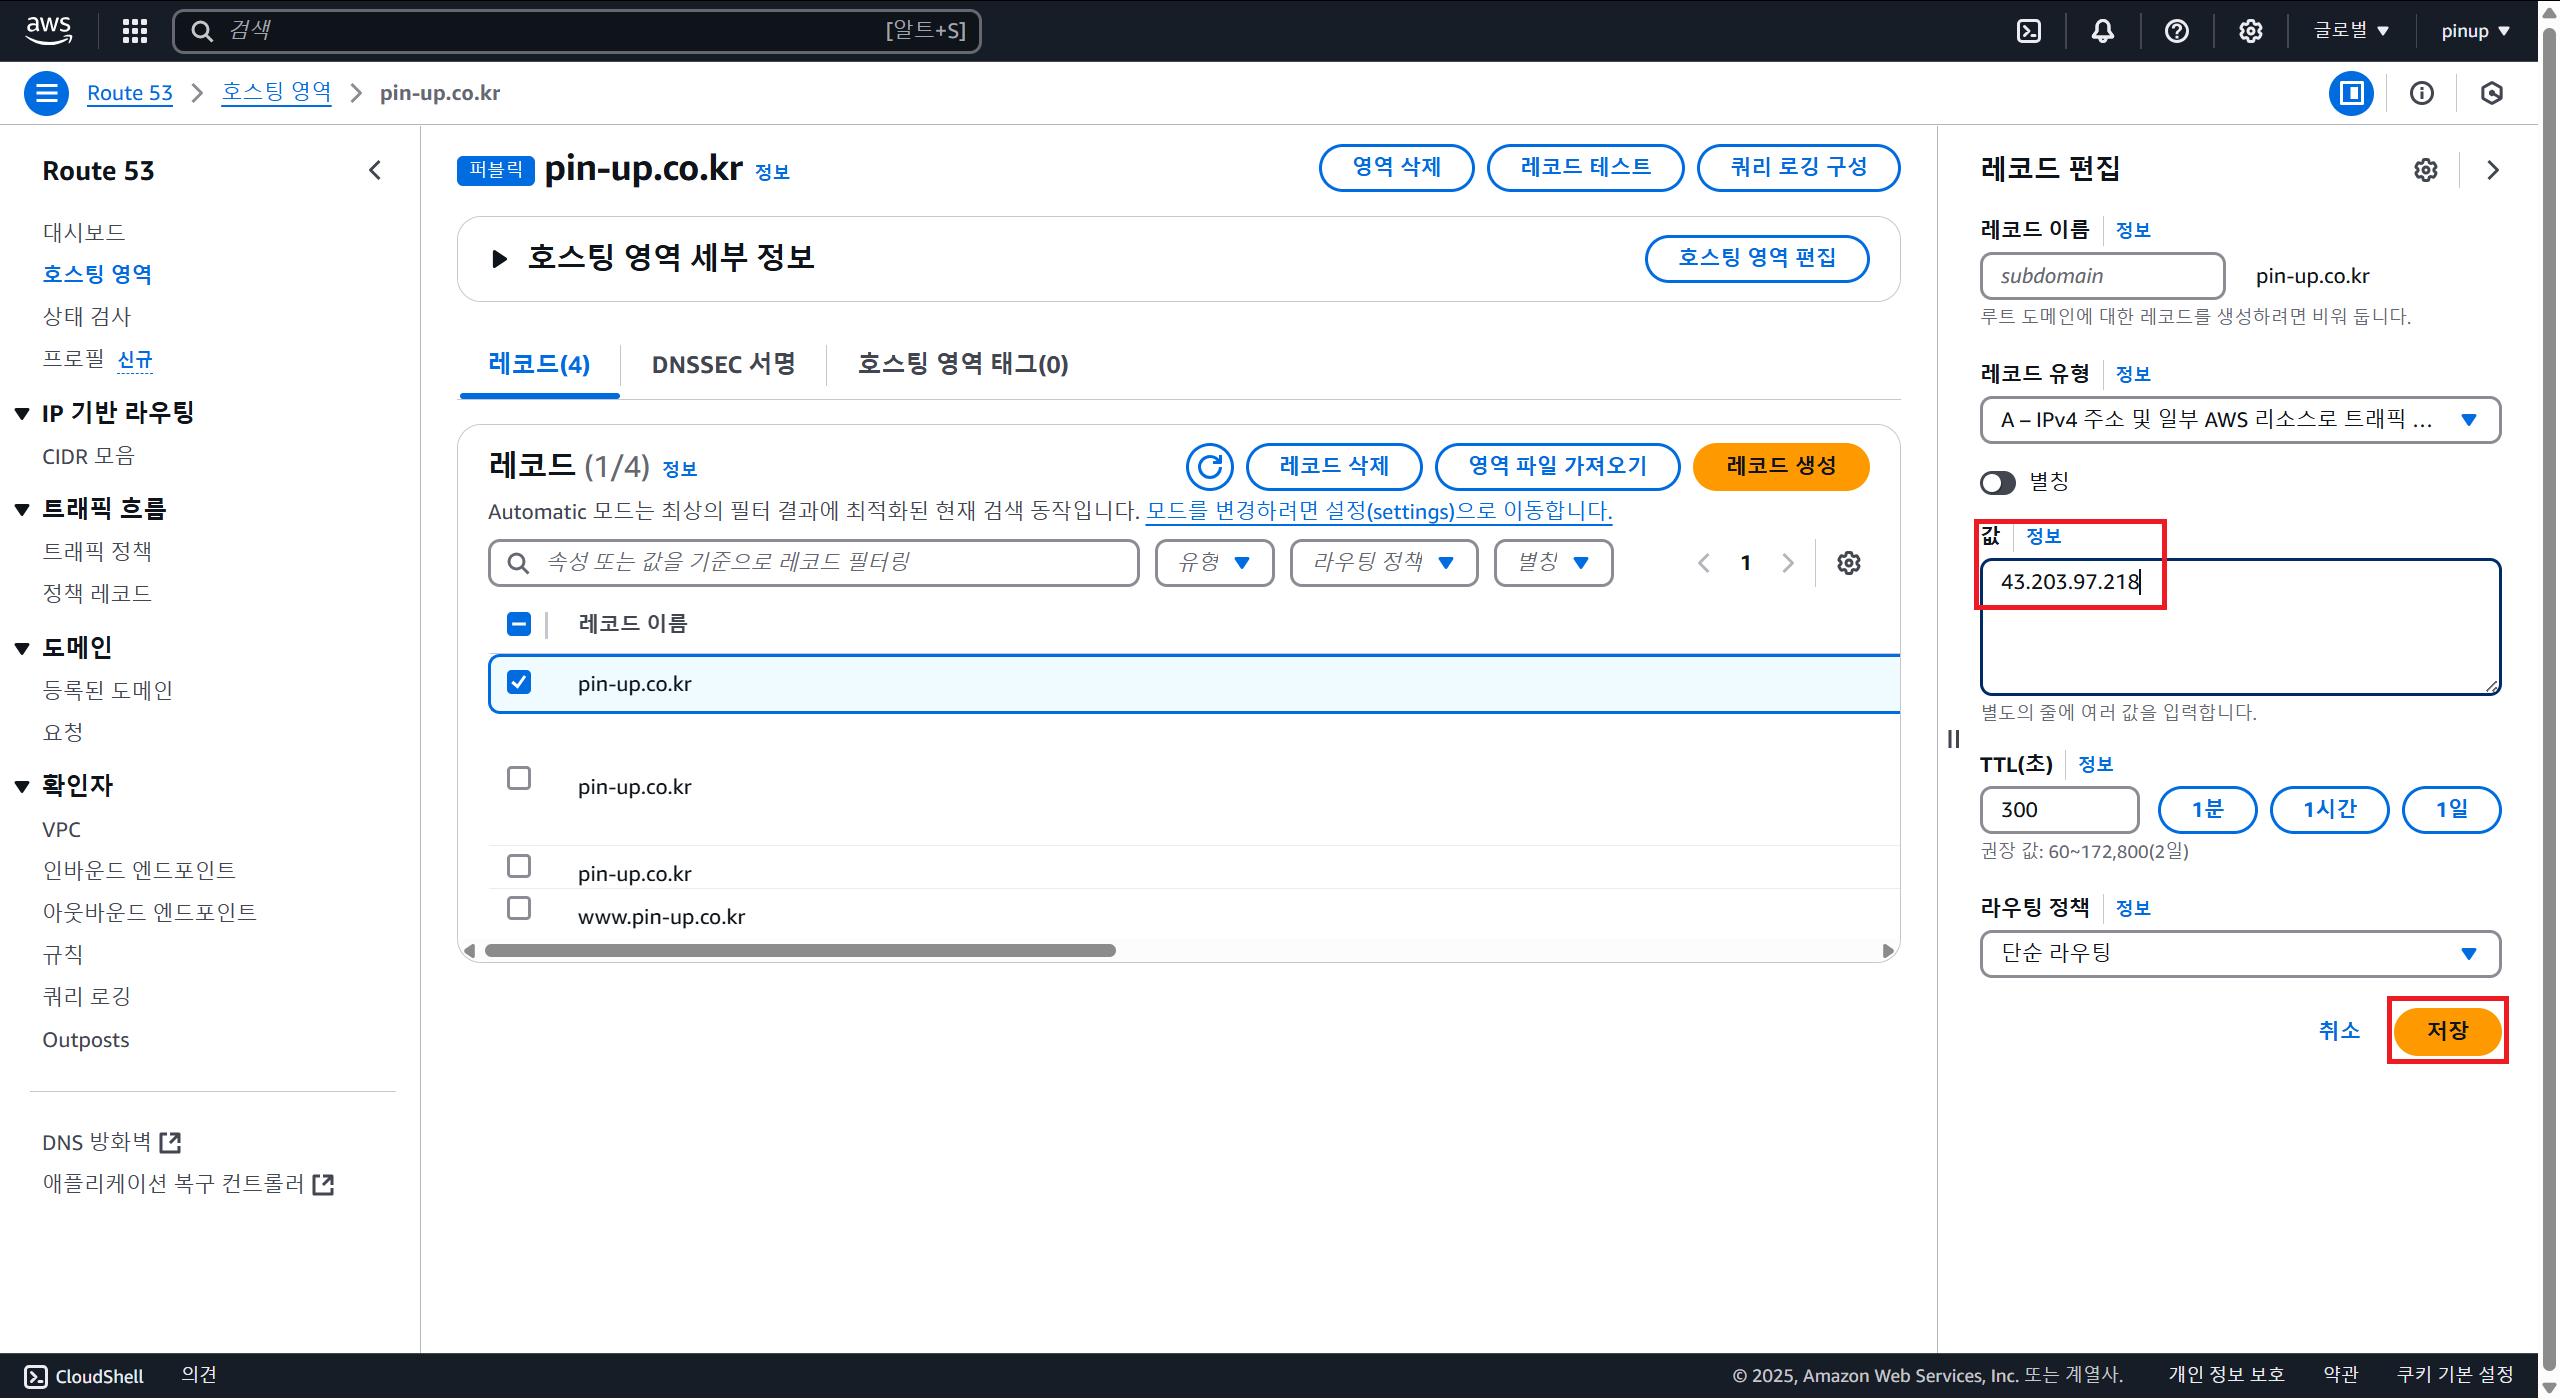
-
변경 확인
또는```bash dig pin-up.co.kr ``` ```bash nslookup pin-up.co.kr ``` - 새로운 Elastic IP가 반영되었는지 확인 - 적용 시간은 DNS 전파 상태에 따라 다름 (최대 10~15분)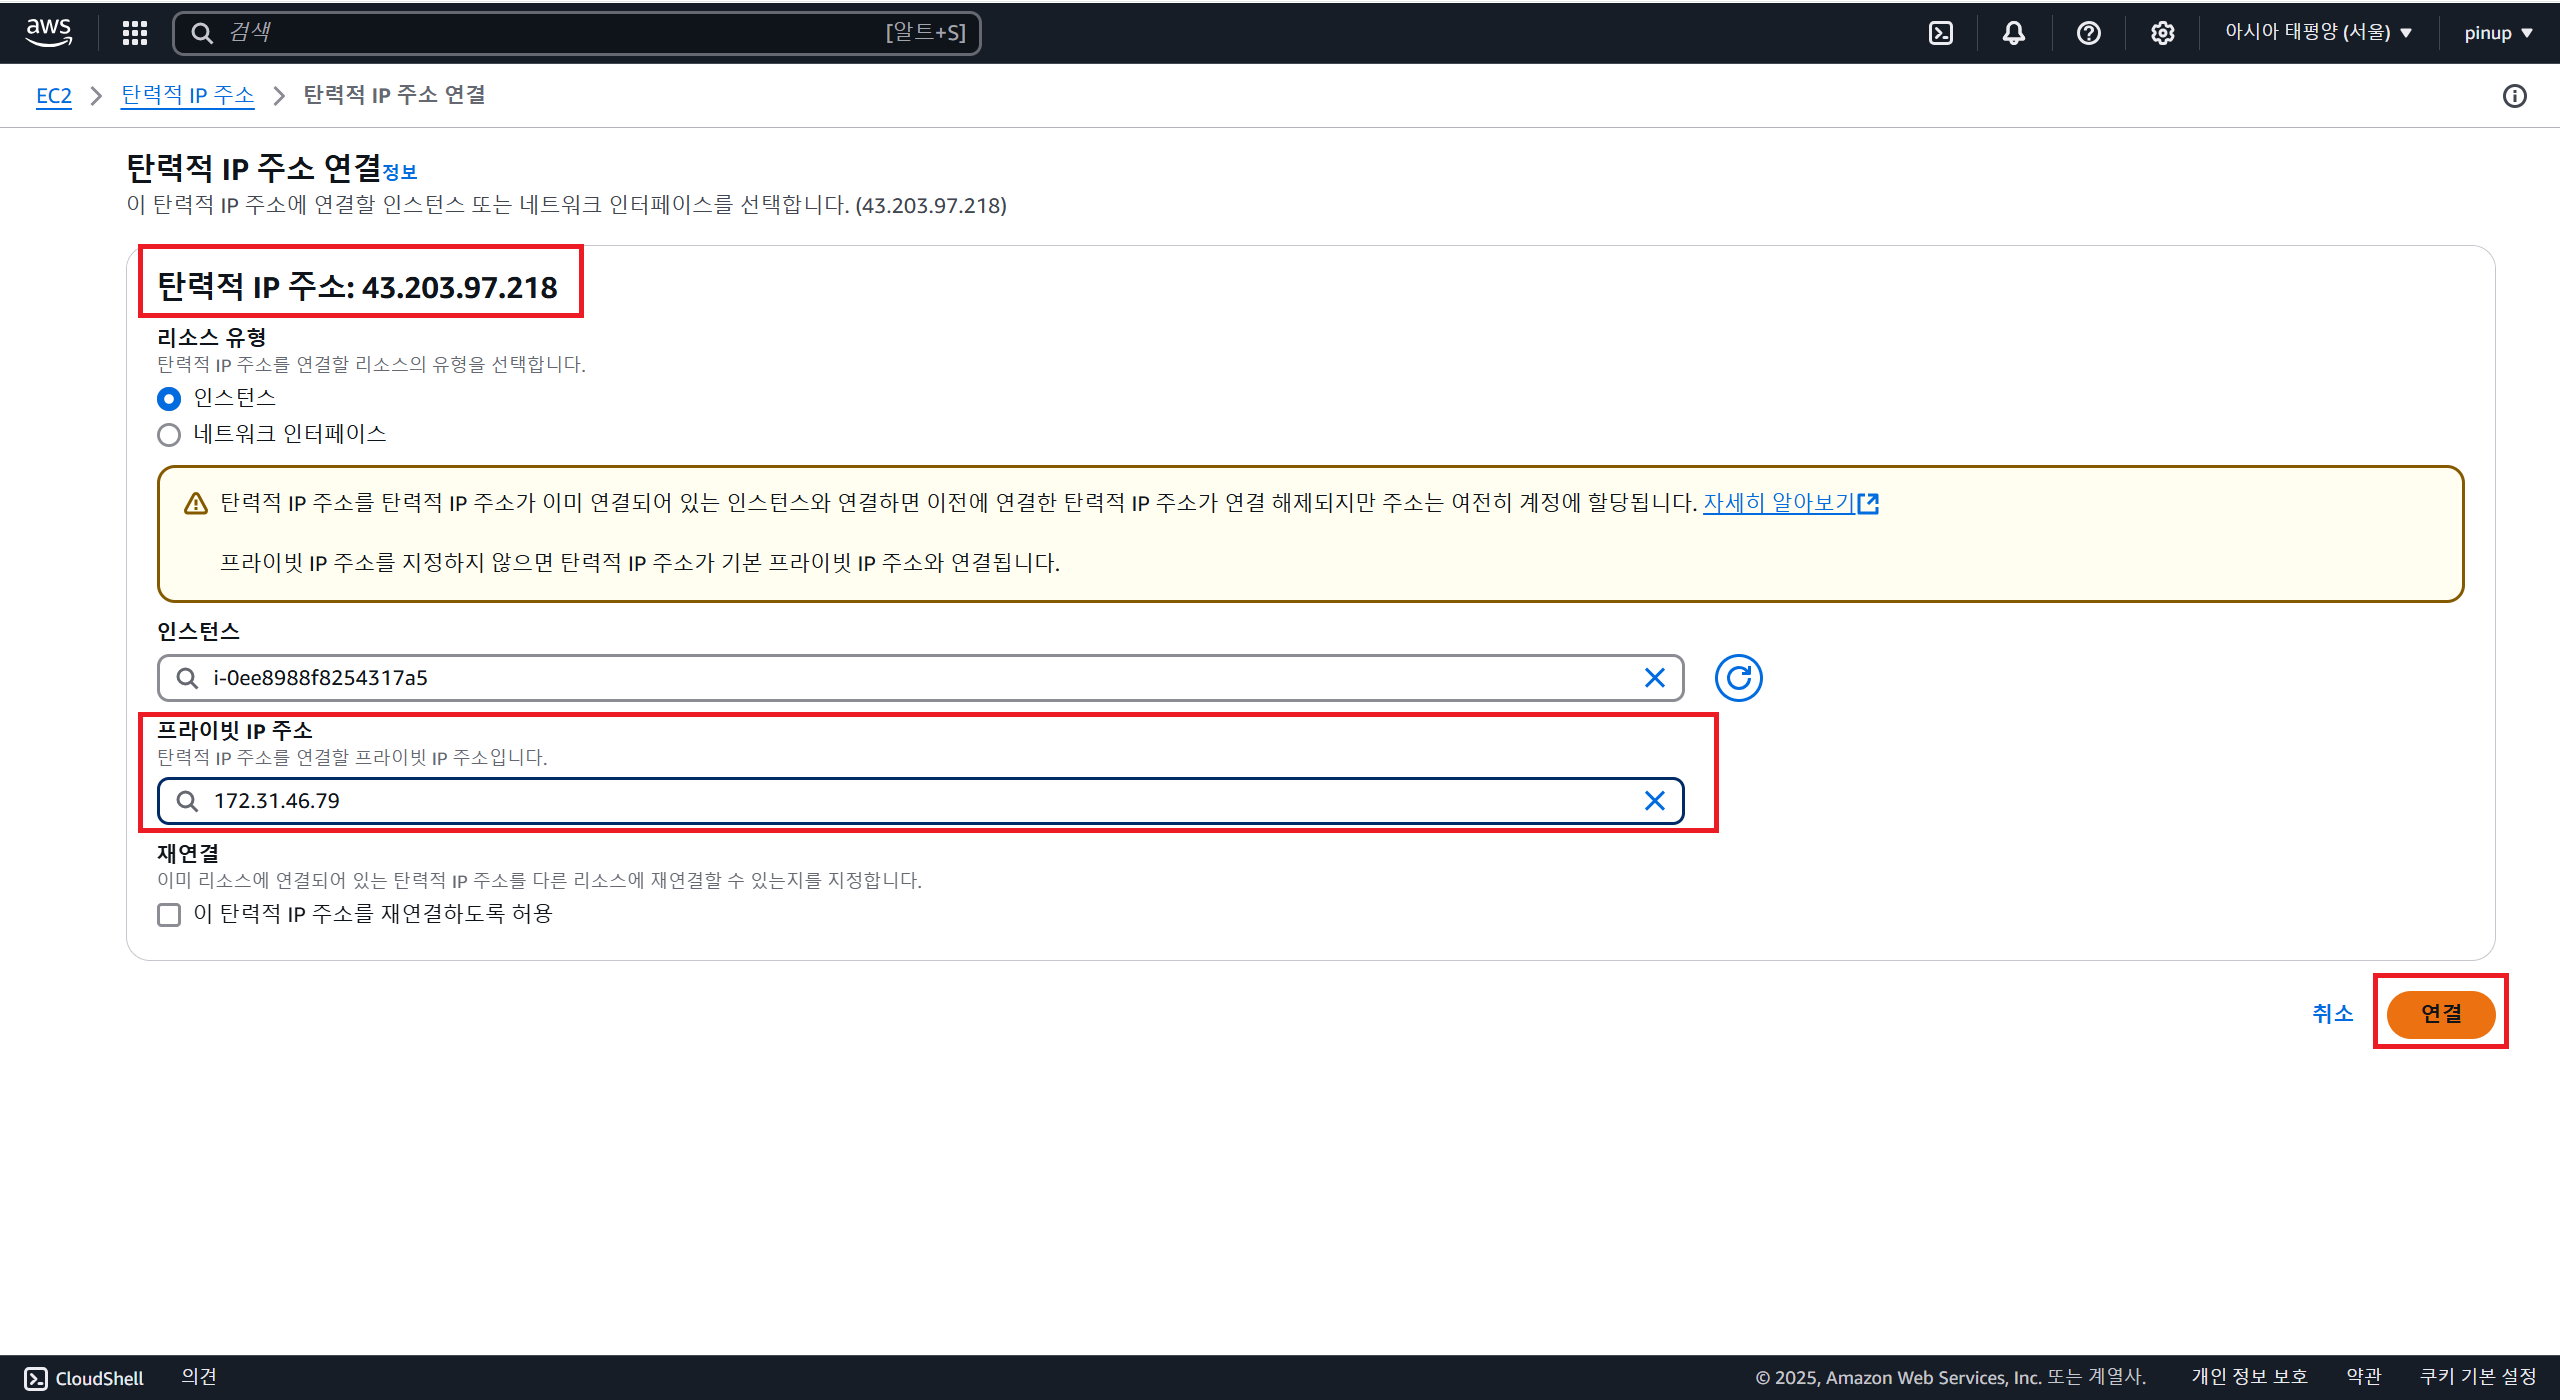
🔹 4. Nginx 설정 확인 및 재시작
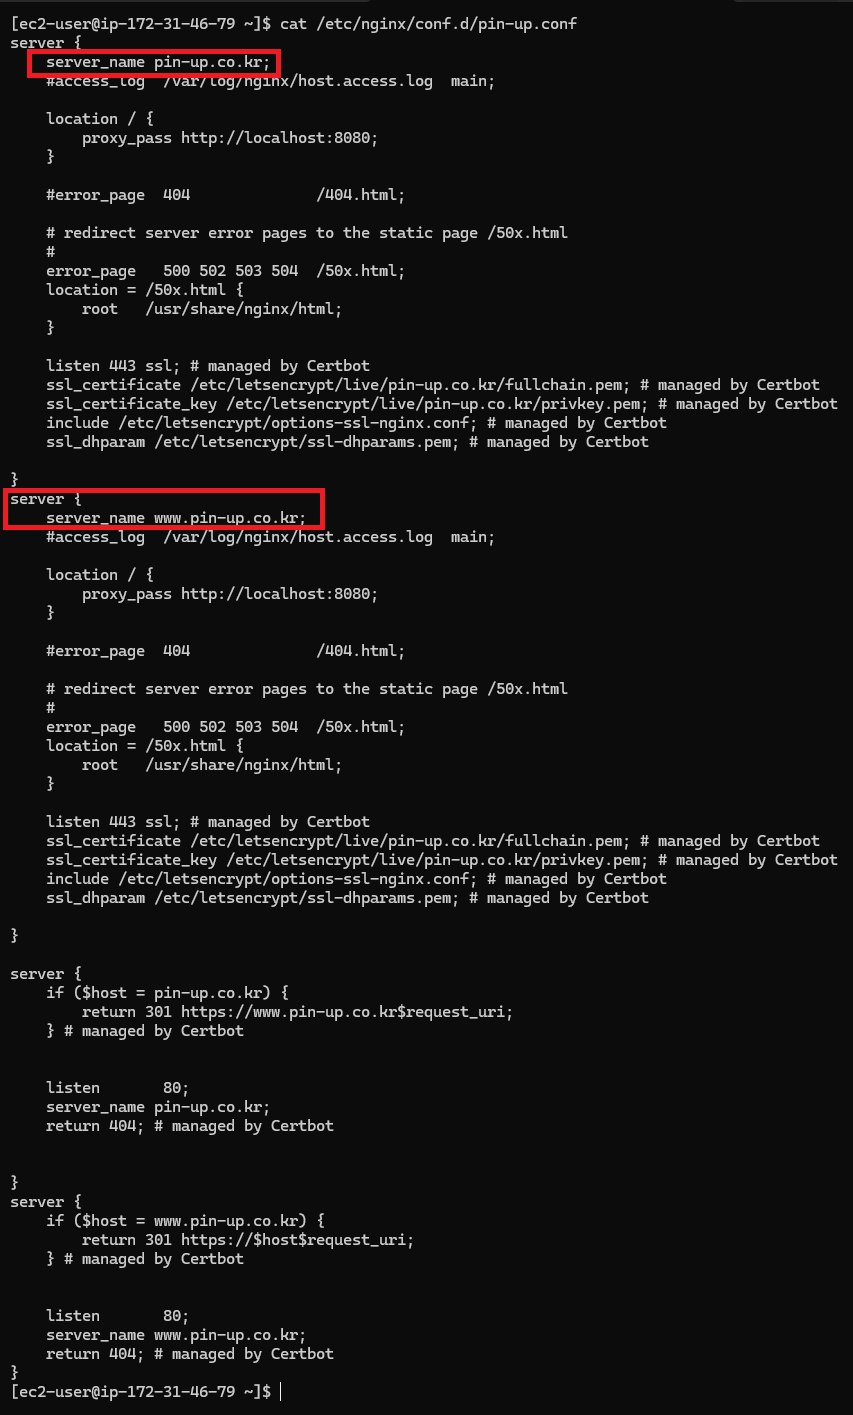
(1) Nginx 설정 파일에서 서버 블록 확인
cat /etc/nginx/conf.d/pin-up.conf
-
server_name example.com;설정이 올바르게 되어 있는지 확인
(2) Nginx 설정 테스트
sudo nginx -t✅ 정상 출력 예시:
nginx: configuration file /etc/nginx/nginx.conf test is successful(3) Nginx 재시작 - ip 변경이기 때문에 재시작 필요
sudo systemctl restart nginx(4) Nginx 상태확인
sudo systemctl status nginx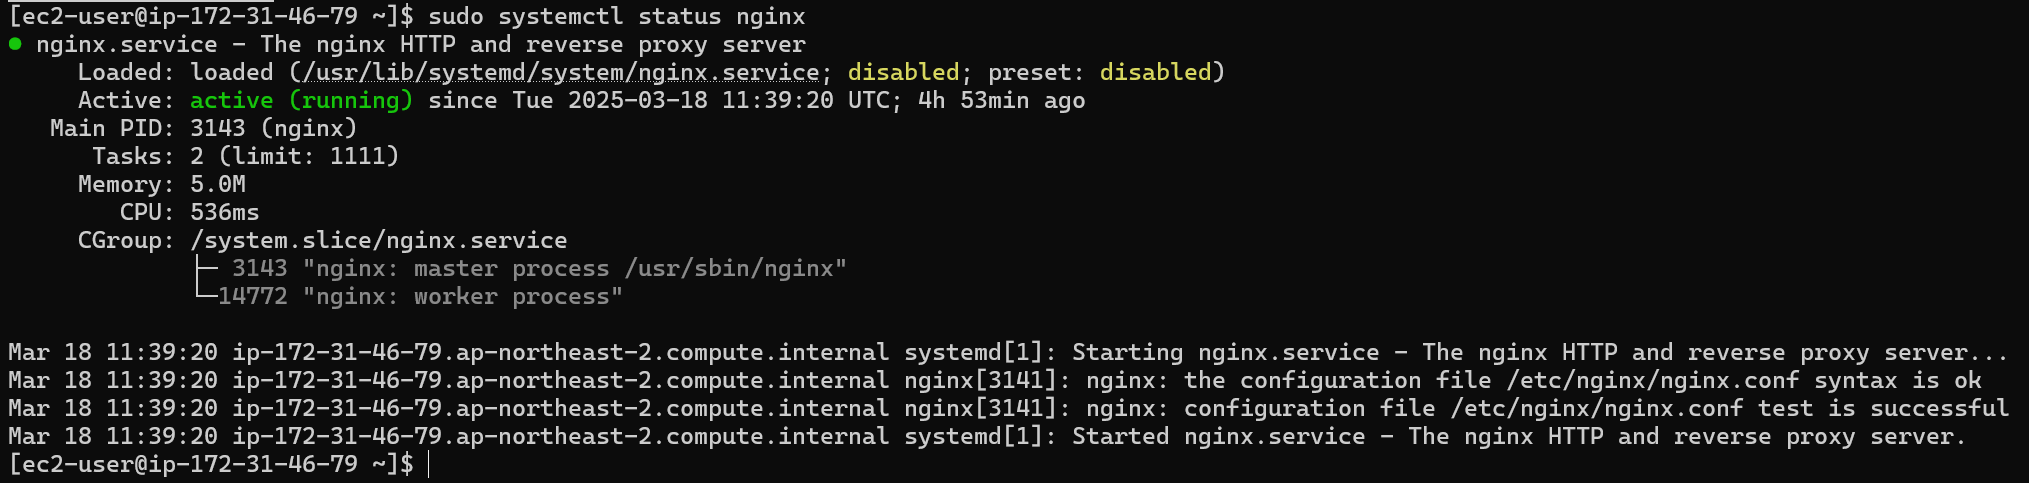
🔹 5. SSL 인증서 갱신 테스트
(1) 인증서 갱신 테스트
sudo certbot renew --dry-run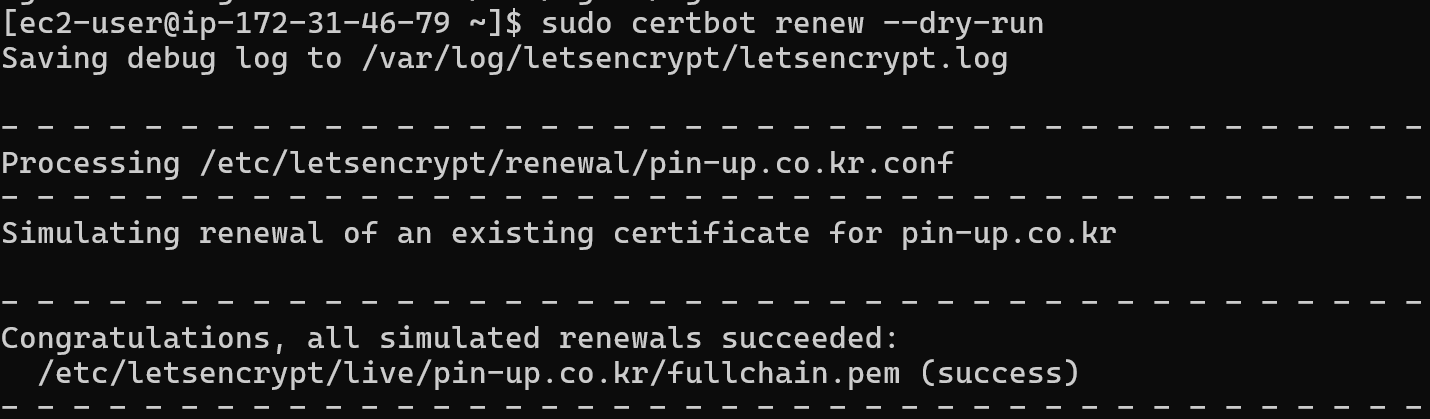
-
정상적으로 동작하는지 확인
(2) SSL 인증서 상태 확
openssl s_client -connect pin-up.co.kr:443 -
유효한 인증서인지 확인
🔹 6. 방화벽 및 보안 그룹 설정 확인
(1) 현재 방화벽 상태 확인
sudo firewall-cmd --list-all✅ HTTP(80), HTTPS(443) 포트가 열려 있어야 함
(2) EC2 보안 그룹 확인
-
AWS EC2 콘솔 → 인스턴스 선택
-
보안 그룹(Security Group)이동 →인바운드 규칙(Inbound Rules)확인 -
80, 443 포트가 모든 사용자(0.0.0.0/0, ::/0) 또는 특정 IP에 대해 허용되어 있는지 체크
🔹 7. 애플리케이션 정상 동작 확인
-
배포한 사이트 접속 (
https://pin-up.co.kr) -
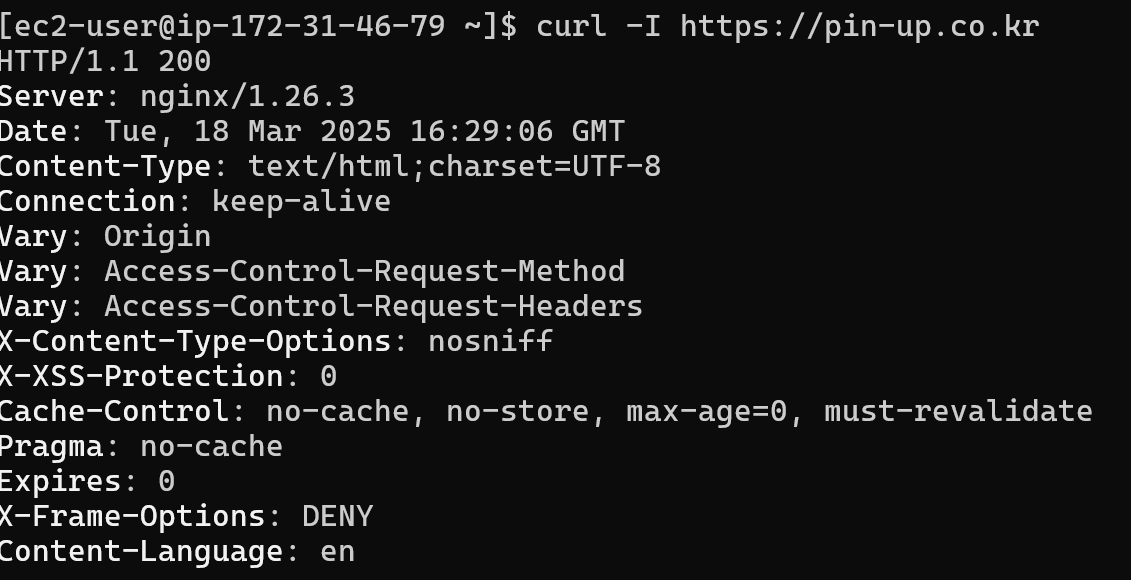
curl로 응답 확인curl -I https://pin-up.co.kr✅ 정상 출력 예시:
🔹 8. 배포 완료 후 불필요한 인스턴스 종료 (선택 사항)
Elastic IP를 새 인스턴스에 연결한 경우, 기존 인스턴스를 정리해야 함
-
AWS EC2 콘솔 → 이전 인스턴스 선택
-
인스턴스 상태(Instance State)→중지(Stop)또는종료(Terminate)🚨 주의: 기존 인스턴스를 종료하기 전에 새 인스턴스가 정상적으로 배포되었는지 확인해야 함!
-