✅ 목표 요약
- Assets.xcassets를 사용하지 않는다.
- Figma로부터 받은 light/dark hex 값들을 코드로만 관리한다.
- iOS 시스템 light/dark 모드 전환에 따라 컬러가 자동 전환되도록 한다.
Flow Result
- Figma의 Design Tokens Manager 플러그인을 통해 json 파일들로 export
- export 된 여러 json 파일들 -> colors.json 파일 생성
- colors.json 파일 -> colors.swift 파일 생성
- colors.swift 의 enum Color 로 바로 dark, light 모드간 전환되는 UIColor, Color 구현
서론
이번에 Figma로 디자인을 반영하는 과정을 통해 token 으로 컬러값들을 새롭게 정리하였다.
근데... 이 컬러들을 언제 일일이 Assets 에 반영해야 하지?
혹시 Figma 내에서 variable 로 관리중인 color 값들을 바로 쓸 수 있는 방법이 없을까?
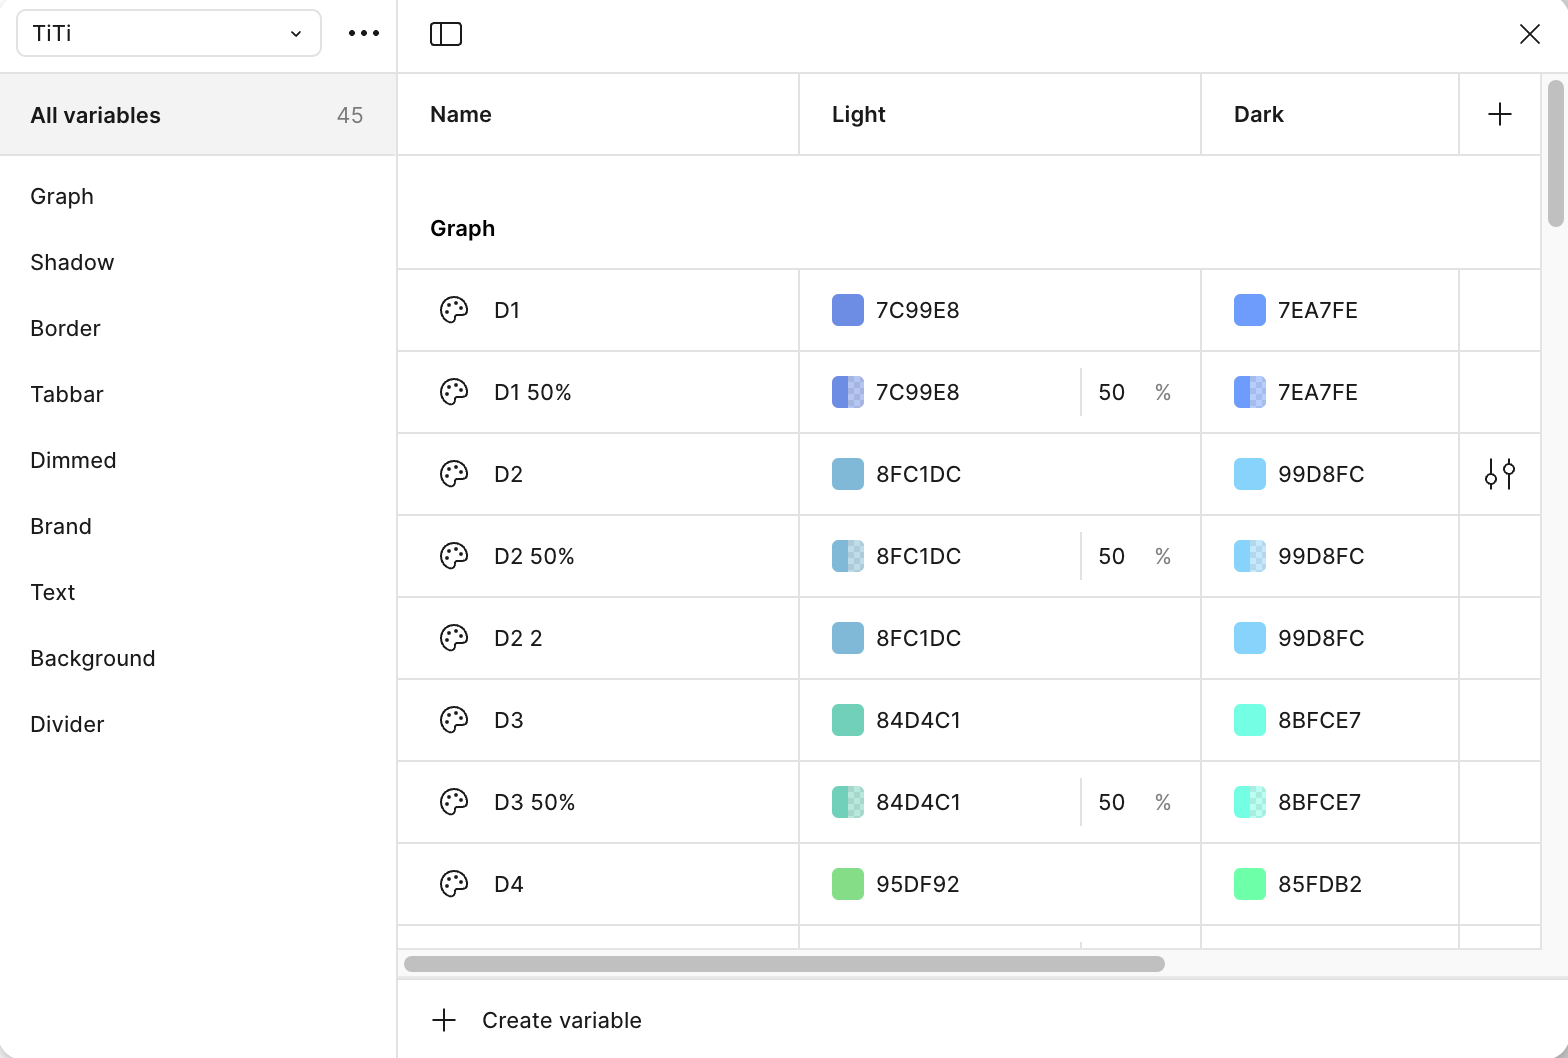
Design Tokens Manager
figma 플러그인 중 해당 플러그인을 사용하면 token 값들을 json 파일로 export 가 가능
  // TiTi.Light.tokens.json

  "Graph": {
    "D1": {
      "$type": "color",
      "$value": "#7c99e8"
    },
    "D1_50%": {
      "$type": "color",
      "$value": "#7c99e880"
    },
    "D2": {
      "$type": "color",
      "$value": "#8fc1dc"
    },
    "D2_50%": {
      "$type": "color",
      "$value": "#8fc1dc80"
    }
  },
  "Shadow": {
    "primary": {
      "$type": "color",
      "$value": "#52525280"
    },
    "secondary": {
      "$type": "color",
      "$value": "{neutral.500}"
    }
  }
}
다만 light, dark 각각의 json 파일로 추출되고, primitive color 를 사용한 컬러의 경우 해당 primitive color 값과 매칭시키는 작업이 필요
gpt 를 토대로 이 json 파일들을 업로드해서 필요한 예시를 토대로 Colors enum 문 생성까지는 가능한 것으로 확인
enum Colors: String {
    case graph_d1 // light: #7c99e8, dark: #7ea7fe
    case graph_d1_50_ // light: #7c99e880, dark: #7ea7fe80
    case graph_d2 // light: #8fc1dc, dark: #99d8fc
    case graph_d2_50_ // light: #8fc1dc80, dark: #99d8fc80
    case graph_d2_2 // light: #8fc1dc, dark: #99d8fc
    case graph_d3 // light: #84d4c1, dark: #8bfce7
    case graph_d3_50_ // light: #84d4c180, dark: #8bfce780
    case graph_d4 // light: #95df92, dark: #85fdb2
    case graph_d4_50_ // light: #95df9280, dark: #85fdb280
    case graph_d5 // light: #ffe55a, dark: #f7fc85
    case graph_d5_50_ // light: #ffe55a80, dark: #f7fc8580
    case graph_d6 // light: #ffc253, dark: #f5c084
    case graph_d6_50_ // light: #ffc25380, dark: #f5c08480
    case graph_d7 // light: #ffa475, dark: #f99f70
    case graph_d7_50_ // light: #ffa47580, dark: #f99f7080
    case graph_d8 // light: #ff959e, dark: #fb7a7a
    case graph_d8_50_ // light: #ff959e80, dark: #fb7a7a80
    case graph_d9 // light: #ff93cc, dark: #fca7ab
    case graph_d9_50_ // light: #ff93cc80, dark: #fca7ab80
    case graph_d10 // light: #da97d3, dark: #d897d4
    case graph_d10_50_ // light: #da97d380, dark: #d897d480
    case graph_d11 // light: #b58add, dark: #8e6dcc
    case graph_d11_50_ // light: #b58add80, dark: #8e6dcc80
    case graph_d12 // light: #9389f0, dark: #5d79f2
    case graph_d12_50_ // light: #9389f080, dark: #5d79f280
    case shadow_primary // light: #52525280, dark: #fafafa80
    case shadow_secondary // light: #737373, dark: #a1a1a1
    case border_graph // light: #d0d0d0, dark: #818181
    case tabbar_selected // light: #0000008c, dark: #0000008c
    case tabbar_deselected // light: #00000033, dark: #00000033
    case dimmed_primary // light: #00000033, dark: #00000033
    case dimmed_dark // light: #00000066, dark: #00000066
    case brand_primary // light: #007aff, dark: #007aff
    case brand_secondary // light: #007aff, dark: #00bcff
    case brand_background // light: #a4c0e4, dark: #a4c0e4
    case text_primary // light: #000000, dark: #ffffff
    case text_secondary // light: #525252, dark: #d4d4d4
    case text_tertiary // light: #737373, dark: #a1a1a1
    case text_groupprimary // light: #404040, dark: #dddddd
    case background_system // light: #ffffff, dark: #000000
    case background_primary // light: #ffffff, dark: #171717
    case background_secondary // light: #fafafa, dark: #000000
    case background_widget // light: #ffffff, dark: #0a0a0a
    case background_color // light: #ffffff, dark: #ffffff
    case divider_primary // light: #d4d4d4, dark: #bababa
}
문제
이를 토대로 Assets 내 넣는 작업은 노가다가 필요한 행위로 보였기에
Assets 를 사용하지 않고 swift 파일 혹은 json 파일로 light, dark 모드간 전환 가능한 Color 시스템을 갖춰보고자 함
추가로 위 과정에서 json 파일간 매칭시키는 과정 또한 더욱 줄일 수 있지 않을까?
json 파일 기반 light, dark 모드간 전환 가능한 구조
GPT와 위 문제해결에 대해 논의해본 결과 해당 형태의 json 파일이 생성된다면 이 json 파일을 토대로 Assets 없이 light, dark 모드간 전환 가능한 컬러를 만들 수 있다고 한다.
{
  "graph_d1"        : { "light": "#7C99E8", "dark": "#7EA7FE" },
  "graph_d1_50_"    : { "light": "#7C99E880", "dark": "#7EA7FE80" },
  "graph_d2"        : { "light": "#8FC1DC",  "dark": "#99D8FC"  },
  ...
  "divider_primary" : { "light": "#D4D4D4", "dark": "#BABABA"  }
}
사용하는 단은 아래와 같은 형식이고
view.backgroundColor = Colors.background_primary.uiColor       // UIKit
Text("Hello").foregroundColor(Colors.text_primary.color)       // SwiftUI
그래서 좁혀진 목표는 Figma → 위 형태의 json 파일을 생성하는 과정이 되겠다.
다만 그전에 하나만 더 확인해봤다.
light ↔ dark 모드간 전환 시 자동으로 컬러 변경 가능여부
Assets 를 사용했던 이유는 dark 모드 컬러를 위해서였기에 이를 지원할 수 있는지를 확인해봤다.
extension Colors {

    /// UIKit 전용
    var uiColor: UIColor {
        guard let theme = ColorPalette.shared.theme(for: rawValue) else {
            return .magenta   // 예외 상황 대비
        }
        return UIColor { traits in
            let hex = (traits.userInterfaceStyle == .dark) ? theme.dark : theme.light
            return UIColor(hex: hex)
        }
    }

    /// SwiftUI 전용
    var color: Color { Color(uiColor) }
}
여기서 시스템에서 모드가 변경되면 window.view 에 traitCollectionDidChange(_:) 가 전파되고
해당 뷰가 다시 레이아웃, 그리기 단계로 들어가면서 동일한 UIColor 인스턴스를 다시 resolve 한다고 한다.
따라서 traits 클로저가 새 traits 로 재실행되면서 light ↔ dark 모드간 전환이 가능하다고 한다!
단, cgColor, Core Graphics 의 경우는 픽셀 결과를 캐싱하는 구조이기에 자동으로 변경되지 않는다
필요하다면 traitCollectionDidChange(_:)에서 직접 재계산이 필요하다고 한다.
Figma → json 파일 생성
Figma API 사용
GPT가 처음에 알려준 방법은 accessToken 을 사용해서 REST API를 사용하여 json 파일로 만드는 python 코드로 접근했다.
#!/usr/bin/env python3
"""
figma_colors_export.py (2025-06 수정)
- FILE_KEY 또는 전체 파일 URL(구·신 형식 모두) 입력을 허용
- GET /v1/files/{file_key}/variables/local 엔드포인트 사용
"""
import os, re, sys, json, requests
from pathlib import Path
from typing import Dict
# ──────────────────────────────────────────────────────────────────────────────
# 1) 환경설정 ─ 터미널 인수로 URL·파일키 모두 허용
# python3 figma_colors_export.py https://www.figma.com/design/AbCdEfGhIjKlMnOpQrStUv/FileName
# python3 figma_colors_export.py AbCdEfGhIjKlMnOpQrStUv
# ──────────────────────────────────────────────────────────────────────────────
if len(sys.argv) < 2:
sys.exit("사용법: python figma_colors_export.py <FILE_KEY|FILE_URL>")
INPUT = sys.argv[1]
TOKEN = os.getenv("FIGMA_TOKEN") # 'file_variables:read' 권한 필요
LIGHT_MODE = "Light"
DARK_MODE = "Dark"
# ──────────────────────────────────────────────────────────────────────────────
# 2) FILE_KEY 추출 (file/design/board 등 어떤 접두어도 허용)
# ──────────────────────────────────────────────────────────────────────────────
m = re.search(r"([0-9a-zA-Z]{22,128})", INPUT)
if not m:
sys.exit("❌ FILE_KEY를 추출할 수 없습니다.")
FILE_KEY = m.group(1)
# ──────────────────────────────────────────────────────────────────────────────
# 3) Figma REST API 요청
# ──────────────────────────────────────────────────────────────────────────────
API_BASE = "https://api.figma.com/v1"
URL = f"{API_BASE}/files/{FILE_KEY}/variables/local" # ← 중요
HEADERS = {"X-Figma-Token": TOKEN}
try:
resp = requests.get(URL, headers=HEADERS)
resp.raise_for_status()
except requests.HTTPError as e:
sys.exit(f"❌ API 요청 실패: {e}")
data = resp.json()
# ──────────────────────────────────────────────────────────────────────────────
# 4) 색상 딕셔너리 변환
# ──────────────────────────────────────────────────────────────────────────────
def rgba_to_hex(rgba: dict) -> str:
r = round(rgba["r"] * 255)
g = round(rgba["g"] * 255)
b = round(rgba["b"] * 255)
a = round(rgba["a"] * 255)
return f"#{r:02X}{g:02X}{b:02X}" + (f"{a:02X}" if a < 255 else "")
mode_id_to_name = {m["modeId"]: m["name"] for m in data["modes"]}
result: Dict[str, Dict[str, str]] = {}
for v in data["variables"]:
if v["resolvedType"] != "COLOR":
continue
name = v["name"].replace(" ", "_")
light_hex = dark_hex = None
for entry in v["valuesByMode"]:
mode = mode_id_to_name.get(entry["modeId"])
if mode == LIGHT_MODE:
light_hex = rgba_to_hex(entry["value"])
elif mode == DARK_MODE:
dark_hex = rgba_to_hex(entry["value"])
if light_hex and dark_hex:
result[name] = {"light": light_hex, "dark": dark_hex}
# ──────────────────────────────────────────────────────────────────────────────
# 5) 저장
# ──────────────────────────────────────────────────────────────────────────────
out_path = Path("Colors.json")
out_path.write_text(json.dumps(result, indent=2, ensure_ascii=False))
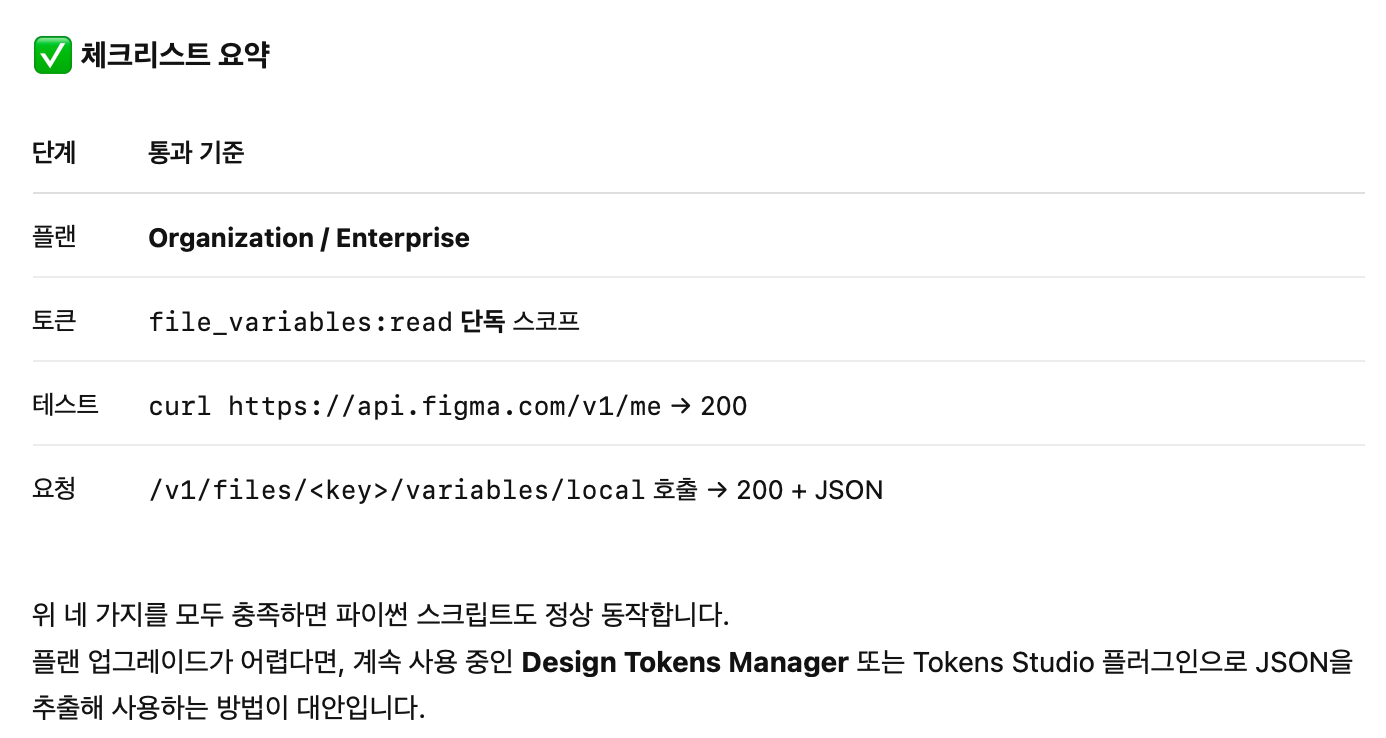
print(f"✅ {len(result)}개 색상을 '{out_path}'로 내보냈습니다.")근데 계속해서 403 오류가 발생됐었고, 확인해본 결과 Figma 의 REST API 를 사용하기 위해서는 플랜이 Organization / Enterprise 이상일때만 가능하다는 결과를 알 수 있었다.
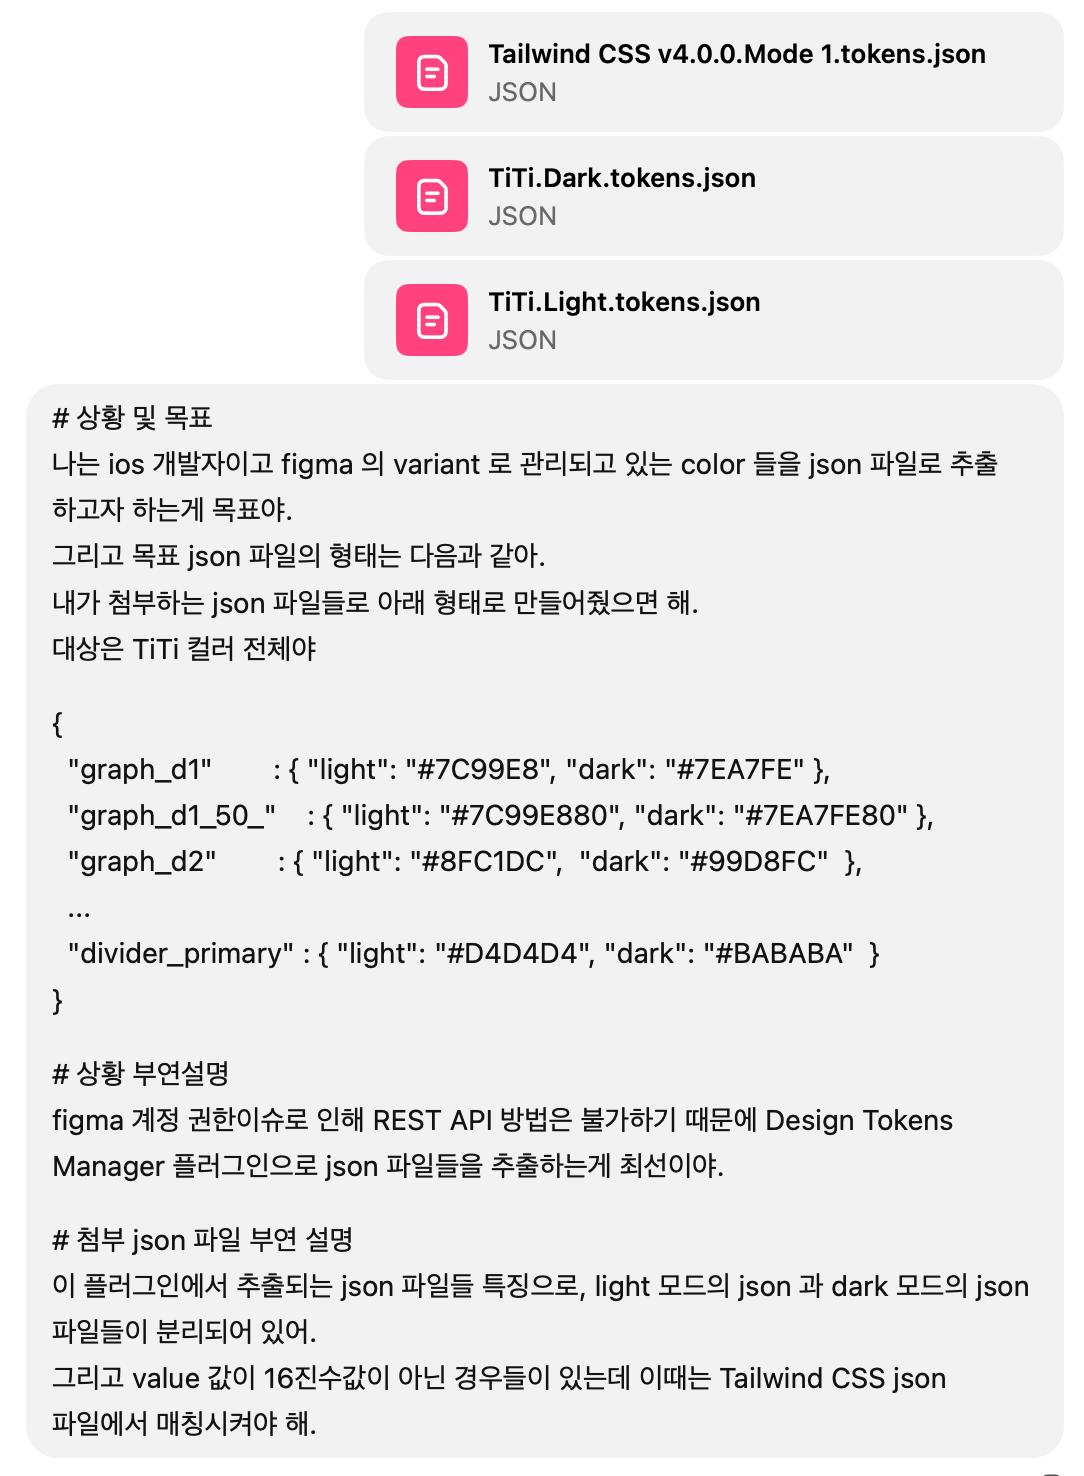
python 스크립트 by ChatGPT
그래서 GPT에게 원하는 json 파일을 만들 수 있도록 일단 명확하게 요청해봤다.
혹시라도 GPT에게 어떻게 물어야 할지 모르시는 분들은 해당 스크립트를 참고해보시는 것도 좋을 것 같다.
이렇게 계산기처럼 답이 정해져 있는 질문이 아닌, 논리가 필요한 경우에는 o3 모델을 선택해서 구체적으로 질문하곤 한다.
그러면 자기가 필요한 것들을 분석해서 정리해주고 이를 토대로 구현한 결과를 보여준다.
이렇게 명확하게 원하는 결과를 얻을 수 있게 학습시킨 후에 이를 python 코드화 요청을 하였다.
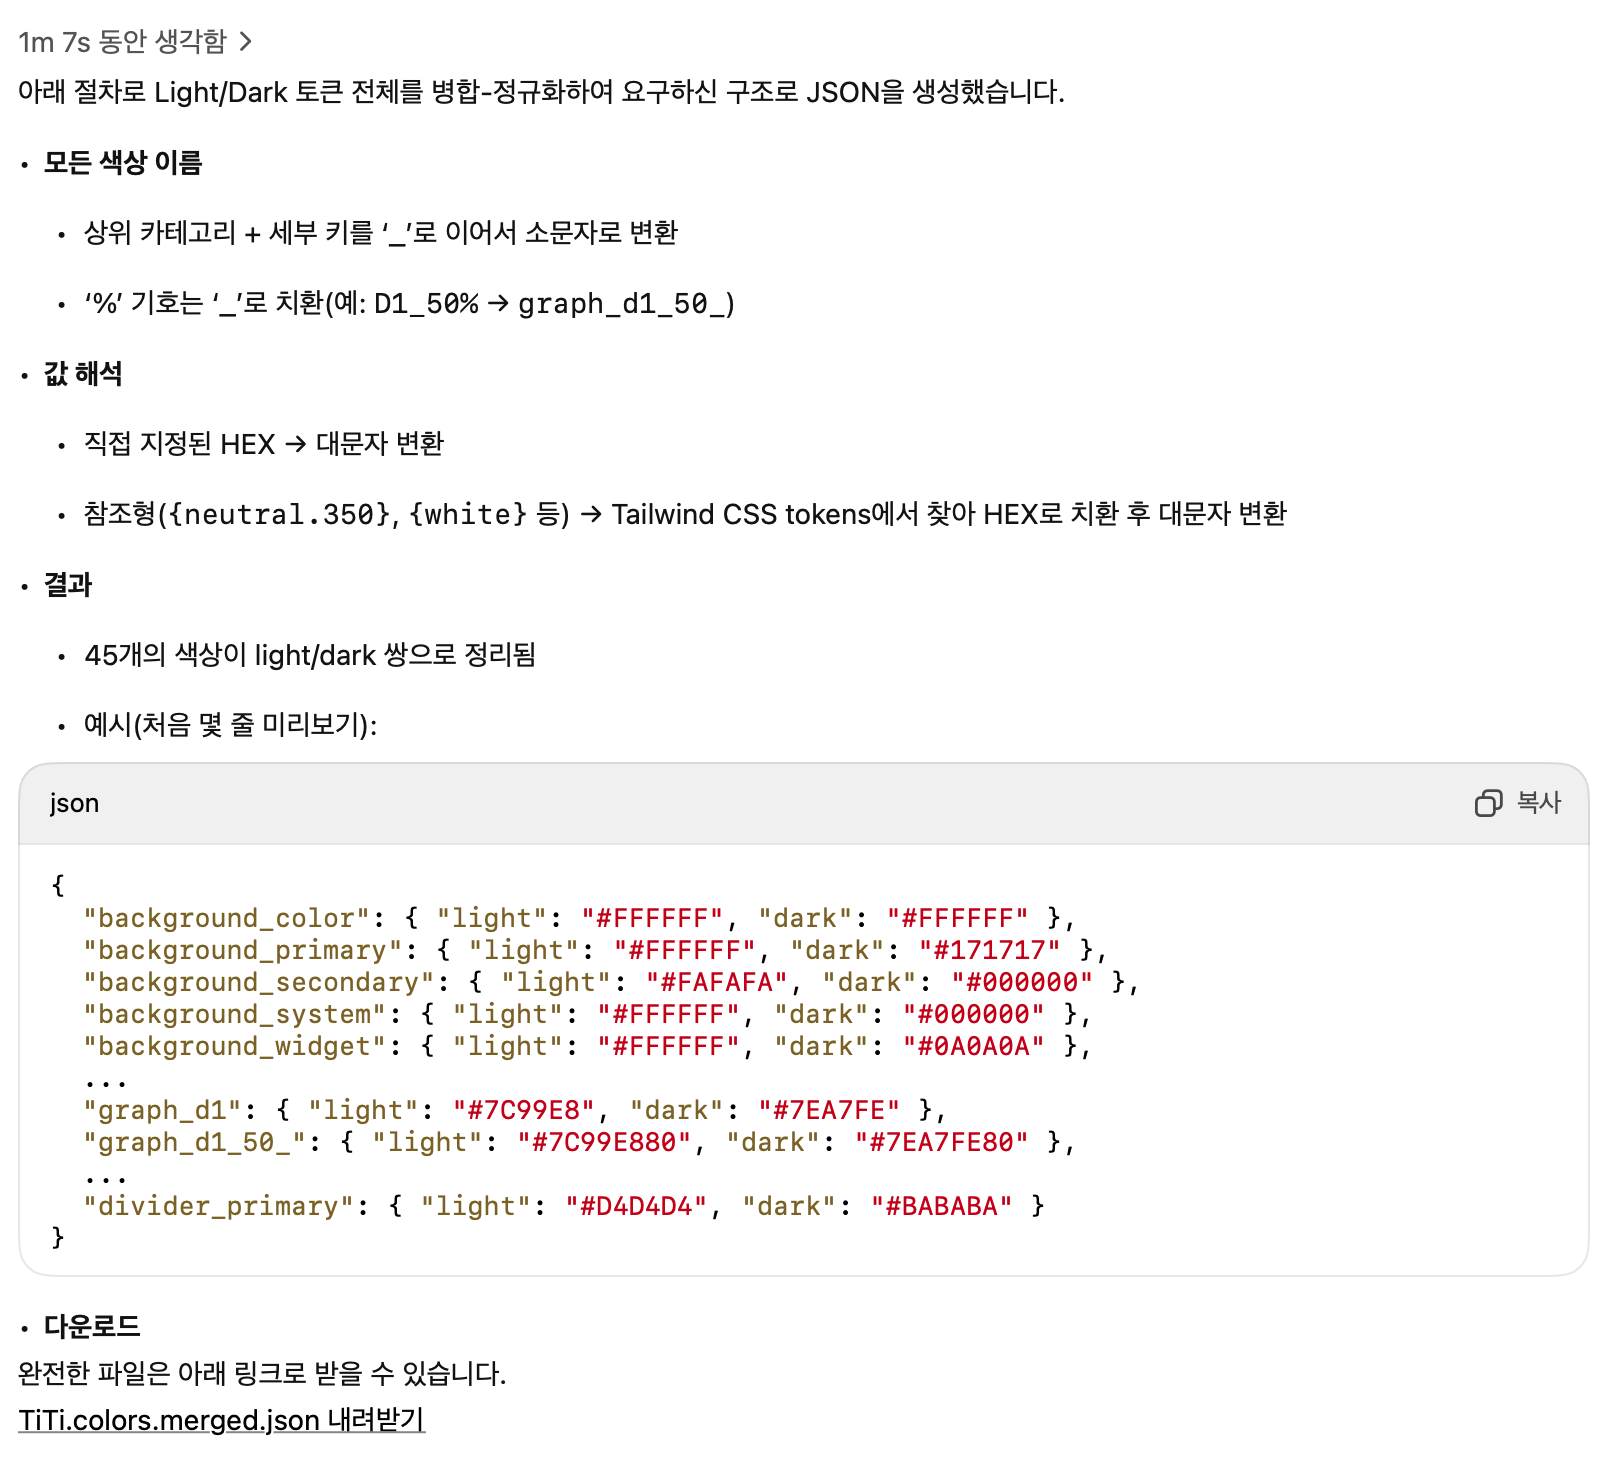
1. colors.json 생성
최종 구현된 파이썬 스크립트는 다음과 같다.
#!/usr/bin/env python3
"""
merge_titi_tokens.py
────────────────────
Light/Dark 토큰을 병합해 `{ "some_key": { "light": "#HEX", "dark": "#HEX" }, ... }`
형태의 JSON을 생성한다.

폴더 구조 (예시)
.
└─ design-tokens/
   ├─ TiTi.Light.tokens.json
   ├─ TiTi.Dark.tokens.json
   └─ Tailwind CSS v4.0.0.Mode 1.tokens.json

실행:
    python3 merge_tokens.py
결과
    colors.json
"""

from pathlib import Path
import json, re, sys

ROOT = Path(__file__).resolve().parent
TOKENS_DIR = ROOT / "design-tokens"

LIGHT_FILE    = TOKENS_DIR / "TiTi.Light.tokens.json" # 시멘틱컬러 Light 모드 json 파일명
DARK_FILE     = TOKENS_DIR / "TiTi.Dark.tokens.json" # 시멘틱컬러 Dark 모드 json 파일명
TAILWIND_FILE = TOKENS_DIR / "Tailwind CSS v4.0.0.Mode 1.tokens.json" # 프리미티브컬러 json 파일명
OUT_FILE      = ROOT / "colors.json" # 병합된 토큰 파일명

# ──────────────────────────────────────────────────────────────────────────
# 헬퍼: Tailwind reference 해석  {white}  {neutral.350}  등
# ──────────────────────────────────────────────────────────────────────────
def resolve_tailwind(ref: str, tailwind: dict) -> str:
    """{white} 나 {neutral.350} 형식을 HEX(대문자)로 변환"""
    key_path = ref.strip("{}").split(".")
    node = tailwind
    for part in key_path:
        node = node[part]
    val = node["$value"]
    if isinstance(val, str) and val.startswith("#"):
        return val.upper()
    if isinstance(val, str) and val.startswith("{"):
        return resolve_tailwind(val, tailwind)
    raise ValueError(f"알 수 없는 Tailwind 참조: {ref}")

# ──────────────────────────────────────────────────────────────────────────
# 헬퍼: 토큰 트리 펼치기 + key 정규화
# ──────────────────────────────────────────────────────────────────────────
def normalize_key(parts: list[str]) -> str:
    """
    ['Graph', 'D1_50%'] → 'graph_d1_50'
    규칙: join('_') → 소문자 → ' ', '-' → '_'  → '%' → ''
    """
    key = "_".join(parts)
    key = re.sub(r"[ \-]+", "_", key)
    key = key.replace("%", "").lower()
    return key

def collect_colors(node: dict, tailwind: dict, path=tuple()) -> dict[str, str]:
    """
    재귀적으로 내려가며 '$value'가 있는 color 항목 수집.
    반환: { normalized_key: '#RRGGBB[AA]' }
    """
    out = {}
    for k, v in node.items():
        if isinstance(v, dict) and v.get("$type") == "color" and "$value" in v:
            raw = v["$value"]
            if raw.startswith("#"):
                hex_val = raw.upper()
            else:                      # Tailwind 참조
                hex_val = resolve_tailwind(raw if raw.startswith("{") else f"{{{raw}}}", tailwind)
            out[normalize_key(path + (k,))] = hex_val
        elif isinstance(v, dict):
            out.update(collect_colors(v, tailwind, path + (k,)))
    return out

# ──────────────────────────────────────────────────────────────────────────
# 메인 로직
# ──────────────────────────────────────────────────────────────────────────
def main() -> None:
    if not LIGHT_FILE.exists() or not DARK_FILE.exists() or not TAILWIND_FILE.exists():
        sys.exit("❌ design-tokens 폴더에 필요한 JSON 파일이 모두 존재하는지 확인하세요.")

    tailwind = json.loads(TAILWIND_FILE.read_text())
    light_tokens = json.loads(LIGHT_FILE.read_text())
    dark_tokens  = json.loads(DARK_FILE.read_text())

    light_colors = collect_colors(light_tokens, tailwind)
    dark_colors  = collect_colors(dark_tokens,  tailwind)

    merged: dict[str, dict[str, str]] = {}
    for key in sorted(set(light_colors) | set(dark_colors)):
        merged[key] = {
            "light": light_colors.get(key, dark_colors.get(key, "")).upper(),
            "dark" : dark_colors.get(key, light_colors.get(key, "")).upper(),
        }

    OUT_FILE.write_text(json.dumps(merged, indent=2, ensure_ascii=False))
    print(f"✅ 완료! {OUT_FILE.relative_to(ROOT)} 생성")

if __name__ == "__main__":
    main()
그러면 아래와 같은 json 파일이 만들어진다.
{
  "background_color": {
    "light": "#FFFFFF",
    "dark": "#FFFFFF"
  },
  "background_primary": {
    "light": "#FFFFFF",
    "dark": "#171717"
  },
  "background_secondary": {
    "light": "#FAFAFA",
    "dark": "#000000"
  },
  "background_system": {
    "light": "#FFFFFF",
    "dark": "#000000"
  },
  ...
}
2. Colors.swift 생성
Xcode 상에서 Color 를 enum 으로 간편하게 사용하기 위하여 enum Color 를 만드는 스크립트를 추가로 만들었다.
#!/usr/bin/env python3
"""
generate_colors_enum.py
───────────────────────
colors.json → Colors.swift

실행:
    python3 generate_colors_enum.py
결과:
    Colors.swift
"""

from pathlib import Path
import json, datetime, sys

ROOT = Path(__file__).resolve().parent
TOKENS_JSON = ROOT / "colors.json"
OUT_SWIFT   = ROOT / "Colors.swift"

def main() -> None:
    if not TOKENS_JSON.exists():
        sys.exit("❌ colors.json 파일을 찾을 수 없습니다.")

    data = json.loads(TOKENS_JSON.read_text())
    keys = sorted(data.keys())                       # 알파벳 순 정렬

    today = datetime.date.today().isoformat()
    header = f"""//
//  Colors.swift
//  Auto-generated on {today}.
//  DO NOT EDIT MANUALLY.
//

import Foundation

enum Colors: String, CaseIterable {{
"""
    cases  = "".join(f"    case {k}\n" for k in keys)
    footer = "}\n"

    OUT_SWIFT.write_text(header + cases + footer)
    print(f"✅  {OUT_SWIFT.relative_to(ROOT)} 생성 — {len(keys)}개 enum case")

if __name__ == "__main__":
    main()
그러면 아래와 같은 swift 파일이 만들어진다.
//
//  Colors.swift
//  Auto-generated on 2025-06-18.
//  DO NOT EDIT MANUALLY.
//

import Foundation

enum Colors: String, CaseIterable {
    case background_color
    case background_primary
    case background_secondary
    case background_system
    ...
}
3. UIColor, Color 매칭
이미 앞선 GPT와 방향을 정하는 과정에서 위와 같이 json 파일만 만들어지고 enum 으로 관리될 수 있다면 dark <-> light 모드간 전환 가능한 UIColor, Color 시스템을 만들 수 있는 점을 확인했었다.
그리고 그 결과는 다음과 같다.
//
//  Colors+Helper.swift
//  Project_Timer
//
//  Created by Minsang on 6/18/25.
//  Copyright © 2025 FDEE. All rights reserved.
//

import Foundation
import UIKit
import SwiftUI

/// 사용 예시:
/// ```swift
/// view.backgroundColor = Colors.background_primary.uiColor       // UIKit
/// Text("Hello").foregroundColor(Colors.text_primary.color)       // SwiftUI
/// ```

struct ColorTheme: Decodable {
    let light: String
    let dark:  String
}

typealias ColorDict = [String: ColorTheme]

final class ColorPalette {
    static let shared = ColorPalette()
    private let dict: ColorDict

    private init() {
        if let url = Bundle.main.url(forResource: "Colors", withExtension: "json"),
           let data = try? Data(contentsOf: url),
           let decoded = try? JSONDecoder().decode(ColorDict.self, from: data) {
            dict = decoded
        } else {
            dict = [:]
            assertionFailure("⚠️ Colors.json 로드 실패")
        }
    }

    func theme(for name: String) -> ColorTheme? {
        dict[name]
    }
}

extension Colors {

    /// UIKit 전용
    var uiColor: UIColor {
        guard let theme = ColorPalette.shared.theme(for: rawValue) else {
            return .magenta   // 예외 상황 대비
        }
        return UIColor { traits in
            let hex = (traits.userInterfaceStyle == .dark) ? theme.dark : theme.light
            return UIColor(hex: hex)
        }
    }

    /// SwiftUI 전용
    var color: Color { Color(uiColor) }
}

extension UIColor {
    convenience init(hex: String) {
        let cleaned = hex.trimmingCharacters(in: .whitespacesAndNewlines)
                         .replacingOccurrences(of: "#", with: "")
        var value: UInt64 = 0
        Scanner(string: cleaned).scanHexInt64(&value)

        let hasAlpha = cleaned.count == 8
        let a = hasAlpha ? CGFloat((value & 0xFF000000) >> 24) / 255 : 1
        let r = CGFloat((value & 0xFF0000) >> 16) / 255
        let g = CGFloat((value & 0x00FF00) >>  8) / 255
        let b = CGFloat( value & 0x0000FF)        / 255
        self.init(red: r, green: g, blue: b, alpha: a)
    }
}
구현 결과
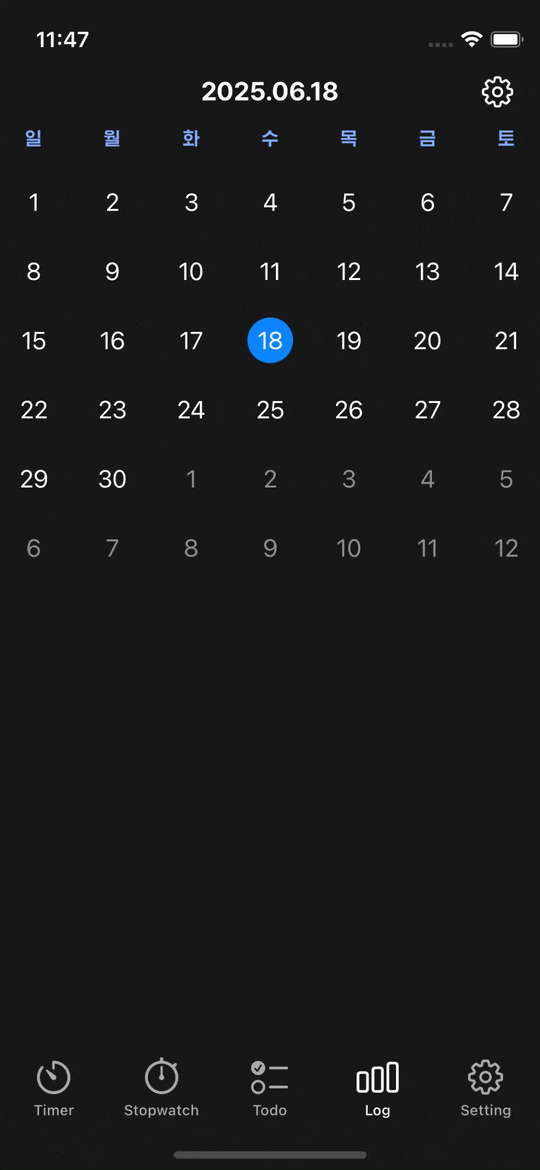
이렇게 구현한 결과 이번에 Figma 상에 새롭게 추가한 background_primary 컬러를 곧바로 쓸 수 있게 되었다!
var body: some View {
        VStack(spacing: 0) {
            HeaderView(viewModel: viewModel)
            CalendarView(viewModel: viewModel.calendarViewModel)
                .padding(.top, 12)

            Spacer()
        }
        .background(Colors.background_primary.color) // 여기에서 사용
        .edgesIgnoringSafeArea(.bottom)
    }
그리고 아주 원하는대로 동작한다~!
목표 달성
이를 토대로 Figma 에서만 컬러를 관리하면 곧바로 Xcode에서 사용 가능한 시스템을 구축했다.