react native에서 firebase를 사용하면 간혹가다가 v5버전 모듈을 사용하고 있는 앱들이 있을 것이다. 사실 내가 근무하고 있는 회사에서 개발한 앱도 v5버전 모듈을 사용하고 있다. 하지만 최근들어서 플레이스토어에 앱을 배포하기 위해 apk를 빌드하는 과정에서 다음과 같은 오류가 간헐적으로 발생하는 빈도가 높아졌다.
execution failed for task ':react-native-firebase:compileReleaseJavaWithJavac'.
> Compilation failed; see the compiler error output for details
이 오류를 구글에 검색해보니, stackOverflow에 올라와 있는 대부분의 솔루션은 v6 버전으로 마이그레이션을 하라는 것이다. 이 내용을 보고서 이제 v5 모듈의 지원중단 시기가 얼마 남지 않은 것 같다는 생각이 들었다.
이전에는 회사 기획팀 관계자에게 더 많은 기능을 제공하기 위한 제안삼아 v6로 마이그레이션을 하는 것이 어떻겠냐는 제안을 했었다. 하지만 이제는 v5 모듈의 지원중단과 관련될 수 있는 매우 중요하면서 심각한 사안인 만큼 더이상 늦출수 없다고 판단, 이번 업데이트 버전의 안드로이드, ios 심사 승인 및 출시 후 v6 버전으로의 마이그레이션을 결정하였다.
따라서 이번에는 react native 앱의 firebase 모듈을 v5 버전에서 v6 버전으로 마이그레이션 하는 방법을 정리해보고자 한다. 이 또한 react-native로 개발된 많은 앱들 중에서 v5 버전 firebase 모듈을 사용하고 있는 많은 앱들에게 도움이 되는 문서가 됬으면 좋겠다.
현재 우리 회사에서 개발한 앱에서 cloud messaging, analytics, dynamic-link 등을 연결해 사용하고 있는데, 그걸 기준으로 설명하겠다.
1. 기존 사용 v5 버전 모듈 삭제
우선, 기존에 사용하고 있던 v5 버전 firebase 모듈(react-native-firebase) 모듈을 삭제해준다.
yarn remove react-native-firebase2. v6 모듈 설치
기존 v5 버전 모듈에는 firebase에서 사용 중인 모든 기능이 하나의 모듈에 들어있는 구조이다 보니 모듈 자체가 무거웠다. 하지만 v6 버전은 firebase에서 제공하는 서비스 별로 모듈을 모두 나눠놨기 때문에 필요한 모듈만 설치하면 되고, 또한 프로젝트 안에서 별도로 안드로이드, ios 의존성 선언을 했어야 했던 기존 v5 버전과 달리 v6 버전은 거의 모든 의존성 설정을 자동화하면서 프로젝트 내부에 별도로 의존성 설정을 할 필요가 없어졌다.
따라서 firebase를 사용하면 필수적으로 설치해야 하는 core 모듈(@react-native-firebase/app)을 설치하고 서비스별로 필요한 모듈을 모두 설치하면 된다.
yarn add @react-native-firebase/app @react-native-firebase/{설치하고자 하는 서비스 모듈} ...Firebase 서비스 별 모듈 이름
AdMob: @react-native-firebase/admob
Analytics: @react-native-firebase/analytics
App Invites: @react-native-firebase/invites
Authentication: @react-native-firebase/authentication
Cloud Firestore: @react-native-firebase/firestore
Cloud Functions: @react-native-firebase/functions
Cloud Messaging: @react-native-firebase/messaging
Cloud Storage: @react-native-firebase/storage
Crashlytics: @react-native-firebase/crashlytics
Dynamic Links: @react-native-firebase/dynamic-links
In-app Messaging: @react-native-firebase/in-app-messaging
Instance ID: @react-native-firebase/iid
ML: @react-native-firebase/ml
Performance Monitoring: @react-native-firebase/perf
Realtime Database: @react-native-firebase/database
Remote Config: @react-native-firebase/remote-config
3. v5 설정내용 제거
1. Android
1) firebase 구성 설정 해제
프로젝트 루트/android/settings.gradle에 들어가서 firebase 설정과 관련된 구성 설정을 해제한다.(우리 프로젝트는 이 부분이 안 적혀있어서 그냥 넘어갔다.)
다음 두줄을 삭제해주면 된다.
- include ':react-native-firebase'
- project(':react-native-firebase').projectDir = new File(rootProject.projectDir, '../node_modules/react-native-firebase/android')
2) cloud messaging 클래스 참조 해제
프로젝트 루트/android/app/src/main/AndroidManifest.xml에 들어가서 다음 코드를 삭제해 v5 버전 cloud messaging 클래스 참조를 해제한다.
- <service android:name="io.invertase.firebase.messaging.RNFirebaseMessagingService">
- 				<intent-filter>
- 				  <action android:name="com.google.firebase.MESSAGING_EVENT" />
- 				</intent-filter>
- 			</service>
- <service android:name="io.invertase.firebase.messaging.RNFirebaseBackgroundMessagingService" />
3) 네이티브 종속성 제거
프로젝트 루트/android/app/build.gradle에 들어가서 dependencies 블록 안에 다음 코드를 제거한다.(우리 프로젝트는 다음 코드가 적혀있지 않아서 넘어갔다.)
- implementation project(path: ':react-native-firebase')그 다음으로 firebase-core와 gms 종속성 선언을 제거한다.(위와 같은 dependencies 블록 안에 있을 것이다.)
-   implementation "com.google.firebase:firebase-core:16.0.9"
-   implementation "com.google.android.gms:play-services-base:16.1.0"
마지막으로 내가 연결한 firebase의 서비스 별로 선언된 종속성 선언을 모두 해제한다.
(우리는 cloud messaging, analytics, dynamic-link를 연결했으므로 이와 관련된 종속성 선언을 모두 해제하였다.)
- implementation 'com.google.firebase:firebase-analytics:17.2.2'
- implementation "com.google.firebase:firebase-messaging:20.0.0"
- implementation "com.google.firebase:firebase-dynamic-links:19.0.0"
- implementation "com.google.firebase:firebase-invites:17.0.0"
4) java 패키지 선언 제거
프로젝트 루트/android/app/src/main/java/{앱 패키지 명}/MainApplication.java로 들어가서 v5 버전 파이어베이스에서 불러온 패키지 선언을 모두 제거한다.
...

- import io.invertase.firebase.RNFirebasePackage;
- import io.invertase.firebase.analytics.RNFirebaseAnalyticsPackage;
- import io.invertase.firebase.messaging.RNFirebaseMessagingPackage;
- import io.invertase.firebase.notifications.RNFirebaseNotificationsPackage;
- import io.invertase.firebase.links.RNFirebaseLinksPackage;

...

@Override
protected List<ReactPackage> getPackages() {
    @SuppressWarnings("UnnecessaryLocalVariable")
    List<ReactPackage> packages = new PackageList(this).getPackages();
    ...
-     packages.add(new RNFirebaseAnalyticsPackage());
-  	  packages.add(new RNFirebaseMessagingPackage());
-  	  packages.add(new RNFirebaseNotificationsPackage());
-     packages.add(new RNFirebaseLinksPackage());
    ...
    return packages;
}
5) gradle 캐시 삭제
cd android
./gradlew clean
6) jdk 버전 업데이트(11이하인 경우만)
v6 버전 firebase 모듈에서는 jdk 버전을 11 이상을 요구한다. 따라서 jdk 버전이 11 미만인 경우 jdk를 최소 11로 업데이트 해줘야 한다.
만약 다음과 같은 내용의 오류가 발생하는 경우
An exception has occurred in the compiler (1.8.0_292).
Please file a bug against the Java compiler via the Java bug reporting page (http://bugreport.java.com) after checking the Bug Database (http://bugs.java.com) for duplicates.
Include your program and the following diagnostic in your report. Thank you.
꼭 jdk 버전을 최소 11로 올려줘야 한다.
brew tap adoptopenjdk/openjdk
brew install --cask adoptopenjdk11
4. iOS
1) cocoapods 패키지 의존성 해제
프로젝트 루트/ios/Podfile에 들어가서 다음 코드가 선언되있으면 제거한다.
- pod 'RNFirebase', :path => '../node_modules/react-native-firebase/ios'그 다음 Firebase/Core 포함, 사용 중인 firebase 서비스의 모든 패키지 의존성 선언을 해제한다.
-   pod 'Firebase/Core','~> 6.13.0'
-   pod 'Firebase/DynamicLinks', '~> 6.13.0'
-   pod 'Firebase/Messaging'
-   pod 'Firebase/Analytics'
그리고 v6 버전을 사용하는데 필요한 새로운 패키지 의존성을 추가해줘야 한다. 제거한 의존성 선언 부분에 다음 코드를 추가해준다.
pod 'FirebaseCore', :modular_headers => true
pod 'FirebaseCoreInternal', :modular_headers => true
pod 'GoogleUtilities', :modular_headers => true
정정합니다
react-native용 firebase 패키지는 설치한 버전에 따라 추가해줘야 하는 의존성 패키지가 다를 수 있음을 알려드립니다.
@react-native-firebase 패키지는 아무리 길어도 1,2주 안에 새 버전이 배포될 정도로 업데이트 주기가 매우 빠릅니다. 제가 이 문서를 작성할 당시 설치한 패키지 버전은 15.3.0이며, 현재 날짜(2023년 4월 12일)을 기준으로 17.4.2버전까지 배포된 상태입니다. 이에 따라 새 버전이 릴리즈되면서 기능향상을 위해 새로운 cocoapod 의존성 패키지가 추가되고 있어, 어떤 버전을 설치하시느냐에 따라 연결해야할 의존성 패키지가 다를 수 있습니다.
=> 연결해야하는 의존성 패키지는 아래에 pod 재설치(pod install) 명령어 실행시 경고로 표시됩니다.
=> pod 재설치는 편의상 맨 마지막 단계에서 하는 것이 좋으니 나중에 설명하겠다.
4. 서비스별 v6로 마이그레이션 하기
1. Cloud Messaging
기존 v5 버전에서는 Cloud Messaging을 통해 메세지를 전달받으면 firebase 모듈에서 자체적으로 푸시 알림까지 띄울수 있었으나, v6에서는 그것이 불가능하므로 로컬에서 푸시알림을 띄워주기 위한 모듈을 따로 설치해야 한다.
1) 푸시알림 모듈 설치(@notifee/react-native)
yarn add @notifee/react-native2) Pod 설치
cd ios
pod install
=> 맨 마지막에 한번에 하는 것이 좋다!!!
3) android 컴파일, 타겟 SDK 버전 수정(31 이하인 경우만)
notifee의 경우 sdk 버전이 31이상인 경우에만 사용이 가능한것으로 확인돼, 만약 컴파일, 타겟 SDK 버전이 31 미만인 경우,
프로젝트 루트/android/build.gradle에 들어가서 compileSdkVersion과 targetSdkVersion을 31로 올려준다.
내용 정정
최신 notifee 버전의 경우 안드로이드 SDK 31버전이 호환이 안될 수 있습니다. 따라서 notifee 공식문서 등을 참조하여 설치된 버전에 맞는 SDK 버전을 적용해주시면 됩니다. Notifee Release Note를 확인하면 설치된 버전에서 요구하는 안드로이드 SDK 버전을 파악할 수 있습니다.
4) 자바스크립트 코드 수정
아마 구글에 검색해서 나오는 v5 버전 설정 방법에서는 FCMContainer.js라는 파일을 생성하고 다음과 같은 구조로 코드를 짰을 것이다.(사실 우리회사 프로젝트가 이렇게 작성이 됬다.)
import React, {useEffect} from 'react';
import { Platform } from 'react-native';
import firebase from 'react-native-firebase';
import AsyncStorage from '@react-native-async-storage/async-storage';
import { FIREBASE_INFO } from './config';
import SplashScreen from './SplashScreen';


const FCMContainer = ({children, onNotificationOpened, ready, setToken}) => {

  let _onTokenRefreshListener;
  let _notificationDisplayedListener;
  let _notificationListener;
  let _notificationOpenedListener;

  const _registerMessageListener = () => {
    firebase
      .notifications()
      .getInitialNotification()
      .then(notificationOpen => {
        if (
          onNotificationOpened &&
          typeof onNotificationOpened === 'function' &&
          notificationOpen &&
          notificationOpen.notification &&
          notificationOpen.notification.data &&
          notificationOpen.notification.data.notifications_id
        ) {
          onNotificationOpened(notificationOpen.notification.data);
        }
      });

    const channel = new firebase.notifications.Android.Channel(
      FIREBASE_INFO.FIREBASE_ANDROID_CHANNEL_ID,
      FIREBASE_INFO.FIREBASE_APP_NAME,
      firebase.notifications.Android.Importance.Max,
    ).setDescription(FIREBASE_INFO.FIREBASE_DESCRIPTION);
    firebase.notifications().android.createChannel(channel);

    _notificationListener = firebase
      .notifications()
      .onNotification(notification => {
        // Process your notification as required
        notification.android.setPriority(
          firebase.notifications.Android.Priority.Max,
        );
        notification.android.setChannelId(FIREBASE_ANDROID_CHANNEL_ID);

        firebase.notifications().displayNotification(notification);
      });
    _notificationDisplayedListener = firebase
      .notifications()
      .onNotificationDisplayed(() => {});
    _notificationOpenedListener = firebase
      .notifications()
      .onNotificationOpened(notificationOpen => {
        if (
          onNotificationOpened &&
          typeof onNotificationOpened === 'function'
        ) {
          onNotificationOpened(notificationOpen.notification.data);
        }
      });
  };

  const _registerToken = async fcmToken => {
    global.mobileToken = fcmToken;
    setToken(true);
  };

  const _registerTokenRefreshListener = () => {
    if (_onTokenRefreshListener) {
      _onTokenRefreshListener();
      _onTokenRefreshListener = undefined;
    }

    _onTokenRefreshListener = firebase.messaging().onTokenRefresh(fcmToken => {
      // Process your token as required
      _registerToken(fcmToken);
    });
  };
  const _updateTokenToServer = async () => {
    try {
      const fcmToken = await firebase.messaging().getToken();
      _registerMessageListener();
      _registerToken(fcmToken);
    } catch (error) {
      setToken(true);
    }
  };

  const _requestPermission = async () => {
    let askedPush;
    try {
      askedPush = await _readFirstAskPush();

      // User has authorised
      await firebase.messaging().requestPermission();
      await _updateTokenToServer();
    } catch (error) {
      // User has rejected permissions
      if (Platform.OS === 'ios' && !askedPush) {
        //Alert.alert("푸시 알림 설정 안 함으로 되었습니다. 폰의 설정에서 변경할 수 있습니다.");
      }
      setToken(true);
    }
  };

  const _readFirstAskPush = async () => {
    try {
      const asked = await AsyncStorage.getItem('askedPush');
      const readAsked = JSON.parse(asked);
      return readAsked;
    } catch (error) {}
  };

  const _checkPermission = async () => {
    try {
      const enabled = await firebase.messaging().hasPermission();
      if (enabled) {
        // user has permissions
        _updateTokenToServer();
        _registerTokenRefreshListener();
      } else {
        // user doesn't have permission
        _requestPermission();
      }

      if (Platform.OS === 'ios') {
        await AsyncStorage.setItem('askedPush', 'true');
      }
    } catch (error) {}
  };

  useEffect(() => {
    _checkPermission();
    return () => {
      if (_onTokenRefreshListener) {
        _onTokenRefreshListener();
        _onTokenRefreshListener = undefined;
      }
      if (_notificationDisplayedListener) {
        _notificationDisplayedListener();
        _notificationDisplayedListener = undefined;
      }
      if (_notificationListener) {
        _notificationListener();
        _notificationListener = undefined;
      }
      if (_notificationOpenedListener) {
        _notificationOpenedListener();
        _notificationOpenedListener = undefined;
      }
    };
  }, []);

  if (Platform.OS === 'ios') {
    firebase.notifications().setBadge(0);
  }

  if (!ready) {
    return (
      <SplashScreen />
    );
  }

  return children;
};
export default FCMContainer;
이 FCMContainer.js라는 컴포넌트는 firebase의 cloud messaging을 사용하기 위한 권한여부와 FCM 토큰, 메세지를 수신받음에 따른 푸시 알림 노출과 같은 설정을 하는 역할을 하게된다. 나는 앱의 안정성을 위해서 이 구조를 최대한 재활용하면서 v6 버전에 맞게 코드를 수정하였다.
우선, 파일 최상단에 선언된 v5 버전 모듈(react-native-firebase) 선언을 해제하고 v6 버전 FCM 모듈(@react-native-firebase/messaging)을 선언한다.
...
- import firebase from 'react-native-firebase'; // => 제거
import messaging from '@react-native-firebase/messaging'; // =>새로 추가
...
그 다음 로컬에서 푸시 알림을 띄워주기 위한 모듈을 새로 선언해준다.
...
import notifee, { AndroidImportance, AndroidVisibility } from '@notifee/react-native';
...
우선 _checkPermission()이라는 메서드를 수정해줘야 하는데, 이 안에서 FCM을 수신받기 위한 권한을 체크하는 부분이다. 이 부분은 다음과 같이 수정해준다.
...
const _checkPermission = async () => {
    try {
      const status = await messaging().hasPermission();
      const enabled = ((status == messaging.AuthorizationStatus.AUTHORIZED)||(status == messaging.AuthorizationStatus.PROVISIONAL))

      if(enabled) {
        _updateTokenToServer();
        _registerTokenRefreshListener();
      }
      else {
        _requestPermission();
      }

      if (Platform.OS === 'ios') {
        await AsyncStorage.setItem('askedPush', 'true');
      }
    } catch (error) {
      __DEV__ && console.log('FCMContainer _checkPermission err: ', error);
    }
  };
그리고 이 메서드를 통해 권한이 없다고 판단될 경우, 새로 권한을 요청할 _requestPermission() 메서드를 수정해준다. 다음처럼 수정하면 된다.
...
const _requestPermission = async () => {
    let askedPush;
    try {
      askedPush = await _readFirstAskPush();
      // User has authorised
      await messaging().requestPermission();
      await _updateTokenToServer();
    } catch (error) {
      __DEV__ && console.log('FCMContainer _requestPermission error: ', error)
      // User has rejected permissions
      if (Platform.OS === 'ios' && !askedPush) {
        //Alert.alert("푸시 알림 설정 안 함으로 되었습니다. 폰의 설정에서 변경할 수 있습니다.");
      }
      setToken(true);
    }
  };
...
다음으로 새로 FCM 토큰을 요청할 _updateTokenToServer() 메서드를 수정해준다.
const _updateTokenToServer = async () => {
    try {
      const fcmToken = await messaging().getToken();
      _registerMessageListener();
      _registerToken(fcmToken);
    } catch (error) {
      __DEV__ && console.log('FCMContainer _updateTokenToServer error: ', error);
      setToken(true);
    }
  };
그 다음, 토큰이 새로 갱신됬을 때 갱신된 토큰을 받아들이는 _registerTokenRefreshListener() 메서드를 수정한다.
const _registerTokenRefreshListener = () => {
    if (_onTokenRefreshListener) {
      _onTokenRefreshListener();
      _onTokenRefreshListener = undefined;
    }

    _onTokenRefreshListener = messaging().onTokenRefresh(fcmToken => {
      _registerToken(fcmToken);
    })
  };
이제 마지막으로 FCMContainer에서 정말 중요한 부분인 _registerMessageListener() 메서드를 수정해준다.
const _registerMessageListener = () => {
	// 백그라운드에서 메세지를 수신했을 경우
    messaging()
    .setBackgroundMessageHandler((message) => {
      if(message) {
        displayNotification(message);
      }
    })
    // foreground에서 메세지를 수신했을 경우
    _notificationListener = messaging().onMessage((message) => {
      if(message) {
        displayNotification(message);
      }
    })

    _notificationOpenedListener = messaging().onNotificationOpenedApp(notificationOpen => {
    })
  };
그리고 이 안에 displayNotification(message)라는 메서드가 보일것이다. 수신 받은 메세지를 notifee를 통해 푸시로 띄워주는 메서드이다. 이 메서드는 새로 추가해줘야 한다.
const displayNotification = async(message) => {
  	// 안드로이드 푸시 채널 설정
    const channelId = await notifee.createChannel({
      id: FIREBASE_INFO.FIREBASE_ANDROID_CHANNEL_ID,
      name: FIREBASE_INFO.FIREBASE_APP_NAME,
      importance: AndroidImportance.HIGH,
      visibility: AndroidVisibility.PUBLIC
    });

  	// firebase 수신 데이터
    const {title, body, data} = message.notification;

  	// 푸시 노출
    await notifee.displayNotification({
      title,
      body: body.replace(/(<([^>]+)>)/gi, ''),
      data,
      android: {
        channelId,
      },
      ios: {
        foregroundPresentationOptions: {
          badge: true,
          sound: true
        },
        critical: true,

      }
    });
    await notifee.incrementBadgeCount();
  }
참고로, 코드 내에 FIREBASE_INFO라는 변수는 우리 프로젝트에서 사용하기 위한 firebase 보안 데이터를 환경변수화한 것이다. 각자 프로젝트에 맞게 설정하면 된다.
5) 메세지 데이터에 따른 페이지 접근 로직 수정
대부분 프로젝트에서 firebase로 메세지를 수신받고 적당한 화면 내에 수신받은 메세지 데이터에 따른 접근 로직을 설정할 것이다. 우리는 앱 메인화면을 담당하는 화면에 처음 접근하는 순간 리스너가 등록되도록 되어있고, 이 부분또한 큰 골격에 대해서 최대한 재활용할 생각이다.
우선 메인화면 컴포넌트에 useEffect로 첫 렌더링 순간에 리스너가 추가된 메서드를 추가한다.(기존에 그렇게 적용되있으면 안건드려도 된다.)
useEffect(() => {
  	...
	notificationListner();
  	...
}, [])
그 다음 이 notificationListner() 메서드를 다음과 같이 수정하였다.
// firebase cloud message listener
  const notificationListner = async () => {

    // 앱이 실행중일 때 호출
    notifee.onForegroundEvent(async({type, detail}) => {

      if(type == EventType.PRESS) {
        __DEV__ && console.log('HomeContainer notificationListner onForegroundEvent detail: ', detail);
        MovePageByCloudMessaging(detail.notification.data, appInfo.login, navigation, dispatch)
      }
    });

    // 실행중이 아닐 때 호출
    const notificationOpen = await messaging().getInitialNotification();

    if(notificationOpen) {
      __DEV__ && console.log('HomeContainer notificationListner getInitialNotification: ', notificationOpen);
      MovePageByCloudMessaging(notificationOpen.data, appInfo.login, navigation, dispatch);

    }

    notifee.cancelAllNotifications();

  };
이 메서드 내부를 부연설명을 하자면, 앱이 실행중인 상태에서는 notifee.onForegroundEvent만이 정상적으로 내용을 수신받았고, background 상태에서는 getInitialNotification()을 통해 메세지를 비동기로 수신받았을 때만 정상적으로 동작하여 다음과 같은 구조로 설계를 하였다.
MovePageByCloudMessaging은 내가 만든 접근 로직 메서드이니 이거는 각자가 알아서 작성하면 된다.
일단 여기까지 하면 cloud messaging에 관한 필요한 설정은 다 끝났다.
2. Dynamic-Links
dynamic-links는 안드로이드에서는 수정할 내용이 없다. 하지만 ios에서는 몇가지 수정이 필요한 부분이 있을 수 있다. 이 내용들은 전부 Xcode에서 하면 된다.
1) url Types 수정
Xcode에서 왼쪽 최상단의 앱 이름을 클릭하고 TARGETS -> {앱 이름} -> INFO로 들어가면 URL TYPES가 있다. 그 걸 열어보면 identifier에 프리픽스, URL Schemes에 앱의 bundle ID가 적혀있는 것이 있을 것이다. 만약 그렇다면 identifier를 "Bundle ID"라고만 수정해주면 된다.(원래 그렇게 되있었다면 넘어가면 된다.)
예시
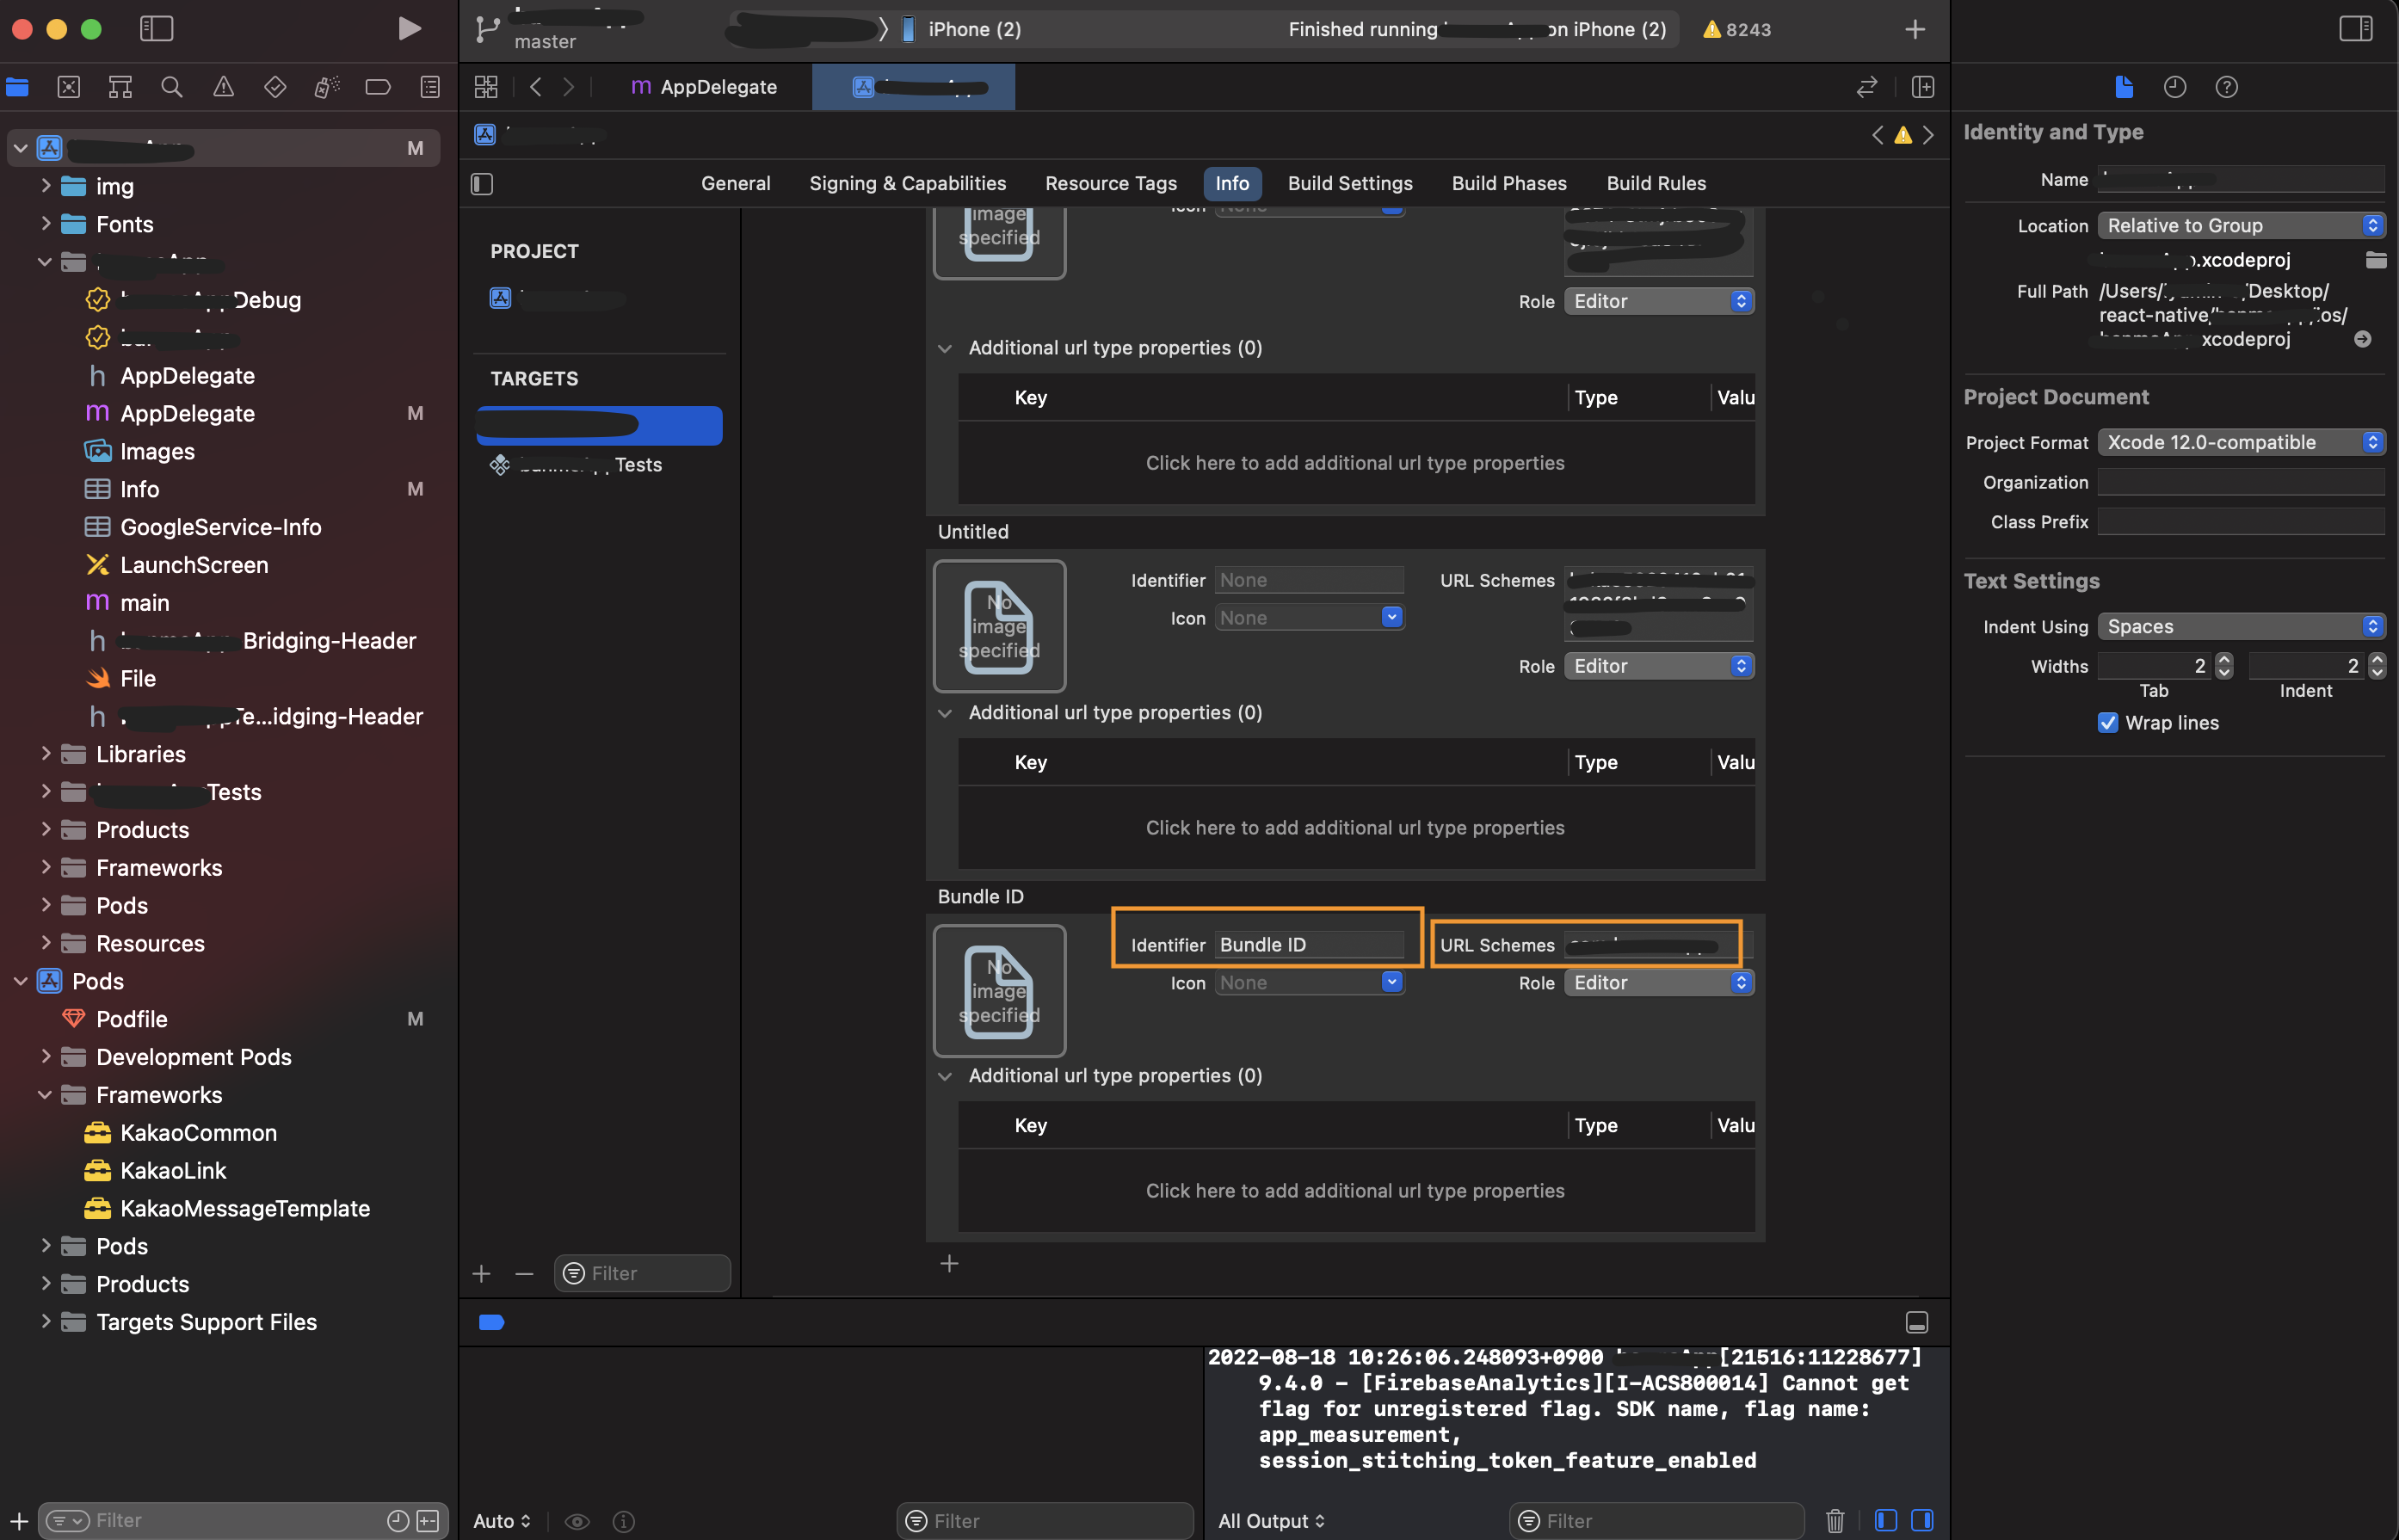 => 이미지 내 프로젝트 관련 정보는 모자이크 처리
2) AppDelegate.m 파일 수정
이때까지의 git 커밋 기록을 확인해보고, dynamic-links 설정과 관련된 모든 코드를 지워주면 된다.
지워야 할 코드는 아래의 링크를 참조할 것!!
React Native에서 다이나믹 링크 사용하기 => 내가 예전에 작성한 v5 버전 다이나믹 링크 설정 방법
3) 자바스크립트 코드 수정
기존 v5 버전 모듈에서는 링크 리스너가 다음과 같이 작성되어 있을 것이다.
...
import firebase from 'react-native-firebase'
...
firebase
.links()
.getInitialLink()
.then((link:string) => {
	...
})
이 코드를 다음과 같이 수정하면 된다.
...
// import firebase from 'react-native-firebase' => 제거
import dynamicLinks from '@react-native-firebase/dynamic-links';
...
// 이 타입은 어떻게 반환되는 지 예시를 들기 위한 타입 선언임. firebase 모듈에서 선언한 타입과는 관련이 없음
type dynamicLinkType = {
	url: string,
  	minimumAppVersion: number | string | null
}
...
dynamicLinks()
.getInitialLink()
.then((link:dynamicLinkType) => {
	...
})
그 다음으로 링크 생성 코드는 우리 프로젝트는 sha-256 인증키가 firebase에 등록이 안되있어서, rest api로 링크를 생성했기 때문에 따로 수정할 부분은 없었다. 만약 사전에 sha-256키를 firebase에 등록을 하고 firebase 모듈을 통해 링크를 생성했다면, firebase 공식문서에 나와있는 대로 링크를 생성하도록 하면 크게 문제될 건 없을 것이다.
추가 유의사항을 알려드립니다.
링크 생성을 위한 API 요청 본문 형식 중 navigationInfo에 enableForcedRedirect라는 boolean 타입 속성이 있을 것입니다. 이 속성은 iOS에서 firebase에서 제공하는 앱 미리보기 웹페이지를 건너뛰고 바로 앱으로 리다이렉트되는 것을 활성화할지를 물어보는 속성입니다. 이 속성은 가급적 사용하지 마시거나, false로 정의해주시기 바랍니다. 이 속성을 true로 정의했을 때 iOS 16버전이 설치된 단말기에서 앱으로 리다이렉트는 되지만 getInitialLink 메서드의 결과값으로 null이 반환되는 문제가 확인되었습니다. (아무래도 앱으로 접속하는 중간에 링크가 유실되는 것으로 추정됩니다.)
=> 참고로 안드로이드 단말기의 경우 기본적으로 크롬 앱이 설치되어 있어 링크를 클릭하는 순간 크롬 브라우저 내부 기능이 실행되어 안정적인 앱 리다이렉트가 이루어지니 안심하고 사용하셔도 됩니다.
3. Analytics
이 부분은 안드로이드와 ios 모두 따로 설정해줄 것은 없다. 다만 프로젝트 내부에서 v5 버전으로 연결되있던 코드들은 전부 v6 버전으로 맞춰서 수정하기만 하면 된다.
5. 안드로이드 캐시 삭제
위에서 한번 했었지만, 안정을 위해 가능하면 이번에 한번 더 gradle의 캐시를 삭제해주고, 그 다음 react-native의 캐시도 한번 삭제해준다.
cd android
./gradlew clean
cd ..
react-native start --reset-cache
6. ios pod 재설치
cd ios
pod deintegrate
rm -rf Podfile.lock
pod install --repo-update
우리 회사의 프로젝트에서는 지금까지의 단계를 통해 v6 버전으로의 마이그레이션을 완료했다. 물론 앱마다 설정한 내용이 다를 수는 있지만, 참고할 수 있는 내용이 되었으면 좋겠다.
유의사항
안드로이드 12 이상 타겟팅
만약 apk를 빌드하고 안드로이드 12이상의 환경에서 앱을 설치 할 때 다음과 같은 오류가 발생하는 경우가 있을 수 있다.
adb: failed to install ./app/build/outputs/apk/release/app-arm64-v8a-release.apk:
Failure [INSTALL_PARSE_FAILED_MANIFEST_MALFORMED: Failed parse during installPackageLI:
/data/app/vmdl1222974705.tmp/base.apk
(at Binary XML file line #327): com.nhn.android.naverlogin.ui.OAuthCustomTabActivity:
Targeting S+ (version 31 and above) requires that an explicit value for android:exported be defined when intent filters are present]
이는 안드로이드 sdk가 버전 31이상을 타겟팅하는 상태에서 안드로이드 12 이상의 OS에서 실행할 때 문제가 되는 것이니, 프로젝트의 AndroidMenifest.xml의 모든 activity 태그에 android:exported="true"설정이 되있어야 한다.
예시)
...
<activity
	...
    android:exported="true"
>
	...
</activity>
이 문제는 따로 설치한 오픈소스 모듈에도 이 설정이 안되있으면 설치에 실패하기 때문에, 모듈의 버전이 오래됬으면 모듈의 버전을 업데이트 해주는 것이 좋다.
문제가 된 오픈 소스 모듈 및 버전
- 네이버 로그인 모듈
@react-native-seoul/naver-login: 버전 2.1.0 이하
(지금은 네이버 로그인 모듈에서만 문제가 된걸 찾았지만, 다른 프로젝트를 진행하면서 문제가 된 모듈을 발견할 때마다 계속 업데이트하겠습니다.)
참고자료
- react native firebase - Migrating to v6
- velog - React naitve 푸시알림 구현/firebase + @notifee
- notifee
- velog - React Native 빌드 에러(2)
- velog - INSTALL_PARSE_FAILED_MANIFEST_MALFORMED / 인텐트 필터 / android:exported
- StackOverflow - INSTALL_PARSE_FAILED_MANIFEST_MALFORMED
- Android Developer - 앱 menifest 파일:activity
작업환경
- react-native-cli: 2.0.1
- react-native: 0.64.2
- OS: Mac OS Monterey 12.4
- 컴퓨터: M1 MAX 맥북프로 16인치

감사합니다. Pod 부분에서 저런걸 추가해줘야 하는군요..!