Review on www_mvc Project
Project 구성:
-Project 구현 목적: URI상에 있는 주소를 얻어와 명령어로 처리하는 패턴을 구현
-Project Type: Dynamic Web Project
-Name: www_mvc
-Package Name: action, controller, model
-폴더 구조:
www_mvc/WebContent/view : jsp 파일들
www_mvc/WebContent/template : template관련 파일들
www_mvc/WEB-INF : web.xml 환경 설정 파일 위치
www_mvc/WEB-INF/classes : 서블릿 클래스 위치, 자동 생성
www_mvc/WEB-INF/config : properties 파일등, 기타 리소스 파일
www_mvc/WEB-INF/lib : jar 파일의 라이브러리 위치, 자동 생성
www_mvc project를 tomcat 서버에서 실행 시, 처음 발생하는 주요 steps:
-
Tomcat(web server)이 시작되면서 web container(지금 사용하는 Java의 경우 Servlet container)가 동작하기 시작한다. Servlet container의 역할중에는 servlet의 life cycle을 manage하는것과 요청 url과 servlet을 연결하는것이 포함된다. Container가 Servlet과 interact하기 시작하면서 controller역할을 수행 할 servlet class가 container에 load된다.
-
Servlet container가 구동하기 시작하면서 web application이 load되는데, 이때 하나의 application마다 하나의 ServletContext를 생성해서 server 메모리에 올린다. web.xml에 정의된 Servlet, Filter, Listener의 설정 내용을 토대로 생성한다.
-
web.xml에 명시된 web-app의 설정을 반영한다. Servlet 태그안에 servlet이름, Servlet에서 사용할 parameter 정보, 그리고 servlet-mapping 정보가 담겨있다.
실습에서 사용한 Controller.java는 javax.servlet package의 Servlet interface가 구현된 클래스이다. Servlet interface는 servlet의 lifecycle에 중요한 method들이 선언되어있는데, 이들은 init(), service(), destroy()이다. container의 구동이 시작되면서 init() 메소드는 자동으로 호출되어 Controller 클래스의 맴버 변수들을 메모리에 올리고 초기화한다.
- web.xml에 정의된 Servlet의 name, class, init-param, load-on-startup 설정 내용대로 Servlet이 생성된다. 실습의 경우, web.xml에서 다음과 같이 설정내용을 구성했다:
src>controller>Controller.java 클래스로 Servlet이 생성되고, 이 Servlet 클래스에는 2가지 parameter(configFile과 templatePage)가 각각 congifuration.properties, template.jsp 파일을 값으로 가지고 생성된다. 그리고 servlet-mapping에 설정된바와 같이 Controller는 특정 url-pattern과 mapping 된다.
web.xml:
<?xml version="1.0" encoding="UTF-8"?>
<web-app xmlns:xsi="http://www.w3.org/2001/XMLSchema-instance"
xmlns="http://xmlns.jcp.org/xml/ns/javaee"
xsi:schemaLocation="http://xmlns.jcp.org/xml/ns/javaee
http://xmlns.jcp.org/xml/ns/javaee/web-app_4_0.xsd" id="WebApp_ID" version="4.0">
  <display-name>www_mvc</display-name>
  <description>
        MVC 예제 소스 코드 및 실행 코드
  </description>

  <servlet>
     <servlet-name>Controller</servlet-name>
     <servlet-class>controller.Controller</servlet-class>

     <init-param>
  	<param-name>configFile</param-name>
  	<param-value>C:/Study/Spring/workspace/www_mvc/WebContent/WEB-INF/config/config.properties
        </param-value>
     </init-param>

     <init-param>
  	<param-name>templatePage</param-name>
  	<param-value>/template/template.jsp</param-value>
     </init-param>

    <!-- "load-on-startup": Application 로딩 시, 자동으로 실행하라는 태그이다.-->
     <load-on-startup>1</load-on-startup>
 </servlet>
 <servlet-mapping>
     <servlet-name>Controller</servlet-name>
     <url-pattern>*.do</url-pattern>
  </servlet-mapping>
</web-app>-
Controller 클래스를 들여다보면, configFile (config.properties)에 설정된 command와 HandlerClass(class호출 및 instance생성된)객채를 HashMap객체 map에 담는다. 이 map은 Controller 클래스의 맴버 변수로서, 나중에 client가 보낸 요청 URI에 특정 command가 주어지면, client의 요청을 handle할 수 있는 Action class 객체를 찾을 수 있는 key-value pair들을 담고있다.
-
Controller 클래스의 templatePage맴버 변수 WebContent/template/ 폴더안에 template.jsp값을 templatePage변수에 대입하여 view page의 틀을 구성 할 template을 갖춘다.
-
init()외에도, Controller에는 doGet(), doPost() method들이 있는데, 이들은 browser에서부터 받은 요청을 처리하는 역할을 한다. 먼저 요청 URI에서 command 문자열을 찾고, command가 key인 value를 init()에서 만들었던 HashMap map에서 찾는다. 그리고 요청을 처리하도록 각 handler class(Action class)의 처리 method(execute())를 실행시킨다.
-
각 doGet(), doPost() method들은 get/post 방식을 다르지만, 둘다 결국 요청에대한 처리 결과를 view page로 넘겨주는 역할을 한다. 결과 값을 HttpServletRequest request객체에 attribute로 담아서 dispatcher를 사용한 forward 방식으로 browser에 응답을 보여 줄 수 있는 view(.jsp) 페이지로 이동한다.
Controller.java:
package controller;
import java.io.FileInputStream;
import java.io.IOException;
import java.util.Iterator;
import java.util.Map;
import java.util.Properties;
import javax.servlet.RequestDispatcher;
import javax.servlet.ServletConfig;
import javax.servlet.ServletException;
import javax.servlet.http.HttpServlet;
import javax.servlet.http.HttpServletRequest;
import javax.servlet.http.HttpServletResponse;
import action.NullAction;
import action.Action;
public class Controller extends HttpServlet {
private boolean usingTemplate = false;
private String templatePage = null;
//명령어=명령처리Action객체
private Map map = new java.util.HashMap();
public void init(ServletConfig config) throws ServletException {
String configFile = config.getInitParameter("configFile");
Properties prop = new Properties();
FileInputStream fis = null;
try {
fis = new FileInputStream(configFile);
prop.load(fis);
} catch (IOException e) {
throw new ServletException(e);
} finally {
if (fis != null) try { fis.close(); } catch(IOException ex) {}
}
Iterator keyIter = prop.keySet().iterator();
while( keyIter.hasNext() ) {
String command = (String)keyIter.next();
System.out.println("command: " + command);
String handlerClassName = prop.getProperty(command).trim();
System.out.println("handlerClassName: " + handlerClassName);
try {
//클래스를 JVM으로 로딩합니다.
Class handlerClass = Class.forName(handlerClassName);
//읽어들인 클래의 객체를 생성합니다.
Object handlerInstance = handlerClass.newInstance();
//MAP에 키와 각 클래스별 객체가 저장합니다.
map.put(command, handlerInstance);
} catch (ClassNotFoundException e) {
throw new ServletException(e);
} catch (InstantiationException e) {
throw new ServletException(e);
} catch (IllegalAccessException e) {
throw new ServletException(e);
}
}
templatePage = config.getInitParameter("templatePage");
if (templatePage != null && !templatePage.equals("")) {
usingTemplate = true; // 템플릿 페이지 존재
}
}
public void doGet(
HttpServletRequest request, HttpServletResponse response)
throws ServletException, IOException {
process(request, response);
}
protected void doPost(
HttpServletRequest request, HttpServletResponse response)
throws ServletException, IOException {
process(request, response);
}
private void process(
HttpServletRequest request, HttpServletResponse response)
throws ServletException, IOException {
String command = request.getRequestURI();
System.out.println("RequestURI: " + request.getRequestURI());
//URI:/www_mvc/mvc/list.do
//(URL이였다면, URL:http://localhost:9000/www_mvc/mvc/list.do)
//처음 주어진 command가 rootcontext로 시작한다면, (/www_mvc/),
//root context가 끝난곳 부터 command 문자열로 지정한다 (command = /mvc/list.do)
//(config.properties 파일의 mapping list내용을 보고 key값그대로 찾을 수 있도록
//command 문자열을 지정해야한다.)
if (command.indexOf(request.getContextPath()) == 0) {
command = command.substring(request.getContextPath().length());
System.out.println("command: " + command);
}
Action action =
(Action)map.get(command);
// 핸들러가 없는 경우
if (action == null) {
action = new NullAction();
}
String viewPage = null;
try {
viewPage = action.execute(request, response);
} catch(Throwable e) {
throw new ServletException(e);
}
if (usingTemplate) {
request.setAttribute("CONTENT_PAGE", viewPage);
}
//jsp에서의 forward 태그와 같은역할
//usingTemplate이 true라면, templatePage forward될것이고. 만약 false라면 viewPage가 return됨.
RequestDispatcher dispatcher =
request.getRequestDispatcher(
usingTemplate ? templatePage : viewPage);
dispatcher.forward(request, response);
}
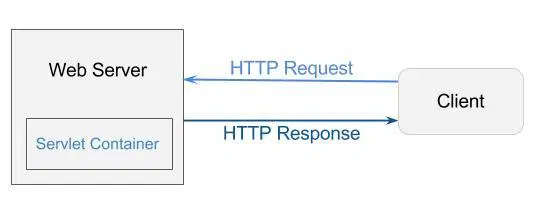
} Web server가 client의 HTTP request에 귀기울여 듣고있다가 request가 오면, servlet container가 새로운 HttpServletRequest와 HttpServletResponse 객체를 생성한 뒤, 이미 생성해둔 Servlet instance의 method들중 요청 url과 match가 되는 method에게 전달한다.
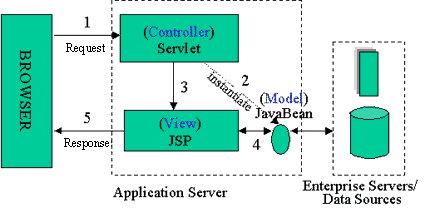
Browser로 client의 요청이 들어왔을때에, 이를 처리하는 전체 실행 순서 상세하게 보면 다음과 같다:
ⓐ http://127.0.0.1:8000/www_mvc/mvc/hello.do
(or http://localhost:8000/www_mvc/mvc/hello.do)
이와 같은 http URL 요청이 들어온다.
ⓑ Controller Servlet이 요청을 받아 URL에서 Context Root Path(App 이름 "www_mvc")을 제외한 '/mvc/hello.do'만 String Class의 substring()메소드를 이용해 추출
ⓒ Controller는 'config.properties'파일에서 '/mvc/hello.do'키와 일치하는 Action 인터페이스 구현 클래스를 검색
ⓓ Action Interface의 구현 클래스의 객체에 있는 execute() 메소드를 실행
ⓔ execute()메소드는 Service Class의 객체를 만들어 필요한 메소드를 실행
ⓕ Action 클래스는 실행 결과를 객체로 만들어 request 객체에 저장
ⓖ Action 클래스는 이동할 jsp 페이지를 Controller Servlet에게 전달
ⓗ Controller Servlet은 RequestDispatcher객체를 이용해 Action으로부터
리턴된 jsp주소로 제어를 이동(forward) 시킨다.
ⓘ jsp 페이지는 별다른 처리없이 request 객체에서 값을 가져와 출력한다.
Notes
1. URI vs. URL?
URI: 특정 resource를 identify하는 것이다. URL보다 더 포괄적인 개념이다.
URL: URI의 subset이기때문에 동일하게 resource를 identify하는 역할을 하지만, 특별히 그 resource를 어떻게 access하는지는 알려주는 identifier이다.
Example:
URI(Uniform Resource Identifier): www_mvc/mvc/hello.do
URL(Uniform Resource Locator): http://localhost:8000/www_mvc/mvc/hello.do
2. Properties 클래스란?
key와 value의 구조를 가지고있고, 특정 객체를 생성하는 경우에 초기값으로 많이 사용된다.
- 상속 구조
java.lang.Object
java.util.Dictionary<K,V>
java.util.Hashtable<Object,Object>
java.util.Properties<String,String>
예를 들어서 config.properties 파일을 보면 command(key) = HandlerClass(value) pair로 구성되있다. 주어진 command에 따라 HandlerClass 객체를 생성할때에 사용된다.
또는 jdbc.properties와 같이 oracle JDBC driver 설정내용을 아래와같이 정의할수있다.
#----------------------------------
jdbc.properties
#----------------------------------
driver=oracle.jdbc.driver.OracleDriver
url=jdbc:oracle:thin:@127.0.0.1:1521:XE
account=user1234
password=1234
#driver=org.gjt.mm.mysql.Driver
#url=jdbc:mysql://127.0.0.1:3306/ojtdb?useUnicode=true&characterEncoding=euckr
#account=ojtuser
#password=1234
#driver=org.gjt.mm.mysql.Driver
#url=jdbc:mysql://127.0.0.1:3306/**?useUnicode=true&characterEncoding=euckr
#account=**
#password=**
3. Class 클래스란?
Class는 컴파일된 Class파일에 저장된 class나 interface정보를 가져오는데에 활용된다.
java.lang.Class에 대해 정리했던 내용 참고:
https://blog.naver.com/sojun1221/222210807187
만약 String class정보를 가져오려고한다면, 다음과 같이 3가지 방법이있다:
--> String s = new String()
Class c = s.getClass(),
--> Class c = String.Class(),
--> Class c = Class.forName("java.lang.String")
command에 match하는 HandlerClass정보를 불러와서 해당 class의 instance를 생성할때에 (url 요청을 처리하기위해 HandlerClass내 method를 실행하기위해) 아래와 같이 사용될 수 있다.
public class ClassTest {

    public static void main(String[] args) {

        String className = args[0];
        // 실행할 클래스명, 패키지 포함
        try{
            Class object = Class.forName(className);
            // JVM으로 소스 로딩
            Action instance = (Action)object.newInstance();
            // 객체 생성
            instance.execute();
        }catch(Exception e){
            System.out.println(e);
        }

    }

}
References:
1. (3~7)MVC의 구현 (Template, View 구현) from lectureblue.pe.kr Framework>MVC_Spring
2. How Web Servers Work? from HowToDoInJava