
DI(Dependency Injection) 의존성 관리
스프링 프레임워크에서는 컨테이너가 자동으로 객체 생성과 의존관계를 관리한다:
container 구동 -> 생성자 자동 호출 -> init method 자동 호출(객체 맴버변수 초기화)
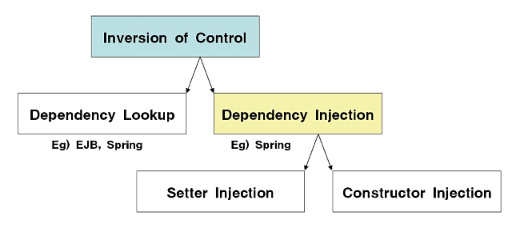
의존성은 Spring IOC의 핵심 원리이다. 아래 그림과 같이 Spring의 의존성 관리 방법은 Dependency Lookup과 Dependency Injection 두가지도 나뉜다.
Dependency Lookup은 컨테이너가 객체를 생성하면, client가 lookup해서 사용하는 방식이고, Dependency Injection은 컨테이너가 spring 설정 파일에 등록된 정보를 바탕으로 객체 사이의 의존관계를 자동으로 처리하는 방식이다.
이 둘중 가장 대표적으로 사용되는 것이 Dependency Injection이다.
의존성의 설정을 바꾸고싶을때에 application program 코드를 수정하는 대신, spring 설정 파일(.xml)만 수정해서 변경 사항을 반영할 수 있는것이 매우 큰 merit이다.
DI(의존성) 구현에는 두가지 방법이 있다:
1. constructor injection
2. setter injection
1. Constructor Injection
매개변수를 가진 constructor 호출하여 의존관계를 설정한다. XML 설정파일에서 < bean >요소의 하위 요소< constructor-arg >를 사용한다.
< constructure >요소 작성방법:
생성자의 매개변수(전달값)이 (String, int 등과 같은)기본형이면 value속성을 사용하고, (개발자가 만근 Class형과 같은)참조형이면 ref속성을 사용.
app-context.xml:
<beans>
....
<bean id="tv" class="ioc.SamsungTV" >
     <constructor-arg ref="speaker"></constructor-arg>
     <constructor-arg value="2700000"></constructor-arg>
</bean>
</beans>
이렇게 app-context.xml에 설정된 정보는 아래와 같이 SamsungTV.java 클래스에서 정의한 생성자와 메치한다. SamsungTV.java의 맴버변수 int price와 AppleSpeaker speaker도 메모리에 올라가기때문에 아래 보이는 volumeUp(), volumeDown() 메소드안에서 호출하는 AppleSpeaker 클래스의 메소드도 호출이 가능해진다.
ioc.SamsungTV.java:
 package ioc;

public class SamsungTV implements TV {

  private AppleSpeaker speaker;
  private int price;
  public SamsungTV() {
    System.out.println(">>>SamsungTV(1) 객체 생성");
  }
  public SamsungTV(AppleSpeaker speaker, int price) {
    System.out.println(">>>SamsungTV(2) 객체 생성");
    this.speaker = speaker;
    this.price = price;
  }
  ....
    public void volumeUp() {
    speaker.volumUp();
  }

  public void volumeDown() {
    speaker.volumDown();
  }

}
2. Setter Injection
Java Class의 의존관계를 setter 메소드를 호출해서 처리한다. 각 객체 Class에 setter 메소드를 통해 맴버변수의 값을 주입하는 것이다.
app-context.xml:
<beans>
....
<bean id="tv" class="ioc.SamsungTV" >
      <property name="speaker" ref="speaker"></property>
      <property name="price" value="2700000"></property>
</bean>
</beans>
이렇게 xml 파일에서 설정을 할때에 코드를 더 간소화하기위해 여러 방법들이 존재한다.
p namespace
(네임스페이스 "http://www.springframework.org/schema/p" 선언 후 사용하면 프로퍼티값을 간편히 설정가능)
< bean >안에 p namespace 요소 작성방법:
p:변수명="기본타입 데이타"
p:변수명-ref="참조타입"
app-context.xml:
<beans
....
xmlns:p="http://www.springframework.org/schema/p"
....>

<description>Example configuration to get you started.</description>
<bean id="tv" class="ioc.SamsungTV" p:speaker-ref="speaker"
p:price="2700000">
</bean>
<bean id="speaker" class="ioc.AppleSpeaker"></bean>
</beans>
Collection type property 설정
Java Class에 맴버변수로 list, map과 같은 collection 형태의 변수를 받아와서 사용하기 위해서는 collection 형태에 맞는 방식으로 bean의 property를 설정해야한다.
먼저 spring 설정 파일을 생성하는 방법을 정리해보자. (기존에 app-context.xml은 프로젝트 생성시, src/java/resources안에 자동으로 생성되었었다.)
New -> Other -> Spring 폴더를 확장한다 -> Spring Bean Configuration File을 선택한다.
말그대로 spring설정 파일 (확장자는 .xml)을 생성하는것인데, 생성하는 단계에서 Spring Bean Definition에 어떤 namespace를 사용할지 check하여 더 쉽게 .xml파일에 < beans >내용을 미리 작성할 수 있다.
(1) list
app-context2.xml:
<bean id= "coll" class="coll.CollectionBean">
	<property name ="list">
		<list>
			<value>Porto</value>
			<value>Lisbon</value>
			<value>Finnistera</value>
		</list>
	</property>
</bean>
coll.CollectionBean.java:
package coll;

import java.util.List;

public class CollectionBean {
  private List<String> list;
  public void setList(List<String> list) {
    this.list = list;
  }
  public List<String> getList() {
    return list;
  }
}
app-context2.xml에서 설정한 정보를 기반으로 CollectionClient class에서 main() 메소드안에서 GenericXmlApplicationContext의 instance를 생성하며 spring 컨테이너를 구동한다. 이때, instance 생성시, GenericXmlApplicationContext 생성자의 매개변수로 설정 xml 파일 이름을 넣는다.(e.g., app-context2.xml)
컨테이너가 구동되면서 configuration xml에서 설정해둔 속성을 지닌 Bean이 생성되고, getBean() 메소드를 통해 Bean 객체를 받아와서, 해당 class(e.g., CollectionBean.java)의 메소드(e.g., getList())를 호출 할 수 있다.
coll.CollectionClient.java:
package coll;

import java.util.List;
import org.springframework.context.support.AbstractApplicationContext;
import org.springframework.context.support.GenericXmlApplicationContext;

public class CollectionClient {

  public static void main(String[] args) {
    //1. Spring 컨테이너 구동한다.
    AbstractApplicationContext factory =
        new GenericXmlApplicationContext("app-context2.xml");

    //2. Spring 컨테이너로부터 필요한 객체를 요청(Lookup)한다
    CollectionBean coll = (CollectionBean)factory.getBean("coll");
    List<String> list = coll.getList();

    //3. list안에 item들을 하나씩 출력하든, 하고싶은거 할수있음
    for(String li :list) {
      System.out.println(li);
    }

    //4.Spring 컨테이너를 종료한다.
    factory.close();
  }
}
(2) map
app-context2.xml:
<bean id="coll" class="coll.CollectionBean">
	<property name="proper">
		<props>
			<prop key="English">onw two three</prop>
			<prop key="Spanish">uno dos tres</prop>
		</props>
	</property>
	<property name="map">
		<map>
			<entry>
				<key><value>Portugal</value></key>
				<value>Lisbon</value>
			</entry>
			<entry>
				<key><value>Spain</value></key>
				<value>Santiago de Compostela</value>
			</entry>
		</map>
	</property>
</bean>
coll.CollectionBean.java:
package coll;

import java.util.Map;

public class CollectionBean {
	//member변수 이름과 text.xml의 property name과 동일해야함
	private Map<String, String> map;
	private Properties proper;

	public CollectionBean() {
		System.out.println("CollectionBean 생성자 호출");
	}
	public void setMap(Map<String, String> map) {
		this.map = map;
		System.out.println(">>> setMap() 호출");
	}
	public Map<String, String> getMap() {
		return map;
	}
	public void setProper(Properties proper) {
		this.proper = proper;
	}
	public Properties getProper() {
		return proper;
	}
coll.CollectionBeanClient.java:
public class CollectionBeanClient {

	public static void main(String[] args) {
		// TODO Auto-generated method stub
		AbstractApplicationContext factory = new GenericXmlApplicationContext("app-context2.xml");

		CollectionBean coll = (CollectionBean)factory.getBean("coll");

		List<String> list = coll.getList();
		for(String li : list) {
			System.out.println(li);
		}

		//Map에서는 어떤 object타입이든 다 넣을 수 있다.
		Map<String, String> map = coll.getMap();
		System.out.println(map.entrySet());

		//Properties는 문자열만 담을수있다
       	        //(e.g.,config.properties 파일에 "commanc"&"handler" 문자열을 가져왔던것처럼)
		Properties proper = coll.getProper();
		System.out.println(proper);

		factory.close();
	}

}
Annotation 사용하기
annotation 설정 추가
annotation설정을 추가하려면 spring 설정 파일의 root element < beans >에 Context관련 namespace와 schema문서 위치를 등록해야한다.
아래 보이는 내용을 beans에 추가한다.
app-context.xml:
<?xml version="1.0" encoding="UTF-8"?>
<beans
...
xmlns:context="http://www.springframework.org/schema/context"
...
xsi:
...
http://www.springframework.org/schema/context
https://www.springframework.org/schema/context/spring-context-3.0.xsd">
Component-scan 설정
application에서 사용할 객체들을 < bean > 등록하지않고 자동으로 생성하려면 < context:component-scan/>을 정의해야한다.
spring을 설정하는 xml 파일안에 context:component-scan을 추가하면, spring container가 classpath에 있는 class들을 쭉 다 scan해서 @Component annotation이 추가된 class들을 자동으로 객체생성한다.
각 class에서 @Component를 표기할때,
@Component("movie") 를 선언하면 요청객체의 id, name을 지정할 수 있다. (만약 "tv"와 같이 따로 지정한 id or name이 없다면 자동으로 class 이름의 첫letter만 lower-cased로 설정한다. (e.g.,, HarryPotter -> harryPotter)
app-context.xml:
<beans
...>
<!-- 무거운 xml 파일의 경량화 하기위해 annotation을 사용 -->
<!-- component-scan: @component로 표기되어있는 class를 자동으로 객체 생성해준다-->
	<context:component-scan base-package="ioc" />
</beans>
ioc.SamsungTV.java:
package ioc;

@Component
public class SamsungTV implements TV {
...
}
ioc.TVUser.java:
TV tv = (TV)factory.getBean("samsungTV"); Dependency Injection Annotation
@Autowired는 의존하는 객체 주입을 위함. (field, methods/setter/constructor에서 사용한다.)
@Autowired 대신 @Resource로 표기하거나, @Injection을 사용 해도되는데, @Injection은 Autowired와 동일한 기능이고, @Resource는 의존하는 객체 주입(필드,setter 에서 사용), DI객체가 중복될때 Resource(name="") 사용한다.
DI객체가 중복될때는 @Qualifier("name1"), @Qualifier("name2") 각각 표기하여 사용함.
예시)
ioc.AppleSpeaker.java:
package ioc;

import org.springframework.stereotype.Component;

@Component("apple")
public class AppleSpeaker {
...
}
ioc.LgTV.java:
package ioc;

import org.springframework.beans.factory.annotation.Autowired;
import org.springframework.stereotype.Component;

@Component("tv")
public class LgTV implements TV {
   //@Autowired: 의존하는 객체 주입 (필드,메소드/setter,생성자 에서 사용)
   //@Qualifier("distinct name") 여러 변수일때에 Qualifier를 사용해서 다른 이름으로 구분한다
   //DI가 여러개 있을때 (aka 여러개의 speaker가 있을때에)

   @Autowired
   @Qualifier("apple")
   private AppleSpeaker speaker;

   @Qualifier("apple2")
   private AppleSpeaker speaker2;

   private int price;

  ...
}
@Resource를 사용하는 경우, 아래와 같이 @Resource(name="이름")을 표기해준다.
ioc.LgTV.java:
package ioc;

import org.springframework.beans.factory.annotation.Autowired;
import org.springframework.stereotype.Component;

@Component("tv")
public class LgTV implements TV {
  @Resource(name="apple")
  private AppleSpeaker speaker;
  ...
}
그외 다른 annotations:
@Required :필수 프로퍼티를 명시 (setter 메소드에서 사용)
@Component : @Repository, @Service 를 포괄적으로 사용
@Controller : @Component가 대신 사용될수 없음
@Service : business logic 의 서비스 패턴 클래스 에서 사용
@Repository : database access logic의 DAO 패턴 클래스 에서 사용
References: