EL(Expression Language)
EL은 JSP에서 객체의 출력을 단순화하는 용도로 사용한다. (JSP 2.0은 JSTL 1.1버젼에 포함된 EL기능을 제공함)
표현 방법: ${expr}
note: 값이 없는 경우, null값을 출력하지 않는다.
JSP 내부 객체에 대한 EL 객체 종류와 예시:
-
pageContext: page context 객체
${pageContext.request.requestURI} <!-- request URI--> ${pageContext.request.contextPath} <!-- Context Path 추출--> -
pageScope: page 영역에 포함된 객체
-
requestScope: request 영역에 포함된 객체
-
sessionScope: session 영역에 포함된 객체
${sessionScope.Id} <!-- session 영역에서 Id이라는 이름으로 저장된 객체--> -
applicationScope: application 영역에 포함된 객체
-
param: HTTP의 parameters
${param.productId} <!-- productId라는 이름의 parameter 값--> -
paramValues: 하나의 parameter의 값들
${paramValues.productId} <!-- productId라는 이름의 parameter 값들--> -
header: 헤더 정보들
-
headerValues: 하나의 헤더의 값들
-
cookie: 쿠키들
-
initParam: 컨텐츠의 초기화 parameters
el 방식 vs. scriptlet 방식
기존 <% %>를 사용해서 java 문법을 html파일에서 그대로 사용하는 방법을 scriptlet방식이라고한다. 이보다 더 간단하게 표현하는 방식이 el방식이다.
MVC pattern을 구현하면서 client의 요청에 대한 응답 데이터를 전송할때에 Controller에서부터 HttpServletRequest 또는 HttpSession 객체에 데이터를 담아서 view jsp 파일로 보내왔었다. setAttribute() 메소드를 통해 view jsp를 구현하는데에 필요한 데이터를 request 객체의 attribute로 가져온다. jsp에서 scriptlet 또는 el 방식으로 parameter/attribute에 담긴 데이터를 사용할 수 있다.
Dynamic Web Project를 하나 생성해서 web page를 구현하는 jsp 파일에서 request 객체에 담은 정보를 표현하는 실습을 해보았다.
${} 기호를 사용하면 el방식으로 request영역에 기본적으로 접근할 수 있다. 아래 코드를 보면 두가지 방식 모두 동일하게 이름, 총점, 가산점, 평균을 출력한다.
<%@ page contentType="text/html; charset=UTF-8"%>

<h2>
<%
request.setAttribute("name", "가길동");
request.setAttribute("tot", 190);
request.setAttribute("avg", 95);
%>

<%
// Scriptlet을 이용한 경우
String name = (String)request.getAttribute("name");
int tot = (Integer)request.getAttribute("tot");
int avg = (Integer)request.getAttribute("avg");

out.println("성명: " + name + "<br/>");
out.println("총점: " + (tot) + "<br/>");
out.println("가산점: " + (tot+5) + "<br/>");
out.println("평균: " + avg + "<br/>");
%>

<br><br>
성명:${name}<br>
총점:${tot}<br>
가산점:${tot+5}<br>
평균:${avg} 점<br>
</h2>
아래 4가지 방식 모두 "Java 개발자"를 출력한다.
<%@ page contentType = "text/html; charset=UTF-8" %>
<% request.setAttribute("name", "JAVA 개발자"); %>
<html>
<head><title>EL Object</title></head>
<body>
request의 name 속성(스크립틀릿 방식: print): <%=request.getAttribute("name")%> <br>
request의 name 속성(스크립틀릿 방식: assign & print):
	<% String name = (String)request.getAttribute("name");
		out.print(name);%><br>
request의 name 속성(EL-requestScope.name): ${requestScope.name} <br>
request의 name 속성(EL-name): ${name} <br>
</body>
</html>
url에 직접 parameter값을 넣어서 출력해볼수도있다. 아래 주석에 적힌 경로를 입력하면 파라미터 code에 입력한 값이 그대로 html내용으로 출력된다. 아래 코드의 경우 ABCDE가 출력된다.
<%@ page contentType = "text/html; charset=UTF-8" %>
<html>
<head><title>EL Object</title></head>
<body>
<%
/* http://localhost:9000/JSTL_test/el/elParam.jsp?code=ABCDE
 * ?전까지가 url. ?이후에 code 파라미터값을 입력.
 */
String code = request.getParameter("code"); %>
code 파라미터(스크립틀릿 방식) : <% out.println(code);%> <br>
code 파라미터(EL 방식) : ${param.code} <br />
</body>
</html>
el표기방식으로 java class 객체에 접근할수있다.
ELDTO.java 클래스를 생생한 후, jsp 에서 해당 클래스의 instance 생성 및 변수들을 접근할 수 있다.
src/jstl_test/el/ELDTO.java:
public class ELDTO {
    private String name;
    private String movie;

    public ELDTO() {
        super();
        // TODO Auto-generated constructor stub
    }

   public ELDTO(String name, String movie) {
        super();
        this.name = name;
        this.movie = movie;
    }

    public String getName() {
        System.out.println("getName() call");
        return name;
    }

    public void setName(String name) {
        System.out.println("setName() call");
        this.name = name;
    }

    public String getMovie() {
        System.out.println("getMovie() call");
        return movie;
    }

    public void setMovie(String movie) {
        System.out.println("setMovie() call");
        this.movie = movie;
    }

}
jsp 페이지에서 객체 request영역에 저장 및 el로 사용할 수 있다.
먼저 import jstl_test.el.* 를통해서 ELDTO 클래스가있는 패키지 또는 해당 클래스를 import해야한다.
WebContent/el/eldto.jsp:
<%@ page language="java" contentType="text/html; charset=UTF-8" pageEncoding="UTF-8"%>
<%@ page import="jstl_test.el.*" %>
<!-- el can be used to directly access a member variable of a bean or a request object-->
    <%
    	ELDTO dto = new ELDTO("Daniel Redcliff","Harry Potter");
    	request.setAttribute("dto",dto);
    %>

<!DOCTYPE html>
<html>
<head>
<meta charset="UTF-8">
<title>Insert title here</title>
</head>
<body>
스크립틀릿을 사용하는 경우<br><br>
<%
	Object obj = request.getAttribute("dto");
	ELDTO eldto = (ELDTO)obj;
	out.print("영화명:"+eldto.getMovie()+"<br><br>");
	out.print("주 연:"+eldto.getName()+"<br><br>");
%>
<br>
EL 올바르게 사용하는 경우<br>
영화명(O): ${requestScope.dto.movie}<br>
주 연(O): ${requestScope.dto.name}<br>
주 연(O): ${dto.movie}=${dto.name}<br><br>

EL 사용이 틀린 경우
Type1(X): ${param.dto.name}<br>
Type2(X): ${param.dto}<br>
Type3(X): ${requestScope.movie}<br>
Type4(X): ${movie}<br>
</body>
</html>
또한, java 클래스 method도 사용이 가능하다. (단, static이여야함. 클래스 instance생성필요없이 바로 호출가능한 메소드)
tld파일이 작성되어야 jsp에서 el방식을 통해 메소드를 호출할 수 있다.
tld: tag library descriptor
tag 라이브러리에 대한 설정 정보를 담고있다.
DateUtil.java:
import java.util.Date;
import java.text.SimpleDateFormat;

public class DateUtil {
    private static SimpleDateFormat formatter =
                new SimpleDateFormat("yyyy-MM-dd");

    public static String format(Date date) {
        return formatter.format(date);
    }
}
WEB-INF/tlds/el-functions.tld:
<?xml version="1.0" encoding="UTF-8"?>

<taglib xmlns="http://java.sun.com/xml/ns/j2ee"
    xmlns:xsi="http://www.w3.org/2001/XMLSchema-instance"
    xsi:schemaLocation="http://java.sun.com/xml/ns/j2ee
                        web-jsptaglibrary_2_0.xsd"
    version="2.0">

    <description>EL에서 함수실행</description>
    <tlib-version>1.0</tlib-version>
    <uri>/ELFunctions</uri>

    <function>
        <description>Date 객체를 포맷팅하여 출력</description>
        <name>dateFormat</name> <!-- jsp에서 EL표기방식으로 사용할 이름이다 -->
        <function-class>
            jstl_test.el.DateUtil
        </function-class>
        <!-- 사용할 method를 정해주는데, class형이나 매개변수형도 package이름까지 다 표기해야좋음 -->
        <function-signature>
            java.lang.String format( java.util.Date )
        </function-signature>
    </function>

</taglib>
jsp페이지에서 java.util.Date 클래스를 import하고 Date 형태의 객체를 확보한 후,
<%@ taglib prefix="elfunc" uri="/ELFunctions" %>
elfunc라이브러리를 불러와서 위의 DateUtil.java 클래스에서 메소드 format(Date date)으로 정의하고, el-functions.tld 파일에서 dateFormat이라는 이름을 붙인 메소드를 호출해서 사용할 수 있다.
el/viewToday.jsp:
<%@ page language="java" contentType="text/html; charset=UTF-8"
    pageEncoding="UTF-8" import="java.util.Date" %>
<!-- the tag information specified in "el-function.tld" is used here.  -->
<!-- in the tld file, the specified Java Class and its method name can be called and used here -->
<!-- elfunction: dateFormat (originally named format() in DateUtil.java class) -->
<%@ taglib prefix="elfunc" uri="/ELFunctions" %>
<%
	Date today = new Date();
	request.setAttribute("today",today);
%>
<!DOCTYPE html>
<html>
<head>
<meta charset="UTF-8">
<title>Insert title here</title>
</head>
<body>
오늘은 <b>${elfunc:dateFormat(today) }</b> 입니다. <br>
오늘은 <b> <%=today %></b>입니다.<br>
</body>
</html>
Browser에 render되는 결과를 보면, 첫번때 줄은 dateFormat(today) 메소드를 통해 YYY-MM-DD형태로 포멧이 된 날짜가 출력되고, 두번째 줄은 format되지않은 날짜, 시간을 모두 출력하는 기본 형태의 날짜가 출력된다.
JSTL(JSP Standard TAG Library)
많이 사용되는 사용자 정의 TAG를 모아서 JSTL 규약을 생성한것이다.
JSTL API: http://java.sun.com/products/jsp/jstl/1.1/docs/tlddocs/index.html
scriptlet/EL보다 더 간결한 문법을 사용할 수 있다.
project의 jsp 코드에 jstl을 사용하려면 library에 jstl.jar 그리고 standard.jar API가 포함되어있어야한다.
WebContent/WEB-INF/lib"경로에 jstl.jar & standard.jar추가한다.
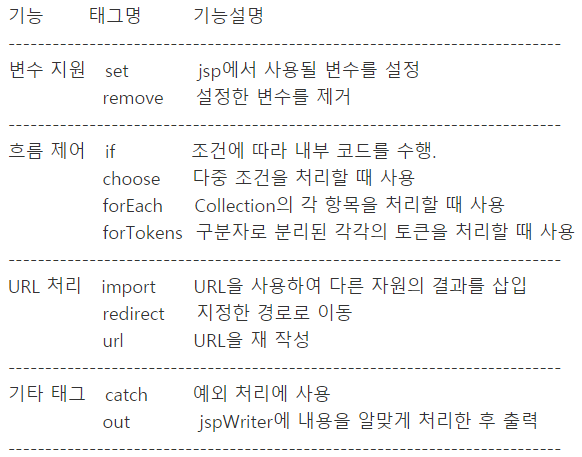
JSTL은 5가지 TAG를 지원한다
-
core (c): 변수 지원, 흐름 제어, URL 처리
<%@ taglib prefix="c" uri="http://java.sun.com/jsp/jstl/core" %> -
XML (x): XML core, 흐름 제어, XML 변환
<%@ taglib prefix="x" uri="http://java.sun.com/jsp/jstl/xml" %> -
국제화 (fmt): 지역, 메시지 형식, 숫자 및 날짜 형식
<%@ taglib prefix="fmt" uri="http://java.sun.com/jsp/jstl/fmt" %> -
데이터베이스 (sql): SQL기능 지원
<%@ taglib prefix="sql" uri="http://java.sun.com/jsp/jstl/sql" %> -
함수 (fn): 콜렉션 처리, String 처리
<%@ taglib prefix="fn" uri="http://java.sun.com/jsp/jstl/functions" %>
Core Tag 활용예시
(Spring container에서 관련 모듈이 제공된다.)
1. 변수지원
변수를 set(또는 remove)하는 예시:
<c:set var="num" value="${20}"/>
<%@ page contentType = "text/html; charset=UTF-8" %>
<%@ taglib prefix="c" uri="http://java.sun.com/jsp/jstl/core" %>
<c:set var="num1" value="${20}" />
<c:set var="num2"> 10.5 </c:set>
<c:set var="today" value="<%= new java.util.Date() %>" />
<html>
<head>
    <title>set 태그와 remove 태그</title>
</head>
<body>
변수 num1 = ${num1} <br>
변수 num2 = ${num2} <br>
num1 + num2 = ${num1 + num2} <br>
오늘은 ${today} 입니다.
<!--아래와 같이 변수를 삭제할수도있다-->
<c:remove var="num1" scope="page" />
</body>
</html>
map 객체를 set하는 예시:
<c:set var="map" value="<%=new java.util.HashMap() %>"/>
<%@ page language="java" contentType="text/html; charset=UTF-8"
    pageEncoding="UTF-8"%>
<%@taglib prefix="c" uri="http://java.sun.com/jsp/jstl/core"%>
<c:set var="map" value="<%=new java.util.HashMap() %>"/>
<!DOCTYPE html>
<html>
<head>
<meta charset="UTF-8">
<title>Insert title here</title>
</head>
<body>
<c:set target="${map}" property="favorite1" value="LAUV"/>
<c:set target="${map}" property="favorite2" value="ANNE MARIE"/>
<c:set target="${map}" property="favorite3" value="ED SHEERAN"/>
<!-- Hashmap의 key가 property, value가 value -->
<h2>
변수 map에 저장된 favorite1 값: ${ map.favorite1 }<br>
변수 map에 저장된 favorite2 값: ${ map.favorite2 }<br>
변수 map에 저장된 favorite3 값: ${ map.favorite3 }<br>
</h2>
</body>
</html>
2. 흐름제어
java에서 if문을 사용하는것과 비슷하게 조건true여부를 check하고 true일시, 값을 출력한다.
<c:if test="${param.name == 'tree'}">
<%@ page language="java" contentType="text/html; charset=UTF-8"
    pageEncoding="UTF-8"%>
<%@ taglib prefix="c" uri="http://java.sun.com/jsp/jstl/core" %>
<!DOCTYPE html>
<html>
<head>
<meta charset="UTF-8">
<title>Insert title here</title>
</head>
<body>
<c:if test="true">무조건 수행<br></c:if>
<!-- browser에 "http://localhost:9000/jstl_test/jstl/ifTag.jsp?name=tree" 주소입력 -->
<c:if test="${param.name == 'tree' }">
name 파라미터 값이 ${param.name }입니다.</c:if>
<!-- brwoser에 "http://localhost:9000/jstl_test/jstl/ifTag.jsp?name=tree&age=20" 입력.(age는 >18입력) -->
<c:if test="${18<param.age }">
당신의 나이는 18세 이상입니다.
</c:if>

</body>
</html>
java에서 if, else if, else를 사용하는것과 비슷하다.
<c:choose>, <c:when>, <c:otherwise>
<%@ page language="java" contentType="text/html; charset=UTF-8"
    pageEncoding="UTF-8"%>
<%@ taglib prefix="c" uri="http://java.sun.com/jsp/jstl/core" %>
<!DOCTYPE html>
<html>
<head>
<meta charset="UTF-8">
<title>Insert title here</title>
</head>
<body>
<!-- 구조 -->
<!-- c:when = if, else if -->
<!-- c:otherwise = else -->
<!-- ::note:: comments cannot be written inside the c:choose tag -->
<ul>
	<c:choose>
		<c:when test="${param.name=='tree'}">
			<li> 당신의 이름은 ${param.name }입니다.</li>
		</c:when>
		<c:when test="${param.age>18 }">
			<li> 당신의 나이는 18세 이상입니다.</li>
		</c:when>
		<c:otherwise>
			<li> 당신의 나이는 18세 이상입니다.</li>
		</c:otherwise>
	</c:choose>
</ul>
</body>
</html>
forEach tag
collection, map에 저장되있는 값에 순차적으로 접근
<%@ page language="java" contentType="text/html; charset=UTF-8"
    pageEncoding="UTF-8" import="java.util.*"%>
<%@ taglib prefix="c" uri="http://java.sun.com/jsp/jstl/core" %>
<%
	Map mapData = new HashMap();
	mapData.put("name","Lauv");
	mapData.put("today", new Date());
%>
<c:set var="intArray" value="<%=new int[]{20,30,40,50}%>"/>
<c:set var="map" value="<%=mapData %>"/>
<!DOCTYPE html>
<html>
<head>
<meta charset="UTF-8">
<title>Insert title here</title>
</head>
<body>
<h4>1부터 100까지 홀수의 합</h4>
<c:forEach var="i" begin="1" end="100" step="2">
	<c:set var="sum" value="${sum+i }"/>
</c:forEach>
결과 = ${sum }
<br>

<h4>구구단:4단</h4>
<ul>
<c:forEach var="i" begin="1" end="9">
	<li>4*${i } = ${4*i }</li>
</c:forEach>
</ul>
<br>

<h4> int형 배열</h4>
<c:forEach var="i" items="${intArray }" begin="2" end="4">
	[${i }]
</c:forEach>

<h4>Map</h4>
<c:forEach var="i" items="${map }">
	${i.key }=${i.value }<br>
</c:forEach>

</body>
</html>
forTokens Tag
<%@ page language="java" contentType="text/html; charset=UTF-8"
    pageEncoding="UTF-8"%>
<%@ taglib prefix="c" uri="http://java.sun.com/jsp/jstl/core" %>
<!DOCTYPE html>
<html>
<head>
<meta charset="UTF-8">
<title>Insert title here</title>
</head>
<body>
<!-- be careful with stating delims-->
콤마와 점을 구분자로 사용:<br>
<c:forTokens var="token"
             items="빨강색,주황색.노란색.초록색,파랑색,남색.보라색"
             delims=",.">
${token}
</c:forTokens>
</body>
</html>
html 출력:
콤마와 점을 구분자로 사용:
빨강색 주황색 노란색 초록색 파랑색 남색 보라색
3. url 처리
import Tag
url값을 주어서 해당 경로의 파일을 주입시킬 수 있다.
<%@ page language="java" contentType="text/html; charset=UTF-8" pageEncoding="UTF-8"%>
<%@ taglib prefix="c" uri="http://java.sun.com/jsp/jstl/core" %>
<c:import url="url.jsp" var="urlEx" />
<c:import url="http://localhost:9000/JSTL_test/jstl/header.jsp" var="head">
    <c:param name="id" value="tree" />
</c:import>
<c:import url="footer.jsp" var="foot" />
<!DOCTYPE html>
<html>
<head>
<meta charset="UTF-8">
<title>import와 url 태그</title>
</head>
<body>
${head}

${urlEx}

${foot}

</body>
</html>
각각 head, urlEx, foot변수로 import한 jsp를 body내 내용으로 호출하여 출력한다.
redirect Tag
servlet에서 사용한 send redirect와 동일한 페이지 이동방식이다. 그러나 이방식으로 페이지 이동 시, parameter를 가지고가려면 url에 ?로 지정해서 redirect하면 된다.
<%@ page language="java" contentType="text/html; charset=UTF-8"
    pageEncoding="UTF-8"%>
<%@ taglib prefix="c" uri="http://java.sun.com/jsp/jstl/core"%>
<c:redirect url="../index.jsp">
	<c:param name="name" value="잔나비"/>
</c:redirect>
<!-- redirectTag.jsp 이파일을 Run on Server 실행을 하면, index.jsp로 redirect한다.-->
<!-- 즉, http://localhost:9000/jstl_test/index.jsp?name=잔나비 이 주소로 바로 redirect된다.-->

<!DOCTYPE html>
<html>
<head>
<meta charset="UTF-8">
<title>Insert title here</title>
</head>
<body>

</body>
</html>
redirectTag에서 assign한 parameter를 가지고 아래 index.jsp로 바로 이동시킨다.
index.jsp:
<%@ page language="java" contentType="text/html; charset=UTF-8"
    pageEncoding="UTF-8"%>
<%@ taglib prefix="c" uri="http://java.sun.com/jsp/jstl/core"%>
<!DOCTYPE html>
<html>
<head>
<meta charset="UTF-8">
<title>Insert title here</title>
</head>
<body>
<h1>기본 페이지입니다.</h1>
	<c:choose>
		<c:when test="${empty param.name }">
			<p>인덱스 페이지 입니다.</p>
		</c:when>
		<c:otherwise>
			<p style="font-size: large; color: green;">${param.name }님 안녕하세요</p>
		</c:otherwise>
	</c:choose>
</body>
</html>
결과로 html 페이지에 아래와 같이 출력된다.
기본 페이지입니다.
잔나비님 안녕하세요
4. 기타 TAG들
out Tag
JspWriter에 데이터를 출력하기위한 태그이다.
< pre >~< /pre >는 공백과 엔터를 있는 그대로 출력하고,
escapeXml="true": < <, > >, & &, ' ', " " 출력한다.
catch Tag
<%@ page contentType = "text/html; charset=UTF-8" %>
<%@ taglib prefix="c" uri="http://java.sun.com/jsp/jstl/core" %>
<html>
<head><title>catch 태그</title></head>
<body>

<c:catch var="ex">
name 파라미터의 값 = <%= request.getParameter("name") %><br>
<%  if (request.getParameter("name").equals("test")) {  %>
${param.name}은 test 입니다.
<%  }   %>
</c:catch>
<p>
<c:if test="${ex != null}">
예외가 발생하였습니다:<br>
${ex}
</c:if>

</body>
</html>
국제화 Tag
숫자, 날짜를 formatting할 수 있다.
useNumberFormat.jsp:
<%@ page language="java" contentType="text/html; charset=UTF-8"
    pageEncoding="UTF-8"%>
<%@ taglib prefix="fmt" uri="http://java.sun.com/jsp/jstl/fmt" %>
<%@ taglib prefix="c" uri="http://java.sun.com/jsp/jstl/core" %>
<html>
<head><title>numberFormat 태그 사용</title></head>
<body>
<c:set var="price" value="10000" />
통화: <fmt:formatNumber value="${price}" type="currency" currencySymbol="₩" /> <br>
퍼센트: <fmt:formatNumber value="${price}" type="percent" groupingUsed="true" /> <br>
<fmt:formatNumber value="${price}" type="number" var="numberType" />
숫자: ${numberType} <br>
금액 출력: ₩ ${numberType}
</body>
</html>
출력 결과:
통화: ₩10,000
퍼센트: 1,000,000%
숫자: 10,000
금액 출력: ₩ 10,000
useDateFormat.jsp:
<%@ page language="java" contentType="text/html; charset=UTF-8"
    pageEncoding="UTF-8"%>
<%@ taglib prefix="fmt" uri="http://java.sun.com/jsp/jstl/fmt" %>
<%@ taglib prefix="c" uri="http://java.sun.com/jsp/jstl/core" %>
<html>
<head><title>numberFormat 태그 사용</title></head>
<body>

<c:set var="now" value="<%= new java.util.Date() %>" />
<fmt:formatDate value="${now}" type="date" dateStyle="full" /> <br>
<fmt:formatDate value="${now}" type="date" dateStyle="short" /> <br>
<fmt:formatDate value="${now}" type="time" /> <br>
<fmt:formatDate value="${now}" type="both" dateStyle="full" timeStyle="full" /> <br>
<fmt:formatDate value="${now}" pattern="z a h:mm" /> <br>

</body>
</html>
출력결과:
2021년 3월 31일 수요일
21. 3. 31.
오전 10:06:14
2021년 3월 31일 수요일 오전 10시 6분 14초 대한민국 표준시
KST 오전 10:06
useTimeZone.jsp:
<%@ page language="java" contentType="text/html; charset=UTF-8"
    pageEncoding="UTF-8"%>
<%@ taglib prefix="fmt" uri="http://java.sun.com/jsp/jstl/fmt" %>
<%@ taglib prefix="c" uri="http://java.sun.com/jsp/jstl/core" %>
<html>
<head><title>timeZone 태그 사용</title></head>
<body>
<c:set var="now" value="<%= new java.util.Date() %>" />

<fmt:formatDate value="${now}" type="both"
                dateStyle="full" timeStyle="full" />
<br>
<fmt:timeZone value="Hongkong">
<fmt:formatDate value="${now}" type="both"
                dateStyle="full" timeStyle="full" />
</fmt:timeZone>
</body>
</html>
출력 결과:
2021년 3월 31일 수요일 오전 10시 8분 16초 대한민국 표준시
2021년 3월 31일 수요일 오전 9시 8분 16초 홍콩 표준시
function Tag
useFunctions.jsp:
<%@ page language="java" contentType="text/html; charset=UTF-8"
    pageEncoding="UTF-8"%>
<%@ taglib prefix="c" uri="http://java.sun.com/jsp/jstl/core" %>
<%@ taglib prefix="fn" uri="http://java.sun.com/jsp/jstl/functions" %>
<!DOCTYPE html>
<html>
<head>
<meta charset="UTF-8">
<title>Insert title here</title>
</head>
<body>
<c:set var="str1" value="Functions <tag>를 사용합니다." ></c:set>
<c:set var="str2" value="사용"/>
<c:set var="tokens" value="1,2,3,4,5,6,7,8,9,10"/>

length(str1) = ${fn:length(str1) }<br>
toUpperCase(str2) = ${fn:toUpperCase(str1) }<br>
toLowerCase(str3) = ${fn:toLowerCase(str1) }<br>
substring(str1,3,6) = ${fn:substring(str1,3,6) }<br>
<!-- 3부터 6바로전까지 substring  -->
substringAfter(str1,str2)=${fn:substringAfter(str1,str2) }
substringBefore(str1, str2) = "${fn:substringBefore(str1, str2)}" <br>
trim(str1) = "${fn:trim(str1)}" <br>
replace(str1, src, dest) = "${fn:replace(str1, " ", "-")}" <br>
indexOf(str1, str2) = "${fn:indexOf(str1, str2)}" <br>
startsWith(str1, str2) = "${fn:startsWith(str1, 'Fun')}" <br>
endsWith(str1, str2) = "${fn:endsWith(str1, "합니다.")}" <br>
contains(str1, str2) = "${fn:contains(str1, str2)}" <br>
containsIgnoreCase(str1, str2) = "${fn:containsIgnoreCase(str1, str2)}" <br>

<c:set var="array" value="${fn:split(tokens, ',')}" />

join(array, "-") = "${fn:join(array, "-")}" <br>
escapeXml(str1) = "${fn:escapeXml(str1)}" <br>

</body>
</html>
</body>
</html>
출력 결과:
length(str1) = 23
toUpperCase(str2) = FUNCTIONS 를 사용합니다.
toLowerCase(str3) = functions 를 사용합니다.
substring(str1,3,6) = cti
substringAfter(str1,str2)=합니다. substringBefore(str1, str2) = "Functions 를 "
trim(str1) = "Functions 를 사용합니다."
replace(str1, src, dest) = "Functions-를-사용합니다."
indexOf(str1, str2) = "17"
startsWith(str1, str2) = "true"
endsWith(str1, str2) = "true"
contains(str1, str2) = "true"
containsIgnoreCase(str1, str2) = "true"
join(array, "-") = "1-2-3-4-5-6-7-8-9-10"
escapeXml(str1) = "Functions <tag>를 사용합니다."
References