
- 상속기능
* 객체지향 문법 사용하는 이유
1. Object 여러개 만들어 사용하기 위해
2.
* constructor (생성자)
새롭게 비슷한 object를 생성할 때 사용
constructor는 앞글자를 대문자로 사용하는 관습
instance = construcotr에서 생성되는 object가 가리키는 this
예시
function MakePD(name, price) {
    this.name = name;
    this.price = price;
    this.showPD = function() {
        console.log(`상품명: ${this.name}, 가격: ${this.price}원`);
    }
    this.vatPD = function() {
        console.log(`부가세: ${this.price*0.1}원`);
    }
}
const shirt = new MakePD('셔츠', 50000);
const pant = new MakePD('바지',60000);
shirt.showPD(); // result: 상품명: 셔츠, 가격: 50000원
shirt.vatPD(); // result: 부가세: 5000원
pant.showPD(); // result: 상품명: 바지, 가격: 60000원
pant.vatPD(); // result: 부가세: 6000원
* Prototype
prototype = 유전자
prototype에 값을 추가하면 모든 자식들은 물려받아 사용 가능
function Student(name,age) {
  	this.sayGender = function() {
      	console.log(`성별은 ${this.gender}입니다`)
    };
}
Student.prototype.gender = 'male'; // prototype에 추가한 것
const student1 = new Student('kim','15');
student1.sayGender(); // result: 성별은 male입니다
동작원리
예시: object에 자료 출력할 때
1. 변수에 자료가 있는지 확인 > 있다면 출력
2. 없다면 > 부모 유전자 확인(prototype) > 있다면 출력
3. 없다면 > 자료형의 prototype 확인(ex. Array.prototype, String.prototype) > 있다면 출력
4. 없다면 최상위 부모인 window 확인
특징
1. prototype은 constructor 내부에 생성
2. 부모 유전자(부모의 prototype)을 검사할 때 _ _ proto _ _ 사용
번외. Object.getPrototypeOf(child)도 동일하게 부모의 prototype 검사
function Student(){
  this.name = 'Kim';
  this.age = 15;
}
var student1 = new Student();
console.log(student1.__proto__); // result: 동일한 constructor를 가리킴
console.log(Student.prototype); // result: 동일한 constructor를 가리킴
3. _ _ proto _ _ 를 직접 등록하면 object끼리 상속기능을 구현가능
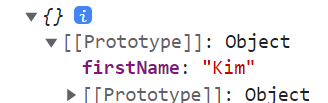
var parent = { firstName : 'Kim' };
var child = {};
child1.__proto__ = parent;
console.log(child.firstName); // result: 'kim'
4. 콘솔창에 prototype 정보들이 항상 출력
var parent = { firstName : 'Kim' };
var child = {};
child1.__proto__ = parent;
console.log(child);
* Object.create() = ES5 버전
Object.create(물려받을 부모 Object)
var parent = { name : 'kim', age : 50 };
var child = Object.create(parent); // result: prototype에 parent 상속, 직접 가지고 있는 값은 없음
child1.age = 20; // 직접적인 값 추가
var grandchild = Object.create(child); // child와 parent의 prototype 상속
* Class = ES6 버전
예시
class parent {
  constructor(name, age) {
    this.name = name;
    this.age = age;
  }
}
var child = new parent('kim',40);
Class 함수 추가
1. constructor에 직접 추가 = 자식요소가 직접 함수를 가짐
class parent {
  constructor() {
    this.sayHi() = function() {
      console.log('hello')
    }
  }
}
2. 부모.prototype에 추가 = 자식요소는 직접 함수를 갖지 않음, 부모의 유전자로 상속받음
기능수정, 관리 용이
class parent {
  constructor() {}
  sayHi() {
    console.log('hello')
  }
}
* extends
class 상속하여 복사
class grandparent {
  constructor(lastName) {
    this.fistName = 'Kim';
    this.lastName = lastName;
  }
  sayHi() {
    console.log('hello I`m grandfater');
  }
}
var grandfather = new grandparent('chunduck'); // result: {fistName: 'Kim', lastName: 'chunduck'}
// ----extends하여 calss 상속----
class parent extends grandparent {
  constructor(lastname) {
    super(lastname); // super() 1번
    this.age = 50;
  }
  sayHi() {
    console.log('hello i`m father');
    super.sayHi(); // super() 2번 // result: hello I`m grandfater
  }
}
var father = new parent('manduck'); // result: {fistName: 'Kim', lastName: 'manduck', age: 50}
extends를 사용한 class에 this를 넣기 위해서 super()를 사용하여야 한다.
super()
1. constructor 내부에서 사용할 때: 부모 class의 constructor를 의미
2. constructor 외부에서 사용할 때: 부모 class의 prototype을 의미

A fancy web like a rose