EventBridge Scheduler, SQS, Lambda, SES를 사용해 이메일 전송 기능을 구현해보자!
서비스 알아보기
EventBridge Scheduler
Amazon EventBridge Scheduler는 하나의 중앙 관리형 서비스에서 작업을 생성, 실행 및 관리할 수 있는 서버리스 스케줄러입니다.
설정한 일정에 맞춰 대상의 API를 호출한다.
- 일정은 특정한 시간으로, 혹은 반복적으로, 일정한 빈도로 설정 가능하다.
- 대상으로는 다양한 AWS 서비스의 API를 선택할 수 있다.
- 예를 들자면, 2025년 3월 1일 2시에 일정을 설정하고, 대상으로 Lambda Invoke API를 선택할 수 있다. 설정한 시간에 Lambda가 Invoke된다.
EventBridge의 규칙과 유사하지만 다른 서비스이다. 차이점은 다음과 같다.
- 이벤트 버스를 사용하지 않는다.
- 대상에게 파라미터를 전달할 수 있다.
- 일정이 아닌 다른 트리거를 사용할 수 없다.
- EventBridge 규칙은 AWS 서비스 등의 이벤트를 트리거로 사용 가능하다.
- EventBridge 규칙은 AWS 서비스 등의 이벤트를 트리거로 사용 가능하다.
SQS
Amazon Simple Queue Service(Amazon SQS)는 마이크로 서비스, 분산 시스템 및 서버리스 애플리케이션을 쉽게 분리하고 확장할 수 있게 해주는 완전관리형 메시지 대기열 서비스입니다.
완전 관리형 메시지 큐 서비스이다. 대기열 서비스로, 다음과 같은 과정으로 작동한다.
- 생산자가 대기열에 메시지를 담는다.
- 이 프로젝트에서 생산자는 EventBridge Scheduler가 된다.
- 소비자가 대기열에서 메시지를 폴링한다.
- 이 프로젝트에서 소비자는 Lambda가 된다.
- 소비자가 받은 메시지를 처리하고 삭제한다.
- Lambda가 SQS에서 메시지를 받은 후 메시지를 처리하고 삭제한다.
- Lambda가 SQS에서 메시지를 받은 후 메시지를 처리하고 삭제한다.
Lambda
Lambda는 서버를 프로비저닝하거나 관리하지 않고도 애플리케이션을 빌드하는 데 사용할 수 있는 컴퓨팅 서비스입니다.
서버리스 서비스로, 함수 단위로 구성되어 있으며 Lambda를 사용한다면 빠른 개발과 배포가 가능하다.
SES
Amazon Simple Email Service(Amazon SES)는 신뢰성 있고 확장 가능하며 비용 효율적인 이메일 서비스입니다.
완전 관리형 이메일 서비스이다.
작동
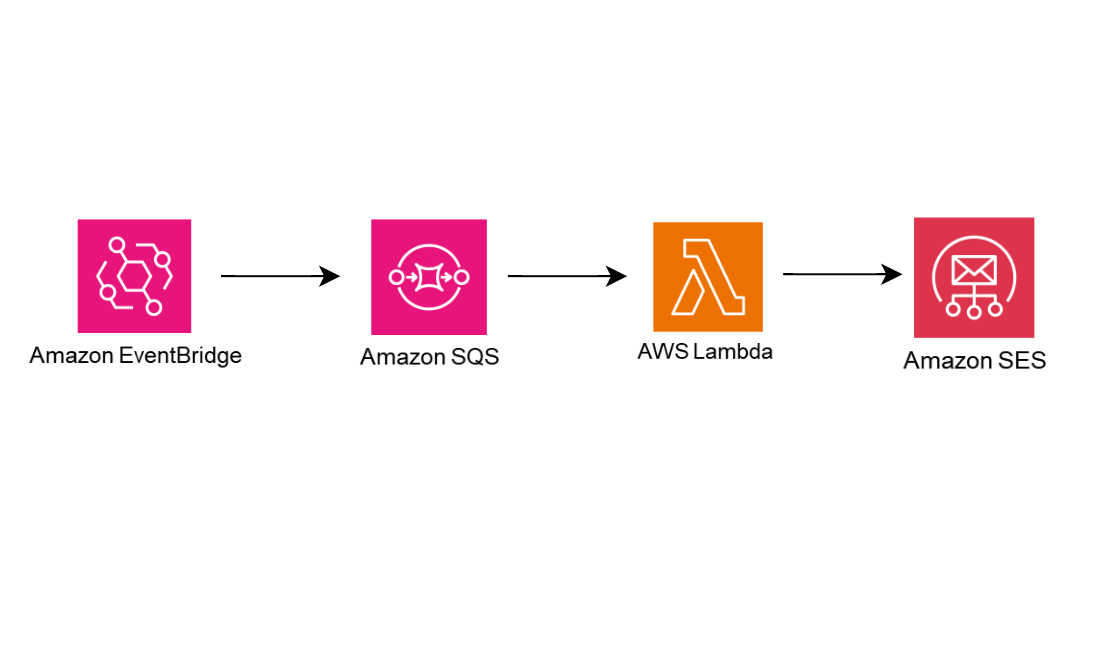
이 프로젝트에서 위 4개의 서비스는 다음과 같이 작동한다.
- Spring boot 서버에 특정 API 요청이 들어온다.
- API 요청이 EventBridge Scheduler SDK를 실행해 지금 즉시 실행되는 EventBridge Scheduler를 생성한다.
- EventBridge Scheduler는 SQS를 대상으로 메시지를 전달한다.
- SQS의 메시지가 Lambda 트리거를 발생시켜 Lambda 함수가 실행된다.
- 실행된 Lambda 함수에서 SES SDK를 실행해 SES에서 이메일을 전송한다.
이메일 전송 기능 구현하기
Spring Boot
build.Gradle
implementation(platform("software.amazon.awssdk:bom:2.29.39"))
implementation 'software.amazon.awssdk:scheduler'
implementation 'software.amazon.awssdk:netty-nio-client'
EventBridge Scheduler를 사용하기 위한 종속성을 추가한다.
EventBridge Scheduler Config
@Configuration
public class SchedulerConfig {

    @Bean
    public SchedulerAsyncClient getAsyncClient() {
        SdkAsyncHttpClient httpClient = NettyNioAsyncHttpClient.builder()
                .maxConcurrency(50)
                .connectionTimeout(Duration.ofSeconds(60))
                .readTimeout(Duration.ofSeconds(60))
                .writeTimeout(Duration.ofSeconds(60))
                .build();

        ClientOverrideConfiguration overrideConfig = ClientOverrideConfiguration.builder()
                .apiCallTimeout(Duration.ofMinutes(2))
                .apiCallAttemptTimeout(Duration.ofSeconds(90))
                .retryStrategy(RetryMode.STANDARD)
                .build();

        return SchedulerAsyncClient.builder()
                .region(Region.AP_NORTHEAST_2)
                .httpClient(httpClient)
                .overrideConfiguration(overrideConfig)
                .build();
    }
}
Config 클래스를 생성해 빈을 등록한다.
별도의 credential 관련 메소드를 사용하지 않고도 SDK를 실행가능하다. 이는 aws configure profile 설정하기를 참고하자.
EventBridge Scheduler SDK
EventBridge Scheduler SDK에서 CreateSchedule을 참고해 코드를 작성했다.
createScheduleAsync 메소드에서 각각의 파라미터가 의미하는 내용은 다음과 같다.
- name: 스케줄 이름
- scheduleExpression: 스케줄 시간
- Cron, Rate 표현식을 참고해 작성한다.
- scheduleGroupName: 스케줄 그룹
- default로 지정해서 사용했다.
- targetArn: 스케줄 대상의 ARN
- SQS로 전달할 예정이기 때문에, 해당 SQS의 ARN을 작성했다.
- roleArn: 스케줄 실행에 사용할 ARN
- input: EventBridge Scheduler가 대상에게 전달할 파라미터 값
- deleteAfterCompletion: 스케줄러 실행 후 삭제 여부
- useFlexibleTimeWindow: 유연한 기간 옵션
이를 변형해 다음과 같은 코드를 작성했다.
@Service
@RequiredArgsConstructor
public class ScheduleService {

    private final SchedulerAsyncClient schedulerAsyncClient;

    @Value("${custom.scheduler.targetArn}")
    private String targetArn;

    @Value("${custom.scheduler.roleArn}")
    private String roleArn;

    public CompletableFuture<Boolean> createScheduleAsync() {

        Target target = Target.builder()
                .arn(targetArn)
                .roleArn(roleArn)
                .input("hello, world!")
                .build();

        CreateScheduleRequest request = CreateScheduleRequest.builder()
                .name(UUID.randomUUID().toString()) // UUID를 사용해 랜덤한 이름 생성
                .scheduleExpression("at(" + calculateScheduleTime(10, ChronoUnit.SECONDS) + ")") // 현재 시간으로부터 10초 뒤
                .groupName("default") // default 그룹에 포함
                .target(target)
                .actionAfterCompletion(ActionAfterCompletion.DELETE) // 일정 실행 후 바로 삭제
                .flexibleTimeWindow(FlexibleTimeWindow.builder()
                        .mode(FlexibleTimeWindowMode.OFF)
                        .build()) // 유연한 기간 옵션 사용 안함
                .build();

        return schedulerAsyncClient.createSchedule(request)
                .thenApply(response -> {
                    //logger.info("Successfully created schedule {} in schedule group {}, The ARN is {} ", name, scheduleGroupName, response.scheduleArn());
                    return true;
                })
                .whenComplete((result, ex) -> {
                    if (ex != null) {
                        if (ex instanceof ConflictException) {
                            //logger.error("A conflict exception occurred while creating the schedule: {}", ex.getMessage());
                            throw new CompletionException("A conflict exception occurred while creating the schedule: " + ex.getMessage(), ex);
                        } else {
                            throw new CompletionException("Error creating schedule: " + ex.getMessage(), ex);
                        }
                    }
                });
    }

    // 요청 시간 생성 메소드
    private String calculateScheduleTime(long amount, ChronoUnit unit) {
        return Instant.now().plus(amount, unit)
                .atZone(java.time.ZoneId.of("UTC"))
                .format(DateTimeFormatter.ofPattern("yyyy-MM-dd'T'HH:mm:ss"));
    }
}
ARN은 하드코딩하고 싶지 않아 application.yml에 추가한 후 @Value 어노테이션을 통해 값을 가져오도록 설정했다.
custom:
  scheduler:
    targetArn: [타겟 ARN]
    roleArn: [역할 ARN]
Controller
@RestController
@RequiredArgsConstructor
public class ScheduleController {

    private final ScheduleService scheduleService;

    @GetMapping("/schedule")
    public ResponseEntity<?> createSchedule() throws ExecutionException, InterruptedException {
        Boolean result = scheduleService.createScheduleAsync().get();
        return ResponseEntity.ok().body(result);
    }
}
컨트롤러는 테스트 용도로 아주 간단하게 구성했다.
인프라 구축
IAM 역할
-
EventBridge Scheduler의 roleArn에 사용할 역할을 생성한다.
- 먼저 아래의 권한을 갖는 정책을 생성한다.
- Scheduler →
CreateSchedule,DeleteSchedule - SQS →
SendMessage
- Scheduler →
- 엔터티 유형은 사용자 지정 신뢰 정책을 선택한다. AWS 서비스 유형에 Scheduler가 없기 때문이다.
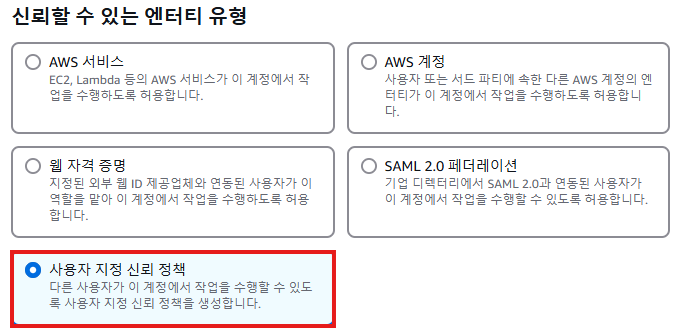
- 아래의 사용자 지정 신뢰 정책에 이 코드를 붙여 넣는다.
{ "Version": "2012-10-17", "Statement": [ { "Effect": "Allow", "Principal": { "Service": "scheduler.amazonaws.com" }, "Action": "sts:AssumeRole" } ] } - 위에서 만든 정책을 추가한다.
- 역할 생성 후 역할의 ARN을 EventBridge Scheduler SDK의 roleArn에 추가한다.
- 먼저 아래의 권한을 갖는 정책을 생성한다.
-
Lambda가 사용할 역할을 생성한다.
- 먼저 아래의 권한을 갖는 정책을 생성한다.
- SQS →
ReceiveMessage,DeleteMessage,GetQueueAttributes - SES →
SendEmail
- SQS →
- 사용 사례에 Lambda를 선택한다.
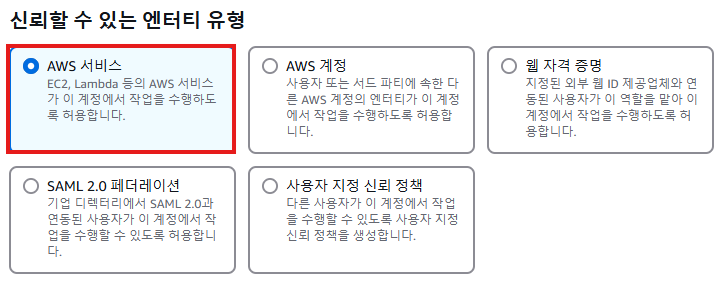
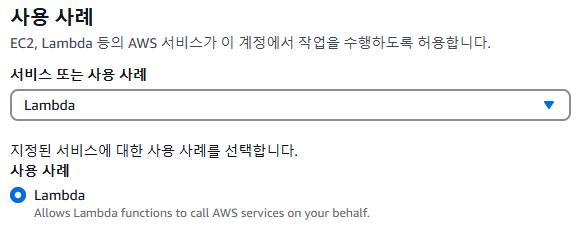
- 위에서 만든 정책과
AWSLambdaBasicExecutionRole정책을 추가한다.
- 먼저 아래의 권한을 갖는 정책을 생성한다.
SQS 설정
- 표준 대기열로 SQS를 생성한다. 그 외 별도의 설정을 따로 하지는 않았다.
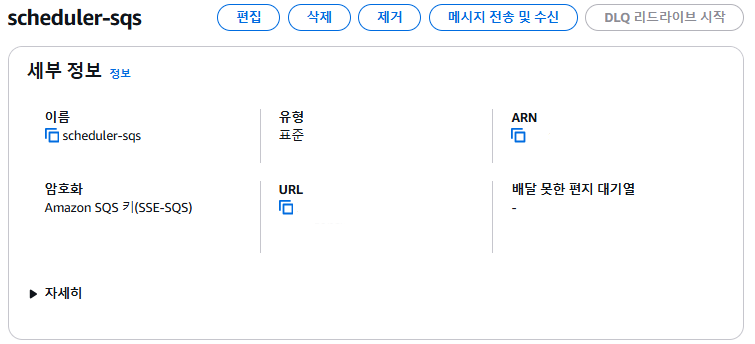
- SQS 생성 후 ARN을 EventBridge Scheduler SDK의 targetArn에 추가한다.
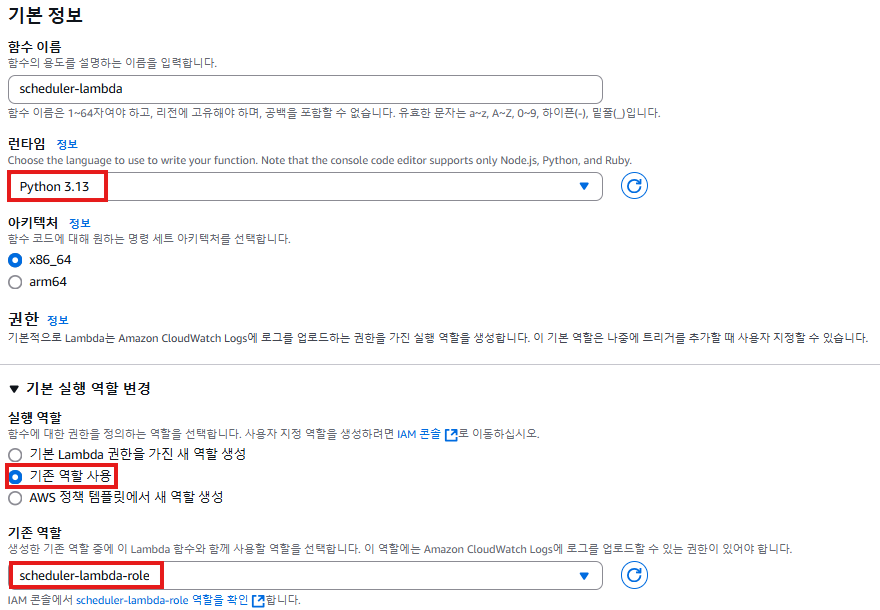
Lambda 설정
-
lambda 함수를 생성한다.
- 언어는 python을 사용한다.
- 위에서 생성한 역할을 적용한다.
-
lambda 코드는 다음과 같이 작동한다.
- SQS에서 받은 메시지 내용을 추출해 전송할 이메일의 HTML 내에 포함한다.
- SES로 이메일을 전송한다.
import boto3
import logging
import json
from botocore.exceptions import ClientError

ses_client = boto3.client("ses", region_name='ap-northeast-2')

logger = logging.getLogger()
logger.setLevel(logging.INFO)

class SesMailSender:
    def __init__(self, ses_client):
        self.ses_client = ses_client

    def send_email(self, source, destination, subject, html):
        send_args = {
            "Source": source,
            "Destination": destination,
            "Message": {
                "Subject": {"Data": subject},
                "Body": {"Html": {"Data": html}},
            },
        }
        try:
            response = self.ses_client.send_email(**send_args)
            message_id = response["MessageId"]
            logger.info("Sent mail %s from %s to %s.", message_id, source, destination)
        except ClientError:
            logger.exception("Couldn't send mail from %s to %s.", source, destination)
            raise
        else:
            return message_id


def lambda_handler(event, context):
    mail_sender = SesMailSender(ses_client)

    source = "보내는 이메일"
    destination = {"ToAddresses": ["받는 이메일"]}

    try:
        # SQS 메시지 내용 추출
        sqs_message = event["Records"][0]["body"]

        logger.info("Extracted SQS message: %s", sqs_message)

        # HTML 내용에 SQS 메시지 추가
        subject = "Test Email with SQS Message"
        html = f"<html><body><h1>Received SQS Message:</h1><p>{sqs_message}</p></body></html>"

        # 이메일 전송
        message_id = mail_sender.send_email(source, destination, subject, html)
        return {"statusCode": 200, "body": f"Email sent successfully with message ID: {message_id}"}
    except Exception as e: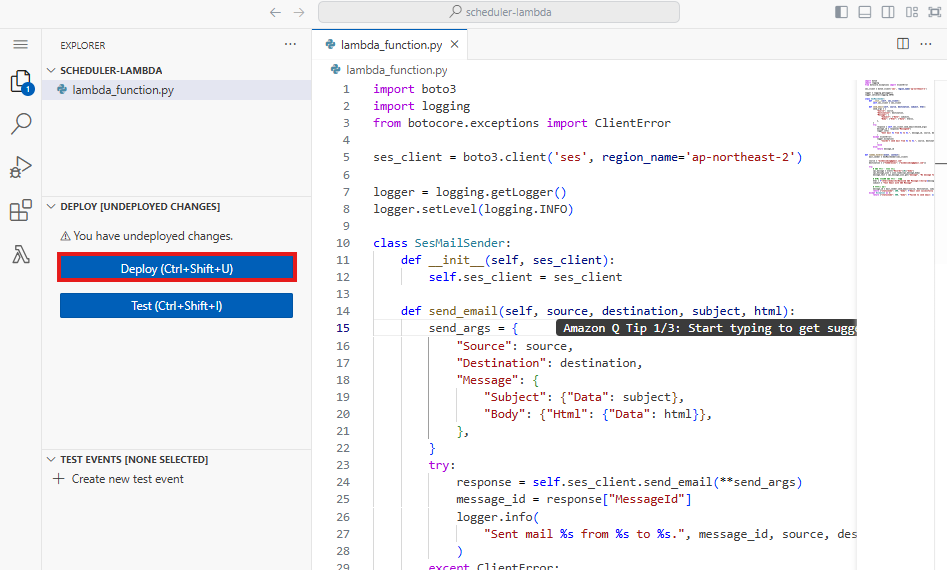
return {"statusCode": 500, "body": f"Failed to send email: {str(e)}"}- lambda 함수는 수정한 후 Deploy를 눌러 변경 사항을 저장한다.
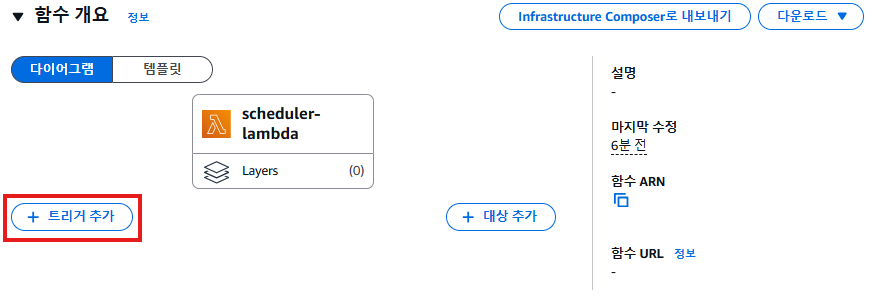
- 트리거 추가에서 위에서 생성한 SQS를 추가한다.
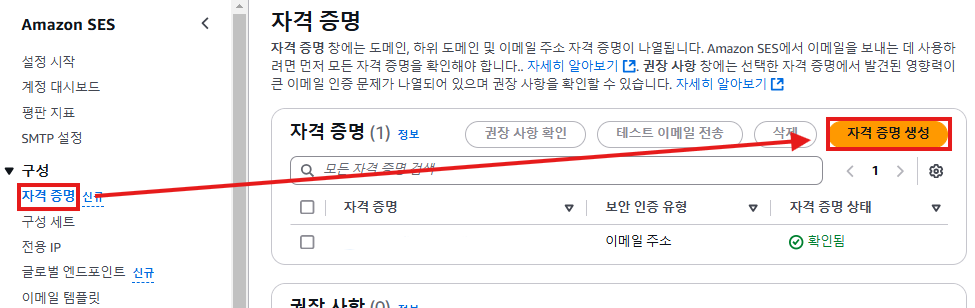
SES 설정
- SES는 샌드박스 상태이기 때문에, AWS SES 콘솔에서 인증된 이메일에만 이메일을 송신, 수신 가능하다.
- 자격 증명에서 자격 증명을 생성해 이메일을 송수신할 이메일을 등록한다.
- 자격 증명에서 자격 증명을 생성해 이메일을 송수신할 이메일을 등록한다.
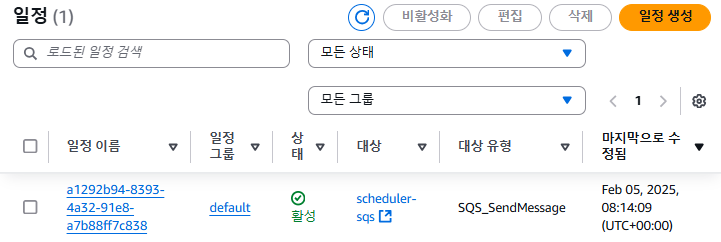
실행
해당 SDK를 실행하는 API를 요청하면, 아래와 같이 Scheduler에 일정이 생성된다.
SQS로 전달된 후 일정은 삭제된다.
CloudWatch를 확인해보면, Lambda 로그 그룹이 생성된 것을 확인할 수 있다.
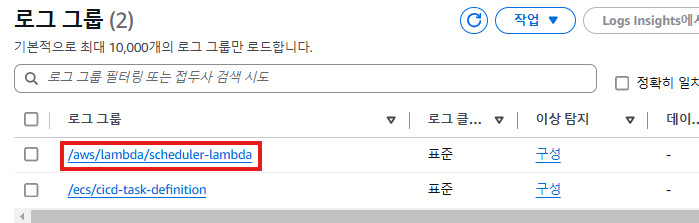
이후 이메일함에 메일이 도착한 것을 확인할 수 있다.