
TIL (Today I Learned)
오늘 공부한거!

- (또) 둥글게 처리하기...이번엔
CircleImageView곁들인...
또! 이번엔 원형의 이미지뷰를 XML에 만들어두지 않고
코틀린 코드에서 만들어 넣는 방법을 R아Bo자!
ImageView를 확장한 라이브러리이기 때문에 기본 사용법은 ImageView와 동일
BUT 이런라이브러리를 쓸땐 뭐 부터 혀야되느냐

- [ build.gradle (모듈)]의 dependencies에 implementation 하기!!!<<
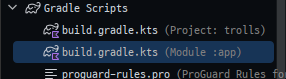
- [ build.gradle (모듈)]의 dependencies에 implementation 하기!!!<<
dependencies { //CircleImageView 라이브러리 추가
    implementation("com.github.bumptech.glide:glide:4.12.0")
}
그 다음은!!!
-
2. 리스트만큼 반복해서 LinearLayout안에 CircleImageView 넣기 코드
    private fun convertDpToPixel(dp: Int): Int { //dp를 sp로 바꿔주는 함수
      return TypedValue.applyDimension(
          TypedValue.COMPLEX_UNIT_DIP, dp.toFloat(), this.resources.displayMetrics
      ).toInt()
  }
     //CircleImageView를 넣을 레이아웃
     var mypage_lo_mylikes = this.findViewById<LinearLayout>(R.id.mypage_lo_mylikes)
	  //다음 페이지에 넘겨줄 데이터
      var likeIntent = Intent(this, MyPageActivity::class.java)
      for (like in likes) {//likes 만큼 반복
          val circleView = CircleImageView(this)//this = 현재 액티비티
          circleView.setImageResource(like.checkedUser.profileImageResource) // drawable id = 그림추가
          circleView.setOnClickListener{
              likeIntent.putExtra("LIKE", like.checkedUser)
              likeIntent.putExtra("TARGET","like")
              startActivity(likeIntent)
          }
          val circleView_params = LinearLayout.LayoutParams(
              convertDpToPixel(90), // width
              convertDpToPixel(90) // height
          )//가로세로 깍을 DP?
          circleView_params.marginEnd = convertDpToPixel(15)
          circleView.layoutParams = circleView_params
          mypage_lo_mylikes.addView(circleView)// CircleImageView 하나 넣기
      }
Today Review
마크다운 이미지 정렬 + 크기 조절해서 넣기
<p aligin ="center">
<img src="이미지 링크" width="200" hgight="10%" />
</p>

공장자동화와 웹 개발을 핥아 먹다 앱 개발로 전향한 개발자의 키보드의 낡은 키캡⛑️