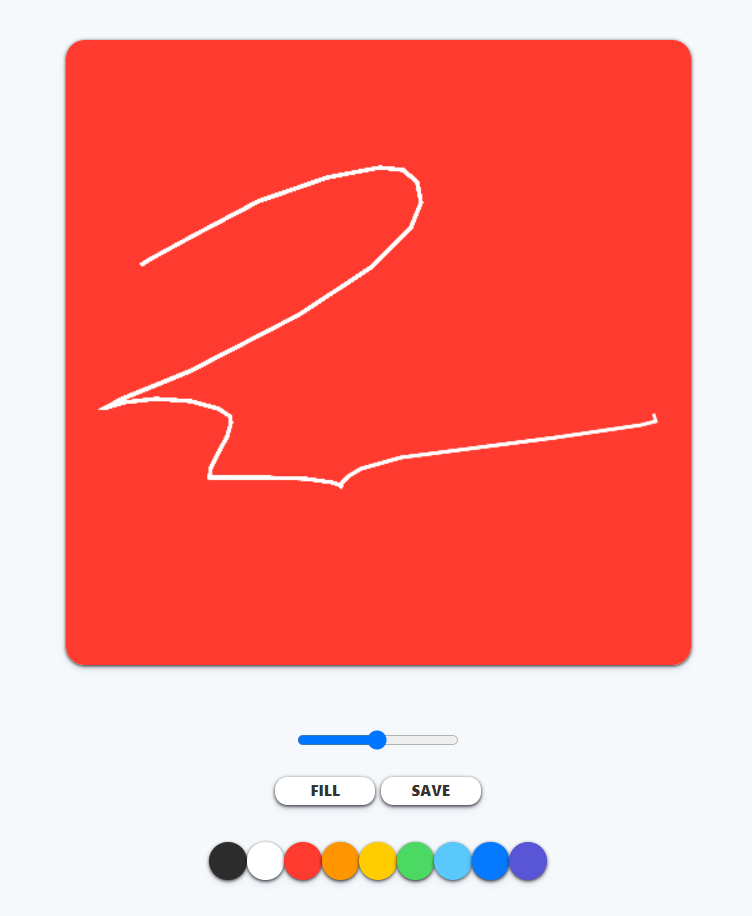
Javascript로 그림판 만들기
구현하는 기능과 배우는 컨셉
✔ HTML5 Canvas
✔ Mouse Events
✔ 2D Context
✔ 2D Painting
✔ Brush Size
✔ Image Saving
JS Code
const canvas = document.querySelector('#jsCanvas');
const ctx = canvas.getContext('2d');
const colors = document.querySelectorAll('.jsColor');
const range = document.querySelector('#jsRange');
const mode = document.querySelector('#jsMode');
const saveBtn = document.querySelector('#jsSave');
const INITAL_COLOR = '#2c2c2c';
const CANVAS_SIZE = 500;
canvas.width = CANVAS_SIZE;
canvas.height = CANVAS_SIZE;
ctx.fillStyle = 'white';
ctx.fillRect(0, 0, CANVAS_SIZE, CANVAS_SIZE);
ctx.strokeStyle = INITAL_COLOR;
ctx.fillStyle = INITAL_COLOR;
ctx.lineWidth = 2.5;
let painting = false;
let filling = false;
◾ querySelecotr를 이용해 html tag를 불러온다.
◾ 자주 사용하는 값들은 상수화시킨다.
◾ getContext( ' 2d ' )는 해당 요소의 context를 2d로 랜더링시켜준다.
◾ fillRect()메서드는 왼쪽 상단 모서리를 (X, Y)에 배치하고 너비와 높이의 크기를 지정합니다
◾ lineWidth는 선의 굵기를 나타냄
◾ fillStyle, lineWidth defalut 값 설정
◾ painting / filling default false 설정 (변환시키기위해)
function startPainting() { painting = true; } function stopPainting() { painting = false; } function onMouseMove(event) { const x = event.offsetX; const y = event.offsetY; if (!painting) { ctx.beginPath(); ctx.moveTo(x, y); } else { ctx.lineTo(x, y); ctx.stroke(); } } function handleColorClick(event) { const color = event.target.style.backgroundColor; ctx.strokeStyle = color; ctx.fillStyle = color; } function handdleRangeChange(event) { const size = event.target.value; ctx.lineWidth = size; } function handdleModeClick() { console.log(filling); if (filling === true) { filling = false; mode.innerText = 'Fill'; } else { filling = true; mode.innerText = 'Paint'; } } function handleCanvasClick() { if (filling) { ctx.fillRect(0, 0, CANVAS_SIZE, CANVAS_SIZE); } } function handleCM(event) { event.preventDefault(); } function handleSaveClick(event) { const image = canvas.toDataURL(); const link = document.createElement('a'); link.href = image; link.download = 'PaintJS[🐱]'; link.click(); }
◾ startPainting() 호출시 painting = true로 설정하여, mousedown시 false에서 true로 변환시킴
◾ stopPainting() 호출시 painting = false로 설정하여, mouseup true에서 false 변환시킴
◾ onMouseMove 호출시 canvas안에 있는 offsetX , Y를 기준으로
painting이 false가 아니면 ( true이면) ctx.beginPath(),
ctx.moveTo(x, y) 실행
◾ beginPath()는 path를 그리기시작함, 하지만 끝이 정해지지않아 실질적으로 그려려지진않음
◾ moveTo(x,y)로 시작하여 lineTo(x,y)로 끝나는 지점을 설정
◾ stroke()호출하여 이어주는 경로를 그린다.
◾ handleColorClick 함수는 원하는 색상을 click시 fill, strokeStyle을 원하는 색상으로 변경시켜준다.
◾ storkeStyle => path color
◾ handleCM 함수는 우클릭시 저장항목을 삭제하는 기본값설정
◾ handleSaveClick 함수는 click시 다운로드 하여 저장하게해줌
◾ toDataURL()는 데이터 url를 가져올수있다.
◾ 가져온 url를 a tag안에 href에 할당한다.
◾ downloadsURL 및 기타 선택적 기본 설정이 주어지면 파일을 다운로드한다.
if (canvas) {
  canvas.addEventListener('mousemove', onMouseMove);
  canvas.addEventListener('mousedown', startPainting);
  canvas.addEventListener('mouseup', stopPainting);
  canvas.addEventListener('mouseleave', stopPainting);
  canvas.addEventListener('click', handleCanvasClick);
  canvas.addEventListener('contextmenu', handleCM);
}
/* array.from => object to array */
Array.from(colors).forEach((color) =>
  color.addEventListener('click', handleColorClick)
);
if (range) {
  range.addEventListener('input', handdleRangeChange);
}
if (mode) {
  mode.addEventListener('click', handdleModeClick);
}
if (saveBtn) {
  saveBtn.addEventListener('click', handleSaveClick);
}
◾ canvas를 불러와서 event 이용
◾ Array.from(object) => object를 array로 변환시켜줌
◾ range는 input event에서 사용