설정
ncloud 설정 변경하기
도메인 파기
도메인을 판다.
무료인 내도메인 한국을 이용해도 된다.
도메인 등록
Classic / Global DNS / Record 로 이동하여 도메인 등록을 진행한다.
ACG 규칙 변경
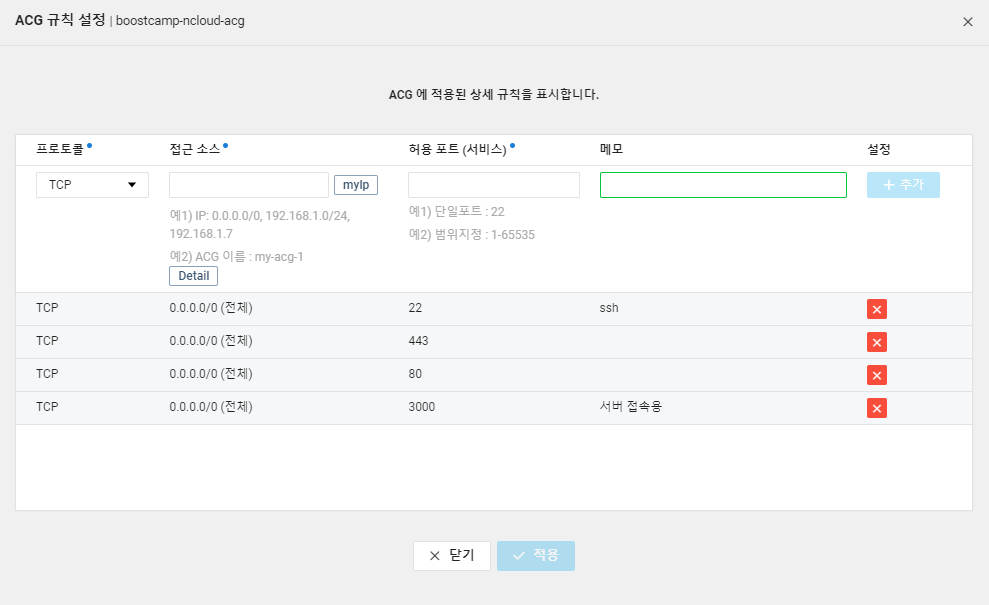
443(https), 80(http)를 연다.
nginx 설치
sudo apt-get update
sudo apt-get install nginx
nginx를 설치한다.
방화벽 설정
ufw allow 'Nginx Full'
ufw allow 'OpenSSH'
ufw enable
ufw status
방화벽을 설정한다.
letsencrypt 설치
sudo apt install snapd
sudo snap install core
sudo snap install --classic certbot
sudo ln -s /snap/bin/certbot /usr/bin/certbot //설치 확인
sudo certbot --nginx -d www.example.com
Congratulations! You have successfully enabled ~ 가 뜨면 성공한 것이다. 혹시나 www를 적지 않으면 오류가 날 수 있다.
아래 위치에 인증서가 저장되어 있는 것을 확인할 수 있다.
/etc/letsencrypt/live/www.example.com/fullchain.pem
/etc/letsencrypt/live/www.example.com/privkey.pem
v1
nginx 설정
vi /etc/nginx/sites-enabled/default위 파일에서 location과 ssl_certificate, ssl_certificate_key를 확인한다.
server {
        server_name nodebird.com www.nodebird.com;
        return 301 https://nodebird.com$request_uri;
}
server {
        listen 443 ssl;
        server_name nodebird.com;
        ssl_certificate /etc/letsencrypt/live/nodebird.com-0002/fullchain.pem; # managed by Certbot
        ssl_certificate_key /etc/letsencrypt/live/nodebird.com-0002/privkey.pem; # managed by Certbot
        include /etc/letsencrypt/options-ssl-nginx.conf; # managed by Certbot
        ssl_dhparam /etc/letsencrypt/ssl-dhparams.pem;
        location / {
                proxy_set_header Host $host;
                proxy_set_header X-Forwarded-For $proxy_add_x_forwarded_for;
                proxy_set_header X-Forwarded-Proto $scheme;
                proxy_set_header Upgrade $http_upgrade;
                proxy_set_header Connection "upgrade";
                proxy_set_header X-Real-IP $remote_addr;
                proxy_pass http://127.0.0.1:3000;
                proxy_redirect off;
       }
}
제로초님 글을 참고하였다.
certbot이 작성한건 그대로 두고 location부분을 수정한다.
proxy_pass를 3000으로 바꾸고 헤더를 설정해주자.
proxy_set_header 부분은 Header들을 넘겨주는 코드인데 X-Forwarded-Proto는 https를 할 때 필요하고, Upgrade나 Connection은 웹소켓을 할 때 필요하다고 한다.
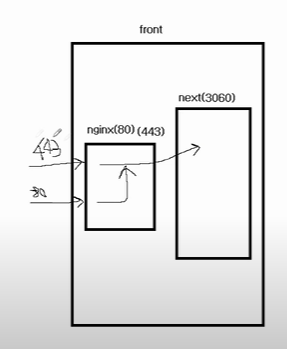
제로초님 강의에서 그림이 나오는데 이해하는데 도움이 될 것이다..!
이제 80번으로 요청이 오면 443번으로 리다이렉트되고, 443번으로 요청이 오면 http://127.0.0.1:3000으로 요청을 전달하게 된다.
nginx 재시작
sudo service nginx restart
sudo systemctl restart nginx
sudo /etc/init.d/nginx restart

// 상태
sudo service nginx status
sudo systemctl status nginx
기존 코드 변경
기존에 구현하였던 api, socket코드들을 https로 변경해준다.
https에서 http로 요청을 하면 mixed content 오류가 발생한다.
다시 git clone을 받고 pm2를 재시작한다.
끝!😀

하고 보니까 별거 아닌 것 같은데 힘들었다..😂
v2 react, api 따로
vi /etc/nginx/sites-enabled/default/root/WEB29-BoostTeams/frontend/build
location / {
      root /플젝경로/build;
      index index.html index.htm;
      try_files $uri $uri/ /index.html;
}- root는 build된 파일들이 있는 경로
- index는 기본(default) 인덱스 페이지를 설정
- try_files 설정은 일종의 nginx 자체의 라우팅 설정
500 Internal Server Error 뜨는경우 참고
location /api {
	proxy_set_header Host $host;
    	proxy_set_header X-Forwarded-For $proxy_add_x_forwarded_for;
        proxy_set_header X-Forwarded-Proto $scheme;
        proxy_set_header Upgrade $http_upgrade;
        proxy_set_header Connection "upgrade";
        proxy_set_header X-Real-IP $remote_addr;
        proxy_pass http://127.0.0.1:4000;
        proxy_redirect off;
}- back 4000번일경우
후 과정은 위와 같다.
참고자료
certbot.eff.org
nginx와 let's encrypt로 SSL 적용하기(+자동 갱신)
NGINX + HTTPS 적용하기 유튜브
Nginx로 React를 배포하는 방법
React를 Nginx웹 서버에 배포하기

sites-enabled 수정해주셨네요 ㅎㅎ 감사합니다 :)