
이 글은 책 「스프링 부트와 AWS로 혼자 구현하는 웹 서비스」를 공부하고 정리한 글입니다.

오늘은 네이버 로그인 기능을 추가해보자.
[ 네이버 로그인 ]
1. 네이버 API 등록
🔗 네이버 오픈 API 접속

- 회원이름, 이메일, 프로필 사진은 필수이다.
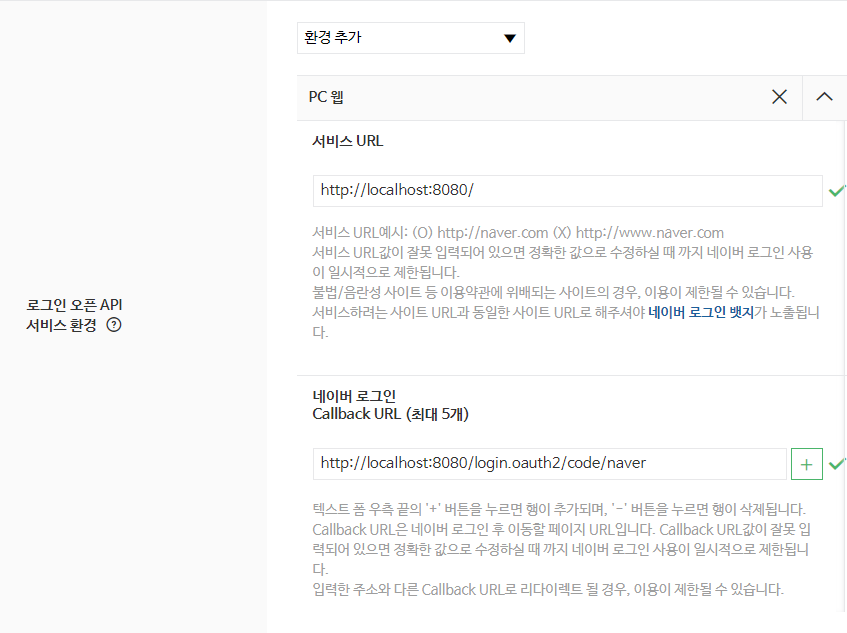
서비스 URL은 필수이다.Callback URL은 구글에서 등록한 리디렉션 URL과 같은 역할을 한다.
등록을 완료하면 ClientID와 ClientSecret이 생성된다.
✅ application-oauth.properties
Client ID와 Client Secret 정보를 등록해야 한다. 네이버에서는 스프링 시큐리티를 공식 지원하지 않기 때문에 그동안 CommonOAuth2Provider에서 해주던 값들도 전부 수동으로 입력해야 한다.
# registration
spring.security.oauth2.client.registration.naver.client-id=클라이언트ID
spring.security.oauth2.client.registration.naver.client-secret=클라이언트SECRET
spring.security.oauth2.client.registration.naver.redirect-uri={baseUrl}/{action}/oauth2/code/{registrationId}
spring.security.oauth2.client.registration.naver.authorization-grant-type=authorization_code
spring.security.oauth2.client.registration.naver.scope=name,email,profile_image
spring.security.oauth2.client.registration.naver.client-name=Naver

# provider
spring.security.oauth2.client.provider.naver.authorization-uri=https://nid.naver.com/oauth2.0/authorize
spring.security.oauth2.client.provider.naver.token-uri=https://nid.naver.com/oauth2.0/token
spring.security.oauth2.client.provider.naver.user-info-uri=https://openapi.naver.com/v1/nid/me
spring.security.oauth2.client.provider.naver.user-name-attribute=responseuser_name_attribute=response- 기준이 되는
user_name의 이름을 네이버에서는response로 해야 한다. - 네이버 회원 조회 시 반환되는 JSON 형태 떄문이다.
- 스프링 시큐리티에서는 하위 필드를 명시할 수 없는데, 네이버 응답값 최상위 필드는 resultCode, message, response이다.
- 이러한 이유로 스프링 시큐리티에서 인식 가능한 필드는 3개 중에 골라야 하며, 본문에서 담고 있는
response를user_name으로 지정하고 이후 자바 코드로 response의 id를 user_name으로 지정하겠다.
- 기준이 되는
2. 스프링 시큐리티 설정 등록
✅ OAuthAttributes
public class OAuthAttributes {

    ...
    public static OAuthAttributes of(String registrationId, String userNameAttributeName, Map<String, Object> attributes) {
        if ("naver".equals(registrationId)) {
            return ofNaver("id", attributes);
        }

        return ofGoogle(userNameAttributeName, attributes);
    }

	...
    private static OAuthAttributes ofNaver(String userNameAttributeName, Map<String, Object> attributes) {
        Map<String, Object> response = (Map<String, Object>) attributes.get("response");

        return OAuthAttributes.builder()
                .name((String) response.get("name"))
                .email((String) response.get("email"))
                .picture((String) response.get("profile_image"))
                .attributes(response)
                .nameAttributeKey(userNameAttributeName)
                .build();
    }
	...
}
네이버인지 판단하는 코드와 네이버 생성자를 추가하면 된다.
✅ index.mustache
{{^userName}}
	<a href="/oauth2/authorization/google" class="btn btn-success active" role="button">Google Login</a>
	<a href="/oauth2/authorization/naver" class="btn btn-success active" role="button">Naver Login</a>
{{/userName}}/oauth2/authorization/naver- 네이버 로그인 URL은
application-oauth.properties에 등록한redirect-uri값에 맞춰 자동으로 등록된다. /oauth2/authorization/까지는 고정이고 마지막 Path만 각 소셜 로그인 코드를 사용하면 된다.
- 네이버 로그인 URL은
✅ 실행 화면

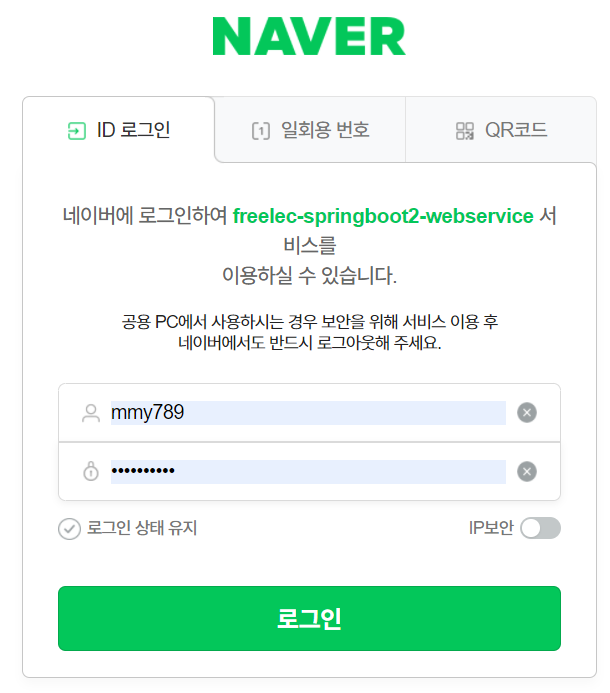
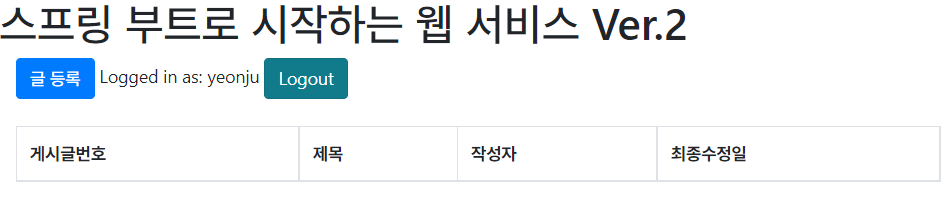

로그인 성공!
[ 기존 테스트에 시큐리티 적용하기 ]
기존 테스트에 시큐리티 적용으로 문제가 되는 부분을 해결해보자.
기존에는 바로 API를 호출할 수 있어서 테스트 코드 역시 바로 API를 호출하도록 구성했다. 하지만 시큐리티 옵션이 활성화되면 인증된 사용자만 API를 호출할 수 있다. 기존의 API 테스트 코드들이 모두 인증에 대한 권한을 받지 못하였으므로, 테스트 코드마다 인증한 사용자가 호출한 것처럼 작동하도록 수정해야 한다.
문제점을 하나씩 살펴보면서 해결해보자.
문제점 1 | CustomOAuth2UserSerivce를 찾을 수 없다.
첫 번째 실패 테스트인 hello가_리턴된다의 메시지를 보면 다음과 같은 에러를 발견할 수 있다.
No qualifying bean of type 'com.yeonju.book.config.auth.CustomOAuth2UserService'CustomOAuth2UserService를 생성하는데 필요한 소셜 로그인 관련 설정값들이 없기 때문에 발생한다.
application-oauth.properties에 분명히 설정값들을 추가했는데 이러한 이유가 발생한 이유는 src/main과 src/test은 본인만의 환경 구성을 가지기 때문이다. test가 자동으로 가져오는 옵션의 범위는 application.properties까지로, application-oauth.properties는 test에 없다고 가져오는 파일이 아니라서 에러가 발생하는 것이다.
✅ 해결 방법
이 문제를 해결하기 위해 테스트 환경을 위한 application.properties를 만들어 보자. 실제로 구글 연동까지 진행할 것은 아니므로 가짜 설정값을 등록한다.
src/test/resources/application.properteis
spring.jpa.show_sql=true
spring.h2.console.enabled=true
spring.session.store-type=jdbc

# Test OAuth
spring.security.oauth2.client.registration.google.client-id=test
spring.security.oauth2.client.registration.google.client-secret=test
spring.security.oauth2.client.registration.google.scope=profile,email
문제점 2 | 302 Status Code
두 번째 실패 테스트인 Post_등록()을 보면 응답의 결과로 200을 기대했는데 302(리다이렉션 응답)이 와서 실패한 것을 알 수 있다. 이는 스프링 시큐리티 설정 때문에 인증되지 않은 사용자의 요청은 이동시키기 때문이다. 그래서 이런 API 요청은 임의로 인증된 사용자를 추가하여 API만 테스트해 볼 수 있도록 하여 해결해보자.
✅ 해결 방법
스프링 시큐리티 테스트를 위한 여러 도구를 지원하는 spring-security-test를 build.gradle에 추가한다.
testImplementation 'org.springframework.security:spring-security-test:5.6.2'PostApiControllerTest의 2개의 테스트 메소드에 임의 사용자 인증을 추가해보자.
@Test
@WithMockUser(roles = "USER")
public void Post_등록() throws Exception {

...

@Test
@WithMockUser(roles = "USER")
public void Post_수정() throws Exception {@WithMockUser(roles="USER")- 인증된 모의(가짜) 사용자를 만들어서 사용한다.
roles에 권한을 추가할 수 있다.- 이 어노테이션으로 인해
ROLE_UER권한을 가진 사용자가 API를 요청하는 것과 동일한 효과를 가지게 된다.
이렇게 해도 @WithMockUser가 MockMvc에서만 작동하기 때문에 아직 테스트가 작동하지 않는다. 현재 PostApiController는 MockMvc를 전혀 사용하지 않는다. @SpringBootTest에서 MockMvc를 사용하도록 코드를 다음과 같이 변경해보자.
public class PostApiControllerTest {
	...
    @Autowired
    private WebApplicationContext context;

    private MockMvc mvc;

    @Before
    public void setup() {
        mvc = MockMvcBuilders
                .webAppContextSetup(context)
                .apply(springSecurity())
                .build();
    }

    ...

    @Test
    @WithMockUser(roles = "USER")
    public void Post_등록() throws Exception {
		...

        //when
        mvc.perform(post(url)
                        .contentType(MediaType.APPLICATION_JSON_UTF8)
                        .content(new ObjectMapper().writeValueAsString(requestDto)))
                .andExpect(status().isOk());

        //then
        List<Post> all = postRepository.findAll();
        assertThat(all.get(0).getTitle()).isEqualTo(title);
        assertThat(all.get(0).getContent()).isEqualTo(content);
    }

    @Test
    @WithMockUser(roles = "USER")
    public void Post_수정() throws Exception {
		...

        //when
        mvc.perform(put(url)
                        .contentType(MediaType.APPLICATION_JSON_UTF8)
                        .content(new ObjectMapper().writeValueAsString(requestDto)))
                .andExpect(status().isOk());

        //then
        List<Post> all = postRepository.findAll();
        assertThat(all.get(0).getTitle()).isEqualTo(expectedTitle);
        assertThat(all.get(0).getContent()).isEqualTo(expectedContent);
    }
}@Before- 매번 테스트가 시작되기 전에 MockMvc 인스턴스를 생성한다.
mvc.perform- 생성된 MockMvc를 통해 API를 테스트 한다.
- 본문 영역은 문자열로 표현하기 위해
ObjectMapper를 통해 문자열 JSON으로 변환한다.
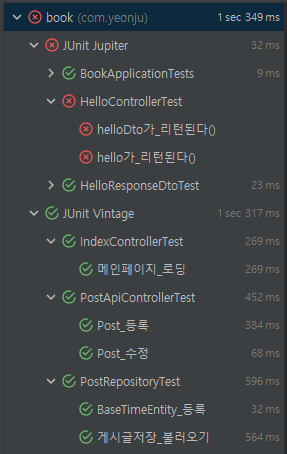
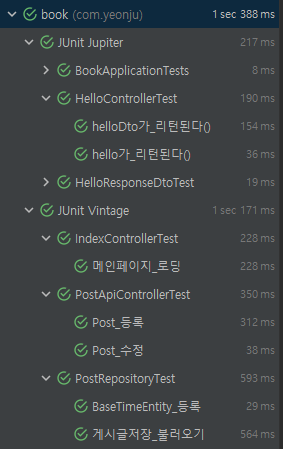
전체 테스트를 다시 수행해보면 다음과 같이 Post 테스트가 정상적으로 수행되는 것을 볼 수 있다.
문제점 3 | @WebMvcTest에서 CustomOAuth2UserService를 찾을 수 없음
@WebMvcTest는 CustomOAuth2UserService를 스캔하지 않기 때문에 발생하는 에러이다. **스캔 대상에서 SecurityConfig`를 제거하여 해결해보자.
HelloControllerTest.java
@RunWith(SpringRunner.class)
@WebMvcTest(controllers = HelloController.class,
        excludeFilters = {
                @ComponentScan.Filter(type = FilterType.ASSIGNABLE_TYPE, classes = SecurityConfig.class)
        })
class HelloControllerTest { ... } @WithMockUser를 사용해서 가짜로 인증된 사용자도 생성하자.
@WithMockUser(roles = "USER")
@Test
public void hello가_리턴된다() throws Exception { ... }

@WithMockUser(roles = "USER")
@Test
public void helloDto가_리턴된다() throws Exception { ... }
테스트를 돌려보면 추가 에러가 발생한다.
java.lang.IllegalArgumentException: At least one JPA metamodel must be present!@EnableJpaAuditing 때문에 발생한다. @EnableJpaAuditing을 사용하기 위해서는 최소 하나의 @Entity 클래스가 필요한데 @WebMvcTest이다 보니 당연히 없다. 그래서 @EnableJpaAuditing과 @SpringBootApplucation 둘을 분리해보자.
Application.java
//@EnableJpaAuditing 제거
@SpringBootApplication
public class BookApplication { ... }
config/JpaConfig.java
@Configuration
@EnableJpaAuditing	//JPA Auditing 활성화
public class JpaConfig {
}
이제 전체 테스트를 수행하면 모든 테스트가 통과한다!
다음 시간에는 AWS를 이용하여 서비스를 배포하고 운영하는 과정을 진행해보자!