
목적
- 어플리케이션 설계 방식에 대한 사고 방법
- react 설계 목적 달성
- component 설계 목적 달성
1. 목업으로 시작하기
배경
JSON API와 목업을 디자이너로부터 하기와 같이 전달이 되었다.
Mock up

JSON data
[
  {category: "Sporting Goods", price: "$49.99", stocked: true, name: "Football"},
  {category: "Sporting Goods", price: "$9.99", stocked: true, name: "Baseball"},
  {category: "Sporting Goods", price: "$29.99", stocked: false, name: "Basketball"},
  {category: "Electronics", price: "$99.99", stocked: true, name: "iPod Touch"},
  {category: "Electronics", price: "$399.99", stocked: false, name: "iPhone 5"},
  {category: "Electronics", price: "$199.99", stocked: true, name: "Nexus 7"}
];
1단계: UI를 component 계층 구조로 나누기
1. component naming
- UI에 따른 component 이름을 정한다. 이름을 정할 때는 디자이너와 같이 협업을 하여 정해도 된다. 디자이너와 협업을 위해 싱크를 맞춰야될 경우에 유용하다.
2. component 분리
- 단일 책임 원칙을 통해 새로운 함수나 객체를 만들 때처럼 component를 작성한다.
- component는 한가지 일만 한다. 단일 component가 커진다면 보다 작은 단일 component로 분리를 해야된다.
- UI와 data modal은 같은 information architecture 를 가지는 경향이 있기 때문에 각 component가 데이터 모델의 한 조각을 나타내도록 분리를 한다.
예시) Mock up component 분리
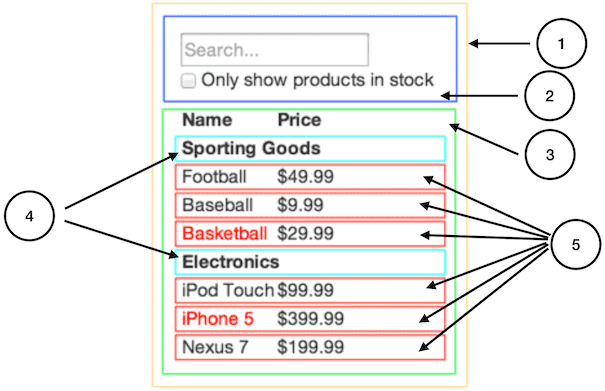
1) FilterableProductTable: Mock up 전체
2) SearchBar: user input component
3) ProductTable: user input을 기반한 data collection filtering component
4) ProductCategoryRow: category header component
5) ProductRow: product row component
Name 과 Price 를 포함한 table header component 가 없는 이유는 데이터를 위한 독립된 component를 생성할지 생성하지 않을지는 선택이기 때문이다. ProductTable의 책임인 data collection이 렌더링의 일부이기 때문에 ProductTable을 따로 작성한다. 만약 헤더가 복잡해진다면 ProductTableHeader component는 만들어서 분리하는 것이 더 합리적이다.
예시) Mock up component 계층 분리
|-- FilterableProductTable
	|-- SearchBar
    |-- ProductTable
    	|-- ProductCategoryRow
        |-- ProductRow
2단계: React로 정적인 버전 만들기
example code
class ProductCategoryRow extends React.Component {
  render() {
    const category = this.props.category;
    return (
      <tr>
        <th colSpan="2">
          {category}
        </th>
      </tr>
    );
  }
}

class ProductRow extends React.Component {
  render() {
    const product = this.props.product;
    const name = product.stocked ?
      product.name :
      <span style={{color: 'red'}}>
        {product.name}
      </span>;

    return (
      <tr>
        <td>{name}</td>
        <td>{product.price}</td>
      </tr>
    );
  }
}

class ProductTable extends React.Component {
  render() {
    const rows = [];
    let lastCategory = null;

    this.props.products.forEach((product) => {
      if (product.category !== lastCategory) {
        rows.push(
          <ProductCategoryRow
            category={product.category}
            key={product.category} />
        );
      }
      rows.push(
        <ProductRow
          product={product}
          key={product.name} />
      );
      lastCategory = product.category;
    });

    return (
      <table>
        <thead>
          <tr>
            <th>Name</th>
            <th>Price</th>
          </tr>
        </thead>
        <tbody>{rows}</tbody>
      </table>
    );
  }
}

class SearchBar extends React.Component {
  render() {
    return (
      <form>
        <input type="text" placeholder="Search..." />
        <p>
          <input type="checkbox" />
          {' '}
          Only show products in stock
        </p>
      </form>
    );
  }
}

class FilterableProductTable extends React.Component {
  render() {
    return (
      <div>
        <SearchBar />
        <ProductTable products={this.props.products} />
      </div>
    );
  }
}


const PRODUCTS = [
  {category: 'Sporting Goods', price: '$49.99', stocked: true, name: 'Football'},
  {category: 'Sporting Goods', price: '$9.99', stocked: true, name: 'Baseball'},
  {category: 'Sporting Goods', price: '$29.99', stocked: false, name: 'Basketball'},
  {category: 'Electronics', price: '$99.99', stocked: true, name: 'iPod Touch'},
  {category: 'Electronics', price: '$399.99', stocked: false, name: 'iPhone 5'},
  {category: 'Electronics', price: '$199.99', stocked: true, name: 'Nexus 7'}
];

const root = ReactDOM.createRoot(document.getElementById('container'));
root.render(<FilterableProductTable products={PRODUCTS} />);
구현 과정을 나눈다.
데이터 모델을 가지고 UI를 렌더링은 되지만 아무 동작도 없는 버전을 만들어본다.
-> 과정을 나누는 것은 좋으나 정적 버전을 만드는 것은 생각은 적게 필요하지만 타이핑이 많으며, 상호작용을 만드는 것은 많은 생각을 필요로 하지만 타이밍은 적게 필요로 하기 때문이다.
1. 재사용 component 작성
- 재사용 가능한 component를 작성하고, props를 이용해 데이터를 전달해준다.
- 정적인 react는 props에
state가 없다.state는 오직 시간이 지남에 따라 데이터가 바뀌는 것에 사용한다.
2. 하양식 개발 VS 상향식 개발
- 간단한 프로젝트에서는 하향식 개발이 효율적이지만 프로젝트가 커지면 상향식으로 개발하는 것이 테스트를 작성하면서 개발하기 편하다.
3. 단방향 데이터 흐름
- 재사용 가능한 component들의 라이브러리를 가지게 된다면 최상단 component는 props로 data 모델을 받는다. 데이터 모델이 변경되면
root.render()를 다시 호출하여 UI가 업데이트가 된다. 업데이트된 UI는 어디에서 변경해야 되는지 알 수 있다. - React의 단방향 데이터 흐름은 모든 것을 모듈화하고 빠르게 만들어 준다.
- 단방향 데이터 흐름은 부모로부터 자식으로만 데이터 전달이 가능한 방식이다. Virtual DOM과 궁합이 잘 맞는 장점이 있다.
props VS state
3단계: UI state에 대한 최소한의 표현 찾아내기
UI를 상호작용하게 만들기 위해선 데이터 모델을 변경할 수 있는 방법이 필요하다. 이것을 위해 state를 이용한다.
1. 중복배제 원칙을 지킨다.
- 어플리케이션에서 필요로 하는 변경 가능한 state의 최소 집합을 생각한다. 최소한의 state를 찾고 이를 통해 나머지 모든 것들이 필요에 따라 계산이 되도록 만든다.
- ex) TODO 리스트라면, TODO 아이템을 저장하는 배열만 유지하고 TODO 아이템의 개수를 표현하는 state를 별도로 만들지 않는다. TODO 갯수를 렌더링 해야된다면 TODO 아이템 배열의 길이를 가져오면 된다.
2. state 구분
- 부모로부터 props가 전달이 되어야 된다.
- 시간이 지남에 따라 변해야 된다.
- component안의 다른 state나 props를 가지고 계산이 가능해야된다.
4단계: state 위치 설정
어떤 component가 state를 변경하거나 소유할지 설정을 해야된다.
state 위치 설정 방법
- state를 기반으로 렌더링하는 모든 component를 찾는다.
- common owner component를 찾는다.
- common 혹은 상위에 있는 component가 state를 가져야된다.
- state를 소유할 적절한 component를 찾지 못했다면 state를 소유하는 component를 하나 만들어 common owner component의 상위 계층에 추가한다.
5단계: 역방향 데이터 흐름 추가
하단 컴포넌트에서 state를 업데이트 할 수 있어야된다.
양방향 데이터 방인딩을 사용할 수 있다. 타이핑을 많지만, 데이터 흐름을 명시적으로 보이게 만들어 프로그램의 흐름을 알 수 있다.
user의 action을 통해 상태가 변해야된다. callback 함수를 props로 넘겨 state가 업데이트되어야 할 때마다 호출이 되도록 한다. onChange 나 onClick 과 같은 이벤트를 사용해서 이벤트에 대한 알림을 받을 수 있다. 전달된 callback은 setState()를 호출하고 앱이 업데이트가 될 것이다.