이제 필요한 모든 보안 구성이 완료되었습니다. 드디어 로그인 및 가입 API를 작성할 시간입니다.
그러나 API를 정의하기 전에 API가 사용할 요청 및 응답 페이로드(DTO)를 정의해야 합니다.
먼저 이러한 페이로드를 정의해보겠습니다.
payload혹은 dto 패키지를 생성해주세요 ~ 그안에 작성하겠습니다.
페이로드 요청(DTO)클래스
1. 로그인 요청 (Request)
package com.example.polls.payload;

import javax.validation.constraints.NotBlank;

public class LoginRequest {
    @NotBlank
    private String usernameOrEmail;

    @NotBlank
    private String password;

    public String getUsernameOrEmail() {
        return usernameOrEmail;
    }

    public void setUsernameOrEmail(String usernameOrEmail) {
        this.usernameOrEmail = usernameOrEmail;
    }

    public String getPassword() {
        return password;
    }

    public void setPassword(String password) {
        this.password = password;
    }
}
2. 회원 가입 요청 (Request)
import javax.validation.constraints.*;

@Getter @Setter
public class SignUpRequest {
    @NotBlank
    @Size(min = 4, max = 40)
    private String name;

    @NotBlank
    @Size(min = 3, max = 15)
    private String username;

    @NotBlank
    @Size(max = 40)
    @Email
    private String email;

    @NotBlank
    @Size(min = 6, max = 20)
    private String password;


}
응답 Response payload(DTO)
1. JWT인증 응답(Response)
@Getter @Setter
public class JwtAuthenticationResponse {
    private String accessToken;
    private String tokenType = "Bearer";

    public JwtAuthenticationResponse(String accessToken) {
        this.accessToken = accessToken;
    }
}
2. APIResponse
@Getter @Setter
public class ApiResponse {
    private Boolean success;
    private String message;

    public ApiResponse(Boolean success, String message) {
        this.success = success;
        this.message = message;
    }
}
예외 작성
요청이 유효하지 않거나 예상치 못한 상황이 발생하면 API에서 예외가 발생합니다.
또한 다양한 유형의 예외에 대해 다른 HTTP 상태 코드로 응답하기를 원할 것입니다.
exception이라는 패키지 생성하여 exception을 작성하자
1. AppException
import org.springframework.http.HttpStatus;
import org.springframework.web.bind.annotation.ResponseStatus;

@ResponseStatus(HttpStatus.INTERNAL_SERVER_ERROR)
public class AppException extends RuntimeException {
    public AppException(String message) {
        super(message);
    }

    public AppException(String message, Throwable cause) {
        super(message, cause);
    }
}
2. BadRequestException
import org.springframework.http.HttpStatus;
import org.springframework.web.bind.annotation.ResponseStatus;

@ResponseStatus(HttpStatus.BAD_REQUEST)
public class BadRequestException extends RuntimeException {

    public BadRequestException(String message) {
        super(message);
    }

    public BadRequestException(String message, Throwable cause) {
        super(message, cause);
    }
}
3. ResourceNotFoundException
import org.springframework.http.HttpStatus;
import org.springframework.web.bind.annotation.ResponseStatus;

@ResponseStatus(HttpStatus.NOT_FOUND)
public class ResourceNotFoundException extends RuntimeException {
    private String resourceName;
    private String fieldName;
    private Object fieldValue;

    public ResourceNotFoundException( String resourceName, String fieldName, Object fieldValue) {
        super(String.format("%s not found with %s : '%s'", resourceName, fieldName, fieldValue));
        this.resourceName = resourceName;
        this.fieldName = fieldName;
        this.fieldValue = fieldValue;
    }

    public String getResourceName() {
        return resourceName;
    }

    public String getFieldName() {
        return fieldName;
    }

    public Object getFieldValue() {
        return fieldValue;
    }
}
로그인 컨트롤러
마지막으로 다음은 AuthController로그인 및 가입을 위한 API를 포함하는 전체 코드입니다.
controller라는 패키지 생성해줘서 그안에 작성해주세요~
import com.example.polls.exception.AppException;
import com.example.polls.model.Role;
import com.example.polls.model.RoleName;
import com.example.polls.model.User;
import com.example.polls.payload.ApiResponse;
import com.example.polls.payload.JwtAuthenticationResponse;
import com.example.polls.payload.LoginRequest;
import com.example.polls.payload.SignUpRequest;
import com.example.polls.repository.RoleRepository;
import com.example.polls.repository.UserRepository;
import com.example.polls.security.JwtTokenProvider;
import org.springframework.beans.factory.annotation.Autowired;
import org.springframework.http.HttpStatus;
import org.springframework.http.ResponseEntity;
import org.springframework.security.authentication.AuthenticationManager;
import org.springframework.security.authentication.UsernamePasswordAuthenticationToken;
import org.springframework.security.core.Authentication;
import org.springframework.security.core.context.SecurityContextHolder;
import org.springframework.security.crypto.password.PasswordEncoder;
import org.springframework.web.bind.annotation.PostMapping;
import org.springframework.web.bind.annotation.RequestBody;
import org.springframework.web.bind.annotation.RequestMapping;
import org.springframework.web.bind.annotation.RestController;
import org.springframework.web.servlet.support.ServletUriComponentsBuilder;

import javax.validation.Valid;
import java.net.URI;
import java.util.Collections;

@RestController
@RequestMapping("/api/auth")
public class AuthController {

    @Autowired
    AuthenticationManager authenticationManager;

    @Autowired
    UserRepository userRepository;

    @Autowired
    RoleRepository roleRepository;

    @Autowired
    PasswordEncoder passwordEncoder;

    @Autowired
    JwtTokenProvider tokenProvider;

    @PostMapping("/signin")
    public ResponseEntity<?> authenticateUser(@Valid @RequestBody LoginRequest loginRequest) {

        Authentication authentication = authenticationManager.authenticate(
                new UsernamePasswordAuthenticationToken(
                        loginRequest.getUsernameOrEmail(),
                        loginRequest.getPassword()
                )
        );

        SecurityContextHolder.getContext().setAuthentication(authentication);

        String jwt = tokenProvider.generateToken(authentication);
        return ResponseEntity.ok(new JwtAuthenticationResponse(jwt));
    }

    @PostMapping("/signup")
    public ResponseEntity<?> registerUser(@Valid @RequestBody SignUpRequest signUpRequest) {
        if(userRepository.existsByUsername(signUpRequest.getUsername())) {
            return new ResponseEntity(new ApiResponse(false, "Username is already taken!"),
                    HttpStatus.BAD_REQUEST);
        }

        if(userRepository.existsByEmail(signUpRequest.getEmail())) {
            return new ResponseEntity(new ApiResponse(false, "Email Address already in use!"),
                    HttpStatus.BAD_REQUEST);
        }

        // Creating user's account
        User user = new User(signUpRequest.getName(), signUpRequest.getUsername(),
                signUpRequest.getEmail(), signUpRequest.getPassword());

        user.setPassword(passwordEncoder.encode(user.getPassword()));

        Role userRole = roleRepository.findByName(RoleName.ROLE_USER)
                .orElseThrow(() -> new AppException("User Role not set."));

        user.setRoles(Collections.singleton(userRole));

        User result = userRepository.save(user);

        URI location = ServletUriComponentsBuilder
                .fromCurrentContextPath().path("/api/users/{username}")
                .buildAndExpand(result.getUsername()).toUri();

        return ResponseEntity.created(location).body(new ApiResponse(true, "User registered successfully"));
    }
}
CORS 활성화
자체 개발 서버에서 실행될 반응 클라이언트에서 API에 액세스할 것입니다. CORS 허용하려면 패키지 config를 생성하고 그 내부에 WebMvcConfig 클래스를 만듭니다.
import org.springframework.beans.factory.annotation.Value;
import org.springframework.context.annotation.Configuration;
import org.springframework.web.servlet.config.annotation.CorsRegistry;
import org.springframework.web.servlet.config.annotation.WebMvcConfigurer;

@Configuration
public class WebMvcConfig implements WebMvcConfigurer {

    private final long MAX_AGE_SECS = 3600;

    @Value("${app.cors.allowedOrigins}")
    private String[] allowedOrigins;

    @Override
    public void addCorsMappings(CorsRegistry registry) {
        registry.addMapping("/**")
                .allowedOrigins(allowedOrigins)
                .allowedMethods("HEAD", "OPTIONS", "GET", "POST", "PUT", "PATCH", "DELETE")
                .maxAge(MAX_AGE_SECS);
    }
}
CORS 구성에 허용된 원본은 application.properties파일에서 가져옵니다. 속성 파일에 다음을 추가하십시오 -
# Comma separated list of allowed origins
app:
  cors:
    allowedOrigins: http://localhost:3000
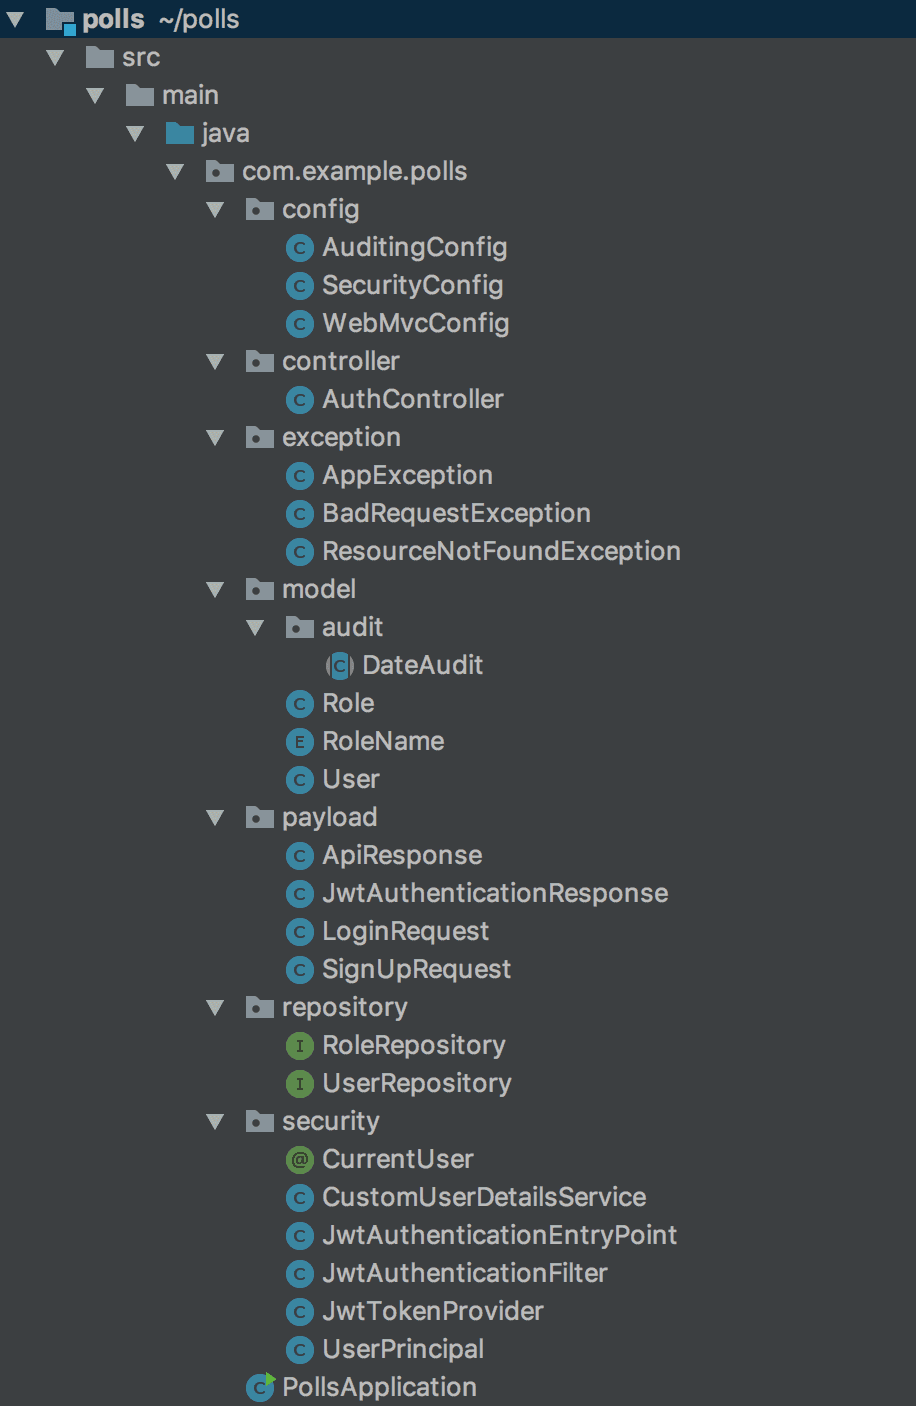
다 작성하면 대강

이런 구조가 나온다.
나는 저 DateAudit 파일을 BaseEntity로 작성
그런다음 프로젝트를 런 한 후
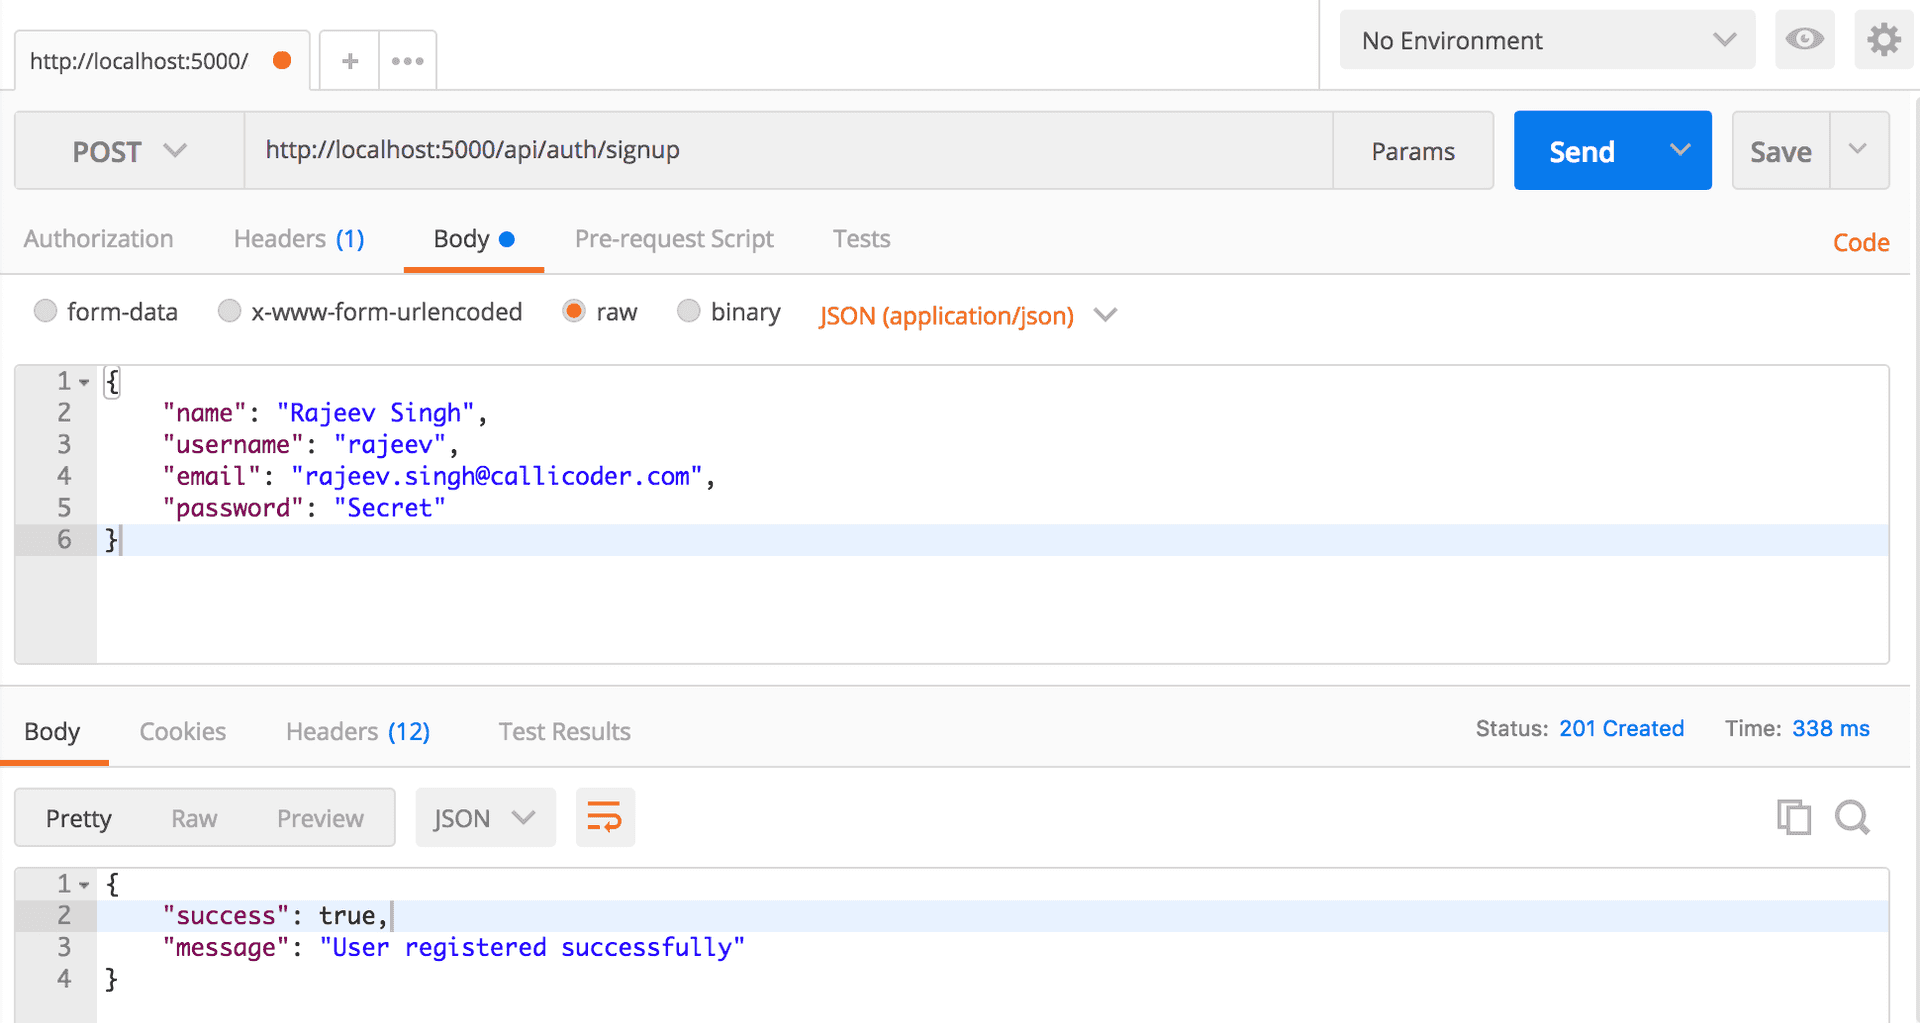
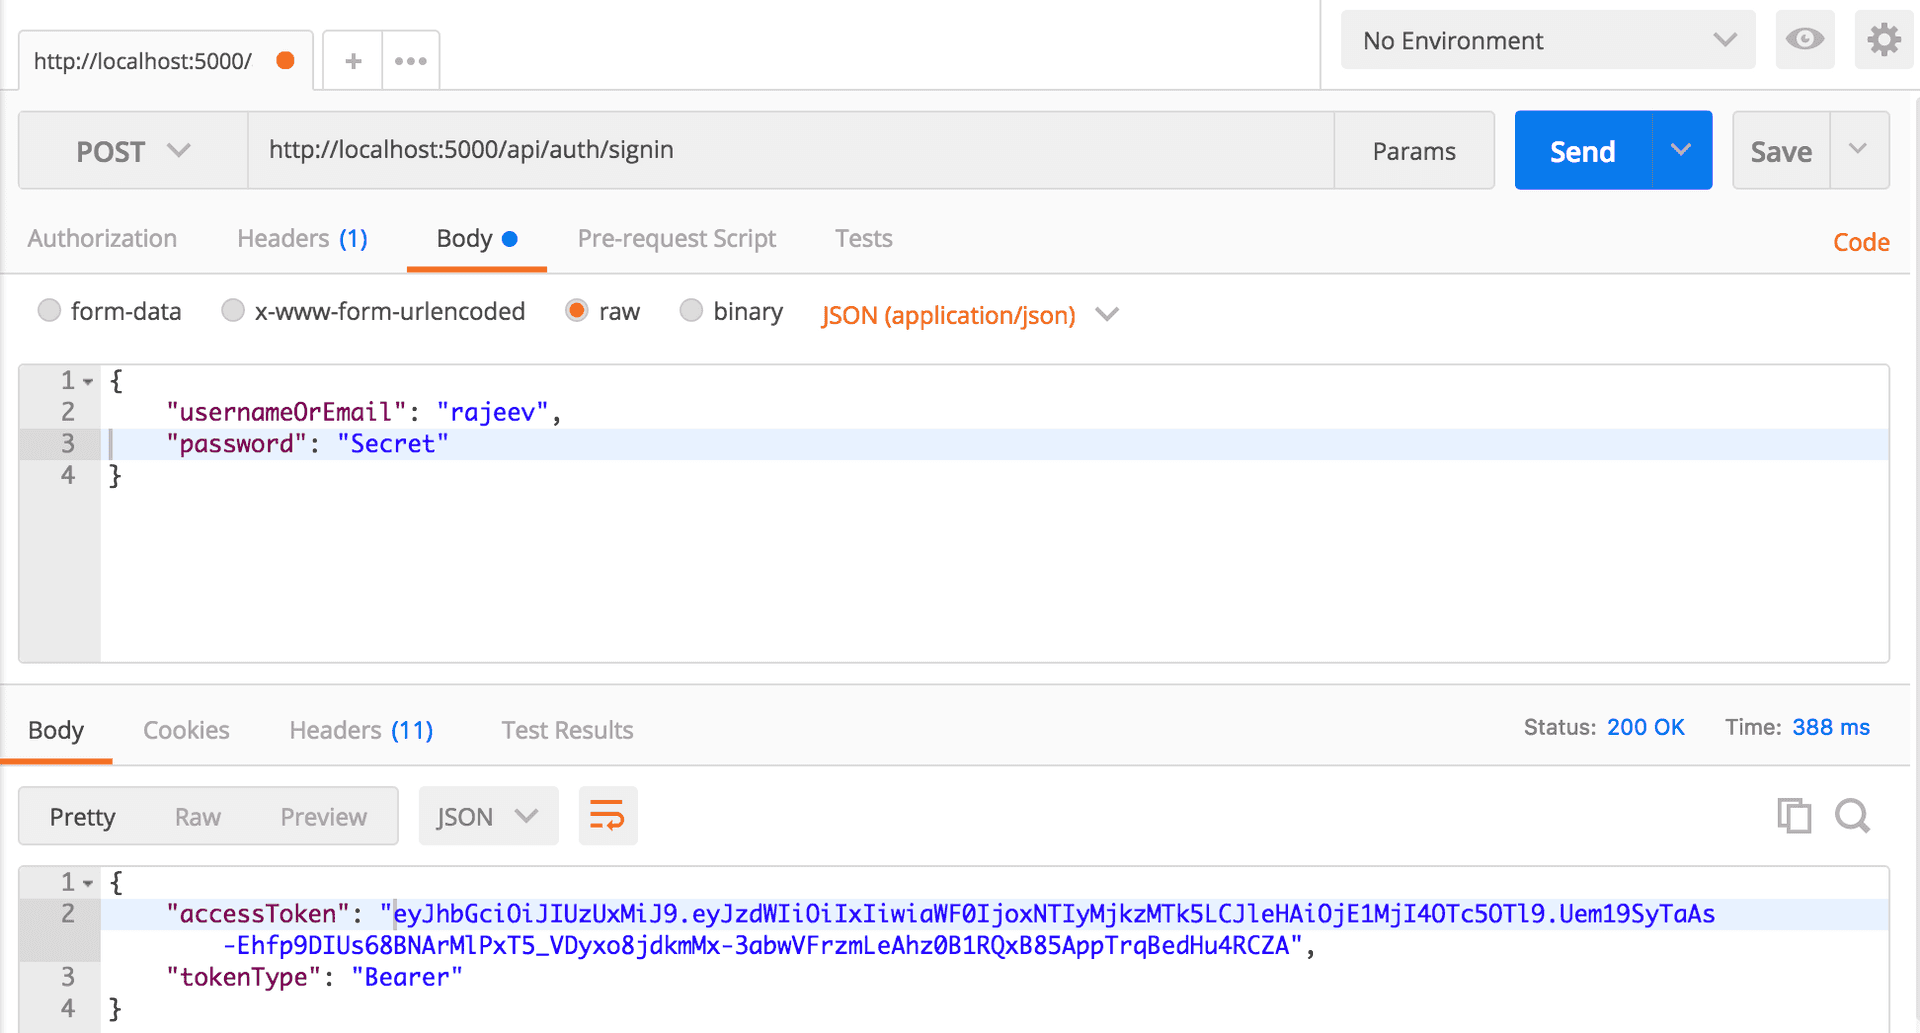
postman에서 실행해본다면,
회원가입

로그인

이렇게 나온다.
보호된 API 호출
로그인 API를 사용하여 액세스 토큰을 얻은 후에는 다음 Authorization과 같이 요청 헤더에 accessToken을 전달하여 보호된 API를 호출할 수 있습니다.
Authorization: Bearer <accessToken>JwtAuthentiacationFilter헤더에서 accessToken을 읽고 확인하고 API에 대한 액세스를 허용/거부합니다.
여기까지 Spring Security와 JWT를 사용하여 견고한 인증 및 권한 부여 로직을 구축했습니다.
감사합니다 :)
여러 Spring Security + JWT 예제를 참고하여 작성하였는데,
옛날 코드들도 많고 그래서 ..
암튼 저는 이렇게 해서 제가 진행하고 있는 플젝에 진행하였습니다.
궁금한게 있으면 댓글 남겨주세요~
