
1주일 배운 typescript로 어찌저찌 props type받아와서 select버튼을 직접 만들어보았다.
appjam프로젝트에서 내가 맡은 부분이 강의리스트들을 서버로부터 받아와서 gui를 구현하고, 해당 강의를 기준에 따라 정렬할 수 있는 sorting 버튼을 만드는 것이었다.
다행히도 정렬 기준은 5개였지만 정렬은 중복을 허용하지 않았다!😂
select 태그의 커스텀 제한
정렬 버튼들은 모습이 select태그와 하는 기능이 똑같았지만, select태그는 커스텀의 제한이 있기 때문에 최종적으로 button태그와 ul+li태그로 구현하게 되었다.
- 사실 이렇게 코드를 짜고 키보드 접근성을 위해 select 태그로 커스텀 하는 과정을 거쳤으나,, selelct안의 option태그는 커스텀이 불가능 하다는 것을 뒤늦게 알고 여러 복잡한 구조를 어찌저찌 고쳤던 것을 원래대로 되돌려 놓았다! ^^
- 여러분 디자이너들이 요구한 select 형식의 드랍다운들은,, select태그로는 구현할 수 없을 것이에요... 커스텀합시다..
- 하지만 한번쯤은 select + option태그들로 만들어보는 연습 하는 것도 좋은 것 같다. option안에 그룹을 지정할 수도 있고, 기본적으로 선택되어있도록, 혹은 disabled 처리를 할 수도 있다. (하지만 css커스텀은 지옥입니다.)
select 버튼 직접 만들기
button태그를 이용해서 직접 select 버튼을 만들고 있었는데, 해야할 것들이 다음과 같았다.
- 선택한 기준(dropdown item)이 버튼 안에 들어가게
- dropdown arrow 아이콘이 isOpen에 따라서 위 아래 바꾸기
- dropdown item선택하면 버튼들은 초기화 되기.
- 한 번에 하나의 버튼만 open 되게 하기
- active 효과 : border, shadow
- dropdown item선택하면 api 연결하기
- 위에 카테고리가 선택되지 않았을 때 disabled 처리하기
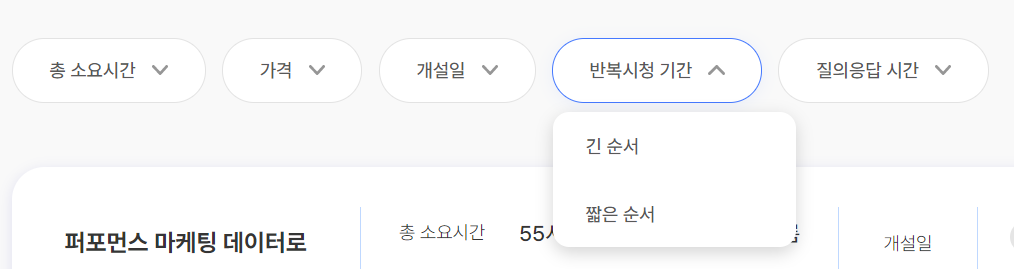
총 소요시간, 가격, 개설일, 반복시청기간, 질의응답 시간에 따라 각각 드랍다운 메뉴가 달랐기 때문에
<SortingBtn>총 소요시간</SortingBtn>
<SortingBtn>가격</SortingBtn>
<SortingBtn>...</SortingBtn>
<SortingBtn>총 소요시간</SortingBtn>
이렇게 일일이 넣어주려다가 그 밑 dropdown 메뉴가 각 버튼마다 다르게 나와야하기때문에 각각 버튼 기준과 그 아래 dropdown메뉴 이름을 객체에 넣어놓고 관리하기로 했다.
SortingBox (sorting버튼 감싸는 컴포넌트)
return (
    <div>
      {sortingCriteria.map((criteria) => (
        <SortingBtn
          key={criteria}
          value={criteria}
          dropListName={dropListName}
          onClickOpenSorting={handleOpenSorting}
          isOpen={isOpen}
          onClickSortingItem={handleClickSortingItem}
          isSelected={isSelected}
          selectedItem={selectedItem}
          criteria={criteria}
        >
          {criteria}
        </SortingBtn>
      ))}
    </div>
  );
}
SortingBtn (각각의 select 버튼들)
interface SortingBtnProps {
  value: sortingType;
  children: React.ReactNode;
  dropListName: IDropListName;
  selectedItem: ISelectedItemName;
  isOpen: ISorting;
  isSelected: ISorting;
  onClickOpenSorting: (criterial: sortingType) => void;
  onClickSortingItem: (value: sortingType, item: string) => void;
  criteria: sortingType;
}

...

function SortingBtn({
  onClickOpenSorting,
  onClickSortingItem,
  isOpen,
  isSelected,
  dropListName,
  selectedItem,
  value,
  criteria,
}: SortingBtnProps) {
  return (
    <StyledRoot onClick={() => onClickOpenSorting(criteria)}>
      <BtnTextWrapper>
        <CriteriaItem color={colors.gray6}>{value}</CriteriaItem>
        {isSelected[value] && (
          <>
            <CriteriaItem>|</CriteriaItem>
            <CriteriaItem color={colors.mainBlue}>{selectedItem[value]}</CriteriaItem>
          </>
        )}
      </BtnTextWrapper>
      {isOpen[value] ? <ArrowUp /> : <ArrowDown />}
      {isOpen[value] && (
        <DropDownBox>
          {dropListName[value].map((item) => (
            <DropDownItem key={item} onClick={() => onClickSortingItem(value, item)}>
              {item}
            </DropDownItem>
          ))}
        </DropDownBox>
      )}
    </StyledRoot>
  );
}
- isOpen: true일 때 Arrow 방향을 다르게 해주었다.
- 각 셀렉트 버튼의 드랍다운 메뉴를 map으로 펼쳐주었다.
- onClickSortingItem함수로 value(선택된 select버튼의 이름)와 item(선택된 드랍다운 메뉴)를 받아와서 어디 버튼에 어떤 메뉴를 넣을지 정보를 얻음.
1. 드랍다운 열기 관리 : isOpen
//isOpen 객체의 type정의
export interface ISorting {
  [key: string]: boolean;
}- 드랍다운 한 개가 열리면 다른 것들이 닫혀야 함 : 여러 개를 한 번에 관리해줘야함
=>드랍다운이 열렸는지 여부(isOpen)를 객체에 담는다. ex){"반복시청 기간": true, ... } - isOpen객체를 만들기 위해 sortingCriteria 배열으로 forEach문을 사용해 값이 모두 false인 객체를 만들었다.
 const sortingObject: ISorting = {};
 sortingCriteria.forEach((element) => (sortingObject[element] = false));
 const [isOpen, setIsOpen] = useState(sortingObject);```
isOpen state로 관리한다.
기본 값으로 들어가는 객체는 다음과 같다.
{  "총 소요시간": false,
   "가격": false,
   "개설일": false,
   "반복시청 기간": false,
   "질의응답 시간": false,
 }
버튼 클릭 시, 버튼의 기준(sortingCriteria의 요소)을 가져와서 switch문에서 처리 각각의 case마다 선택한 기준을 제외하곤 모두 false로 바꿔주고(sortingObject는 isOpen의 default값으로 들어간 객체임. 이걸 사용했음.) 선택된기준을 key로 하는 value는 반대 값으로 바꿔준다.
  const handleOpenSorting = (criteria: sortingType) => {
    switch (criteria) {
      case criteria:
        setIsOpen({
          ...sortingObject,
          [criteria]: !isOpen[criteria],
        });
        break;
    }
  };
2. 드랍다운 아이템 클릭시 값 넣기: selectedItem
3. 한 버튼만 셀렉트 할 수 있음 (중복 선택 불가): isSelected
export type sortingType = "총 소요시간" | "가격" | "개설일" | "반복시청 기간" | "질의응답 시간";
//dropdown 내리면 나오는 선택 목록들 type정의
export type IDropListName = {
  [key in sortingType]: string[];
};
-> 모두 한 객체에 담아 관리하기
  const isSelectedObject: ISorting = {};
  const selectedItemName: ISelectedItemName = {};

  sortingCriteria.forEach((element) => (isSelectedObject[element] = false));
  sortingCriteria.forEach((element) => (selectedItemName[element] = ""));

  const [isSelected, setIsSelected] = useState(isSelectedObject);
  const [selectedItem, setSelectedItem] = useState(selectedItemName);
-
선택된 기준의 경우만 무엇이 선택되었는지 버튼 안에 표시되어야함.
중복 선택이 안되기 때문에 isOpen처럼 isSelected도 객체로.. 한번에 관리한다.
초기값은 모두 false. -
중복 정렬기능이 없기 때문에 한 곳에서 선택했으면 나머지는 초기화되어야함
어떤 기준의 어떤 기준 목록을 선택했는지 저장 필요 ex){"가격": "높은 순", ...} 초기값은 모두 빈 문자열 -
isOpen과 같이 정렬 기준배열을 forEach문으로
const handleClickSortingItem = (value: sortingType, item: string) => { switch (item) { case item: setSelectedItem({ ...selectedItemName, [value]: item, }); setIsSelected({ ...isSelectedObject, [value]: true, }); break; } }; -
드랍다운 아이템을 클릭하면 어떤 기준을 선택했고, 그 기준(value)의 어떤 목록(item)을 선택했는지 받아온다.
-
item이 '긴 순서' '짧은 순서'로 겹치는 경우가 있긴 한데 받아오는 value가 달라서 잘 작동되는 것 같다.
-
어떤 item이 선택되었는지 selectedItemd에 저장하고, 나머지는 빈 문자열로 초기화
-
어떤 기준(value)이 선택되었는지 true로 바꾸고 나머진 false로 초기화

typescript를 배운지 1개월도 되지 않은 상태로 프로젝트 진행중이라 얼렁뚱땅 한 것 같은데, 다행히 잘 돌아가는 걸 보면 이상은 없는 것 같다.앱잼이 끝나면 typescript개념을 다시 익히면서 차근차근 배우고 어떻게 효율적인 코드를 작성할 수 있을지 고민해보면 좋을 것 같다.

킹지구님 쩔어여