React Native를 다뤄본 경험이 있기 때문에 React는 할만할 것 같다.
type script로 만들었기 때문에 이번에도 type script를 쓸 것 같다.
spring 역시 vue와 마찬가지로 찍찍찍찍먹 사후르인데
그래도 JAVA를 어느정도 공부를 해두긴 한 상태이다.
아니었으면 남은 시간에 하기에는 절대 불가능했을 거라고 생각한다.
Vue Node 게시글에서 컴포넌트에 대한 정리를 해두었으니 한 번쯤 읽어보는 것도 나쁘지 않다. 그 밖에도 react와 vue가 겹치는 특징들이 있으니, 혹시 vue node 게시글을 읽지 않았다면 한 번 읽고 오길 바란다. 이번 글은 아마 spring에 대한 방대한 설명 글이 되지 않을까 싶다.
Prologue
React
특징
- Facebook에서 개발한 UI 라이브러리, SPA(Single Page Application)에 최적화.
- SPA란
• 한 번의 HTML 요청 이후, 페이지 전체를 다시 로드하지 않고 JavaScript로 동적으로 화면을 구성하는 방식
- SPA란
- 컴포넌트 기반, Virtual DOM 사용.
- 단방향 데이터 흐름(One-Way Data Flow).
- JSX 문법 사용(HTML과 JS의 결합).
장점
- Virtual DOM으로 효율적이고 빠른 렌더링.
- 컴포넌트 재사용성, 유지보수 용이.
- 방대한 생태계와 활발한 커뮤니티.
- 대규모 애플리케이션 구조화에 유리.
단점
- SPA 특성상 SEO에 불리(SSR 등 추가 작업 필요).
- 상태관리, 라우팅 등은 별도 라이브러리 필요.
- 학습 곡선이 있을 수 있음(JSX, 상태관리, 생명주기 등).
Spring
(Spring Boot 기준)
특징
- Java 기반의 엔터프라이즈급 백엔드 프레임워크.
- 의존성 주입(DI), AOP, 다양한 모듈(데이터, 웹, 보안 등) 제공.
- 의존성(Dependency)이란
• 어떤 객체가 동작하기 위해 다른 객체를 필요로 하는 관계입니다. - 주입(Injection)이란
• 그 필요한 객체를 직접 생성하지 않고, 외부에서 넣어주는 것을 의미합니다. - AOP(관점지향 프로그래밍)란?
• AOP는 핵심 로직과 공통 관심 사항(Cross-Cutting Concern)을 분리해서 개발하는 프로그래밍 패러다임
- 의존성(Dependency)이란
- RESTful API 구현에 적합.
장점
- 대규모, 복잡한 시스템에 적합한 안정성과 확장성.
- 강력한 테스트 지원, 모듈화, 유연성.
- 방대한 커뮤니티와 문서, 다양한 오픈소스 연계.
- REST API 구축이 용이, 엔터프라이즈 환경에 적합.
단점
- 높은 진입장벽, 학습 곡선이 가파름.
- 복잡한 설정, 성능 오버헤드(리플렉션, 프록시 등).
- 의존성 주입 남용 시 코드 복잡성 증가.
- 버전 관리, 신규 기능 습득에 시간 소요.
스프링에 대한 설명은 이 공간만으로는 부족하기 때문에
gochal spring 파트에서 후술하도록 하겠다.
Gochal
React (with Next.js by tsx)
사실 상태관리는 redux가 짱이기 때문에 redux로 할거다.
(나한테는 짱이다.)
(사실 쓸 일이 있을지는 잘 모르겠다.)
아무튼 시간이 없기 때문에 얘도 테마만 다른 곳에서 가져왔다.
근데 테마 코드 분석하는게 오히려 시간이 더 걸리는 것 같기도 하고...
https://www.creative-tim.com/product/nextjs-tailwind-author-page
여기서 가져왔다.
바로 시작하겠다.
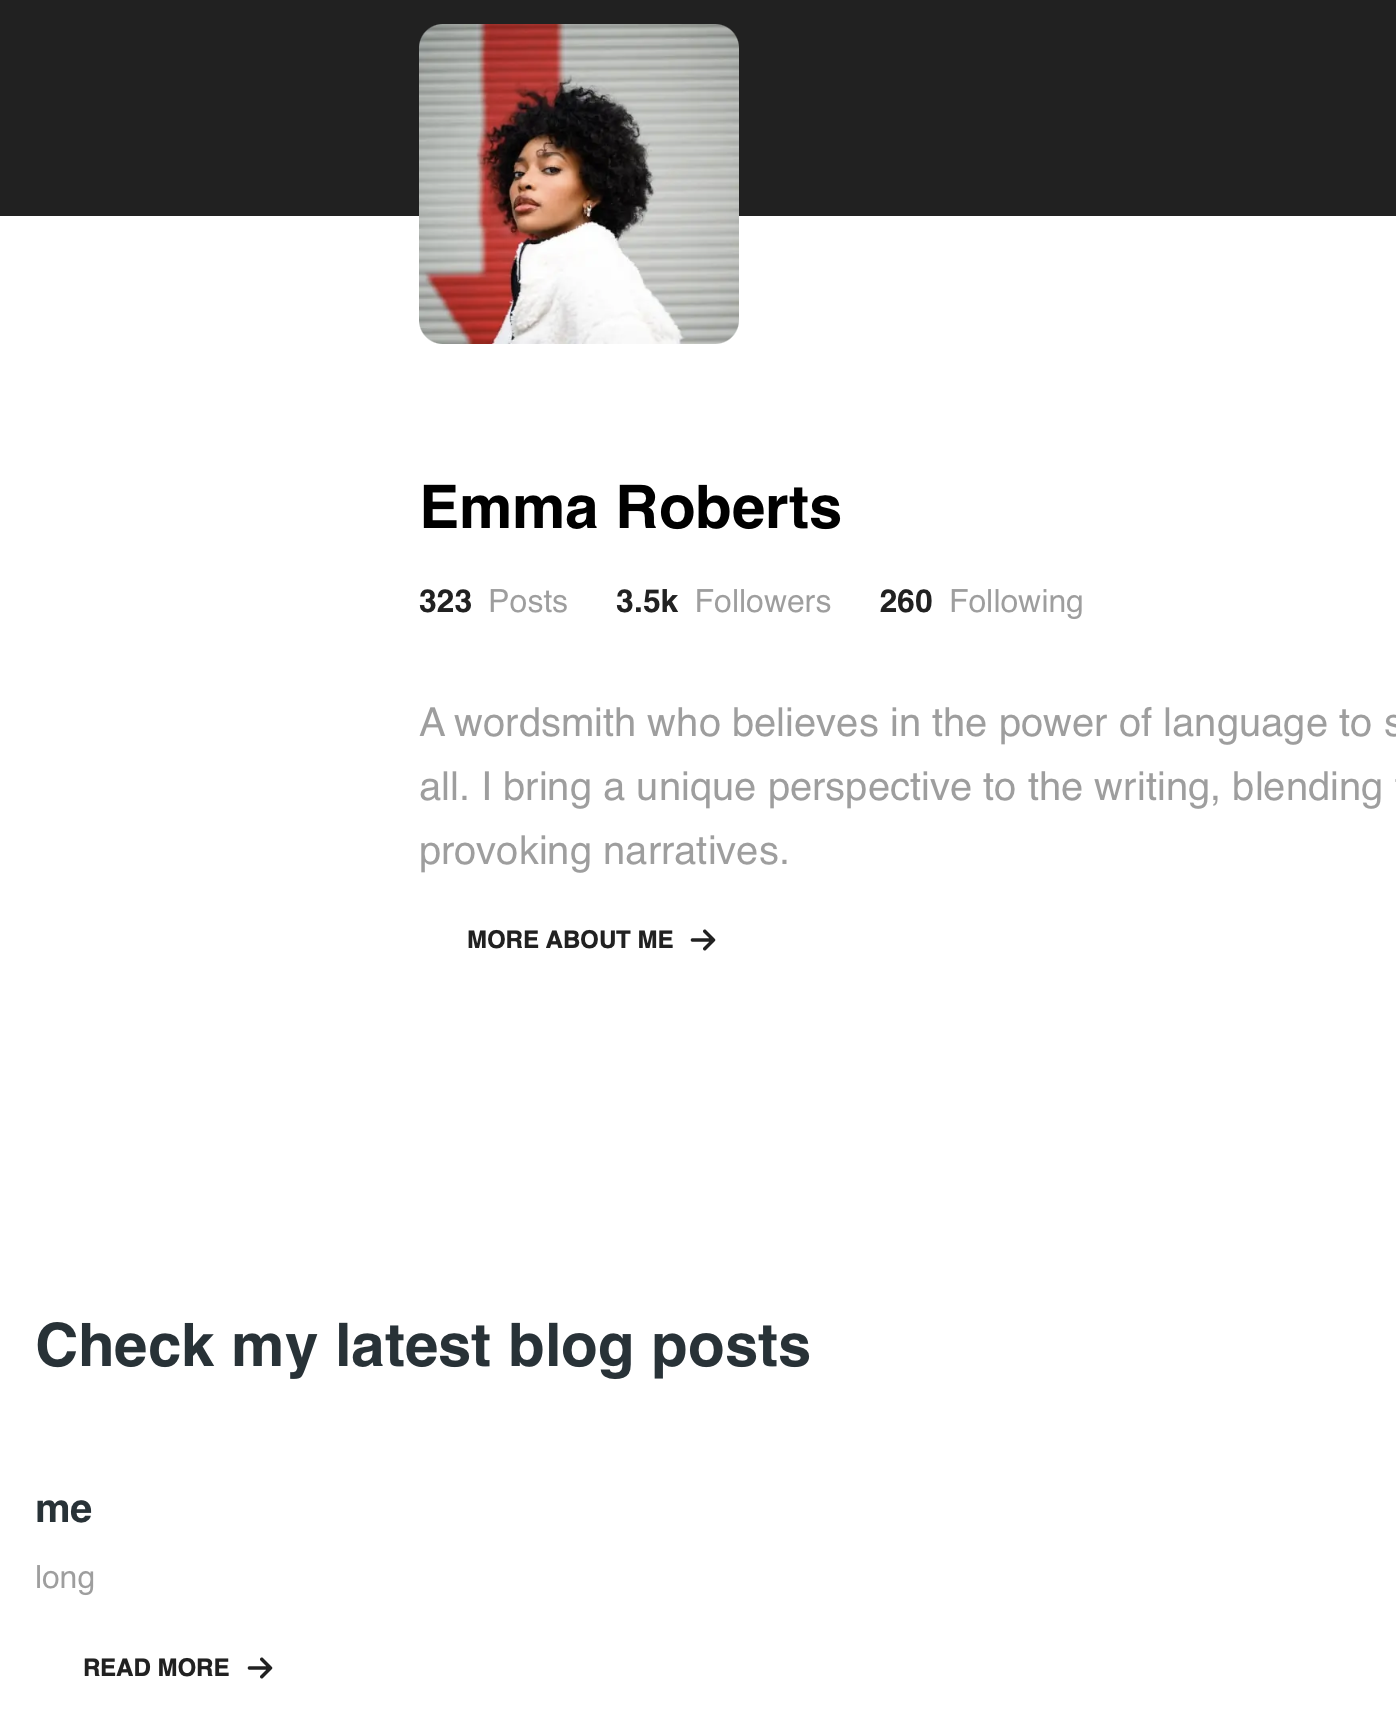
page.tsx에서 contactform을 바로 제거했다.
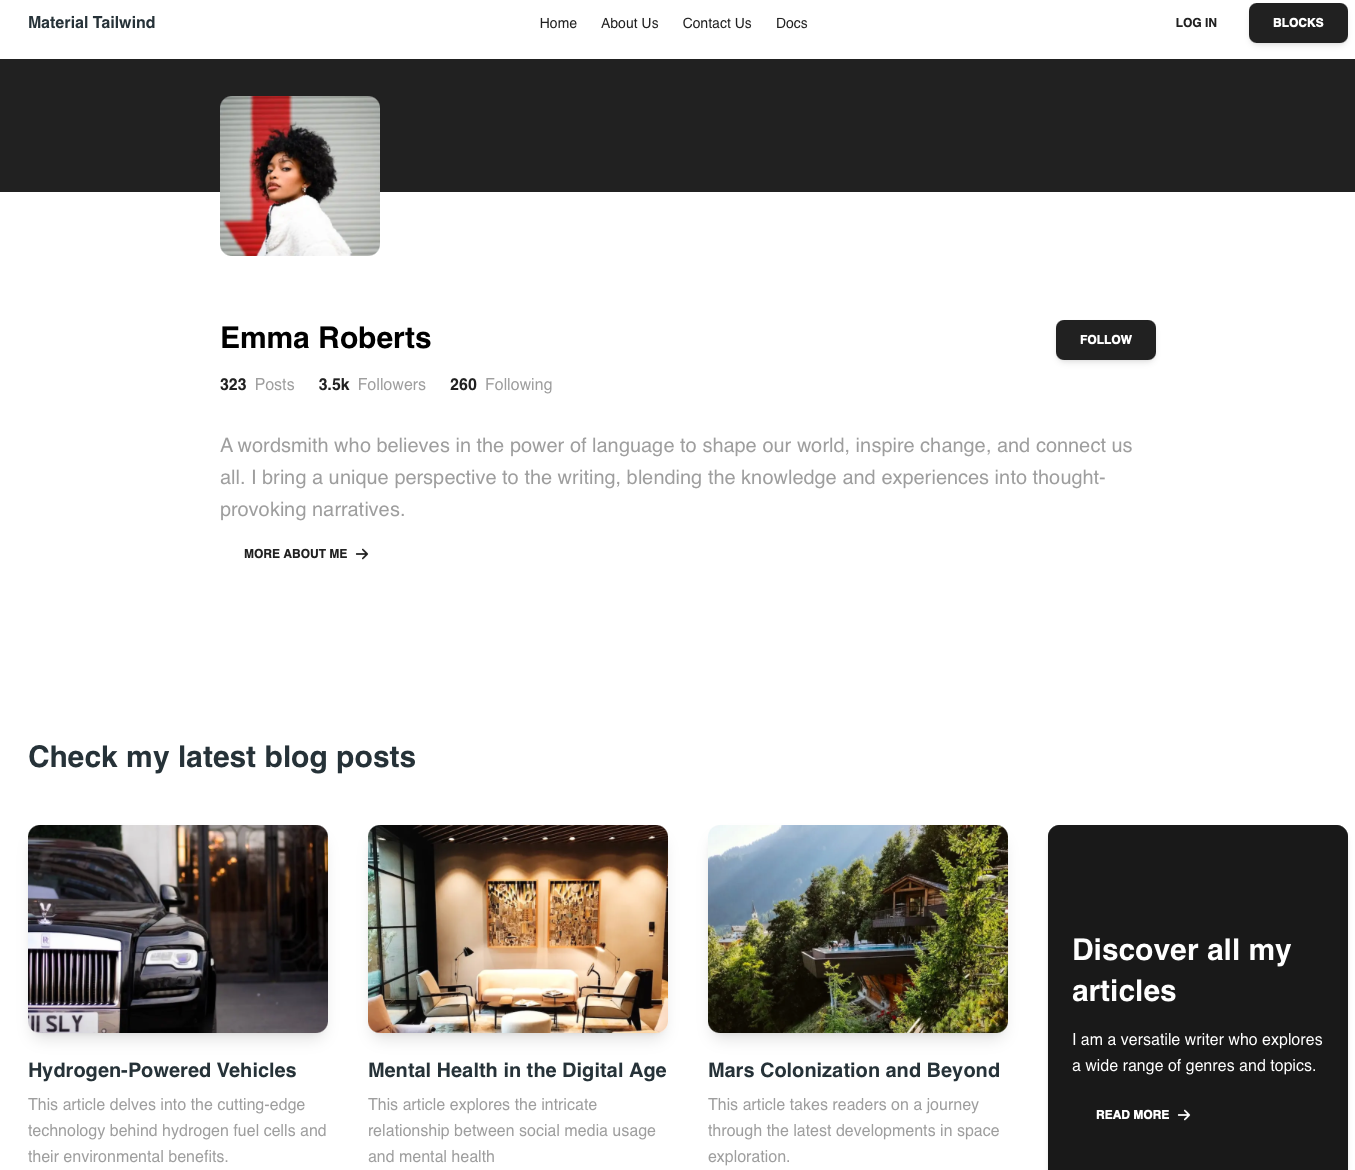
여기서 건드릴 것은 저기 check my latest blog posts 목록들이다.
다른 부분은 왠만하면 건드리지 않을 예정이다.
일단 간소화시켜야 한다.
저기 blog posts에는 제목만 나오게 바꿀 예정이다.
page.tsx에 가면 다음과 같이 나와있다.
// components
import { Navbar, Footer } from "@/components";

// sections
import Hero from "./hero";
import LatestBlogPosts from "./latest-blog-posts";

export default function Campaign() {
  return (
    <>
      <Navbar />
      <Hero />
      <LatestBlogPosts />
      <Footer />
    </>
  );
}
여기서 latest blog posts에 들어가면
const BLOG_POSTS = [
  {
    img: "/image/blogs/blog-1.png",
    title: "Hydrogen-Powered Vehicles",
    desc: "This article delves into the cutting-edge technology behind hydrogen fuel cells and their environmental benefits.",
  },
  {
    img: "/image/blogs/blog-2.png",
    title: "Mental Health in the Digital Age",
    desc: "This article explores the intricate relationship between social media usage and mental health",
  },
  {
    img: "/image/blogs/blog-3.png",
    title: "Mars Colonization and Beyond",
    desc: "This article takes readers on a journey through the latest developments in space exploration.",
  },
];

export function LatestBlogPosts() {
  return (
    <section className="py-40 px-8">
      <div className="container mx-auto mb-12">
        <Typography variant="h3" color="blue-gray">
          Check my latest blog posts
        </Typography>
      </div>
      <div className="container mx-auto grid grid-cols-1 gap-10 md:grid-cols-2 lg:grid-cols-4">
        {BLOG_POSTS.map((props, idx) => (
          <BlogPostCard key={idx} {...props} />
        ))}
        <Card
          className="relative grid h-full w-full place-items-center overflow-hidden
            bg-black"
        >
          <div className="absolute inset-0 h-full w-full bg-gray-900/75" />
          <CardBody className="relative w-full">
            <Typography variant="h3" className="mt-4" color="white">
              Discover all my articles
            </Typography>
            <Typography color="white" className="py-4 font-normal">
              I am a versatile writer who explores a wide range of genres and
              topics.
            </Typography>
            <Button
              variant="text"
              color="white"
              className="flex items-center gap-2"
            >
              read more
              <ArrowRightIcon
                strokeWidth={3}
                className="h-3.5 w-3.5 text-white"
              />
            </Button>
          </CardBody>
        </Card>
      </div>
    </section>
  );
}
위와 같은데,
        {BLOG_POSTS.map((props, idx) => (
          <BlogPostCard key={idx} {...props} />
        ))}
요것이 사실상 저 카드들을 만들어주고 있다.
그 밑 부분의 card 부분은 지저분하니 지워주자.
export function LatestBlogPosts() {
  return (
    <section className="py-40 px-8">
      <div className="container mx-auto mb-12">
        <Typography variant="h3" color="blue-gray">
          Check my latest blog posts
        </Typography>
      </div>
      <div className="container mx-auto grid grid-cols-1 gap-10 md:grid-cols-2 lg:grid-cols-4">
        {BLOG_POSTS.map((props, idx) => (
          <BlogPostCard key={idx} {...props} />
        ))}
      </div>
    </section>
  );
}
훨씬 간단하게 변했다.
여기서 BlogPostCard 컴포넌트를 대체할 새로운 컴포넌트를 만들 예정이다.
그냥 글씨만 커다랗게 나오는 컴포넌트를 만들 예정이다.
이를 위해 components 폴더에 title-card.tsx 파일을 추가하고
blog-post-card.tsx 파일의 내용을 복붙하자.
interface BlogPostCardProps {
  img: string;
  title: string;
  desc: string;
}

export function BlogPostCard({ img, title, desc }: BlogPostCardProps) {
  return (
    <Card color="transparent" shadow={false}>
      <CardHeader floated={false} className="mx-0 mt-0 mb-6 h-52">
        <Image width={768} height={768} src={img} alt={title} className="h-full w-full object-cover" />
      </CardHeader>
      <CardBody className="p-0">
        <a
          href="#"
          className="text-blue-gray-900 transition-colors hover:text-gray-800"
        >
          <Typography variant="h5" className="mb-2">
            {title}
          </Typography>
        </a>
        <Typography className="mb-3 font-normal !text-gray-500">
          {desc}
        </Typography>
        <Button variant="text" color="gray" className="flex items-center gap-2">
          read more
          <ArrowRightIcon
            strokeWidth={3}
            className="h-3.5 w-3.5 text-gray-900"
          />
        </Button>
      </CardBody>
    </Card>
  );
}
interface를 활용하는 것이 어떻게 보면 js와 ts의 가장 큰 차이라고 생각한다.
interface로 타입을 정해버리기 때문이다.
title-card.tsx를 다음과 같이 바꾸고
import React from "react";
import {
  Button,
  Typography,
  Card,
  CardBody,
} from "@material-tailwind/react";

import { ArrowRightIcon } from "@heroicons/react/24/outline";

interface TitleCardProps {
  title: string;
  desc: string;
}

export function TitleCard({ title, desc }: TitleCardProps) {
  return (
    <Card color="transparent" shadow={false}>
      <CardBody className="p-0">
        <a
          href="#"
          className="text-blue-gray-900 transition-colors hover:text-gray-800"
        >
          <Typography variant="h5" className="mb-2">
            {title}
          </Typography>
        </a>
        <Typography className="mb-3 font-normal !text-gray-500">
          {desc}
        </Typography>
        <Button variant="text" color="gray" className="flex items-center gap-2">
          read more
          <ArrowRightIcon
            strokeWidth={3}
            className="h-3.5 w-3.5 text-gray-900"
          />
        </Button>
      </CardBody>
    </Card>
  );
}

export default TitleCard;
이렇게 만들고
latest-blog-posts.tsx도
"use client";

import React from "react";
import {
  Typography,
} from "@material-tailwind/react";
import TitleCard from "@/components/title-card";

const BLOG_POSTS = [
  {
    img: "/image/blogs/blog-1.png",
    title: "Hydrogen-Powered Vehicles",
    desc: "This article delves into the cutting-edge technology behind hydrogen fuel cells and their environmental benefits.",
  },
  {
    img: "/image/blogs/blog-2.png",
    title: "Mental Health in the Digital Age",
    desc: "This article explores the intricate relationship between social media usage and mental health",
  },
  {
    img: "/image/blogs/blog-3.png",
    title: "Mars Colonization and Beyond",
    desc: "This article takes readers on a journey through the latest developments in space exploration.",
  },
];

export function LatestBlogPosts() {
  return (
    <section className="py-40 px-8">
      <div className="container mx-auto mb-12">
        <Typography variant="h3" color="blue-gray">
          Check my latest blog posts
        </Typography>
      </div>
      <div className="container mx-auto grid grid-cols-1 gap-10 md:grid-cols-2 lg:grid-cols-4">
        {BLOG_POSTS.map((props, idx) => (
          <TitleCard key={idx} {...props} />
        ))}
      </div>
    </section>
  );
}


export default LatestBlogPosts;
이렇게 바꿨다.
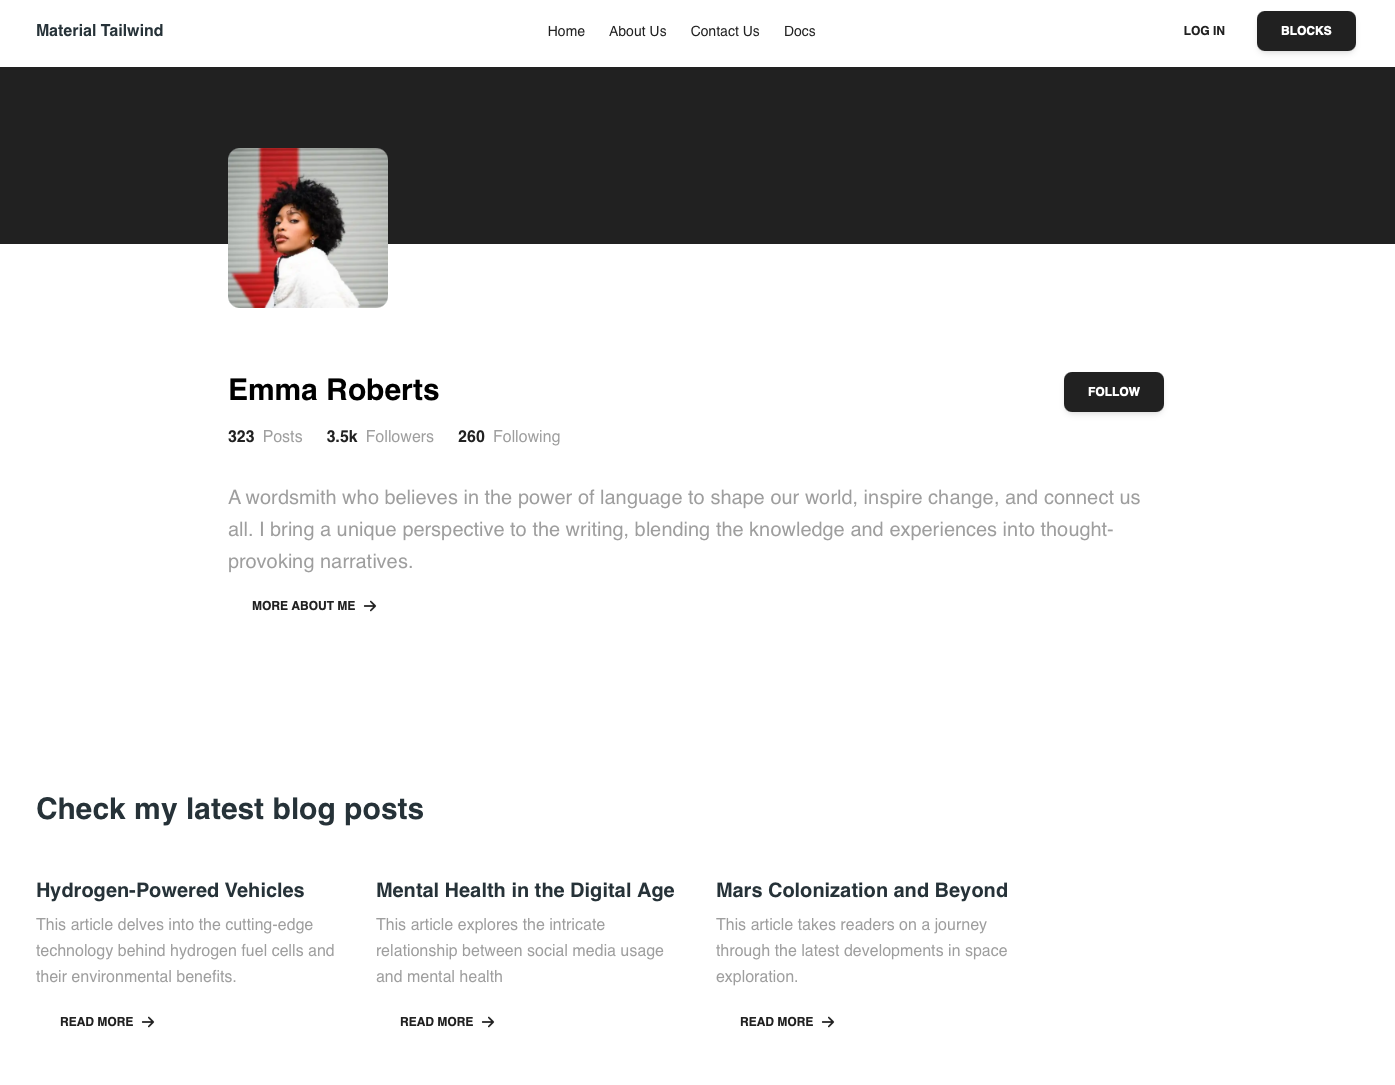
매우 심플해졌다.
우리는 BLOG_POSTS를 back의 db에서 가져오면 된다.
front는 준비가 끝났다.
gpt에게 많이 도움받아야할 것 같다.
Spring
스프링을 제대로 이해하기 위해서는
1. 관점지향 프로그래밍
2. 의존성 주입에 대해서 확실하게 이해해야한다.
1번에 대해서는 어느 정도 알고있지만, 2번은 잘 모른다.
이번 기회에 확실하게 이해해보도록 할 예정이다.
관점지향 프로그래밍
함수형 프로그래밍, 객체지향 프로그래밍과 같이 일종의 프로그래밍 패러다임이다.
이전의 글에서 AOP(관점지향 프로그래밍, aspect oriented programming)에 대해서 언급한 적이 있다.
찾아보니 0주차 글이었다.
@app.before_request를 사용하여 모든 api 접근 전에 token을 검증했다.
이런 느낌이라고 생각하면 된다.
oop가 종단으로 프로그래밍한다고 생각하면
aop는 횡단으로 프로그래밍한다.
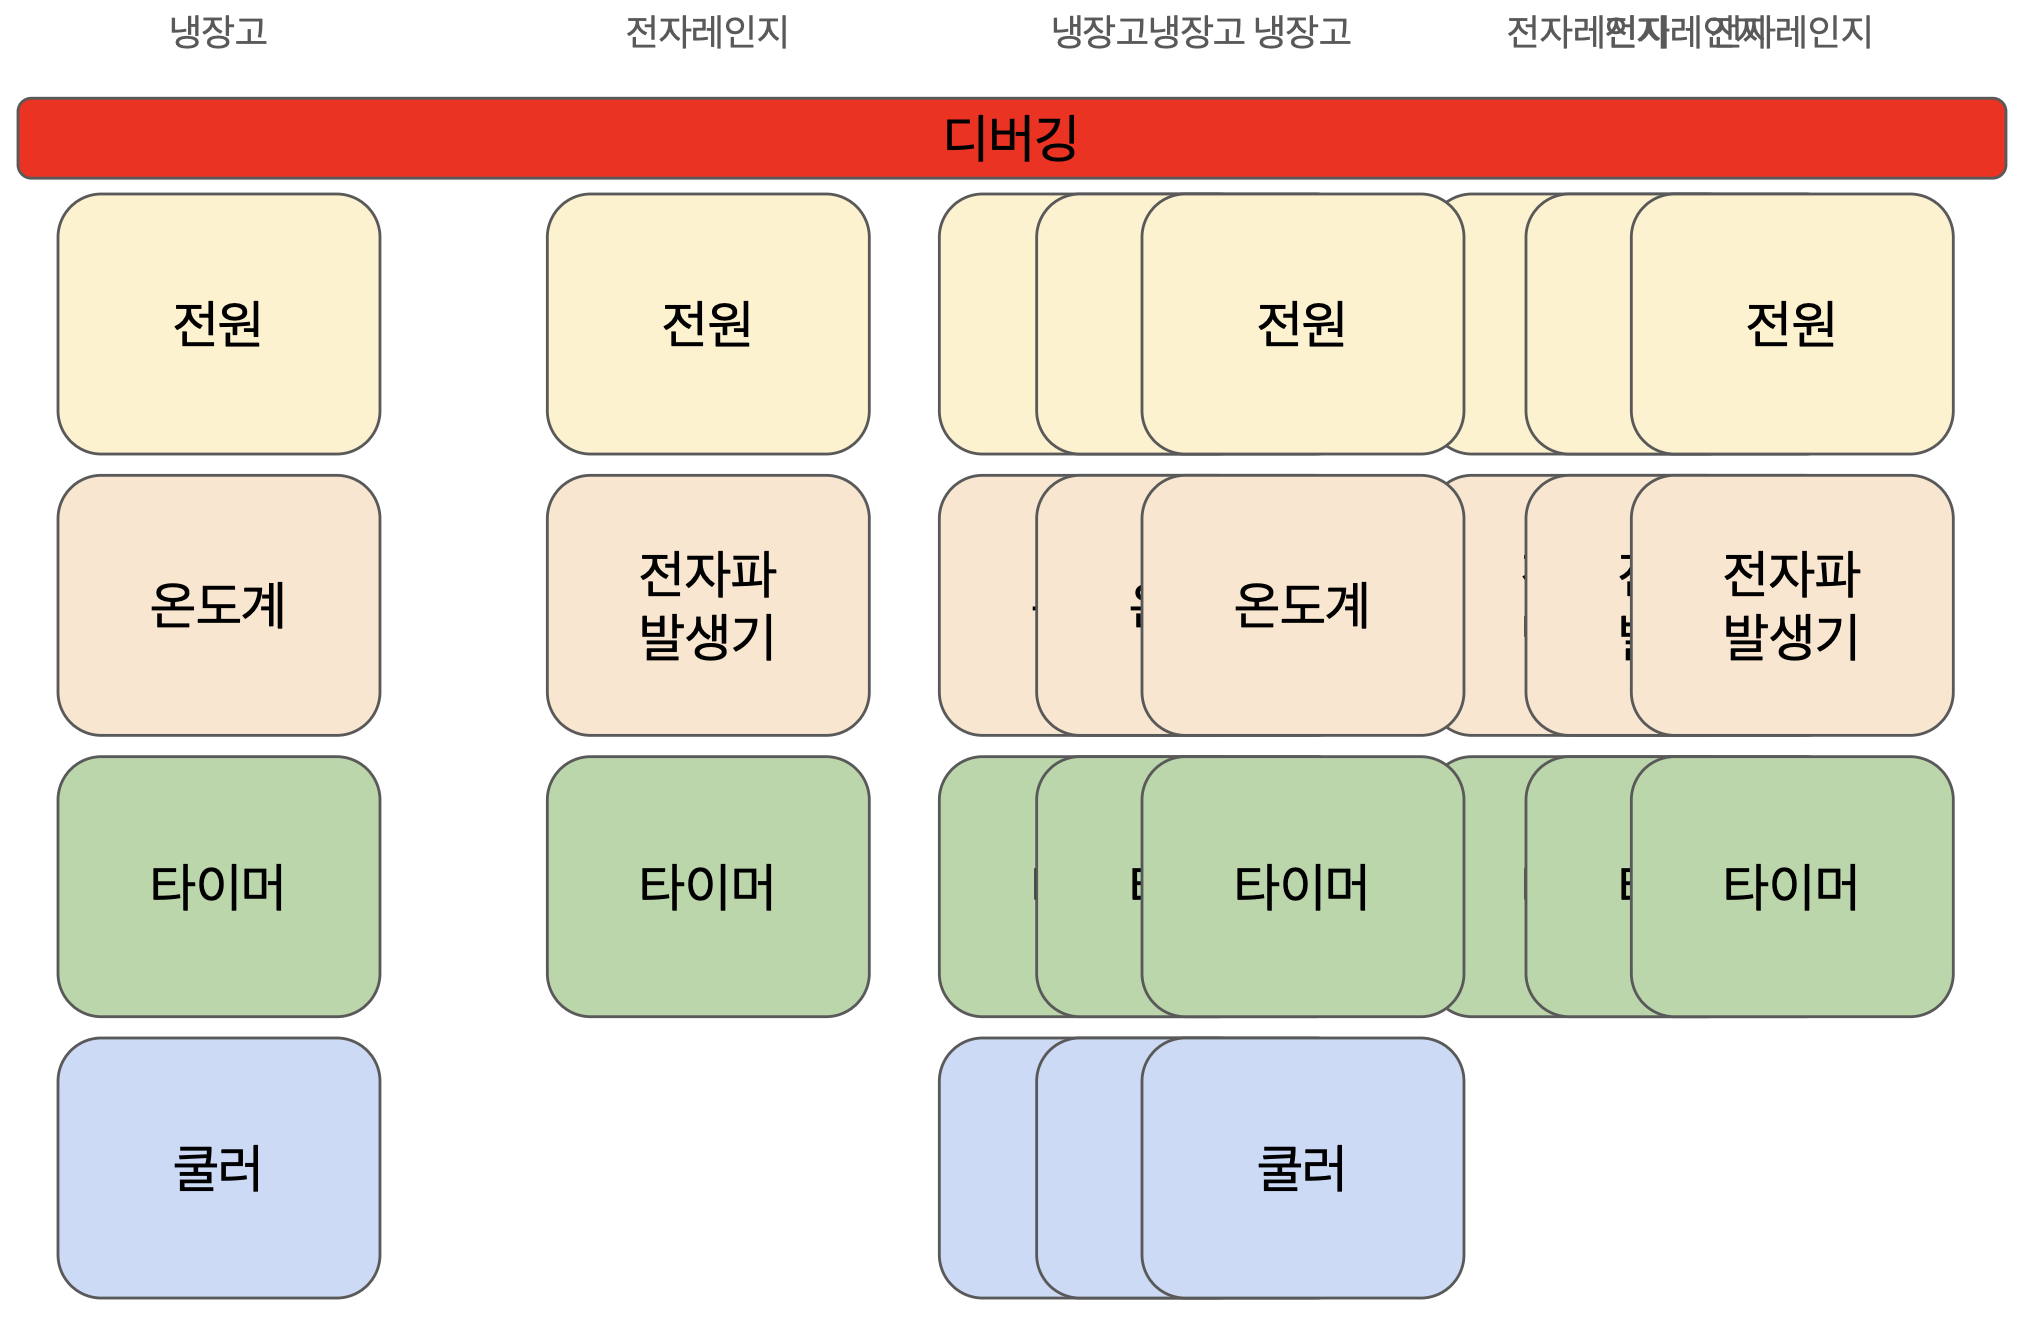
예를 들어
냉장고와 전자레인지라는 객체를 만든다고 할 때
각 객체 안에 다음과 같은 객체를 넣는다고 하자.
냉장고 - 전원, 온도계, 타이머, 쿨러
전자레인지 - 전원, 타이머, 전자파 발생기
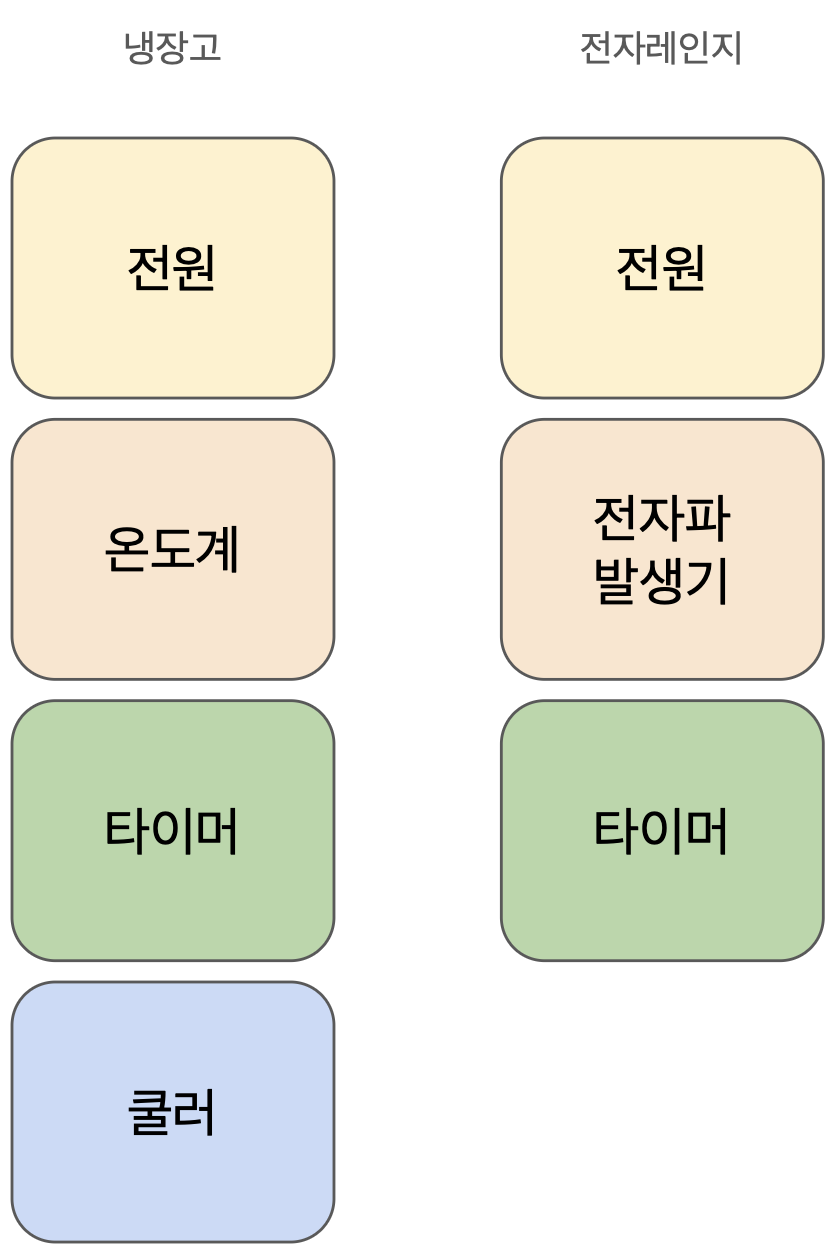 위에서 아래로, 종단으로 내려오고 있다.
냉장고의 전원과 전자레인지의 전원은 비슷하면서도 다른 방식으로 작동할 것이다.
근데 냉장고와 전자레인지가 수리를 위해 디버그 코드를 넣는다고 하자.
전원이 켜질 때 전원이 켜진 시간을 출력하는 객체와
에러가 발생할 때 에러 발생 코드를 출력하는 객체를
냉장고와 전자레인지에 넣는다고 해보자.
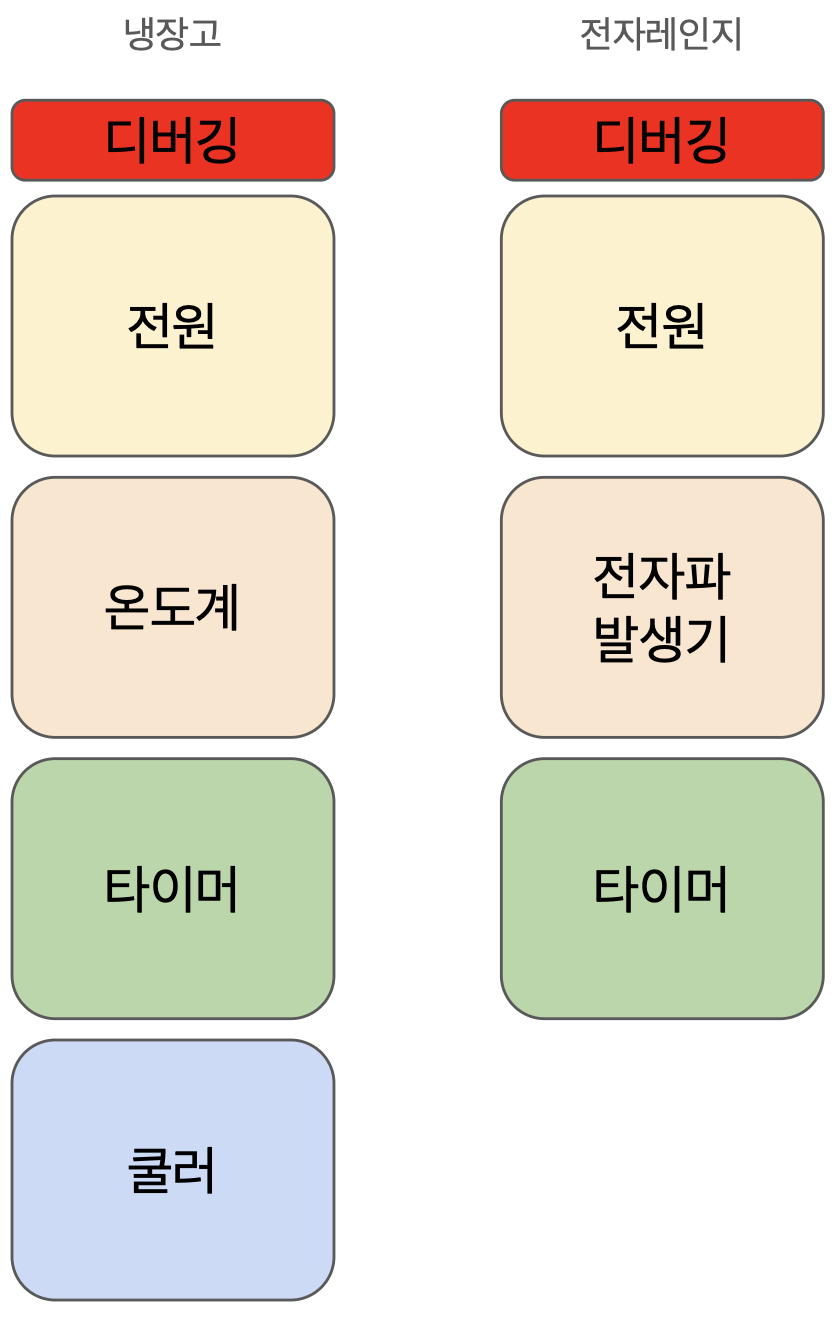
아직까지는 할만할 수 있다.
근데 이제 객체가 많아져서 진공청소기도 생기고 로봇도 생긴다면?
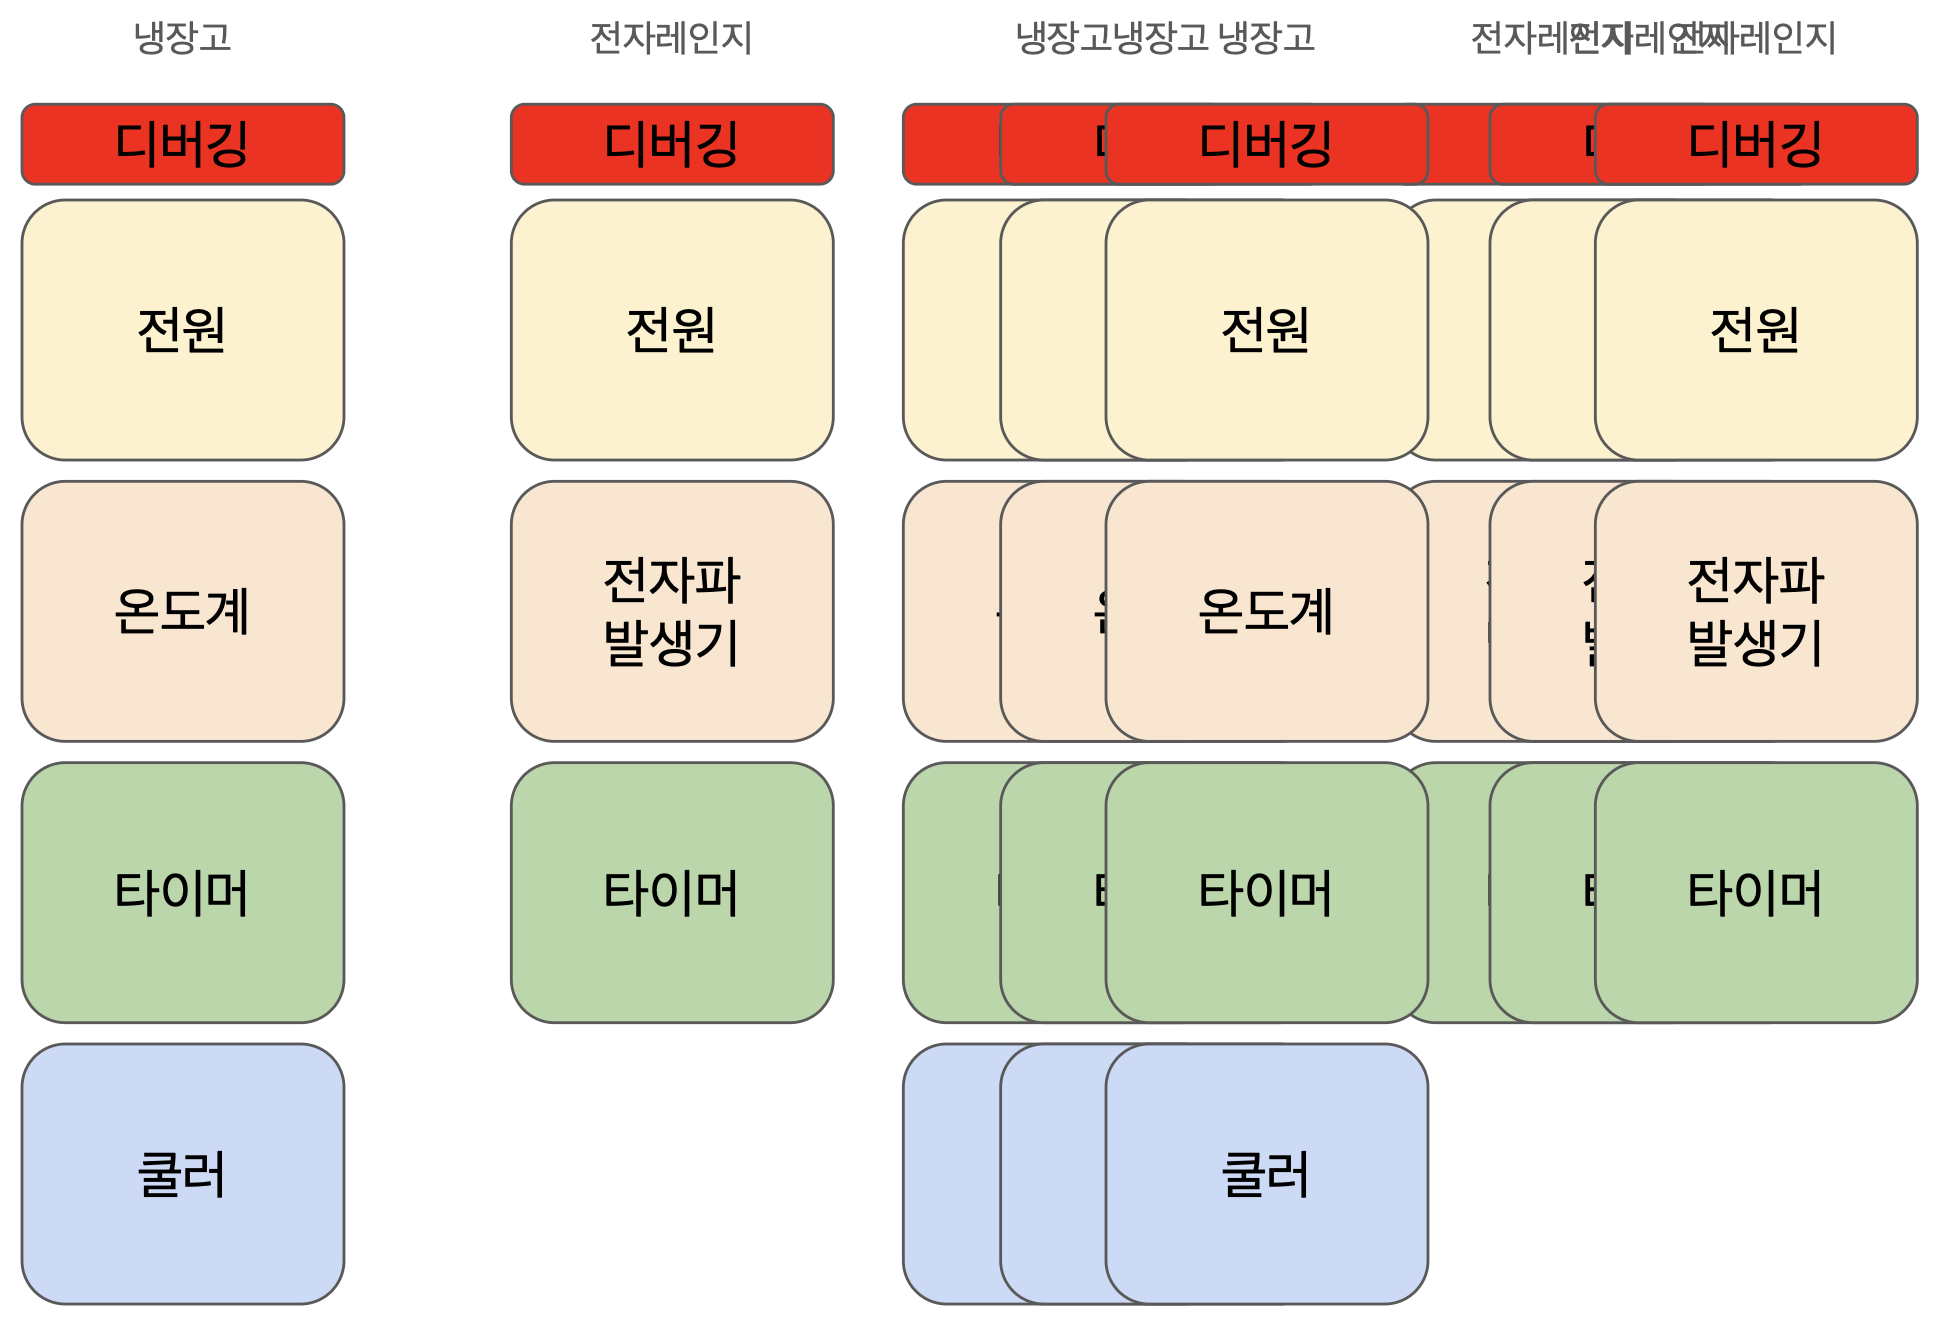
함수 호출 지옥이 될 것이다.
이 문제를 해결하는 것이 AOP이다.
'이 객체들 부르기 전에 이 함수 호출해' 해서
각 객체들 안에서 함수를 호출하지 않고
관점을 변화시켜서 함수가 객체를 선택해서 호출된다.
아래는 gpt의 부연설명이다.
🔹 정확한 표현으로 다시 쓰면?
AOP는 객체들이 실행되는 공통 시점(join point)에
별도로 정의된 함수(aspect)를 자동 삽입하여
핵심 로직과 공통 로직을 분리하는 패러다임이다.
2번은 코드를 작성하면서 알아보자.
대략적으로 @(annotation)이랑 autowired, bean과 관련있다고만 알고있다.
자바는 패키지별로 폴더를 관리하기 때문에 폴더 구성이 엄격하다.
gpt는

이런 구조를 추천해줬다.
차근차근 gpt를 따라가보자.
물론 프로젝트 생성부터다. IDE는 인텔리전스를 썼다.
언어는 Java, 타입은 Maven 으로 선택하고 JDK는 17버전을 선택한다.
제네레이터는 spring boot를 선택한 뒤에
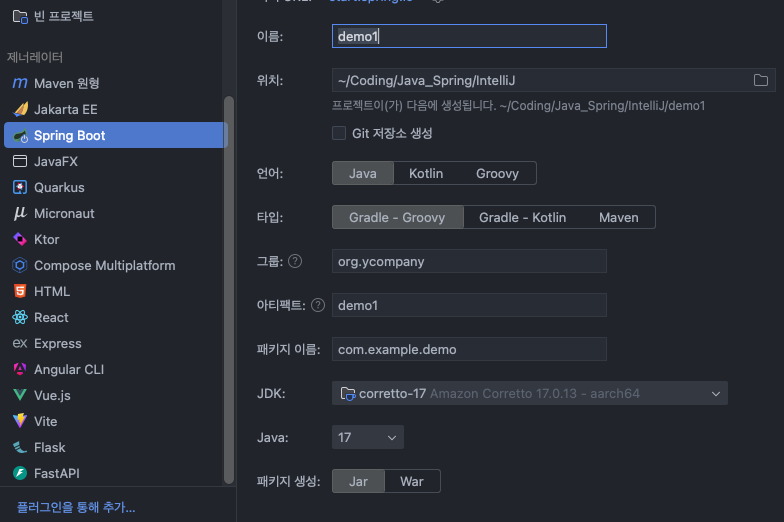
다음을 누르면, 어떤 종속성을 선택할지 나온다.
사실 잘 모르는데, spring web이랑 mariaDB driver을 선택했다.
첫 번째는 Post 객체를 위한 모델 클래스 생성이다.
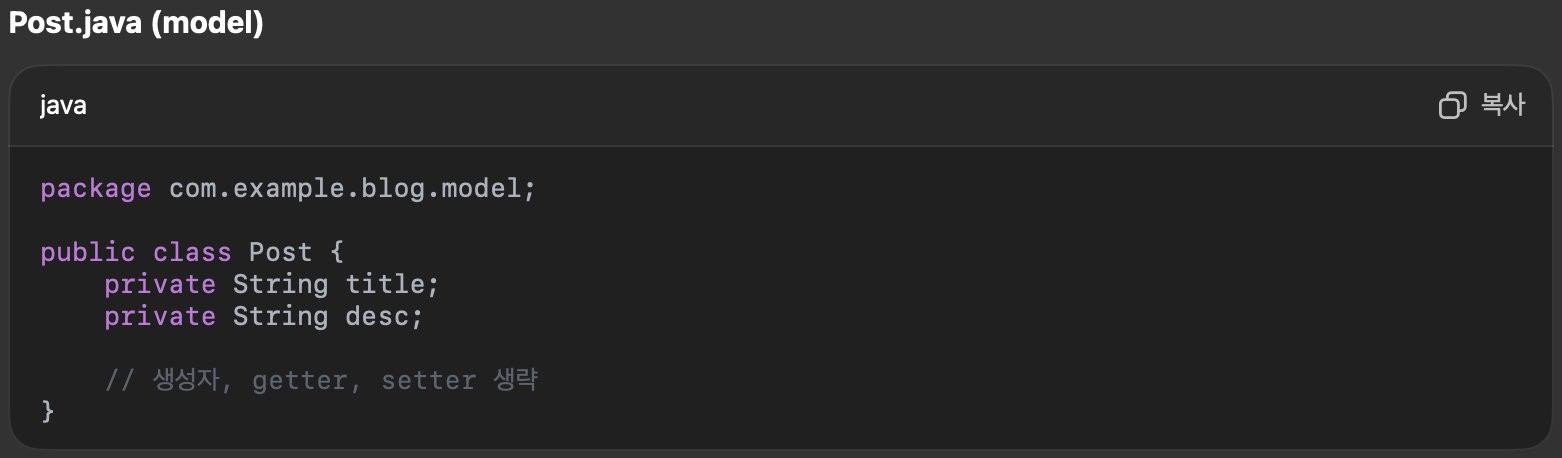
혹시나 생성자, getter, setter를 잘 모르겠다면...
JAVA 책을 보고 오는 것을 추천한다..
public class Post {
    private String title;
    private String desc;

    public Post() {}

    public Post(String title, String desc) {
        setTitle(title);
        setDesc(desc);
    }

    public void setTitle(String title) {
        this.title = title;
    }

    public void setDesc(String desc) {
        this.desc = desc;
    }

    public String getTitle() {
        return title;
    }

    public String getDesc() {
        return desc;
    }
}
보이는가?
위에 골뱅이들이 줄줄이 달리기 시작한다.
이 친구들이 spring의 핵심이라고 할 수 있다.
솔직히 난 골뱅이보다는 꼬막이 좋긴하다.
꼬막 정식을 순천에서 먹어본 적이 있는데, 상다리 부러질 정도로 밑반찬 + 꼬막반찬이 나와서 깜짝 놀랐었다.
궁금하면 검색해보길 바란다.
아무튼 @ 달린 친구들은 스프링 프레임워크의 기능을 선언하는 친구들이라고 한다.
@은 스프링 컨텍스트, 의존성 주입 등과 관련있기도 하니 살펴보고 가자.
스프링 컨텍스트
Spring Framework에서 객체(Bean)를 관리해주는 중앙 컨테이너입니다.
스프링 컨텍스트(Spring Application Context)는 객체(Bean)를 생성하고, 의존성을 주입하고, 생명주기를 관리합니다.
일종의 “Bean Factory(빈 공장)”라고도 볼 수 있습니다.
처음에 이 빈(bean)을 일종의 싱글톤 객체라고 이해를 했었다.
싱글톤
싱글톤에 대해서 잠깐 짚고 넘어가자면
-
싱글톤이란?
- 싱글톤(Singleton)은 프로그램 실행 동안 단 하나의 인스턴스만 존재하도록 보장하는 디자인 패턴입니다.
-
왜 싱글톤을 사용할까?
- 여러 객체가 공유 자원을 사용할 때, 하나의 인스턴스만 있으면 관리가 쉬움
- 메모리 낭비를 방지함
- 설정 값, 로깅, DB 커넥션 풀 등 중앙 집중식 객체에 적합
-
싱글톤 패턴 핵심 특징
- 인스턴스가 1개: 클래스에서 단 하나의 객체만 생성됨
- 전역 접근: 어디서든 접근 가능한 static 메서드 제공
- 생성자 제한: 외부에서 new 키워드로 인스턴스 생성 불가 (private 생성자)
그럼 의문이 들 수도 있다.
이렇게 만든 객체(bean)를 왜, 어떻게 사용해?
포스트들을 db에서 꺼내쓰는 저장소 클래스를 정의했다고 하자.
A클래스와 A-R 저장소와 B클래스에서 B-R 저장소 인스턴스를 생성했다고 했을 때,
여러 작업을 하다보면 A-R 저장소와 B-R 저장소의 내용이 달라질 수 있다.
혹은 이를 방지하기 위해 매번 동기화를 시켜주는 코드를 작성해야 할지도 모른다.
그런데 저장소 클래스를 만들어두고 다 같이 쓰게된다면 어떨까?
무결성 걱정없이 쓸 수 있을 것이다.
메모리 측면에서도 낭비가 적을 것이다.
그럼 그냥 싱글톤 쓰면되지 왜 굳이 스프링 부트의 빈으로 관리하냐고?
그건 gpt가 잘 설명해줬다.
스프링 컨텍스트는 “단순한 싱글톤 + α”
즉, 단순한 인스턴스 공유를 넘어 제어의 역전(IoC), 유지보수성, 확장성을 가능하게 해주는 핵심 도구입니다.
코드로 보자면
아래는 싱글톤
public class PostService {
    private static final PostService instance = new PostService();
    private Connection connection;

    private PostService() {
        try {
            connection = DriverManager.getConnection("jdbc:mysql://localhost:3306/test", "root", "1234");
        } catch (Exception e) {
            e.printStackTrace();
        }
    }

    public static PostService getInstance() {
        return instance;
    }

    public void save(Post post) {
        try {
            connection.setAutoCommit(false);
            // insert logic
            connection.commit();
        } catch (Exception e) {
            connection.rollback();
        }
    }
}
아래는 스프링이다.
@Service
public class PostService {

    private final PostRepository postRepository;

    public PostService(PostRepository postRepository) {
        this.postRepository = postRepository;
    }

    @Transactional
    public void save(Post post) {
        postRepository.save(post);
    }
}
확연히 차이가 드러난다.
의존성 주입
모든 객체가 빈(bean)은 아니다. 어떤 객체가 bean이 될지 지정해주어야 한다.
다양한 방법이 있지만, 이번 프로젝트?에서는 아마도 간단한 어노테이션만 사용할 예정이다.
모든 객체가 빈이 아니라는 말은 다시 말해, 모든 객체가 스프링 컨텍스트 안으로 들어가는 것은 아니라는 얘기다.
그리고 의존성 주입은 이런 스프링 컨텍스트 안에 있는 빈들 사이에 의존 관계를 만들어주는 것이다.
@Component  // 자동 빈 등록
public class MyUtil {}

@Service  // 자동 빈 등록
public class PostService {}

@Repository  // 자동 빈 등록
public class PostRepository {}

@Controller  // 자동 빈 등록
public class PostController {}
위 어노테이션을 통해 빈으로 등록이 된다.
예를 들어
@RestController
public class PostController {

    private final PostService postService;

    public PostController(PostService postService) {
        this.postService = postService;
    }
}
이런 코드가 있을 때
postService가
@Service
public class PostService {
    ...
}
이런 코드면 의존성이 주입되지만,
public class PostService {
    ...
}
이런 코드면 bean 객체가 아닌 그냥 객체로 선언된다.
그리고 그런 경우에는 애초에 new 선언을 해주긴 한다.
앞서 설명했던 빈 등록 어노테이션은 추가적인 기능이 있는 것으로 안다.
-
@Component
• 가장 기본적인 컴포넌트 식별자
• 특정 역할 없이 단순히 빈으로 등록하고 싶을 때 사용
• 스프링이 자동으로 빈으로 등록함 -
@Service
• 비즈니스 로직을 담당하는 서비스 계층 클래스에 사용
• 내부적으로 @Component와 동일하게 작동하며, 빈으로 등록됨
• 가독성과 명확한 역할 구분을 위해 사용 -
@Repository
• 데이터 액세스 계층(DAO) 클래스에 사용
• 예: DB 조회, 저장, 수정 등을 담당하는 클래스
• @Component 역할 + 예외 변환 처리 지원
• 예외 발생 시, 스프링이 데이터 접근 예외로 변환해줌 (DataAccessException 등) -
@Controller
• 웹 계층에서 요청을 받고, JSP/HTML을 반환하는 일반 MVC 컨트롤러
• 주로 뷰 템플릿을 반환하는 경우 사용
• @Component 역할 포함
-
@RestController
• @Controller + @ResponseBody 조합
• 반환값을 JSON, XML 등 HTTP Response Body로 직접 반환
• 주로 REST API 서버에서 사용
• 템플릿 뷰가 아닌, 데이터(JSON) 를 반환할 때 적합
스프링에 대한 대략적인 설명이 끝났다.
물론 더 깊게 들여다보면 더 어려운 내용이 나오긴한다.
(위의 내용 중 MVC도 중요하다. 그리고 AI가 제어의 역전도 설명하라고 하는데 일단은 패스다.)
다시 코드 작성을 시작해보자.
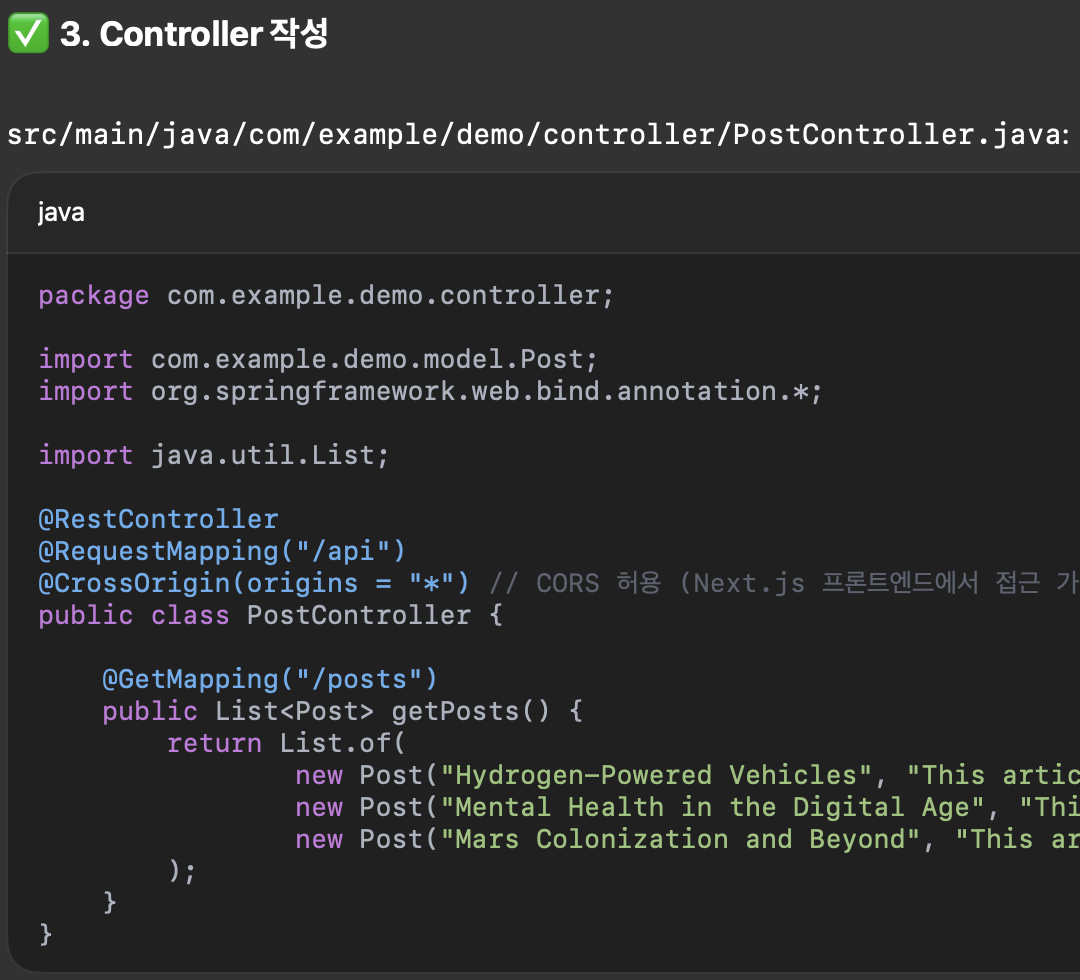
@RestController
@RequestMapping
@CrossOrigin(origins = "*")
public class PostController {

    @GetMapping("/posts")
    public List<Post> getPosts() {
        return List.of(
                new Post(
                        "Hydrogen-Powered Vehicles",
                        "This article delves into the cutting-edge technology behind hydrogen fuel cells and their environmental benefits.")
        );
    }
}
얘를 만들면 front와 back 간의 통신은 구현은 거의 완료됐다.
다시 리액트로 가서
title-card.tsx를 열어서
export interface Post {
  title: string;
  desc: string;
}
아까 어쩌고 props를 이렇게 바꾸자. 사실 큰 의미는 없다.
(근데 뒤에 나올 코드들이 Post 인터페이스를 참조하므로 헷갈리기 싫으면 바꾸자)
그리고 src 폴더에 services 폴더를 추가하고 postService.ts 파일을 추가해서 안에
import axios from 'axios';
import {Post} from '../components/title-card';

export const fetchPosts = async (): Promise<Post[]> => {
  const response = await axios.get<Post[]>('http://localhost:8080/posts');
  return response.data
}
를 추가한다. 물론 npm install axios가 됐다는 가정하에 추가한다.
마지막으로 lastest-blog-posts.tsx 코드를
"use client";

import React, { useEffect, useState } from "react";
import { Typography } from "@material-tailwind/react";
import TitleCard, {Post} from "@/components/title-card";
import { fetchPosts } from "@/services/postService";

export function LatestBlogPosts() {
  const [posts, setPosts] = useState<Post[]>([]);

  useEffect(() => {
    fetchPosts().then(setPosts).catch(console.error);
  }, [])

  return (
    <section className="py-40 px-8">
      <div className="container mx-auto mb-12">
        <Typography variant="h3" color="blue-gray">
          Check my latest blog posts
        </Typography>
      </div>
      <div className="container mx-auto grid grid-cols-1 gap-10 md:grid-cols-2 lg:grid-cols-4">
        {posts.map((props, idx) => (
          <TitleCard key={idx} {...props} />
        ))}
      </div>
    </section>
  );
}


export default LatestBlogPosts;
이렇게 수정하고 Java를 실행시키면
잘된다.
DB
사실 개인적으로 DB 세팅이 제일 어려운 것 같다.
맥을 기준으로 생각했을 때,
brew services start mariadb
를 입력하면 실행이 되는, 그 지점부터 시작하면 된다.
그 전 지점까지는 GPT의 도움을 받거나 다른 블로그를 돌아다니며 찾아보자.
준비가 됐으면, 인텔리전스의 오른쪽에 있는 데이터 베이스를 누른 뒤 MariaDB를 선택하자.
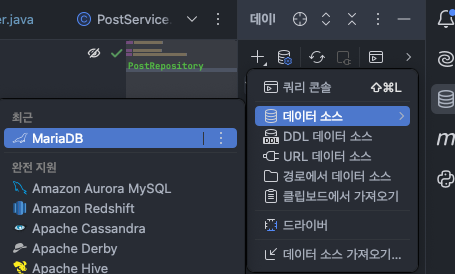
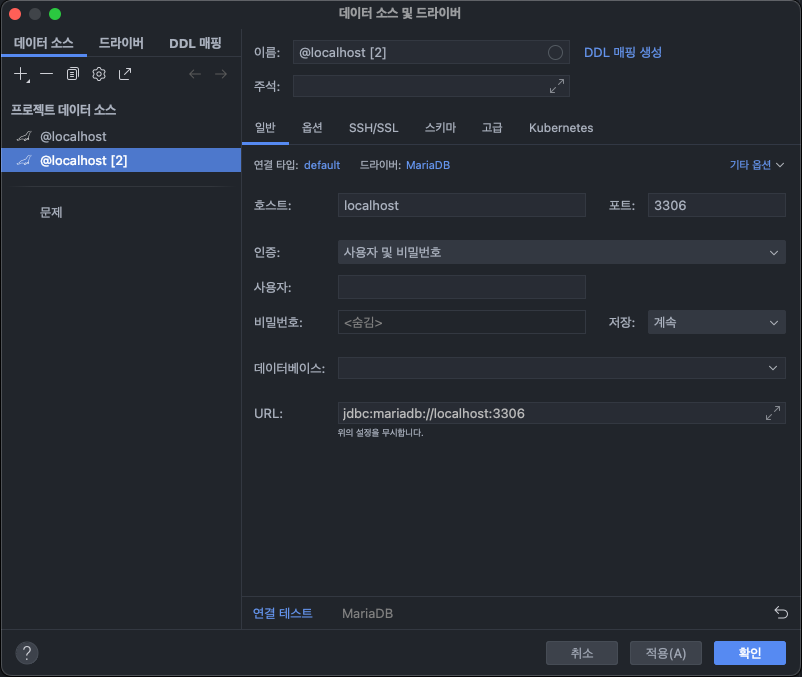
여기선 자신이 세팅했던 사용자나 비밀번호를 입력하면 된다.
그리고 마지막으로 application.properties를 아래와 같이 수정하면
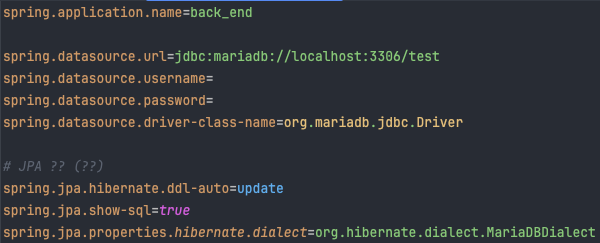
url과 username, password는 알아서 잘 채우자.
url의 마지막 'test'는 자신이 만들어뒀던 스키마로 바꾸면 된다.
이번엔 mariaDB schema에 테이블을 추가하자. mongoDB에서는 막 데이터를 넣으면
알아서 잘 해줬었는데, mariaDB는 엄격하다. 그런 거 없다.

RDBMS와 NoSQL의 차이 때문이다.
얘네의 차이는 언제 시간되면 간살로 정리를 해야겠다.
아무튼 그래서 mariaDB를 세팅해야한다.
schema가 생성되어있다는 가정하에
터미널에 mariadb를 입력해서 실행시키자.
이후 show databases;를 입력하면 schema들이 보일 것이다.
use {schema}를 입력해서 (나 같은 경우에는 use test이다)
해당 스키마로 들어간 뒤, 테이블을 하나 생성한다.
MariaDB [test]> CREATE TABLE posts (
    ->     id INT AUTO_INCREMENT PRIMARY KEY,
    ->     title VARCHAR(100),
    ->     desc TEXT
    -> );
MariaDB [test]> ALTER TABLE posts MODIFY id BIGINT AUTO_INCREMENT;ID 값이 자동으로 증가하도록 만들고
스프링에서도 어떤 테이블을 사용할건지 명시할 것이다.
준비가 끝났다..
너무 단순하게 말했지만, 아마 과정이 생각보다 복잡할 것이다.
일단 MariaDB를 실행시키기까지 힘들 수도 있고
데이터 소스가 제대로 추가되지 않을 수도 있다.
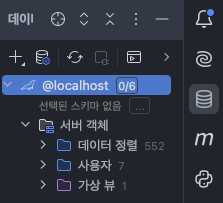
그 과정이 원활하게 이루어졌다면 아래처럼 나올 것이다.
Implementation
이제 준비?가 끝났으니 본격적으로 시작해보자.
- 회원가입
- 글쓰기
- 글 불러오기
- 글 목록 리스트로 만들기
- 댓글
기능을 구현하면 된다.
이번엔 진짜다.
먼저 Post 클래스를 수정하자.
@Entity
@Table(name = "posts")
public class Post {
    @Id @GeneratedValue(strategy = GenerationType.IDENTITY)
    private Long id;

    private String title;
    private String desc;

    public Post() {}

    public Post(String title, String desc) {
        setTitle(title);
        setDesc(desc);
    }

    public void setTitle(String title) {
        this.title = title;
    }

    public void setDesc(String desc) {
        this.desc = desc;
    }

    public String getTitle() {
        return title;
    }

    public String getDesc() {
        return desc;
    }
}
@Entity랑 @Id @GeneratedValue를 추가하면 된다.
@Table을 추가하고 name에는 table 이름을 써주면 된다.
그 아래에 Post(){}를 추가한다. (사실 처음부터 있었는지 기억이 가물가물하다)
entity가 제대로 추가되지 않는다면 jparepository 의존성을 추가하지 않았기 때문이니 설치하자.
pom.xml에 아래 코드를 추가하면 된다.
        <dependency>
            <groupId>org.springframework.boot</groupId>
            <artifactId>spring-boot-starter-data-jpa</artifactId>
        </dependency>
다음에는 repository에서 PostRepository 인터페이스를 추가한다.
PostRepository는
package com.expample.blog.repository;

import com.expample.blog.model.Post;
import org.springframework.data.jpa.repository.JpaRepository;

public interface PostRepository extends JpaRepository<Post, Long> {
}
이런 형태다.
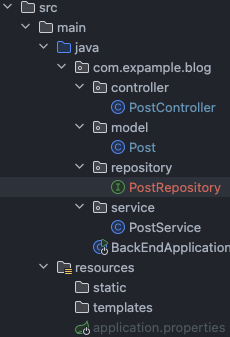
그리고 현재 폴더 구조는 아래와 같다.
사실 항상 궁금했다. 왜 repository는 클래스로 다루지 않고 인터페이스로 다룰까?
-GPT-
Spring에서 Repository를 인터페이스로 선언하는 이유는 단순히 스타일의 문제가 아니라, 유연성과 확장성, 프레임워크의 자동 처리 능력을 활용하기 위함입니다.
아래에서 구체적으로 설명드릴게요.
✅ 1. 스프링 데이터 JPA가 구현체를 자동으로 만들어주기 때문
public interface PostRepository extends JpaRepository<Post, Long> {
}
위 코드는 우리가 구현하지 않았지만, 스프링이 런타임에 구현체를 자동으로 생성해줍니다.
👉 즉, PostRepositoryImpl 같은 클래스는 우리가 직접 만들 필요가 없습니다.
save(), findById() 같은 메서드를 JPA가 알아서 구현해줍니다.
요약:
- 우리가 인터페이스만 정의하면
- 스프링이 프록시 객체로 구현체를 만들어 등록(@Component처럼)
→ 개발자는 비즈니스 로직에만 집중
✅ 2. 관심사 분리(Separation of Concerns)
- 인터페이스: “무엇을 할 것인가”를 정의
- 구현체(프레임워크 내부): “어떻게 할 것인가”를 처리
→ 이 구조 덕분에:
- 테스트 용도로 가짜(Mock) 구현체 주입이 가능
- 데이터 접근 방식을 교체할 때 코드 변경 최소화
✅ 3. 테스트와 유지보수에 유리
- 예: UserRepository를 @MockBean으로 주입하고, 원하는 동작만 흉내낼 수 있음
- 변경에도 강함: JPA 대신 Mongo, JDBC 등으로 바꾸더라도 인터페이스는 그대로
✅ 4. 동적 쿼리 메서드 자동 생성
List<Post> findByTitle(String title);이런 메서드를 인터페이스에 정의만 하면, 스프링 데이터 JPA가 자동 구현합니다.
→ 클래스였다면 이걸 매번 직접 구현해야 했습니다.
✅ 5. 유연한 확장성
public interface MyCustomRepository extends JpaRepository<Something, Long>, QueryDslPredicateExecutor<Something> {
}- JPA 외에 다른 기능을 추가적인 인터페이스 조합으로 확장 가능합니다.
✅ 요약
이유 설명
구현 자동화 스프링이 구현체를 자동으로 만들어줌
관심사 분리 선언과 구현을 분리함으로써 코드 깔끔
테스트 유리 Mock 등으로 대체 쉬움
유지보수 편리 구현체 바뀌어도 인터페이스는 그대로
쿼리 메서드 자동 생성 findBy, countBy 등 자동으로 구현됨
💡 비유하자면:
인터페이스는 “리모컨”이고,
스프링이 “TV 내부 회로”를 알아서 연결해주는 겁니다.
우리는 버튼(메서드)만 누르면 되고, TV 내부는 몰라도 됩니다.
먼저 post 기능을 추가해서 db에 값을 넣는 것까지 해보자.
일단 front부터 수정할 것이다.
postService.ts에서 다음 코드를 추가하자.
export const fetchCreatePost = async (newPost: Post): Promise<Post> => {
  const response = await axios.post<Post>('http://localhost:8080/posts', newPost);
  return response.data;
};
그 다음은 app에 create-blog-posts.tsx를 추가하고 아래 코드로 추가 및 수정했다.
(구조는 latest blog posts에서 가져왔다.)
"use client";

import { Button, Typography } from "@material-tailwind/react";
import {Post} from '../components/title-card';
import { fetchCreatePost } from "@/services/postService";

export function CreateBlogPosts() {

  const tmpPost: Post = {
    title: "test",
    contents: "real test"
  };

  return (
    <section className="py-40 px-8">
      <div className="container mx-auto mb-2">
        <Typography variant="h3" color="blue-gray">
          Create blog posts
        </Typography>
        <Button color="gray" onClick={() => fetchCreatePost(tmpPost)}>create</Button>
      </div>
    </section>
  );
}


export default CreateBlogPosts;
그리고 page.tsx CreateBlogPosts 컴포넌트를 추가한다.
export default function Campaign() {
  return (
    <>
      <Navbar />
      <Hero />
      <LatestBlogPosts />
      <CreateBlogPosts />
      <Footer />
    </>
  );
}
참고로 post 인터페이스 구조를 바꿨다.
export interface Post {
  title: string;
  contents: string;
}
안에 desc가 db 쿼리 예약어랑 겹쳐서 오류가 난다고 한다...
위 코드들을 따라가다보면 버그들이 날 수 있는데, 디버깅을 수시로 하고 있기 때문이다...
그래서 기억나는 것들만 다시 적어두는 편이다.
프론트가 끝났으면 백으로 가서 PostController에서 post api를 만든다.
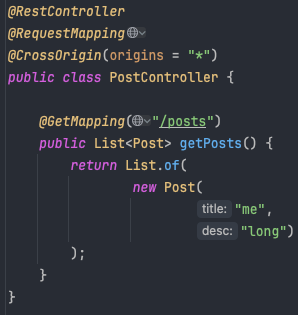
@RestController
@RequestMapping("/posts")
@CrossOrigin(origins = "*")
public class PostController {
private static final Logger log = LoggerFactory.getLogger(PostController.class);
private final PostRepository repo;
public PostController(PostRepository repo) {
this.repo = repo;
}
@GetMapping
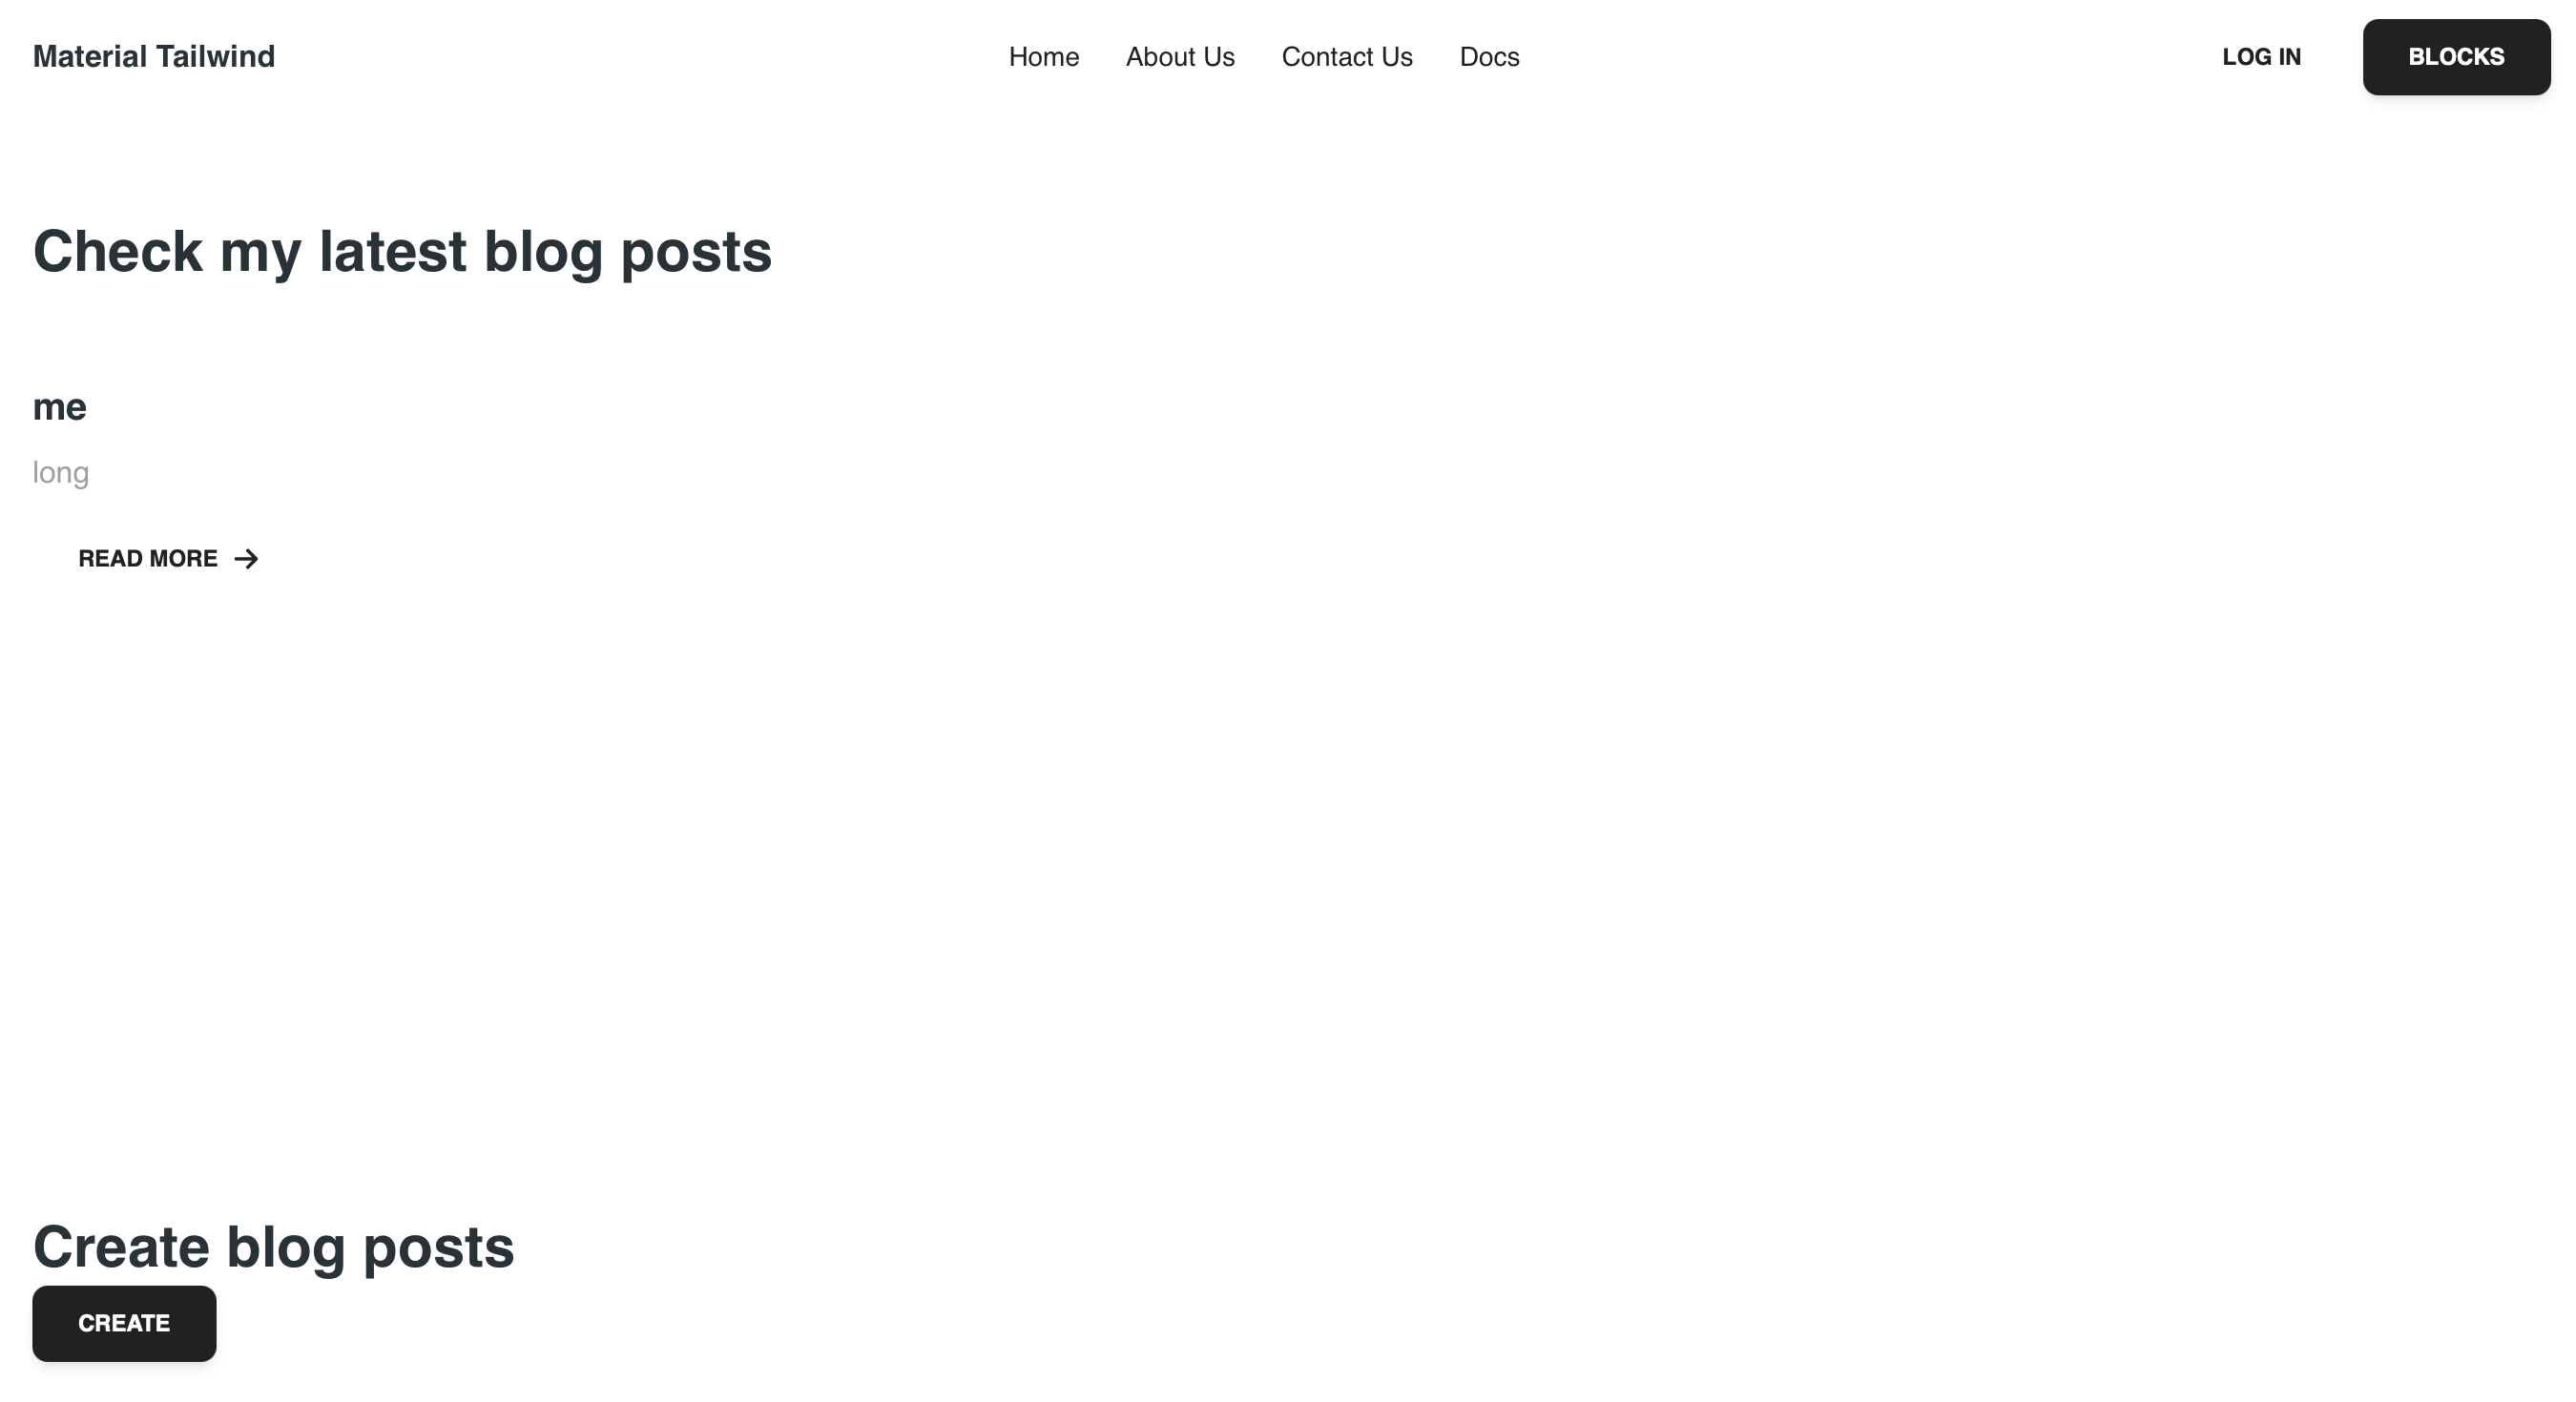
public List<Post> getPosts() {
return List.of(
new Post(
"me",
"long")
);
}
@PostMapping
public Post createPost(@RequestBody Post post) {
log.info(post.getTitle());
return repo.save(post);
}
}로그는 디버깅용이다.
이렇게 수정됐으면
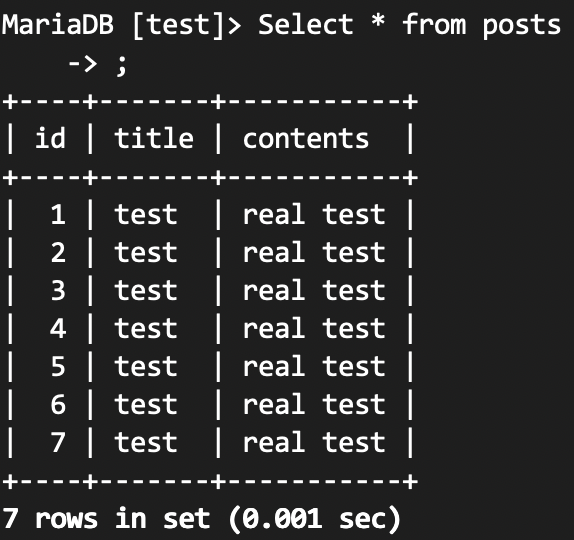
여기서 create를 막 눌러서 posts table에 잘 들어가는지 확인해보자.
참고로 테스트용 포스트는 위에서 tmpPost이다.
MariaDB [test]> Select * from posts;
이제 back이 get을 db에서 가져올 수 있도록 바꿀 것이다.
간단하다. get에 아래 코드만 추가하면 된다.
@GetMapping
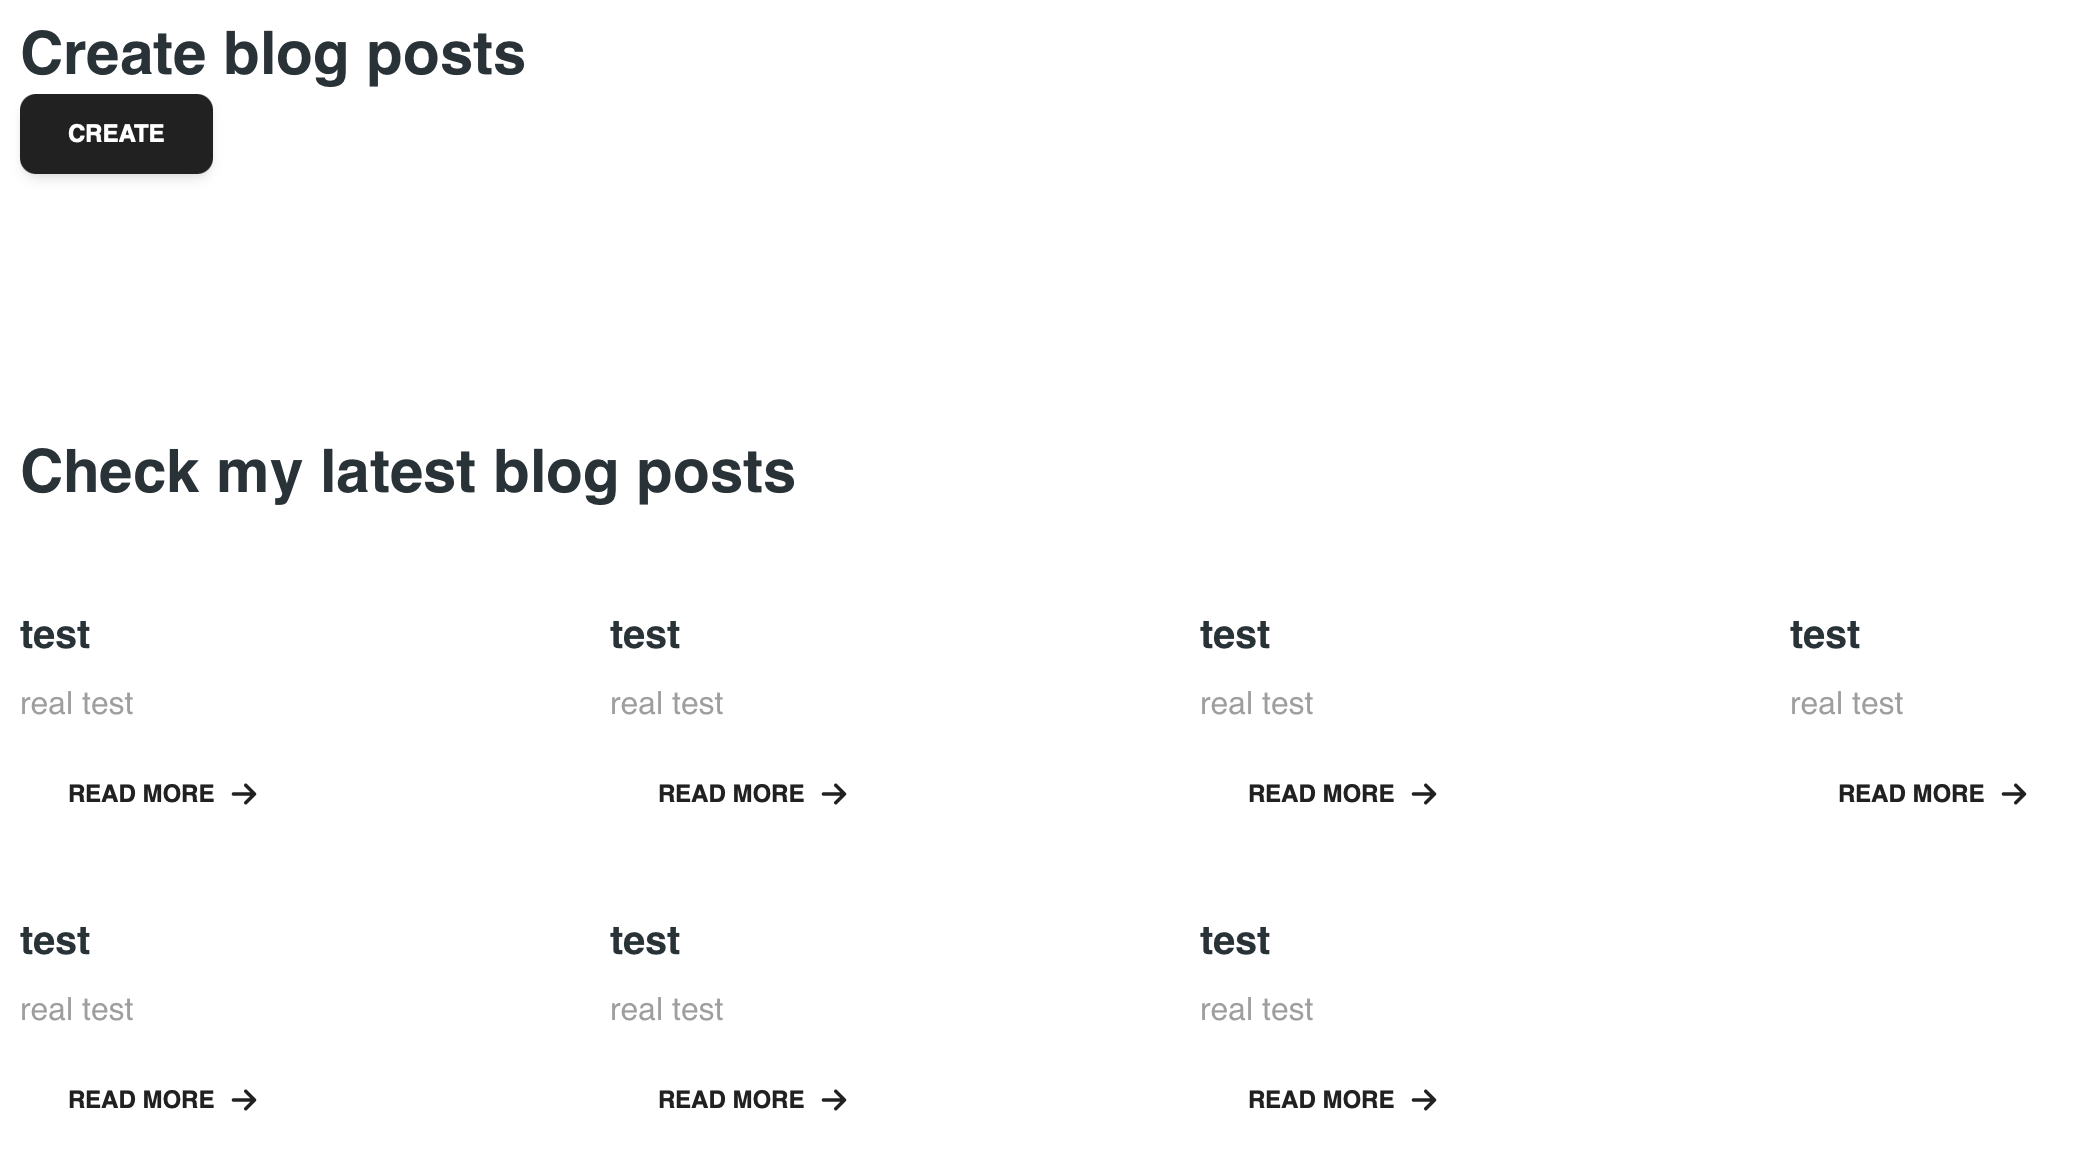
public List<Post> getPosts() {
return repo.findAll();
}
순서랑 디자인만 좀 변경했다.
이제 로그인 페이지와 회원가입 페이지를 만들 예정이다.
react next는 특이한게 폴더 구조를 웹서버 구조로 사용하는 것 같다.
(아닐 수도 있다.)
그래서 app의 하위 폴더에 페이지의 주소가 담긴 폴더를 만들어야하는 것 같다.
next/link에서 Link를 import하고 navbar.tsx를 수정한 뒤
app의 하위 폴더에 login폴더를 만들고 새 page.tsx를 작성했다.
<navbar.tsx>
import React from "react";
import {
  Navbar as MTNavbar,
  Collapse,
  Button,
  IconButton,
  Typography,
} from "@material-tailwind/react";
import { Bars3Icon, XMarkIcon } from "@heroicons/react/24/outline";
import Link from "next/link";
...

export function Navbar() {
  const [open, setOpen] = React.useState(false);
  const [isScrolling, setIsScrolling] = React.useState(false);

  function handleOpen() {
    setOpen((cur) => !cur);
  }

  ...

          <div className="hidden items-center lg:flex gap-2">
          <Link href="/login">
            <Button
              variant="text"
              color={isScrolling ? "gray" : "white"}
            >
              Log in
            </Button>
          </Link>
          <a href="https://www.material-tailwind.com/blocks" target="_blank">
            <Button color={isScrolling ? "gray" : "white"}>Blocks</Button>
          </a>
        </div>
  ...
이렇게 버튼을 Link라는 컴포넌트로 감쌌다.
이 코드는 테일윈드 로그인에서 그대로 가져왔다.
<login-page.tsx>
export default function Login() {
  return (
    <>
      {/*
        This example requires updating your template:

        ```
        <html class="h-full bg-white">
        <body class="h-full">
        ```
      */}
      <div className="flex min-h-full flex-1 flex-col justify-center px-6 py-12 lg:px-8">
        <div className="sm:mx-auto sm:w-full sm:max-w-sm">
          <img
            alt="Your Company"
            src="https://tailwindcss.com/plus-assets/img/logos/mark.svg?color=indigo&shade=600"
            className="mx-auto h-10 w-auto"
          />
          <h2 className="mt-10 text-center text-2xl/9 font-bold tracking-tight text-gray-900">
            Sign in to your account
          </h2>
        </div>

        <div className="mt-10 sm:mx-auto sm:w-full sm:max-w-sm">
          <form action="#" method="POST" className="space-y-6">
            <div>
              <label htmlFor="email" className="block text-sm/6 font-medium text-gray-900">
                Email address
              </label>
              <div className="mt-2">
                <input
                  id="email"
                  name="email"
                  type="email"
                  required
                  autoComplete="email"
                  className="block w-full rounded-md bg-white px-3 py-1.5 text-base text-gray-900 outline-1 -outline-offset-1 outline-gray-300 placeholder:text-gray-400 focus:outline-2 focus:-outline-offset-2 focus:outline-indigo-600 sm:text-sm/6"
                />
              </div>
            </div>

            <div>
              <div className="flex items-center justify-between">
                <label htmlFor="password" className="block text-sm/6 font-medium text-gray-900">
                  Password
                </label>
                <div className="text-sm">
                  <a href="#" className="font-semibold text-indigo-600 hover:text-indigo-500">
                    Forgot password?
                  </a>
                </div>
              </div>
              <div className="mt-2">
                <input
                  id="password"
                  name="password"
                  type="password"
                  required
                  autoComplete="current-password"
                  className="block w-full rounded-md bg-white px-3 py-1.5 text-base text-gray-900 outline-1 -outline-offset-1 outline-gray-300 placeholder:text-gray-400 focus:outline-2 focus:-outline-offset-2 focus:outline-indigo-600 sm:text-sm/6"
                />
              </div>
            </div>

            <div>
              <button
                type="submit"
                className="flex w-full justify-center rounded-md bg-indigo-600 px-3 py-1.5 text-sm/6 font-semibold text-white shadow-xs hover:bg-indigo-500 focus-visible:outline-2 focus-visible:outline-offset-2 focus-visible:outline-indigo-600"
              >
                Sign in
              </button>
            </div>
          </form>

          <p className="mt-10 text-center text-sm/6 text-gray-500">
            Not a member?{' '}
            <a href="#" className="font-semibold text-indigo-600 hover:text-indigo-500">
              Start a 14 day free trial
            </a>
          </p>
        </div>
      </div>
    </>
  )
}
그 다음은 app/sign-up/sign-up.tsx 이다.
Debug
진짜 어이없던 버그
              <button
                type="button"
                className="flex w-full justify-center rounded-md bg-indigo-600 px-3 py-1.5 text-sm/6 font-semibold text-white shadow-xs hover:bg-indigo-500 focus-visible:outline-2 focus-visible:outline-offset-2 focus-visible:outline-indigo-600"
                onClick={async () => {
                  if (loginInfo.email === "" || loginInfo.password === "") {
                    alert("No Info");
                    return;
                  }
                  await fetchLogin(loginInfo);
                }}
              >
type이 button이 아니고 submit이어서 네트워크로 전송조차 안되던 오류
진짜 개고생해가면서 찾았다.
CORS 문제인줄 알고 삽질을 몇 번했는지 모르겠다...