구현 계기
다중 레이어 드롭다운 메뉴는 사용자에게 다양한 옵션을 보여주는 방식으로 하나의 메인 메뉴 아래에 여러 하위 메뉴를 계층화하여 나타내는 것이다.
쿠팡, 11번가 같은 쇼핑몰 사이트와 대학교 사이트 같이 많은 정보를 제공하는 서비스에서 주로 사용한다.
| 11번가 | 한국외대 |
|---|---|
 |  |
하지만 이런 다중 레이어 메뉴를 이용할 때 사용자가 원하는 동작을 하지 않을 때가 있다.
바로 대각선으로 이동하는 경우다.
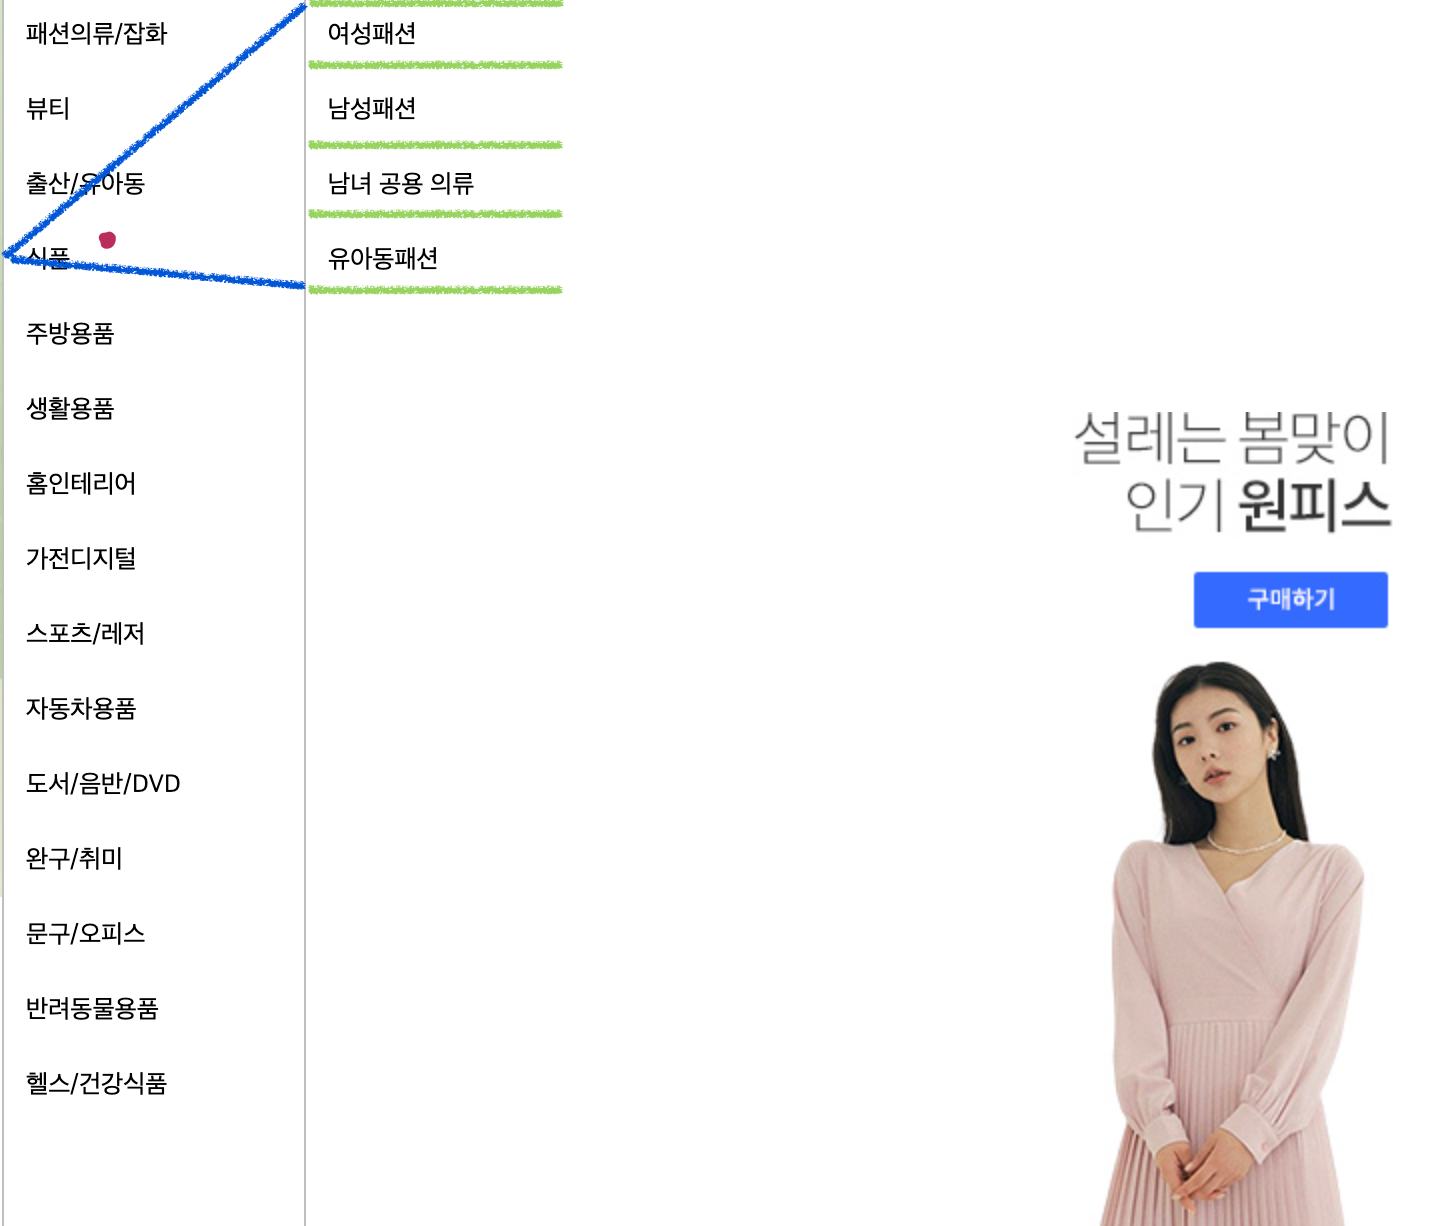
쿠팡 사이트에서 드롭다운 메뉴를 탐색해보았다.
대각선으로 이동하면 다른 메뉴가 인식되어 하위 메뉴가 변경된다.

가전디지털의 하위 메뉴에서 TV/영상 가전으로 바로 이동하고 싶지만 마우스가 홈인테리어 메뉴를 지나면서 해당 탭을 인식해 하위 메뉴가 변경되어 버린다.
TV/영상 가전으로 이동하려면 메인 탭의 바로 옆에 있는 하위 메뉴로 이동하여 고정한 후에 탐색할 수 있다.
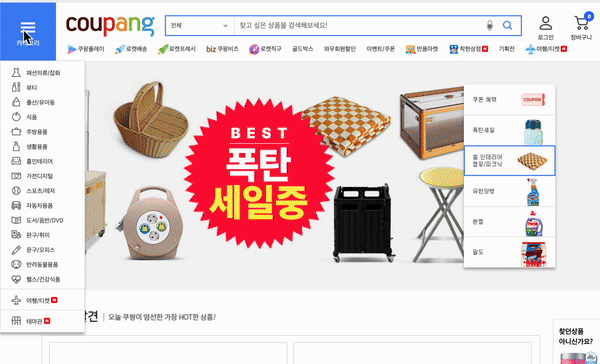
대부분의 사이트에서 이러한 불편함을 확인할 수 있었다.
사용자 경험을 개선하기 위해 대각선으로 이동할 때도 현재 메뉴탭이 유지되는 기능을 구현해보았다.
구현 계획
- mouseover 이벤트 발생시 현재 마우스 좌표를 확인함
- 마우스 좌표가 대각선 허용 범위 내에 있으면 현재 메뉴탭을 유지함
- 마우스 좌표가 대각선 허용 범위 내에 없으면 다른 탭으로 이동함
- debounce를 적용해 현재 메뉴탭에 일정시간(delay)동안 머무를 때 대각선 허용 범위를 설정한다.
- 대각선 허용 범위를 수학적으로 계산하는 것, debounce 적용이 기능 구현의 핵심일 듯 하다.
구현 과정
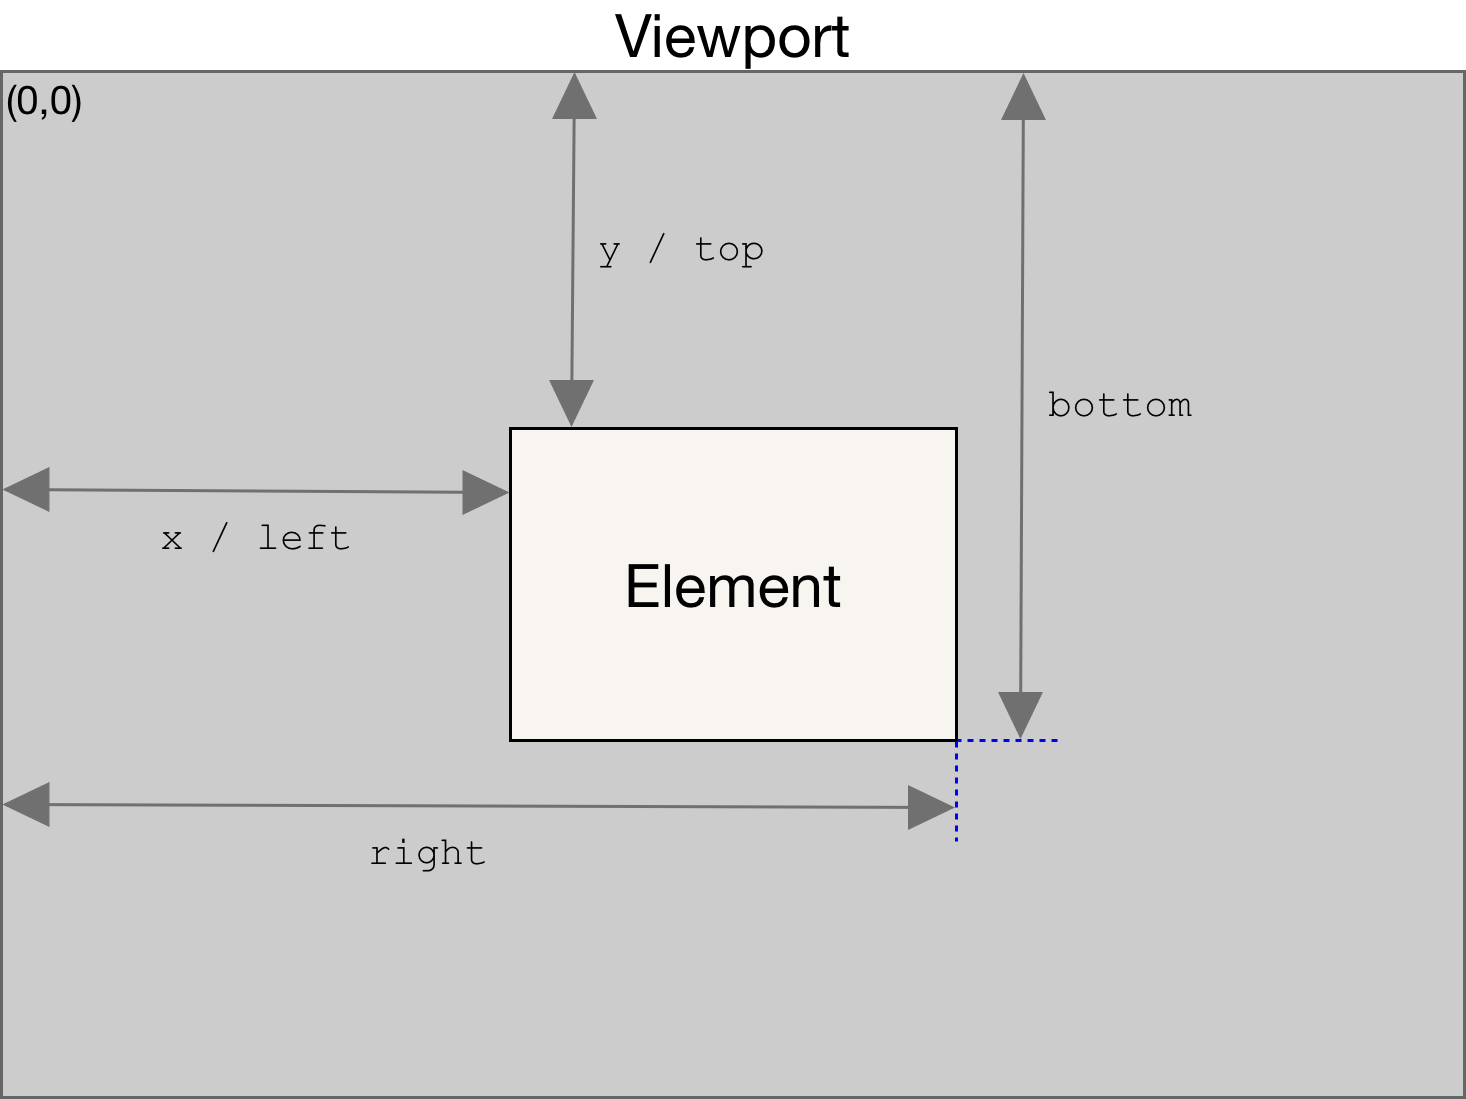
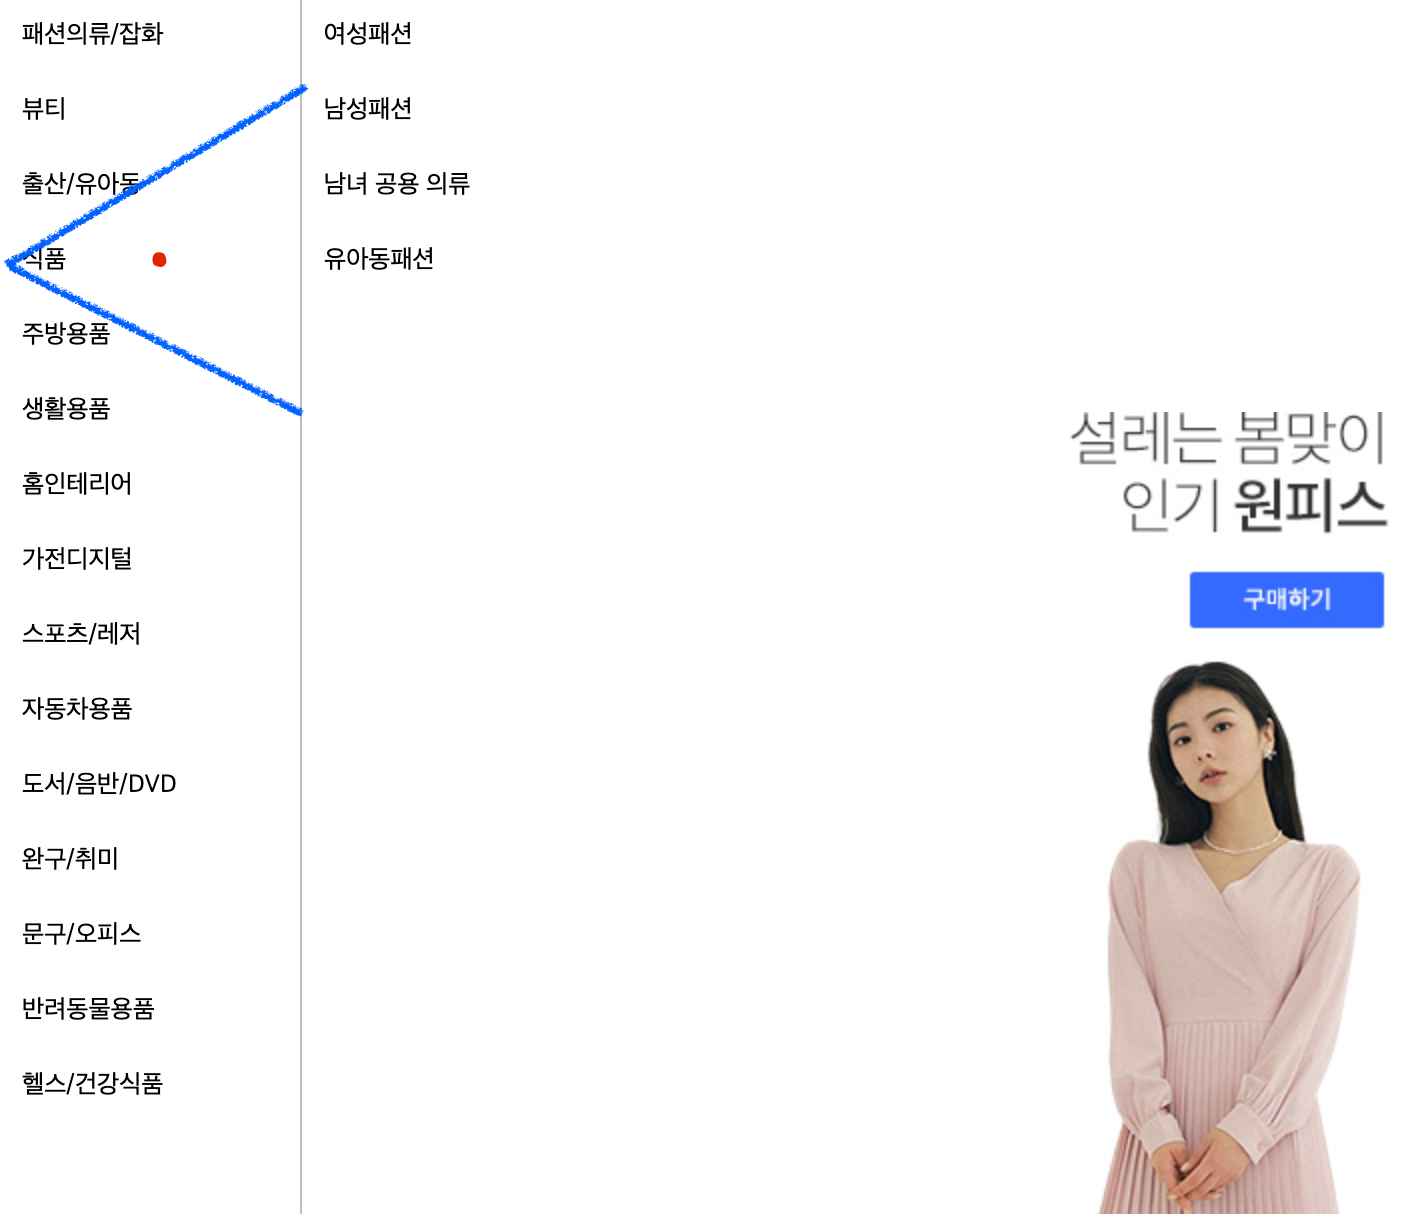
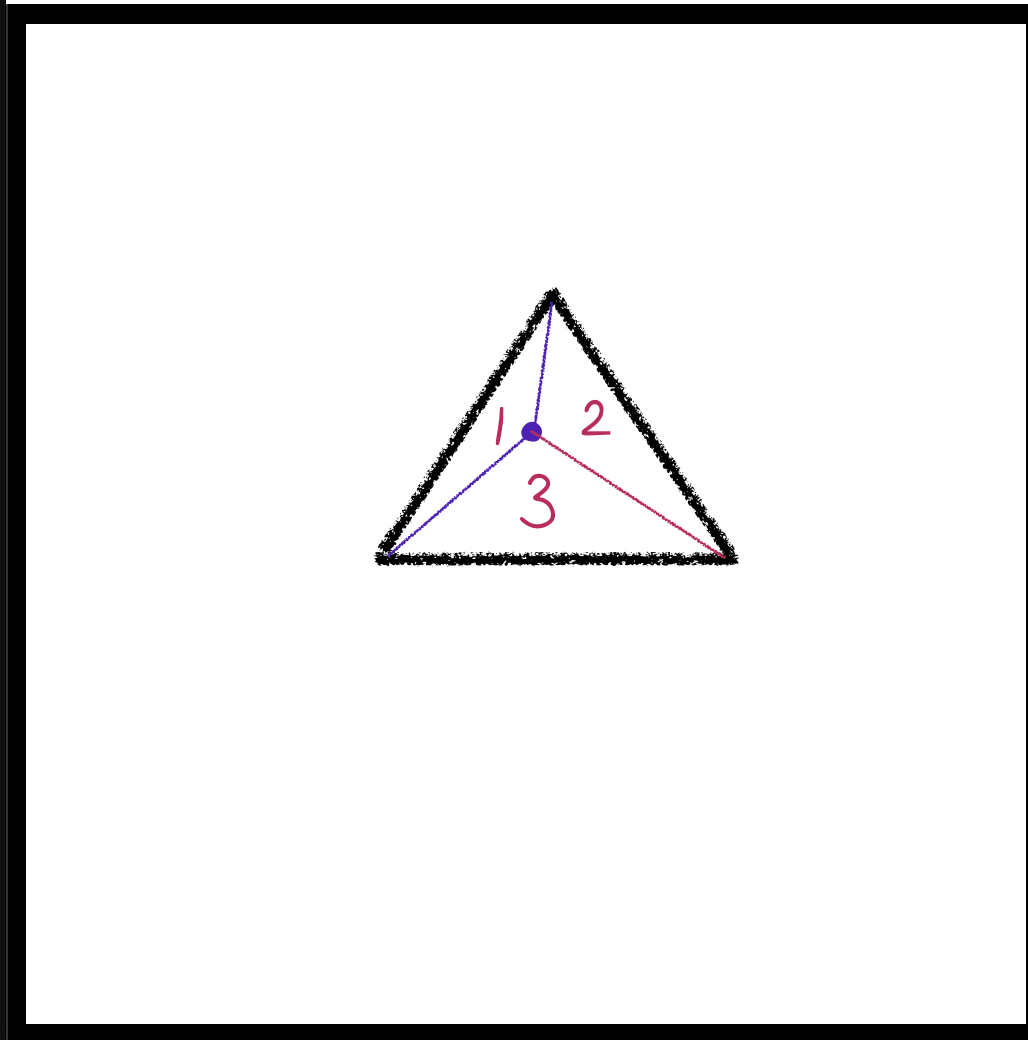
대각선 허용 범위 계산하기
드롭다운 메뉴에서 탭에 mouseover 이벤트가 발생했을 때 대각선 허용 범위를 구한다.
사진에서 빨간 점은 마우스 좌표, 파란 선은 대각선 허용 범위를 의미한다.
실패한 과정도 모두 풀어썼기 때문에 (O)로 표시한 것만 보아도 무방하다.
-
마우스의 x좌표와 현재 메뉴를 기준으로 밑변의 길이를 구하고 일정 각만큼 이동 가능 범위를 구한다. (X)
-
파란색 삼각형 내부에서 mouseover 이벤트가 delay 내에 발생하면 하위 메뉴가 바뀌지 않고 유지될 것이다.

-
-
현재 마우스 좌표를 기준으로 밑변의길이 구하기
Element 의 좌표 함수들
-event.target.getBoundingClientRect().right-event.clientX1. offsetX, offsetY: 요소 영역을 기준으로 내부 좌표를 표시한다.
2. getBoundingClientRect: 엘리먼트의 고정 위치
3. clientX, clientY: 스크롤 상관없이 사용자에게 보여지는 브라우저 페이지를 기준으로 좌표를 표시한다.
4. pageX, pageY: 스크롤을 포함한 페이지를 기준으로 좌표를 표시한다.
5. screenX, screenY: 모니터 스크린을 기준으로 좌표를 표시한다.
-
삼각비를 이용해 삼각형의 좌표를 구한다.
-
밑변의 길이를 알고 있으므로 대각선 이동각을 60도로 하여 높이를 구한다.
- 높이 = 밑변 * tan(60)
-
dot1:
{x: clientX, y: clientY} -
dot2:
{x: clientX + 밑변, y:clientY - 높이} -
dot3:
{x: clientX + 밑변, y:clientY + 높이}makeTrianglePos(mousePos, bottomWidth) { const height = bottomWidth * Math.tan(60); const dot2 = { x: mousePos.x + bottomWidth, y: mousePos.y - height }; const dot3 = { x: mousePos.x + bottomWidth, y: mousePos.y + height }; return { dot1: mousePos, dot2, dot3 }; }
-
-
좌표 계산 코드
  setTrianglePos({ target, clientX, clientY }) {
    const bottomWidth = target.getBoundingClientRect().right - clientX;
    const mousePos = { x: clientX, y: clientY };
    const { dot1, dot2, dot3 } = this.makeTrianglePos(mousePos, bottomWidth);
    this.#pos = { dot1, dot2, dot3 };
  }
🔥 대각선 이동 범위가 너무 좁다.
- mouseover는 태그에 마우스가 진입한 순간 발생하는 이벤트이므로 같은 탭에서는 이벤트가 발생하지 않아서 새로운 좌표가 생성되지 않는다.
- 탭의 오른쪽 부분에서 좌표가 생성되었다면 이동범위가 너무 좁아져서 UX의 향상성이 잘 느껴지지 않았다.
- 대각선 이동 범위를 더 늘려보자.
- 현재 메뉴의 width를 밑변의 길이로 하고 일정 각만큼 이동 가능 범위를 구한다. (X)
- 메뉴의 어느 부분에 마우스가 위치하던지 같은 메뉴라면 같은 이동 범위를 같게 된다.
- 첫번째 좌표의 x는 target의 가장 왼쪽 값, y는 target의 중간값으로 한다.
- dot1:
{ x: target.getBoundingClientRect().top, y: getBoundingRect().top + (getBoundingRect().bottom-getBoundingRect().top)/2 }
- dot1:
- 두번째, 세번째 좌표는 위의 방식과 같이 밑변의 길이로 삼각비를 이용해서 구한 높이로 정한다.
- dot2:
{x: clientX + 밑변, y:clientY - 높이} - dot3:
{x: clientX + 밑변, y:clientY + 높이}
- dot2:
🔥 첫번째 방식보다는 대각선 이동 범위가 조금 더 넓어졌지만 벗어나는 케이스가 생긴다.
- 예를 들어, 식품 → 여성패션으로 가는 경우 이동 범위에 해당하지 않아 기능이 적용되지 않는다.
-
하위 메뉴의 처음과 끝을 기준으로 이동 범위를 정한다.(O)
- 첫번째 좌표는 위의 방식과 동일하게 x는 target의 가장 왼쪽 값, y는 target의 중간값으로 한다.
- dot1:
{ x: target.getBoundingClientRect().top, y: getBoundingRect().top + (getBoundingRect().bottom-getBoundingRect().top)/2 }
- dot1:
- 두번째 좌표는 하위 메뉴를 기준으로 하며 x좌표는 현재 메뉴의 left, y좌표는 하위 메뉴의 첫번째 자식의 top이다.
- dot2:
{ x: document.querySelector(’two-depth’).getBoundingClientRect().left, y: Array.from(document.querySelector(’two-depth’).children)[0].getBoundingClientRect().top, }
- dot2:
- 세번째 좌표도 하위 메뉴를 기준으로 하며 x좌표는 현재 메뉴의 left, y좌표는 하위 메뉴의 마지막 자식의 bottom이다.
- dot2:
{ x: document.querySelector(’two-depth’).getBoundingClientRect().left, y: Array.from(document.querySelector(’two-depth’).children).at(-1).getBoundingClientRect().bottom, }
- dot2:
- 이 경우 세 개의 좌표를 모두 구할 수 있으므로 삼각비가 필요없어진다.
- 첫번째 좌표는 위의 방식과 동일하게 x는 target의 가장 왼쪽 값, y는 target의 중간값으로 한다.
대각선 이동 범위 안에 현재 좌표가 포함되는지 확인하기
- 세 개의 좌표로 이루어진 삼각형 내에 현재 좌표 값이 포함되는지 확인한다.
- 현재 좌표를 기준으로 나눈 세 개의 삼각형의 총 넓이 ≤ 삼각형의 넓이 이면 삼각형 내에 좌표가 위치하는 것이다.
- 신발끈 공식을 이용해서 삼각형의 좌표로 삼각형 넓이를 구할 수 있다.
getAreaOfTriangle(dot1, dot2, dot3) { const l = dot1.x * dot2.y + dot2.x * dot3.y + dot3.x * dot1.y; const r = dot2.x * dot1.y + dot3.x * dot2.y + dot1.x * dot3.y; return 0.5 * Math.abs(l - r); } - 대각선 이동 범위에 현재 좌표가 존재하는지 확인하는 코드
  checkTriangleInPoint(dot1Pos, dot2Pos, dot3Pos, checkPos) {
    const basicArea = this.getAreaOfTriangle(dot1Pos, dot2Pos, dot3Pos);
    const dot12 = this.getAreaOfTriangle(dot1Pos, dot2Pos, checkPos);
    const dot13 = this.getAreaOfTriangle(dot1Pos, dot3Pos, checkPos);
    const dot23 = this.getAreaOfTriangle(dot2Pos, dot3Pos, checkPos);

    // 좌표가 설정되지 않은 초기상태
    if (basicArea === 0) return false;
    return dot12 + dot13 + dot23 <= basicArea;
  }
하위 메뉴 보여주기
- 대각선 이동 범위 내부에 현재 마우스 좌표가 위치하면 기존의 하위 메뉴를 유지한다.
- 대각선 이동 범위 외부에 현재 마우스 좌표가 위치하면 현재 선택된 메뉴의 하위 메뉴를 보여준다.
- 대각선 이동 범위가 아직 설정되지 않았을 때도 외부에 있다고 판단한다.
  dropSubMenu({ target, clientX, clientY }) {
    const mousePos = { x: clientX, y: clientY };
    if (
      !this.checkTriangleInPoint(
        this.#pos.dot1,
        this.#pos.dot2,
        this.#pos.dot3,
        mousePos
      )
    ) {
      this.controller.dropSubMenu(target.innerText);
    }
}- 대각선 이동 범위가 설정되는 순간에 마우스 좌표는 무조건 이동 범위 내에 있게 되므로 위의 조건을 만족하지 못해 하위메뉴를 정상적으로 보여줄 수 없는 경우가 생긴다. 따라서 대각선 이동 범위를 설정하는 로직 내에도 하위 메뉴를 보여주는 코드를 작성한다.
setTrianglePos({ target }) {
	(...)
	this.controller.dropSubMenu(target.innerText);
}
하위 메뉴가 2개 이상인 경우
-
하위 메뉴는 2개 이상일 수도 있다. 기능의 확장성을 위해 class로 ‘one-depth’나 ‘two-depth’를 찾는 것이 아닌
Node.nextSibling vs Element.nextElementSiblingElement.nextElementSibling을 이용해 하위 메뉴를 탐색하도록 수정했다.-
공백(whiteSpace), 텍스트(#text)를 가리지 않고 다음에 있는 것을 가져온다.
let el = document.getElementById("div-1").nextSibling; -
Element.nextElementSibling은 부모의children에서 탐색한 값을 리턴한다.- 공백(whiteSpace), 텍스트(#text) 를 포함하지 않은 Element(요소)만 가져온다.
-
두 경우 모두 현재 node나 element가 마지막인 경우 nextSibling을 null로 리턴한다.
-
ex) 다음 경우에서
childNodes과children은 어떻게 다를까?<ul> <li>A</li> <li>B</li> </ul>console.log(document.getElementTagName("ul").childNodes.length) // 5 console.log(document.getElementTagName("ul").children) // 2childNodes는#text,LI,#text,LI,#text로 총 5개다. 공백은 text로 읽힌다.children은LI,LI로 총 2개다.
-
- 하위 메뉴가 없는 경우 이동 범위를 계산할 필요가 없으므로 early return 한다.
 setTrianglePos({ target }) {
    const nextDepth = target.closest("ul").nextElementSibling;
    if (!nextDepth?.clientWidth) return;

    const { top, bottom, left } = target.getBoundingClientRect();
    const dot1 = { x: left, y: top + (bottom - top) / 2 };
    const dot2 = {
      x: nextDepth.getBoundingClientRect().left,
      y: Array.from(nextDepth.children)[0].getBoundingClientRect().top,
    };
    const dot3 = {
      x: nextDepth.getBoundingClientRect().left,
      y: Array.from(nextDepth.children).at(-1).getBoundingClientRect().bottom,
    };

    this.#pos = { dot1, dot2, dot3 };
    this.controller.dropSubMenu(target.innerText);
  }
어느 시점에 대각선 이동이 가능하게 할 것인가?
-
현재 메뉴에서 delay 내에 대각선 이동이 가능한 경우
- 현재 대각선 이동 범위를 넓게 설정했기 때문에 delay 내에 대각선으로 이동하지 않고 mainMenu에서 다른 메뉴를 계속 탐색하는 경우 대각선 범위 내로 인식되어 다른 탭으로 제대로 이동되지 않는 이슈가 발생했다.
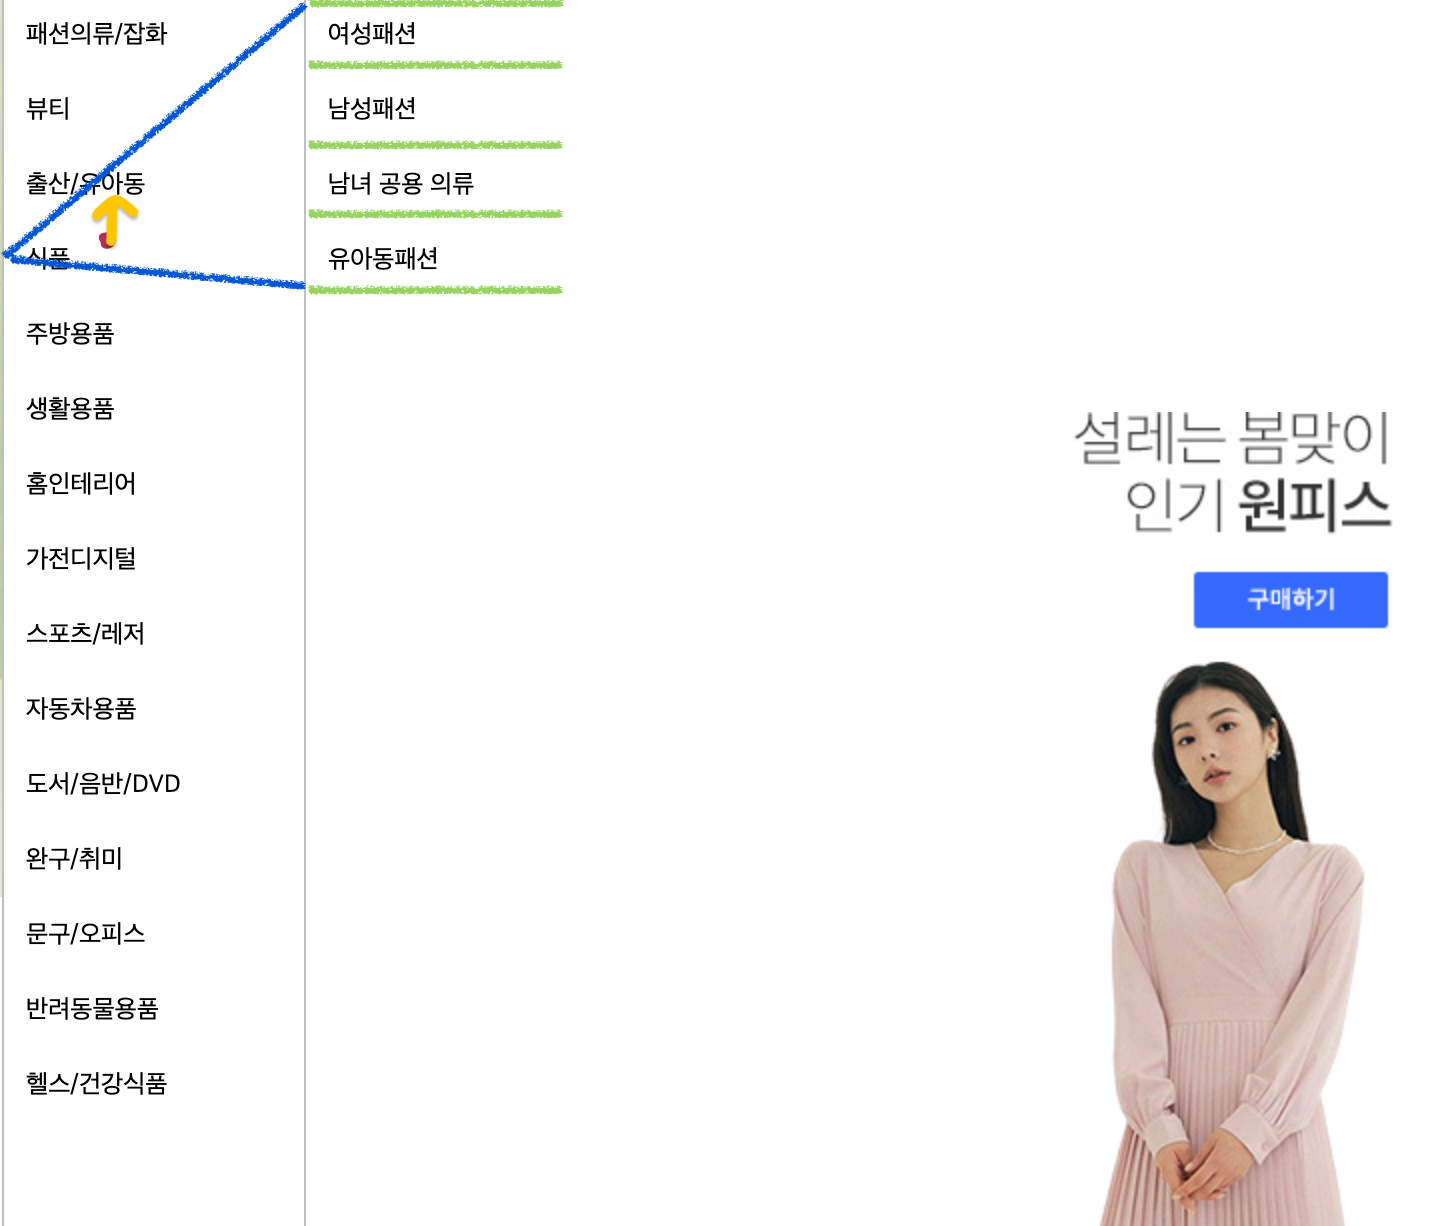
- 위의 경우 식품에서 출산/유아동으로 이동시 대각선 범위에 속해서 탭이 이동하지 않는다.
-
현재 메뉴에서 delay 후에 대각선 이동이 가능한 경우
- 다중 레이어 드롭다운 메뉴의 경우 현재 메뉴에서 탭을 이동하며 하위 메뉴를 탐색하다가 원하는 하위 메뉴가 생겼을 때 이동하는 경우가 많다고 생각한다.
- 따라서 현재 메뉴에서 일정 시간 머물렀을 때 대각선 이동 범위를 설정한다.
- debouncing을 적용해서 마지막에 발생한 mouseover 이벤트의 delay 후 대각선 이동 범위를 설정한다.
- 하지만 이 경우 역시 delay 후에 대각선 이동이 아닌 현재 메뉴의 다른 탭으로 이동을 하는 경우 대각선 범위에 속한다면 이동되지 않는다.
- delay는 사용자가 불편하지 않으면서도, 대각선 범위가 너무 빨리 변경되지 않도록 하는 적정한 시간으로 설정해야 한다. (현재 0.1s)
  setEvent() {
    const DIAGNOL_MOVEMENT_DELAY = 100;
    const setPos = debouncing(
      this.setTrianglePos.bind(this),
      DIAGNOL_MOVEMENT_DELAY
    );

    this.categoryBtn.addEventListener(
      "mouseover",
      ({ target, clientX, clientY }) => {
       (...)
        if (target.tagName === "LI") {
          setPos({ target, clientX, clientY });
          this.dropSubMenu({ target, clientX, clientY });
        }
      }
    );
  }
요약하기
- debounce를 적용해서 메뉴에 마우스가 일정시간(delay) 머무르는 경우 대각선 가동 범위를 설정한다.
- 대각선 가동 범위는 현재 메뉴의 left, 하위 메뉴의 첫번째 탭의 top, 하위 메뉴의 마지막 탭의 bottom을 좌표로한 삼각형이다.
- 대각선 가동 범위인 삼각형 내부에 점이 있는지 판별하고 가동 범위 내에 있다면 하위 메뉴를 유지, 밖에 있다면 현재 마우스가 위치한 메뉴의 하위 메뉴를 보여준다.
- 하위 메뉴가 여러개인 경우를 고려하여
Element.nextElementSibling을 이용하여 로직을 구현한다.
완성 결과
| 개선 전 | 개선 후 |
|---|---|
 |  |
🪄 Smart Multi Layer Dropdown Menu 보러가기
완성된 다중 레이어 드롭다운 메뉴는 위의 링크에서 확인할 수 있다.
TrobuleShooting
- 대각선 이동 범위가 반대 방향으로 잡히는 에러가 발생했다.
-
canvas로 마우스 좌표에 따라 마우스 이동 범위를 그려봤다.
canvas 코드if (this.canvas.getContext) { const ctx = this.canvas.getContext("2d"); ctx.beginPath(); ctx.moveTo(dot1.x, dot1.y); ctx.lineTo(dot2.x, dot2.y); ctx.lineTo(dot3.x, dot3.y); ctx.lineTo(dot1.x, dot1.y); ctx.stroke(); }
- 예상하는 정상 동작과 달리 삼각형 좌표가 반대로 그려지는 경우가 발생하는 것을 확인했다.
예상 동작 실제 동작 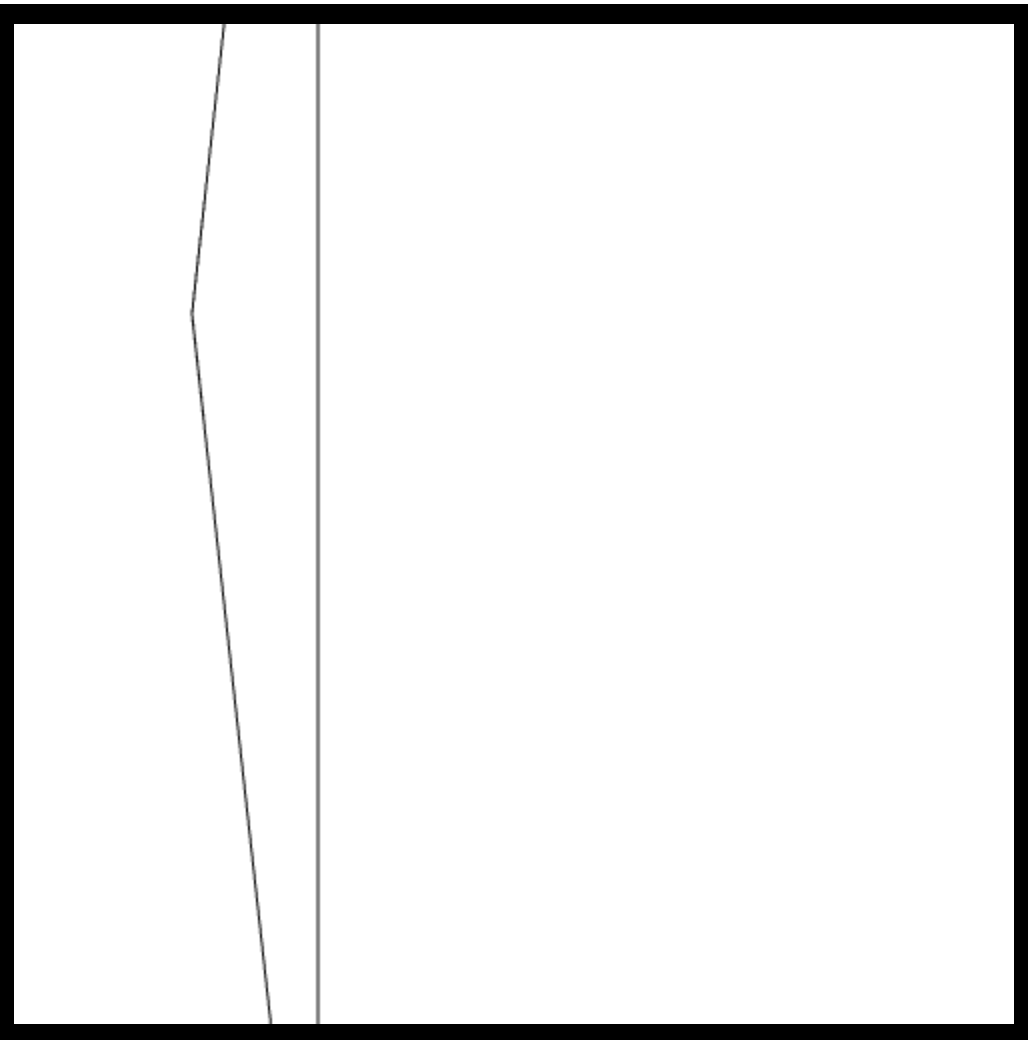
[원인]
- 다중 레이어 드롭다운 메뉴는 메뉴 버튼에 mouseover 이벤트가 발생할 때 나타나고 mouseout 이벤트가 발생하면 사라진다.
- 메뉴에 mouseover 이벤트가 발생할 때 debouncing이 적용된 삼각형의 좌표를 구하는 로직이 실행된다. debouncing이 적용되었으므로 delay동안 이벤트가 발생하면 그동안 등록되었던 타이머 함수는 취소되고 가장 마지막 delay 이후에 콜백함수가 실행된다.
- 마우스가 메뉴위에 있다가 delay 이전에 메뉴를 벗어나면 delay 이후 콜백 함수가 실행되는 시점에 DOM에서 메뉴 element는 사라진 상태다. 따라서
Element.getBoundingClientRect().right의 값은 0이 된다. - 밑변을 구하는 방식(대각선 허용 범위 계산하기-1, 2)에 따라 밑변은 -clientX 값이 된다.
삼각형 좌표를 계산해 보면 다음과 같으므로 왼쪽 방향의 삼각형 좌표가 그려진다.
- dot1:{x: clientX, y: clientY}
- dot2:{x: 0, y:clientY - height}
- dot3:{x: 0, y:clientY + height}
[해결 과정]
- getBoundingClientRect도 이벤트 발생 당시 값을 넘겨준다.
- 다음과 같이 이벤트 리스너를 한 줄로 명료하게 작성할 수 없게 된다.
this.categoryBtn.addEventListener( "mouseover", debouncing(this.setTrianglePos.bind(this)) );- DOM 탐색 코드를 추가해야 하므로 debouncing 리턴 함수와 묶어서 전달해야함
- getBoundingClientRect 값을 한 번만 구해서 this에 저장하고 계속 사용한다.
- 이벤트가 발생해야 (=Element가 DOM에 있어야) 값을 구할 수 있으므로 딱 한 번만 저장해서 사용할 수 있는 방법이 없다.
- 어차피 마우스가 메뉴를 벗어나면 메뉴 자체가 사라져서 탐색이 더이상 불가능하므로 대각선 이동 좌표가 반대로 계산되어도 상관없다.
[결과]
- 기능 구현에 문제가 없는 이슈였다.
- 콜백함수에서 현재 값을 전달하는 방식과 실행 시점이 달라 예상값과 다른 경우를 다시 학습하게 되었다.
   setEvent() {
      this.oneDepth.addEventListener(
        "mouseover",
        debouncing(this.setTrianglePos.bind(this), 1000)
      );
   }

   // 매개변수 clientX, clientY는 이벤트 발생 당시 값이 전달된다.
   setTrianglePos({ target, clientX, clientY }) {
  		// getBoundingClientRect 값은 delay 이후 콜백함수가 실행되는 시점의 값을 가져온다.
      const bottomWidth = this.oneDepth.getBoundingClientRect().right - clientX;
      (...)
    }
💡 clientX, clientY는 event가 발생할 때 매개변수로 전달되는 값이므로 그 시점의 좌표가 전달되지만 콜백함수가 실행되는 시점은 delay 이후이므로 내부 로직은 delay 이후의 DOM을 탐색한다.