Security
사용하는 이유
스프링 시큐리티는 자바 애플리케이션에 인증과 인가를 제공하는 데 중점을 둔 프레임워크이다.
인증 -> 인가 순이다.
기존 서블릿 필터에서 인증처리를 한 것보다
custom requirements(맞춤형 요구사항)을 충족시키기 위해 굉장히 쉽게 확장시킬 수 있다.
사전 개념
1) 필터
필터는 체인처럼 엮어있기 때문에 필터 체인이라고도 불리는데, 모든 request는 이 필터 체인을 반드시 거쳐야 한다.
spring security는 filter 기반으로 동작하기 때문에(AOP) spring MVC와 분리되어 관리 및 동작한다.
2) Security 용어
- 접근 주체(Principal) : 보호된 대상에 접근하는 주체(유저)
- 인증(Authentication) :
증명, 유저가 누구인지 확인하는 것, 통상 회원가입하고 로그인하는 것을 말한다.- 인가(Authorization) :
허락, 유저에 대한 권한을 확인, 허락하는 것
3) 세션-쿠키
spring security는
세션-쿠키방식으로 인증한다.
- 유저가 로그인을 시도 (http request path:
"/login", http Method: POST) - AuthenticationFilter 에서부터 user DB까지 타고 들어가는 과정이다.
- DB에 저장된 유저라면 UserDetails로 꺼내서 유저의 session 생성
- spring security의 인메모리 세션저장소인 🌟 SecurityContextHolder 에 Authentication를 저장
- 유저에게 session ID(JSESSIONID)와 함께 응답을 내려줌
- 이후 요청에서는 요청쿠키에서 JSESSIONID를 까봐서 검증 후 유효하면 Authentication를 controller단도 보내줄 수 있다.
아래는 로그인 성공 상황인데, 익명세션ID에서 security가 내려주는 유효한 세션ID(JSESSIONID)로 뒤바뀌는 장면이다.

출처: https://sjh836.tistory.com/165 [빨간색코딩]
Spring Security의 내부 구조
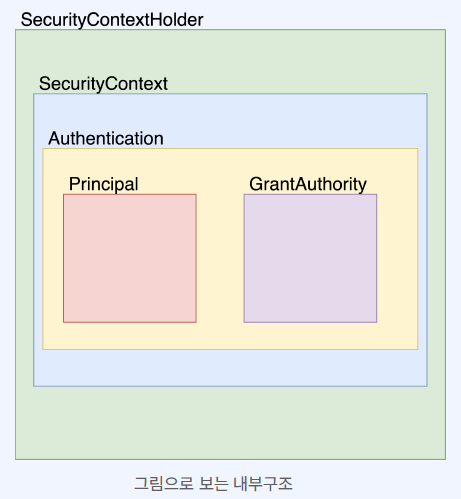
// 객체 코드
SecurityContext context = SecurityContextHolder.getContext(); // Security Context
Authentication authentication = context.getAuthentication(); // authentication
authentication.getPrincipal();
authentication.getAuthorities();
authentication.getCredentials();
authentication.getDetails();
authentication.isAuthenticated();
1) SecurityContextHolder
SecurityContextHolder는 SecurityContext를 제공하는 static 메소드(getContext)를 지원한다.
2) SecurityContext
SecurityContext 는 접근 주체와 인증에 대한 정보를 담고 있는 Context 이다.
즉, Authentication 을 담고 있습니다.
3) Authentication
Principal과 GrantAuthority를 제공합니다.
인증이 이루어 지면 해당 Athentication이 저장됩니다
4) Principal
유저에 해당하는 정보입니다.
대부분의 경우 Principal로 UserDetails를 반환합니다
5) GrantAuthority
ROLE_ADMIN, ROLE_USER 등 Principal이 가지고 있는 권한을 나타냅니다.
GrantAuthority는 prefix로 (ROLE_)이 붙습니다.
인증 이후에 인가를 할 때 사용합니다. 권한은 여러개일수 있기 때문에 Collection<(GrantedAuthority)>형태로 제공합니다.
ex) ROLE_DEVELOPER, ROLE_ADMIN
Spring Security 로그인 인증처리 과정
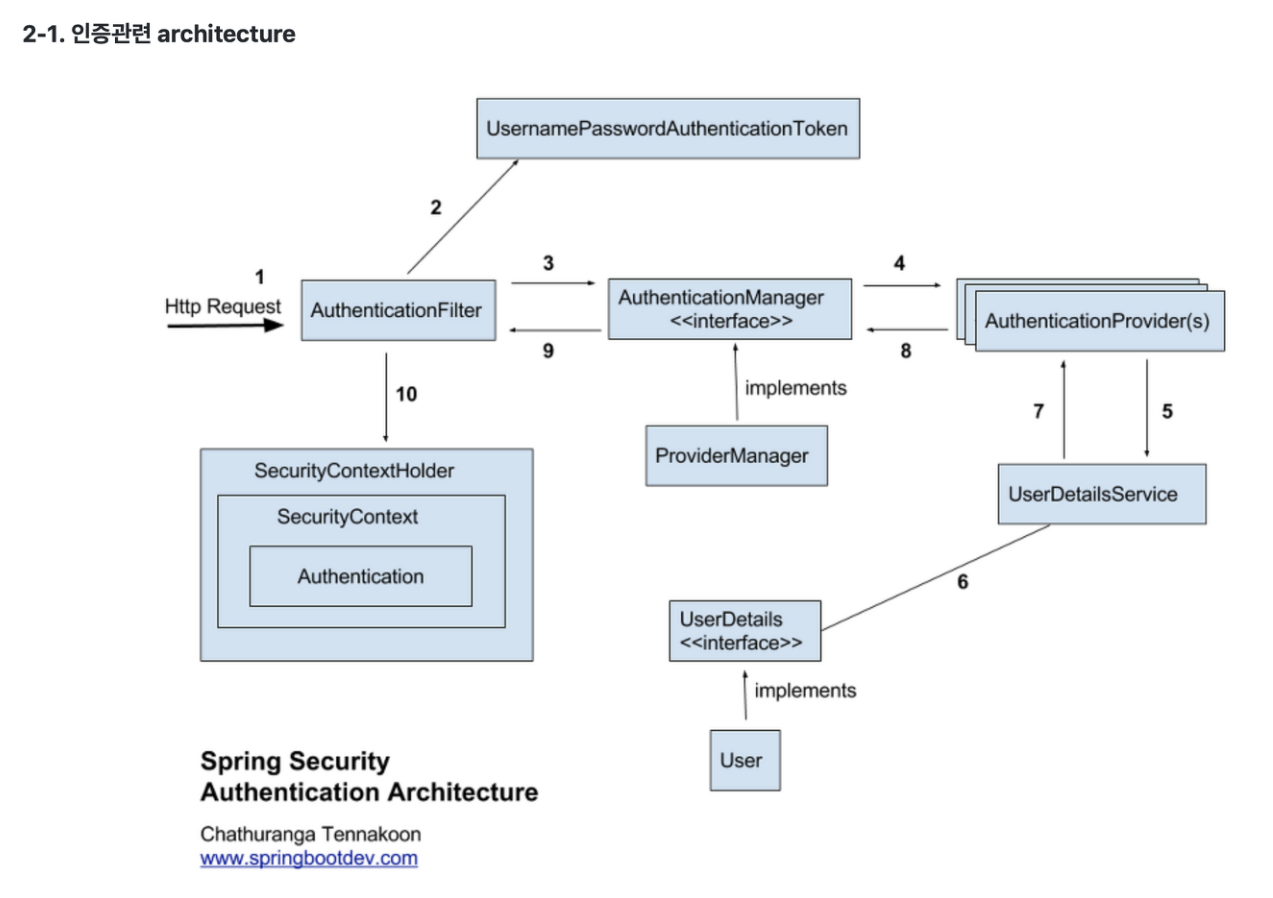
✅ 인증처리순서
1) 처음에 요청이 들어오면 AuthenticationFilter(UsernamePassAuthenticationFilter)를 거친다.
2) 요청에 따른 UsernamePasswordAuthenticationToken을 생성한다. (Authentication 인터페이스의 구현체다.)
3) UsernamePasswordAuthenticationToken(통상 Token이라고 하겠다.)을 AuthenticationManager에게 이 Token은 올바른 유저인지 물어본다.
4) AuthenticationManager는 1개 이상의 AuthenticationProvider(통상 A-Provider)를 갖고 있는데, A-Provider는 Token 객체를 적절히 판단하여 인증처리를 할려고 한다.
5) A-Provider가 우리가 직접 구현한 서비스(UserDetailsService 구현 클래스)에 해당 유저에게 인증요청을 보내 사용자 정보를 가져온다.
6) UserDetailsService 구현 클래스는 사용자 정보를 가져와 UserDetails를 반환한다.
7~10) Provider는 UserDetailsService에서 반환된 UserDetails와 클라이언트가 제공한 인증정보(Token)를 대조해서 이용자가 정당한 사용권한을 가지고 있는지 확인한다.
그리고 SecurityContext에 저장한다.
Spring Security 설정
build.gradle 추가
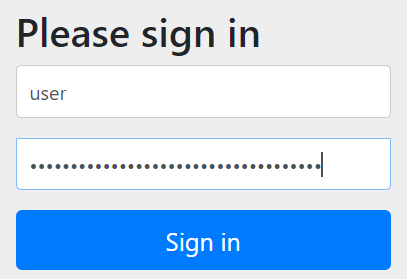
implementation 'org.springframework.boot:spring-boot-starter-security'build.gradle 셋팅만 해줘도 security password & login화면이 나온다.
security password

기존 api url을 입력해도 -> localhost:8090/login 화면으로 가게됨.
username : user(Default)
password : security password
구현 소스
SecurityConfig
// 가장 기본적인 SecurityConfig 구조
@Configuration
@EnableWebSecurity
public class SecurityConfig extends WebSecurityConfigurerAdapter {

    @Override
    protected void configure(HttpSecurity http) throws Exception {
        http
                .csrf().disable()  // csrf 크로스 사이트 위조 요청 설정, 비활성화해줘야만 restful을 사용할 수 있어
                .authorizeRequests()
                .anyRequest()
                .authenticated()
                .and()
                .httpBasic();

        // super.configure(http); // 지워줌!
    }
}
HttpSecurity http 객체
: http 요청에 대한 보안 설정 -> 페이지 권한 설정, 로그인 페이지 설정, 로그아웃 메서드 설정을 추가할 수 있다.
formLogin() 을 추가해줘야 로그인 화면이 나온다.
               ...
               .and()
               .formLogin();
이 상태에서 어플리케이션을 load하면 오류가 뜰 것이다.
[JPA]Error creating bean with name 'springSecurityFilterChain' defined in class path resource
이는 생성자주입할 Component를 찾지 못해 생긴 오류이다.
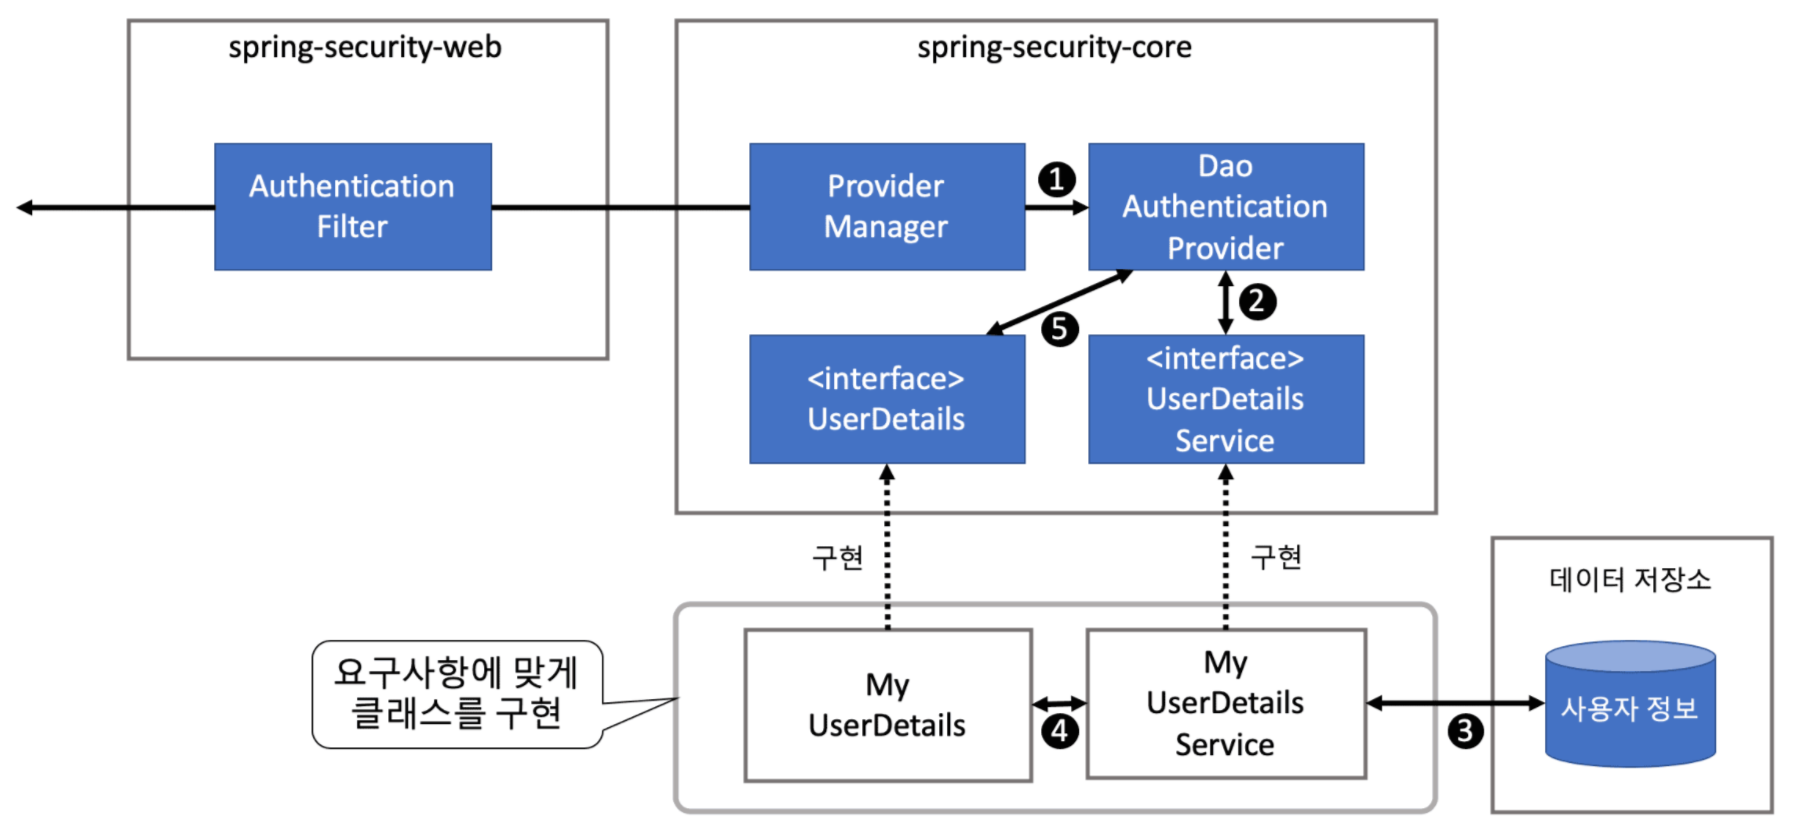
보통 UserDetailsService를 상속할 커스터마이징할 UserService를 주입해주면 해결이 된다. ex) CustomUserDetailsService
REST API Security에선
Postman의
Authorization 탭으로 들어가서
username & password 입력해준다. (브라우저에서 입력시 되지 않는다..)
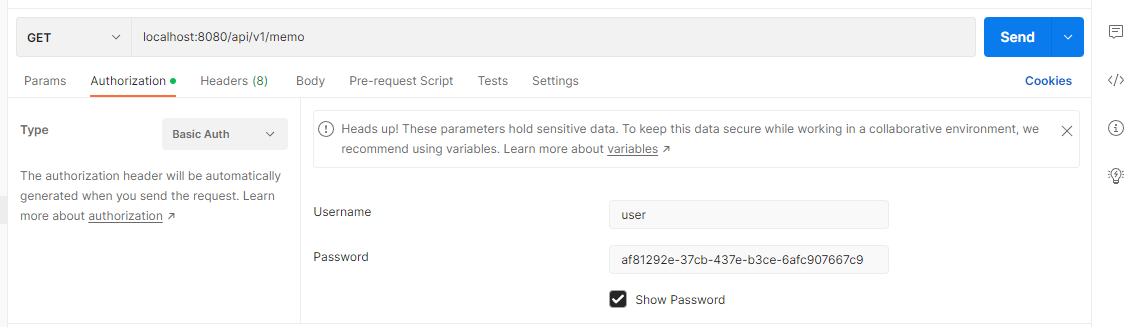
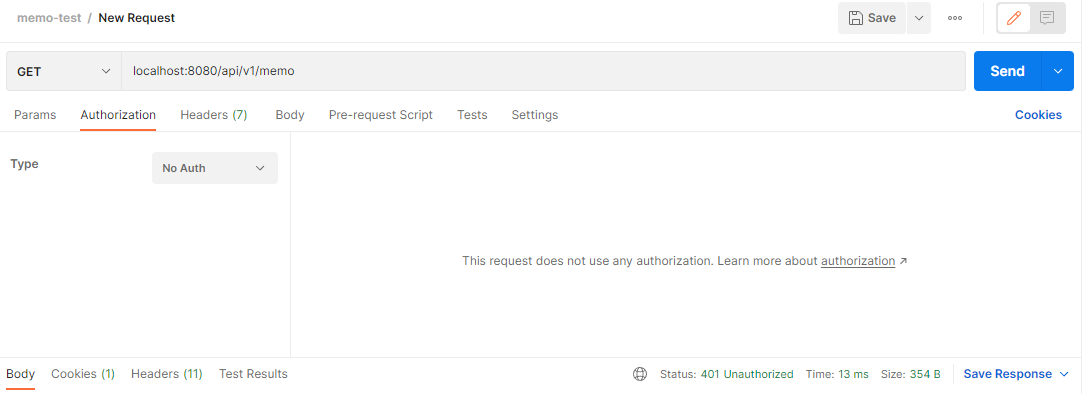
그외 Auth 인증 정보를 입력하지 않을시
401 unauthorized 으로 나온다!
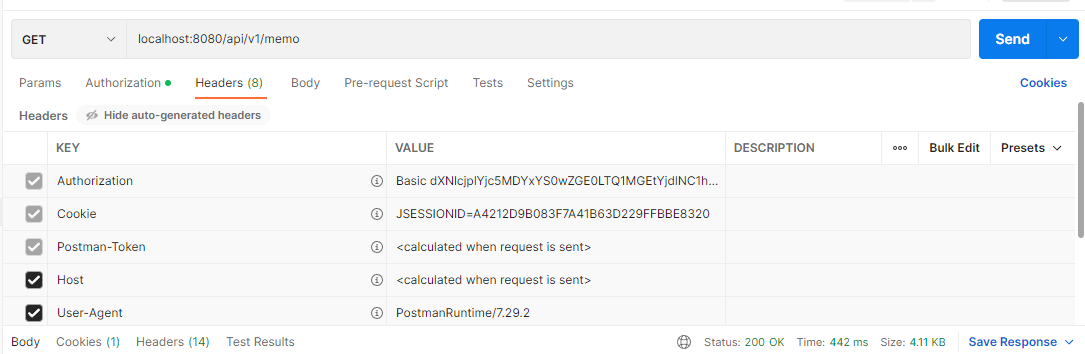
사실 이 password 값은 http header에
Authorization 값으로 Base64 인코딩처리되어 들어가 전해진다. Headers 탭에 들거가서 확인할 수 있다
=> Basic + {base64 인코딩된 password}
SecurityConfig
	// 추가
	// @RequiredArgsConstructor 로 생성자 주입
	private final CustomUserDetailsService customUserDetailsService;

	// AuthenticationManagerBuilder 로 직접 CustomUserDetailsService를 추가해줄 수 있다.
    @Override
    protected void configure(AuthenticationManagerBuilder auth) throws Exception {
        auth.userDetailsService(principalDetailsService)
                .passwordEncoder(passwordEncoder());
    }
CustomUserDetailsService 추가
// UserDetailsService 구현할 클래스
@Service
public class CustomUserDetailsService implements UserDetailsService {

    @Override
    public UserDetails loadUserByUsername(String username) throws UsernameNotFoundException {
        return null;
    }
}
실제 구현 예시
1) Spring MVC
// 가장 기본적인 SecurityConfig 구조
@Configuration
@EnableWebSecurity
@RequiredArgsConstructor
public class SecurityConfig extends WebSecurityConfigurerAdapter {

	private final MemberService memberService;

	// 비밀번호 암호화, 복호화x
    @Bean
    public PasswordEncoder passwordEncoder() {
        return new BCryptPasswordEncoder();
    }

    @Override
    protected void configure(HttpSecurity http) throws Exception {
        http.csrf().disable()  // csrf 크로스 사이트 위조 요청 설정, 비활성화해줘야만 restful을 사용할 수 있어
        http.formLogin()
                .loginPage("/member/login")
                .defaultSuccessUrl("/")
                .usernameParameter("email")
                .failureUrl("/member/login/error")
                .and()
                .logout()
                .logoutRequestMatcher(new AntPathRequestMatcher("/member/logout"))
                .logoutSuccessUrl("/");

    }

    @Override
    protected void configure(AuthenticationManagerBuilder auth) throws Exception {
        auth.userDetailsService(memberService)
                .passwordEncoder(passwordEncoder());
    }
}
@Service
@RequiredArgsConstructor
public class MemberService implements UserDetailsService {
private final MemberRepository memberRepository;
public void saveMember(Member member) {
validateDuplicateMember(member); // 중복검사
memberRepository.save(member);
}
private void validateDuplicateMember(Member member) {
Optional<Member> byEmailOptional = memberRepository.findByEmail(member.getEmail());
if (byEmailOptional.isPresent()) {
throw new IllegalStateException("이미 가입된 회원입니다.");
}
}
@Override
public UserDetails loadUserByUsername(String email) throws UsernameNotFoundException {
Member findMember = memberRepository.findByEmail(email)
.orElseThrow(() -> new RuntimeException("no member"));
return User.builder()
.username(findMember.getName())
.password(findMember.getPassword())
.roles(findMember.getRole().toString())
.build();
}
}2) Spring REST API
SecurityConfig
@Configuration
@EnableWebSecurity
@EnableGlobalMethodSecurity(prePostEnabled = true)
@RequiredArgsConstructor
public class SecurityConfig extends WebSecurityConfigurerAdapter {

    private final CustomUserDetailsService customUserDetailsService;

	// passwordEncoderConfig 로 대체!
    @Bean
    public PasswordEncoder passwordEncoder() {
        return new BCryptPasswordEncoder();
    }

    @Bean
    @Override
    public AuthenticationManager authenticationManagerBean() throws Exception {
        return super.authenticationManagerBean();
    }

    @Override
    protected void configure(HttpSecurity http) throws Exception {
        http
        		.httpBasic().disable()	// rest api이므로 기본설정 안함. 기본설정은 비인증 시 로그인 폼 화면으로 리다이렉트 된다.
                .csrf().disable()		// rest api 이므로 csrf 보안이 필요 없음. disable
                .authorizeRequests()
				.antMatchers(HttpMethod.GET, "/api/v1/memo/*").permitAll()		// '/api/*' 안돼! 정확한 url 워딩 필요!
                .antMatchers("/api/v1/user/**").permitAll()
                .anyRequest()
                .authenticated();
    //        http.httpBasic();

    }

    @Override
    protected void configure(AuthenticationManagerBuilder auth) throws Exception {
        auth.userDetailsService(customUserDetailsService)
                .passwordEncoder(passwordEncoder());
    }

}
@EnableGlobalMethodSecurity(prePostEnabled = true)
ex. hasRole ADMIN인경우에만 등록 요청이 가능하게
MemoController
@Slf4j
@RequestMapping("/api/v1/memo")
@RestController
@RequiredArgsConstructor
public class MemoController {

    private final MemoService memoService;

    @PreAuthorize("hasRole('ADMIN')")
    @PostMapping("/")
    public ResponseEntity<String> create(@RequestBody MemoCreateRequest memoCreateRequest) {

        memoService.create(memoCreateRequest);

        return new ResponseEntity<>("create memo", HttpStatus.CREATED);
    }

    @GetMapping("/")
    public ResponseEntity<List<MemoResponse>> getAll() {

        List<MemoResponse> memoList = memoService.getAll();

        return new ResponseEntity<>(memoList, HttpStatus.OK);
    }
...

}
CustomUserDetailsService
@Service
@RequiredArgsConstructor
public class CustomUserDetailsService implements UserDetailsService {

    private final UserRepository userRepository;

    @Override
    public UserDetails loadUserByUsername(String email) throws UsernameNotFoundException {
        User user = userRepository.findByEmail(email)
                .orElseThrow(() -> new MemoAPIException(ErrorCode.NO_FOUND_ENTITY, "User is not found"));

        return new PrincipalDetails(user);
    }
}
✨ 참고)
WebSecurityConfigurerAdapter를 상속받는 클래스에 @EnableWebSecurity 어노테이션을 선언하면 SecurityFilterChain이 자동으로 포함된다. WebSecurityConfigurerAdapter를 상속받아서 메서드 오버라이딩을 통해 보안 설정을 커스터마이징하는 것이 SpringSecurity의 핵심적 일이다.
주요 객체
- AuthenticationManager
인증요청을 받고 Authentication를 채운다.
유저의 requet 담긴 Authentication를 AuthenticationManager에 넘겨주고, AuthenticationManager를 구현한
ProviderManager가 처리한다. 정확히는 ProviderManager는 private List provider; 로 여러 AuthenticationProvider를 가질 수 있는데, 이것들이 처리를 해서 Authentication를 반환해 준다.(실패하면 예외를 던짐)
- AuthticationProvider
실제 인증이 일어나며, 성공하면 Authentication.isAuthenticated = true를 한다.
- Authentication
모든 접근 주체(=유저) 는 Authentication 를 생성한다. 이것은 SecurityContext 에 보관되고 사용된다.
즉, security의 세션들은 내부 메모리(SecurityContextHolder)에 쌓고 꺼내쓰는 것이다.
Authentication 인터페이스를 상속받는 UserDetails 인터페이스가 중요한 이유이다.
public interface Authentication extends Principal, Serializable {

    Collection<? extends GrantedAuthority> getAuthorities(); // Authentication 저장소에 의해 인증된 사용자의 권한 목록
    Object getCredentials(); // 주로 비밀번호
    Object getDetails(); // 사용자 상세정보
    Object getPrincipal(); // 주로 ID
    boolean isAuthenticated(); //인증 여부
    void setAuthenticated(boolean isAuthenticated) throws IllegalArgumentException;
}
- Authentication를 상속한 UserDetails
public interface UserDetails extends Serializable {

  String getUsername();      // 사용자명 반환
  String getPassword();      // 등록된 패스워드 반환(패스워드 틀리면 BadCredentialsException 발생)
  boolean isEnabled();        // 유효한 패스워드인지 판단
  boolean isAccountNonLocked();       // 계정의 잠금 상태를 판단
  boolean isAccountNonExpired();      // 계정의 유효 기간 상태를 판단
  boolean isCredentialsNonExpired();  // 자격정보의 유효 기간 상태를 판단
  Collection<? extends GrantedAuthority> getAuthorities();   // 사용자가 가진 권한 리스트 반환 (인가 처리를 할 때 필요)

}
User
@NoArgsConstructor(access = AccessLevel.PROTECTED)
@Builder
@Getter
@Entity		// User 클래스가 Mysql에 테이블이 생성이 된다.
//@DynamicInsert	// insert시에 null인 필드를 제외시켜준다.
@Table
public class User {

	@Id
	@GeneratedValue(strategy = GenerationType.IDENTITY)
	private int id;

	@Column(nullable = false, length = 100, unique = true)
	private String name;

	@Column(nullable = false, length = 100)
	private String password;

	@Column(nullable = false, length = 50)
	private String email;

	// 도메인(범위)설정을 해줄 수 있어서//범위 ex. admin, user, manager
	@Enumerated(EnumType.STRING)
	private RoleType role;

	@Builder
    public User(Long id, String name, String email, String password, RoleType roleType) {
        this.id = id;
        this.name = name;
        this.email = email;
        this.password = password;
        this.roleType = roleType;
    }

}
RoleType
public enum RoleType {

	USER, ADMIN
}
이를 커스터마이징한 PrincipalDetails
public class PrincipalDetails implements UserDetails {

    private User user;

    public PrincipalDetails(User user) {		// PrincipalDetails 안에 User 정보를 넣기 위해 생성자에 셋팅!
        this.user = user;
    }

	// getAuthorities 반환값으로 Collection 처리
    @Override
    public Collection<? extends GrantedAuthority> getAuthorities() {
        Collection<GrantedAuthority> collections = new ArrayList<>();
        collections.add(() -> String.valueOf(user.getRoleType()));
        return collections;
    }

    // PrincipalDetails 커스터마이징은 getter에도 있음. 꼭 해줘야 함.
    @Override
    public String getPassword() {
        return user.getPassword();
    }

    @Override
    public String getUsername() {
        return user.getUsername();
    }

    @Override
    public boolean isAccountNonExpired() {
        return true;
//        return false(Default)
    }

    @Override
    public boolean isAccountNonLocked() {
        return true;
//        return false(Default)
    }

    @Override
    public boolean isCredentialsNonExpired() {
        return true;
//        return false(Default)
    }

    @Override
    public boolean isEnabled() {
        return true;
//        return false(Default)
    }
}
SecurityConfig의 Role_ 은 이제 안녕...
현재 Security 공식문서에 따르면, SecurityConfig에 권한처리 표현으로, ROLE_ prefix 표현은 쓰지 않아도 된다!
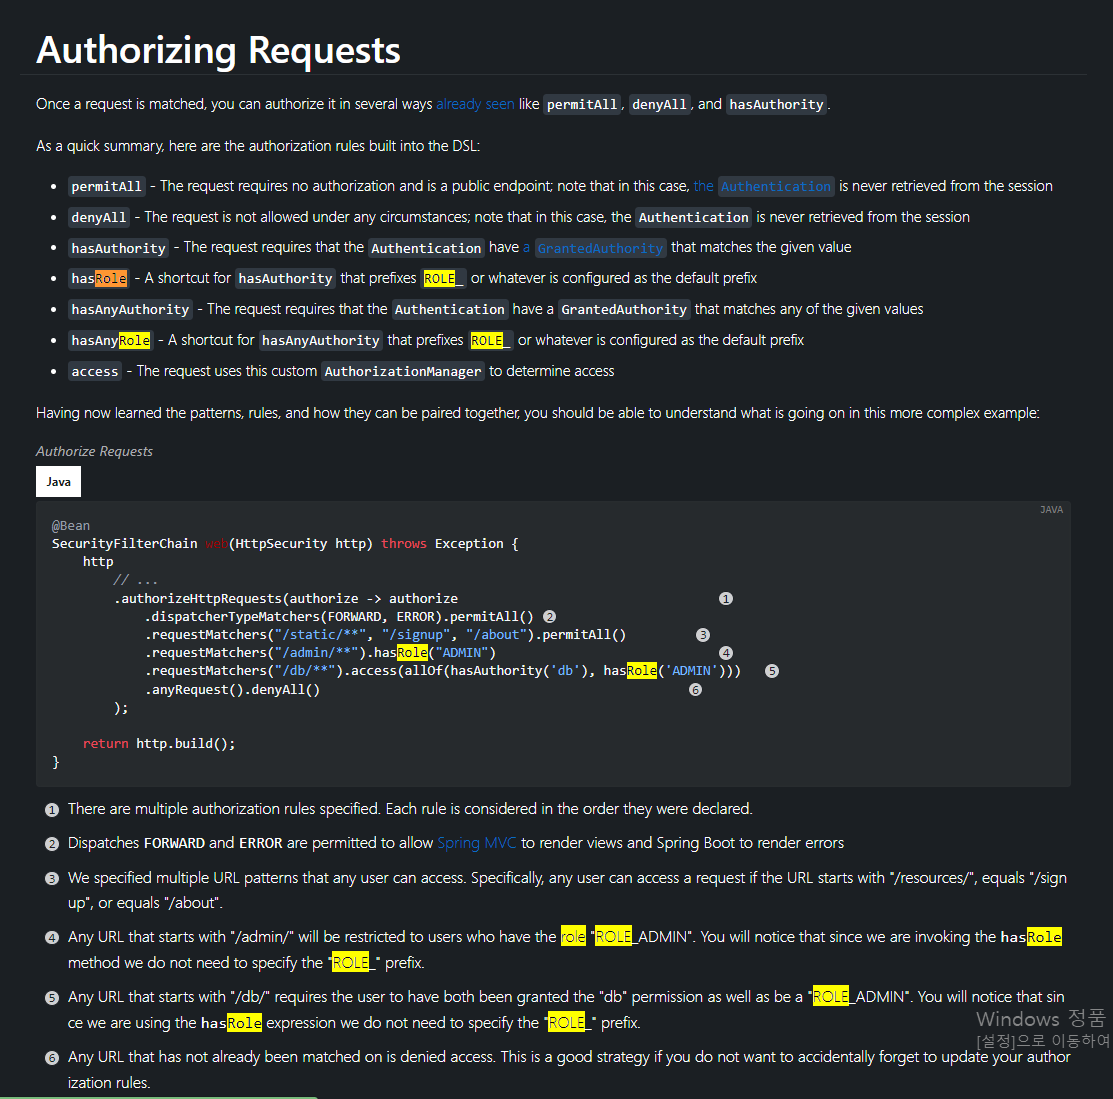
공식문서 링크 - https://docs.spring.io/spring-security/reference/servlet/authorization/authorize-http-requests.html
PasswordEncoder
BcryptPasswordEncoder란?
Bcrypt 해시 함수를 사용한 PasswordEncoder입니다.
Bcrypt는 애초부터 패스워드 저장을 목적으로 설계되었습니다.
Password를 무작위로 여러번 시도하여 맞추는 해킹을 방지하기 위해 암호를 확인할 때 의도적으로 느리게 설정되어있습니다.
BcryptPasswordEncoder는 강도를 설정할 수 있는데 강도가 높을수록 오랜 시간이 걸립니다.
// SecurtyConfig 에 꼭 넣어주세요!
    @Bean
    PasswordEncoder passwordEncoder() {
        return new BCryptPasswordEncoder();
    }
안넣어주면 error!
Encoded password does not look like BCrypt스프링버전5부터는 BcryptPasswordEncoder를 의무적으로 써야 합니다.
💥 주의!
순환참조 문제 생김 => Config 파일로 따로 만들어 해결
@Configuration
public class PasswordEncoderConfig {
	 /* SecurityConfig */ 에 넣도록!
	@Bean
	public PasswordEncoder passwordEncoder() {
		return new BCryptPasswordEncoder();
	}

}
✳️ 업그레이드 버전
@Component
@RequiredArgsConstructor
public class PasswordEncoderUtils {

    private final PasswordEncoder passwordEncoder;

    public String encodePassword(String password) {
        return passwordEncoder.encode(password);
    }

    public boolean checkPassword(String inputPassword, String storedPassword) {
        return passwordEncoder.matches(inputPassword, storedPassword);
    }
}
Authenticate
SecurityConfig에 추가
    @Override
    protected void configure(AuthenticationManagerBuilder auth) throws Exception {
        auth.userDetailsService(customUserDetailsService)
                .passwordEncoder(passwordEncoder());
    }
Controller단에서 실제 로그인요청시 인증, 인가 처리
이 요청이 처리된 후
CustomUserDetailsService loadUserByUsername()가 동작됩니다.
SecurityConfig에 추가
AuthenticationManager Bean으로 등록
    @Bean
    public AuthenticationManager authenticationManager(AuthenticationConfiguration configuration) throws Exception {
        return configuration.getAuthenticationManager();
    }
or
    @Bean
    @Override
    public AuthenticationManager authenticationManagerBean() throws Exception {
        return super.authenticationManagerBean();
    }
UserController
@RestController
@RequestMapping("/api/v1/user")
@RequiredArgsConstructor
public class UserController {

    private final UserService userService;

    @PostMapping(value = {"/register", "/signup"})
    public ResponseEntity<?> register(@RequestBody SignUpDto signUpDto) {
        return ResponseEntity.ok(userService.register(signUpDto));
    }

    @PostMapping(value = {"/login", "/signin"})
    public ResponseEntity<?> login(@RequestBody LoginDto loginDto) {
        return ResponseEntity.ok(userService.login(loginDto));
    }

}
UserServiceImpl
@Slf4j
@Service
@RequiredArgsConstructor
public class UserServiceImpl implements UserService {

    private final AuthenticationManager authenticationManager;
    private final UserRepository userRepository;
    private final PasswordEncoder passwordEncoder;

    @Override
    public String register(SignUpDto signUpDto) {

        if (userRepository.existsByEmail(signUpDto.getEmail())) {
            throw new MemoAPIException(ErrorCode.DUPLICATED_ENTITY, "이미 등록된 이메일입니다.");
        }

        User user = User.builder()
                .name(signUpDto.getName())
                .email(signUpDto.getEmail())
                .password(passwordEncoder.encode(signUpDto.getPassword()))
                .roleType(RoleType.USER)
                .build();

        userRepository.save(user);

        return "register success!";
    }

    @Override
    public String login(LoginDto loginDto) {
        Authentication authentication = authenticationManager.authenticate(new UsernamePasswordAuthenticationToken(
                loginDto.getEmail(), loginDto.getPassword()
        ));
        log.info("authentication: {}", authentication);

        SecurityContextHolder.getContext().setAuthentication(authentication);
        return "User logged-in success!";
    }
}
ROLE Collection 업데이트 Code 구현(2022.11.30)
User 사용자에게 Role 권한이 1:N으로 많아질 수 있다. 그래서 Collection으로 PrincipalDetails를 업데이트했다.
PrincipalDetail
@Getter
@Setter
@ToString
public class PrincipalDetails implements UserDetails {

    private User user;

    public PrincipalDetails(User user) {		// PrincipalDetails 안에 User 정보를 넣기 위해 생성자에 셋팅!
        this.user = user;
    }

    @Override
    public Collection<? extends GrantedAuthority> getAuthorities() {
        // 단수 role 형태일때
//        Collection<GrantedAuthority> collections = new ArrayList<>();
//        collections.add(() -> String.valueOf(user.getRole()));
//        return collections;
        return user.getRoles().stream()
                .map(role -> new SimpleGrantedAuthority(role.getName())).collect(Collectors.toList());
    }
소스출처
- Spring MVC - https://github.com/mooh2jj/board_mybatis.git
- Spring REST API - https://github.com/mooh2jj/springboot-board-example.git