템플릿 엔진(Template Engine)
Thymeleaf에 대해 알아보기 전에 먼저 템플릿 엔진에 대해 알아보자.
웹 서비스를 만들 때에는 서버의 데이터와 정적자원(html, css, image)을 조합해야 하는데, 서버에서 데이터를 보내 웹 서비스를 만드는 방법에는 크게 2가지가 있다.
1. SPA(Single Page Application)
최초 한번 전체페이지를 다 불러오고 응답데이터만 페이지 특정부분 렌더링. ex) React,js, Vue.js
2. SSR(Server Side Rendering)
전통적인 웹 애플리케이션 방식. 요청시마다 서버에서 처리한 후 새로고침으로 페이지에 대한 응답. ex. JSP, Thymeleaf
보통 자바에서 웹 개발시 JSP(Java Server Page)를 이용하여 진행했다. JSP를 사용하면 <% %>형태의 스크립트릿을 사용하여 개발하였다.
그러나 이 방식은 JSP는 WAS에서 즉, 서버사이드에서 랜더링을 거쳐야만 진행될 수 있는 템플릿 엔진이다. 서버와 분리되지 않아 유지보수하기 어려운 상황이 많았다.
템플릿 엔진이란 html(Markup)과 데이터를 결한한 결과물을 만들어 주는 도구 입니다. ex. JSP, Thymeleaf
이러한 상태를 해결할 수 있는 것이 바로 natual 템플릿 엔진 이다.
이는 서버 사이드 랜더링을 거치지 않고 브라우저에 바로 띄어도 정상적인 화면을 볼 수 있는 기술이다.
그중 대표적인 것이 타임리프(Thymeleaf)는 이다.
스프링 부트에서는 JSP가 아닌 Thymeleaf를 사용할 것을 권장한다.
때문에 스프링 부트에서 JSP를 사용하기 위해서는 별도의 설정이 필요하다.
Tymeleaf vs JSP
https://velog.io/@come_true/Thymeleaf-vs-JSP
1) jar export 여부
2) 템플릿 엔진이냐
3) WAS 서버 없이 화면출력이 가능여부
4) 성능은 아직 JSP가 더 나음
- war는 jar와 달리 웹서버나 was가 필요하고 사전에 정의된 구조만을 사용해야합니다.
Thymeleaf 문법
표현식
변수 : ${…}
선택 변수 : *{…}
메시지 : #{…}
Link URL : @{…}
## 타임리프에서 a태그를 작성
## th:href="@{}"

<!-- 특정 url로 이동 -->
<a th:href="@{https://developer-rooney.tistory.com}">글 상세보기</a>


<!-- 현재 서버 내에서 이동 -->
<a th:href="@{/board/list}">게시글 리스트</a>


<!-- 파라미터를 넘길 시 -->
<a th:href="@{/board/view(id = ${board.id})}">글 상세보기</a>


<!-- 파라미터를 여러 개 넘길 시 -->
<a th:href="@{/board/view(id = ${board.id}, writer = ${board.writer}})}">글 상세보기</a>


<!-- PathVariable 사용 시 -->
<a th:href="@{/board/view/{id}(id = ${board.id})}">글 상세보기</a>
리터럴
텍스트 : ‘one text’, ‘Another one’,…
숫자 : 0, 34, 1.0, …
boolean : true, false
Null : null
token : one, sometext, main, …
text opeation
문자열 연결 : +
문자 대체 : |The name is ${name}|
연산
Binary : +, -, *, /, %
마이너스 : -
boolean 연산
Binary : and, or
부정 : !, not
비교 연산
비교연산자 : >, <, >=, <= (gt, lt, ge, le)
균등연산자 : ==, != (eq, ne)
조건 연산
if-then : (if) ? (then)
if-then-else : (if) ? (then) : (else)
Default : (value) ?: (defaultValue)
Thymeleaf 설정
dependenies
1) maven
<dependency>
    <groupId>org.springframework.boot</groupId>
    <artifactId>spring-boot-starter-thymeleaf</artifactId>
</dependency>
<dependency>
    <groupId>org.springframework.boot</groupId>
    <artifactId>spring-boot-starter-web</artifactId>
</dependency>
2) gradle
// thymeleaf 추가
    implementation 'org.springframework.boot:spring-boot-starter-thymeleaf'
    implementation 'org.thymeleaf.extras:thymeleaf-extras-java8time'
    implementation group: 'org.thymeleaf.extras', name: 'thymeleaf-extras-springsecurity5', version: '3.0.4.RELEASE'
    implementation 'nz.net.ultraq.thymeleaf:thymeleaf-layout-dialect'
application.yml
spring:

  thymeleaf:
    cache: false       # thymeleaf cache성 조회 막기
html 파일 설정
1) 파일 위치
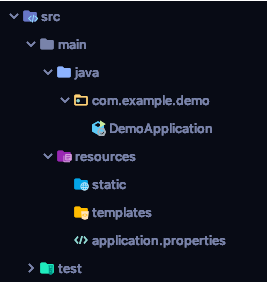
템플릿 의존성(Thymeleaf, groovy, FreeMaker)등을 추가하게 되면 스프링 부트는 자동적으로 src/main/resources/templates경로를 기본 경로로 인식하게 된다. 특별한 사항이 있지 않으면 이 경로로 html파일을 만들면 됩니다.
2) html 태그 추가
Thymeleaf를 사용한다는 선언으로 html 태그에 xmlns:th="http://www.thymeleaf.org"를 추가한다다.
template/greeting.html
<!DOCTYPE HTML>
<html xmlns:th="http://www.thymeleaf.org">
<head>
    <title>Getting Started: Serving Web Content</title>
    <meta http-equiv="Content-Type" content="text/html; charset=UTF-8" />
</head>
<body>
    <p th:text="'Hello, ' + ${name} + '!'" />
</body>
</html>
Controller
package com.example.demo.controller;

import org.springframework.stereotype.Controller;
import org.springframework.ui.Model;
import org.springframework.web.bind.annotation.GetMapping;
import org.springframework.web.bind.annotation.RequestMapping;
import org.springframework.web.bind.annotation.RequestParam;

@Controller
@RequestMapping(value="/greeting") // it is mapped to the TestController
public class TestController {

	@GetMapping("/greeting")
	public String greeting(@RequestParam(name="name", required=false, defaultValue="World") String name, Model model) {
        model.addAttribute("name", name);
		return "greeting";   // html name
	}
}
반복문
기본적으로 많이 사용하는 th:each문을 알아보자.
@RequestMapping("/")
String indexPage(Model model){
    Board board1 = new Board(1, "테스트 제목1", "이종민1");
    Board board2 = new Board(2, "테스트 제목2", "이종민2");
    Board board3 = new Board(3, "테스트 제목3", "이종민3");
    Board board4 = new Board(4, "테스트 제목4", "이종민4");
    Board board5 = new Board(5, "테스트 제목5", "이종민5");
    List<Board> boards = new ArrayList<>();
    boards.add(board1);
    boards.add(board2);
    boards.add(board3);
    boards.add(board4);
    boards.add(board5);

    model.addAttribute("boardList", boards);
    return "index";
}<tbody>
<tr th:each="board : ${boardList}">
<td><span th:text="${board.no}"></span></td>
<td><span th:text="${board.title}"></span></td>
<td><span th:text="${board.writer}"></span></td>
<td><span th:text="${#temporals.format(board.updateTime, 'yyyy-MM-dd HH:mm:ss')}"></span></td>
</tr>
</tbody>
지금은 Board객체에 no가 있기 때문에 번호를 출력해주지만 for문 처럼 숫자를 증가시키고 싶으면 다음과 같이 하면된다.
<tbody>
    <tr th:each="board, iterState : ${boardList}">
        <td><span th:text="${iterState.index}"></span></td>
        <td><span th:text="${board.title}"></span></td>
        <td><span th:text="${board.writer}"></span></td>
        <td><span th:text="${#temporals.format(board.updateTime, 'yyyy-MM-dd HH:mm:ss')}"></span></td>
    </tr>
</tbody>
index는 0부터 시작하는 색인이다. 1부터 시작하고 싶다면 count를 사용하면 된다.
조건문
조건문에는 if, unless, switch, case가 있다. unless는 if문의 반대이고, switch~case는 자바와 동일하게 생각하면 된다. if문을 이용해서 번호가 홀수 일때만 출력하도록 하자.
<tbody>
    <tr th:each="board, iterState : ${boardList}">
        <div th:if="${iterState.count} % 2 != 0">
            <td><span th:text="${iterState.count}"></span></td>
            <td><span th:text="${board.title}"></span></td>
            <td><span th:text="${board.writer}"></span></td>
            <td><span th:text="${#temporals.format(board.updateTime, 'yyyy-MM-dd HH:mm:ss')}"></span></td>
        </div>
    </tr>
</tbody>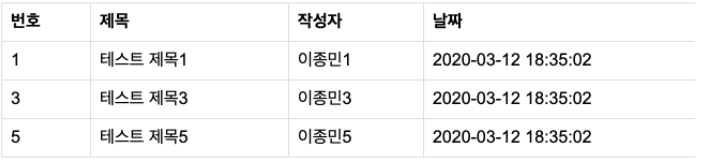
결과를 확인해 보시면 홀수번호만 출력되는 것을 확인할 수 있다.
switch~case는?
<div th:switch="${user.role}">
  <p th:case="'admin'">User is an administrator</p>
  <p th:case="#{roles.manager}">User is a manager</p>
</div>
layout
layout을 사용하는 이유 header와 footer가 고정적으로 들어가는 웹에서 각각의 page 마다 header, footer를 복사해서 넣어주는 것은 효율적이지 않기 때문에, 반복되는 HTML 코드를 줄이기 위해서 layout을 사용하게 된다.
dependency
implementation 'nz.net.ultraq.thymeleaf:thymeleaf-layout-dialect'fragments 파일 내에 header, footer 파일을 넣어준다.
th:fragment="fragment명"
=> th:fragment는 해당 부분을 fragment로 선언한다는 의미
fragments/header.html
<!DOCTYPE html>
<html lang="en" xmlns:th="http://www.thymeleaf.org">

<div th:fragment="header">
    header 영역입니다.
</div>
</html>
fragments/footer.html
<!DOCTYPE html>
<html lang="en" xmlns:th="http://www.thymeleaf.org">

<div th:fragment="footer">
    footer 영역입니다.
</div>
</html>
layouts/layout1.html
<!DOCTYPE html>
<html xmlns:th="http://www.thymeleaf.org"
      xmlns:layout="http://www.ultraq.net.nz/thymeleaf/layout">
<head>
    <meta charset="UTF-8">
    <title>Title</title>

    <!-- CSS only -->
    <link rel="stylesheet" href="https://stackpath.bootstrapcdn.com/bootstrap/4.5.2/css/bootstrap.min.css">
    <link th:href="@{/css/layout1.css}" rel="stylesheet">

    <!-- JS, Popper.js, and jQuery -->
    <script src="https://code.jquery.com/jquery-3.5.1.min.js"></script>
    <script src="https://cdn.jsdelivr.net/npm/popper.js@1.16.1/dist/umd/popper.min.js"></script>
    <script src="https://stackpath.bootstrapcdn.com/bootstrap/4.5.2/js/bootstrap.min.js"></script>

    <th:block layout:fragment="script"></th:block>
    <th:block layout:fragment="css"></th:block>

</head>
<body>

  <!-- thymeleaf layout -->
<div th:replace="fragments/header::header"></div>

<div layout:fragment="content" class="content">

</div>

<div th:replace="fragments/footer::footer"></div>

</body>
</html>
참고