이 포스트는 안드로이드 공식 Codelab 을 기반으로 작성되었습니다.
https://developer.android.com/codelabs/android-lifecycles#0
이 Codelab 에서는 ViewModel , Lifecycle , LiveData 생명 주기를 인식하는 3가지 구성요소를 활용한 예제를 구현해본다.
1단계 - 환경 설정
아래 명령어를 실행해 예제 코드를 다운받는다.
git clone git@github.com:googlecodelabs/android-lifecycles.git코드를 다운받았으면 안드로이드 스튜디오를 열어서 프로젝트를 실행하고 root 디렉토리에서 아래 명령어를 실행한다.
맥OS / 리눅스
mkdir -p .idea/runConfigurations
cp runConfigurations/* .idea/runConfigurations/
윈도우
MKDIR .idea\runConfigurations
COPY runConfigurations\* .idea\runConfigurations\
처음 git 으로 코드를 다운 받았을 때 빌드 오류가 발생했는데 Android Studio에서 지시하는대로 gradle wrapper 버전을 업그레이드 해주었더니 정상적으로 진행되었다.
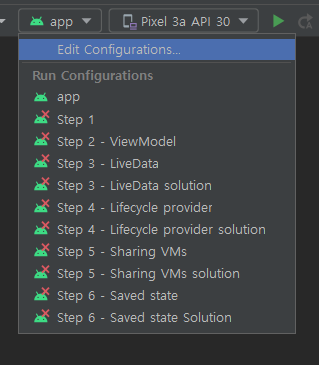
위 과정을 완료하면 앱을 각 단계에 맞춰 실행할 수 있게된다.
1단계 앱을 실행하면 아래와 같은 스크린이 표시된다.
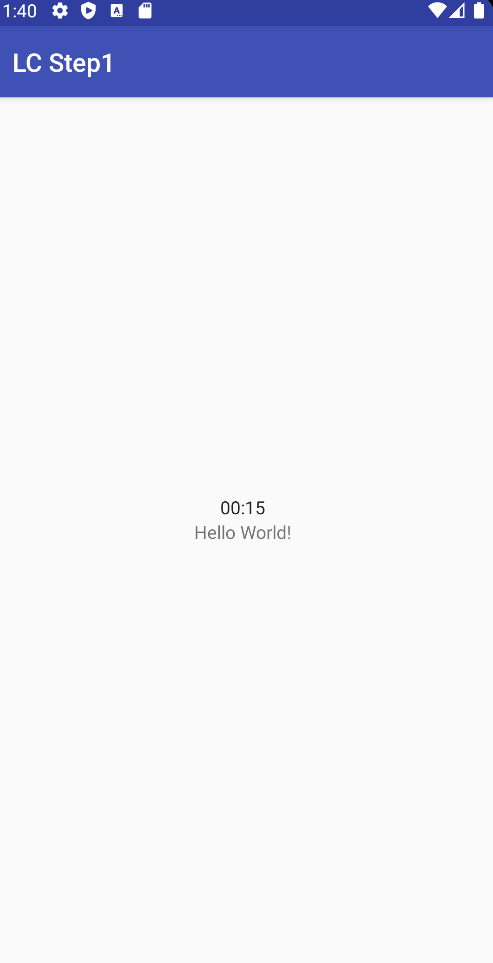
화면을 회전시키면 타이머가 초기화되고 0초부터 다시 시작하는 것을 알 수 있다.
2단계 - ViewModel 추가
ViewModel 을 사용하여 화면을 회전시켜도 타이머가 유지되도록 해보자.
ViewModel을 사용하여 Chronometer의 상태 유지
ChronometerViewModel chronometerViewModel
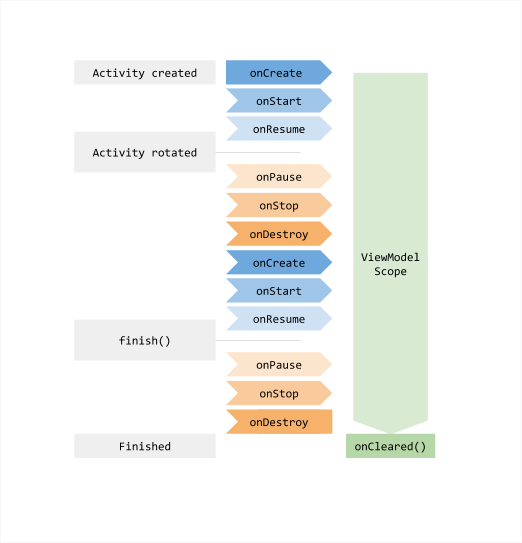
= new ViewModelProvider(this).get(ChronometerViewModel.class);위에서 this는 LifecycleOwner 의 인스턴스를 가리킨다. 예시에서는 ChronoActivity2 가 LifecycleOwner 에 해당한다.
따라서LifecycleOwner 인 ChronoActivity2 가 완전히 종료(Finished) 되기 전까지 ChronometerViewModel 은 파괴(destroyed) 되지 않는다.
Activity및Fragment의 상태는created상태 부터finished상태 (또는terminated) 상태까지 있는데 여기서finished상태는destroyed와는 다르다.
하지만 Step 2. ViewModel 을 적용해도 화면을 회전하면 여전히 타이머가 초기화된다.
3단계 - LiveData로 데이터 감싸기
먼저 chronometer UI 객체를 없애고 Timer 객체를 만들어서 Timer 가 1초마다 UI 객체를 업데이트 시키는 방식으로 변경할 것이고 이 로직은LiveDataViewModel 클래스에서 구현할 것이다.
LifecycleOwner
ChronoActivity3 은 AppCompatActivity 의 인스턴스이며 이는 즉 LifecycleOwner 인터페이스를 이행하고 있어 재정의할 수 있다는 뜻이다.
public LiveDataTimerViewModel() {
    mInitialTime = SystemClock.elapsedRealtime();
    timer = new Timer();

    // Update the elapsed time every second.
    timer.scheduleAtFixedRate(new TimerTask() {
        @Override
        public void run() {
            final long newValue = (SystemClock.elapsedRealtime() - mInitialTime) / 1000;

            // setValue() cannot be called from a background thread so post to main thread.
            mElapsedTime.postValue(newValue);
        }
    }, ONE_SECOND, ONE_SECOND);
}

public class ChronoActivity3 extends AppCompatActivity {

    private LiveDataTimerViewModel mLiveDataTimerViewModel;

    @Override
    protected void onCreate(Bundle savedInstanceState) {
        super.onCreate(savedInstanceState);

        setContentView(R.layout.chrono_activity_3);

        mLiveDataTimerViewModel = new ViewModelProvider(this).get(LiveDataTimerViewModel.class);

        subscribe();
    }

    private void subscribe() {
        final Observer<Long> elapsedTimeObserver = new Observer<Long>() {
            @Override
            public void onChanged(@Nullable final Long aLong) {
                String newText = ChronoActivity3.this.getResources().getString(
                        R.string.seconds, aLong);
                ((TextView) findViewById(R.id.timer_textview)).setText(newText);
                Log.d("ChronoActivity3", "Updating timer");
            }
        };

        // observe the ViewModel's elapsed time
        mLiveDataTimerViewModel.getElapsedTime().observe(this, elapsedTimeObserver);
    }
}
4단계 - 생명주기 이벤트 관찰
LifecycleOwner 객체는 아래 메소드를 통해서 LifecycleOwner 의 현재 생명 주기 상태를 알려줄 수 있다.
lifecycleOwner.getLifecycle().getCurrentState()LifecycleObserver 를 이행하는 생명 주기를 인식하는 객체들은 아래와 같이 Observer 를 LifecycleOwner 에 추가함으로써 생명 주기 변화를 감지할 수 있다.
lifecycleOwner.getLifecycle().addObserver(this);생명주기 인식 컴포넌트 생성
LocationManager 를 상속하는 BoundLocationManager 클래스를 생성한 후 내부 클래스로 LifecycleObserver 를 이행하는 BoundLocationListener 클래스를 생성한다.
BoundLocationListener 는 Observer 로써 생명 주기 변화를 인식하여 ON_RESUME 상태가 되면 addLocationListener 를 수행하고 ON_PAUSE 상태가 되면 removeLocationListener 를 수행한다.
5단계 - 프래그먼트 간 ViewModel 공유
하나의 Activity 안에서 2개의 다른 Fragment 끼리 하나의 ViewModel 과 그 내부의 LiveData 를 공유할 수 있다.
@Override
public View onCreateView(LayoutInflater inflater, ViewGroup container,
                             Bundle savedInstanceState) {
    // Inflate the layout for this fragment
    View root = inflater.inflate(R.layout.fragment_step5, container, false);
    mSeekBar = root.findViewById(R.id.seekBar);

    mSeekBarViewModel = new ViewModelProvider(requireActivity()).get(SeekBarViewModel.class);

    subscribeSeekBar();

    return root;
}

private void subscribeSeekBar() {

    // Update the ViewModel when the SeekBar is changed.
    mSeekBar.setOnSeekBarChangeListener(new SeekBar.OnSeekBarChangeListener() {
        @Override
        public void onProgressChanged(SeekBar seekBar, int progress, boolean fromUser) {
            // Set the ViewModel's value when the change comes from the user.
            if (fromUser) {
                mSeekBarViewModel.seekbarValue.setValue(progress);
            }
        }

        @Override
        public void onStartTrackingTouch(SeekBar seekBar) { }

        @Override
        public void onStopTrackingTouch(SeekBar seekBar) { }
    });

    // Update the SeekBar when the ViewModel is changed.
     mSeekBarViewModel.seekbarValue.observe(requireActivity(), integer -> {
         if (integer == null)
             return;
         mSeekBar.setProgress(integer);
     });
}