개요
- SEO
- Search Advisor (Naver)
- Search Console (Google)
브라우저별 검색 엔진 로봇에게 정보를 주어 홍보할 사이트명을 검색하거나 관련된 내용을 검색했을 때 사이트의 노출 가능성을 높이기 위함.
Og setting 란 ?
- Open Graph 의 약자.
- 검색을 했을 때, 콘텐츠가 표시되는 방식을 관리하기 위해 오픈 그래프 태그를 사용. (마케팅 효과를 낼 수 있음)
- HTML 문서의 정보를 쉽게 표시하기 위해 제목, 설명, 문서 타입, 대표 URL 등을 설정할 수 있음
- SNS 에 게시되는데 최적화 된 데이터를 가질 수 있도록 설정
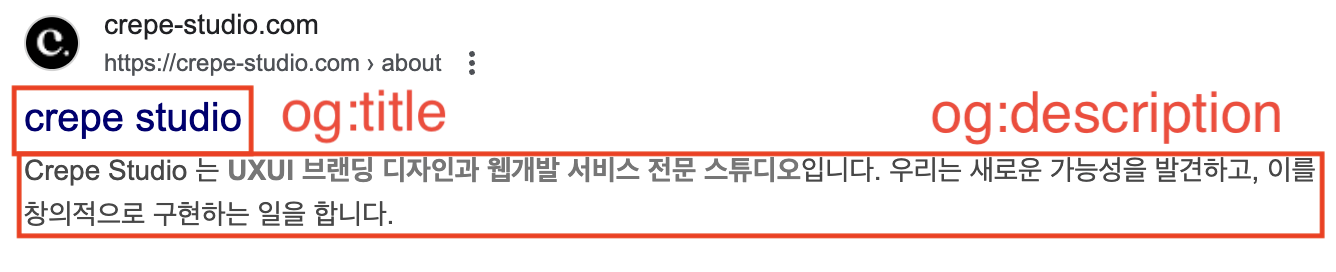
위 사진은 실제 내가 운영하고 있는 사이트이다.
Crepe studio 가 og:title 이고, 아래 텍스트가 og:description 이다.
간단한 대문이라 생각하면 좋을 듯 하다.
Og 설정법
1. Meta 태그 사용
<!-- og tag 정의 -->
<meta property="og:title" content="초간단 mac사용 설명"/> <!-- 카드에 표시하고 싶은 제목 -->
<meta property="og:image" content="https://ih3.img.jpg"/> <!-- 카드에 표시하고 싶은 이미지 -->
<meta property="og:url" content="https://www.youtube/mac..."/> <!-- 표시하고싶은 url주소 -->
<meta property="og:description" content="mac을 이렇게 쉽게..."/> <!-- 카드에 표시하고 싶은 설명 -->- 일반 meta 태그와 다르게 property 사용
- 기본적인 필수 요소 사항들로 title, image, url, description 이 들어가야 함 (이미지 사이즈는 1200 * 630 (1.91:1 비율) 권장)
실제 적용 예시
<meta property="og:title" content="NAVER" />
<meta property="og:site_name" content="NEAVER" />
<meta property="og:url" content="https://naver.com/" />
<meta
  property="og:image"
  content="https://naver-etc.s3.ap-northeast-2.amazonaws.com/og_image.png"
/>
<meta property="og:image:width" content="1200" />
<meta property="og:image:height" content="630" />
<meta
  property="og:description"
  content="네이버는 대한민국 최대 규모의 검색 엔진 시스템입니다. 원하는 키워드나 주제를 입력하면 모든 관련 게시글들을 확인할 수 있습니다.
NAVER is Korea's the largest search engine. When you search any keywords or topics, You can view related posts."
/>
2. Description 설정 주의!
- 두가지 description meta tag 가 들어가야 함.
<meta
  name="description"
  content="레드브릭은 누구나 크리에이터가 되어 창작하고, 플레이하고, 수익을 창출할 수 있는 메타버스 플랫폼입니다."
/>

<meta
  property="og:description"
  content="레드브릭은 누구나 크리에이터가 되어 창작하고, 플레이하고, 수익을 창출할 수 있는 메타버스 플랫폼입니다."
/>- meta name=”description” : 검색 엔진에서 검색했을 때 나오는 페이지의 제목 아래 노출되는 내용
- meta property=”og:description” : SNS 로 해당 페이지 공유 시 나타나는 설명란에 반영
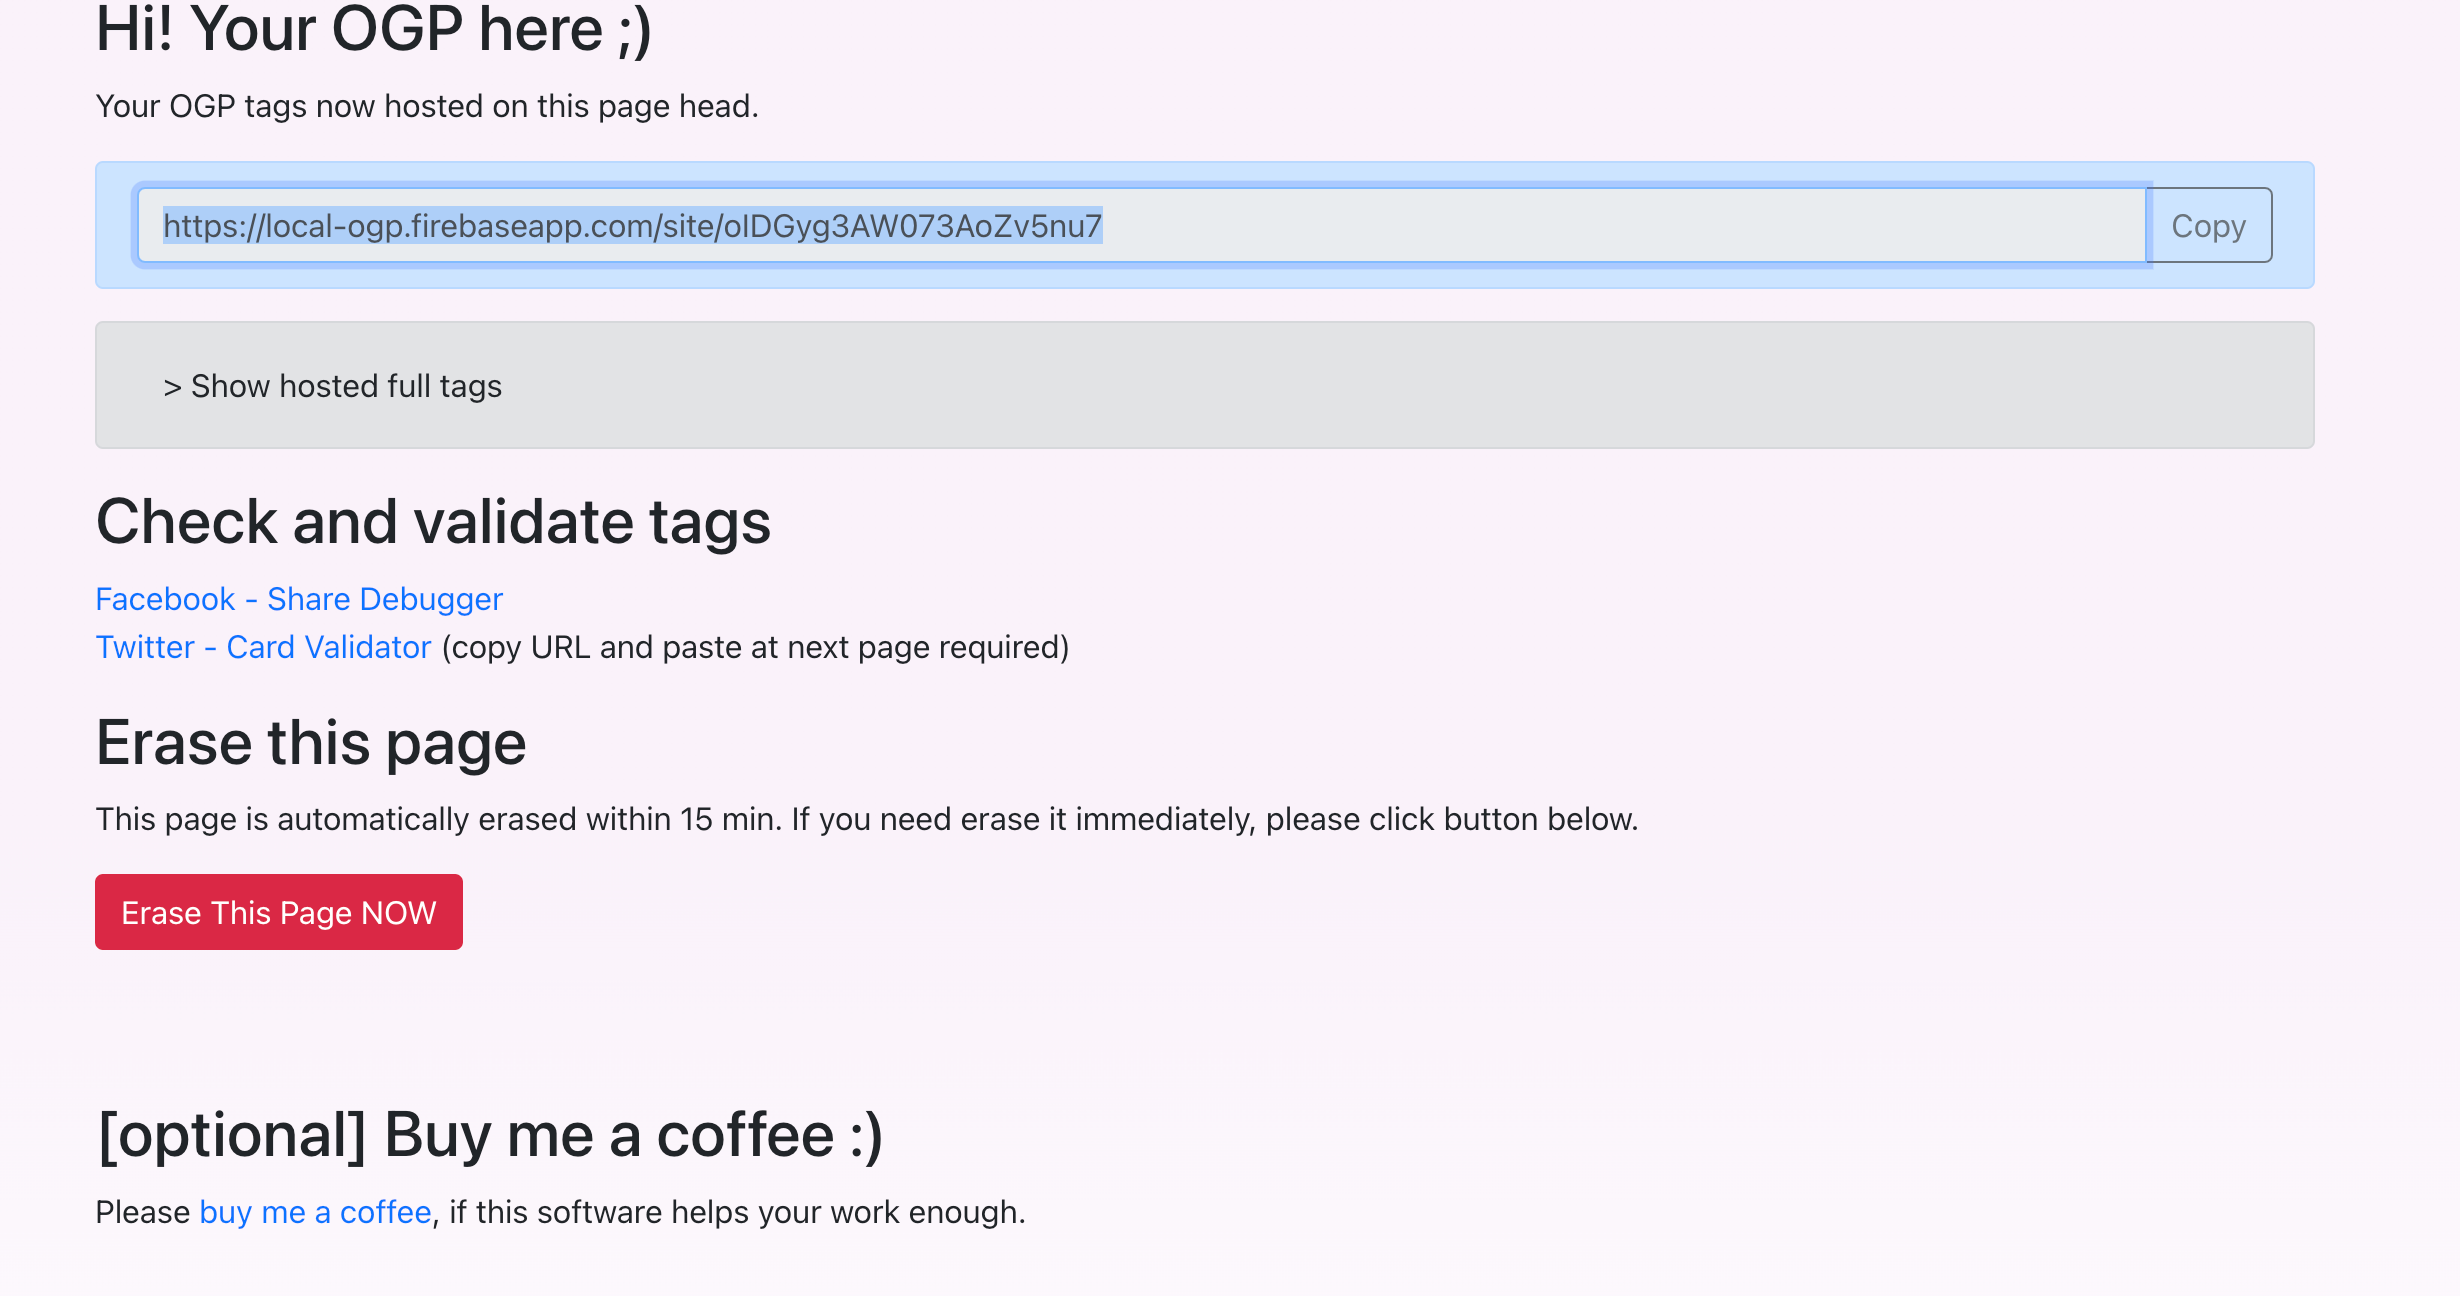
localhost 에서 확인하고 싶다면 ?
하지만 위 설정들은 배포를 한 후 검색 엔진 로봇에게 승인을 받아 브라우저에 올라갔을 때에만 확인할 수 있는데, 로컬에서도 바로바로 확인할 수 있는 방법을 소개하겠다 !
- chrome 확장자 ‘Localhost Open Graph Checker’ 설치
- 확인하고자 하는 localhost 주소로 접속 후 확장 프로그램 오픈
- 아래와 같은 화면이 나오면 URL 복사
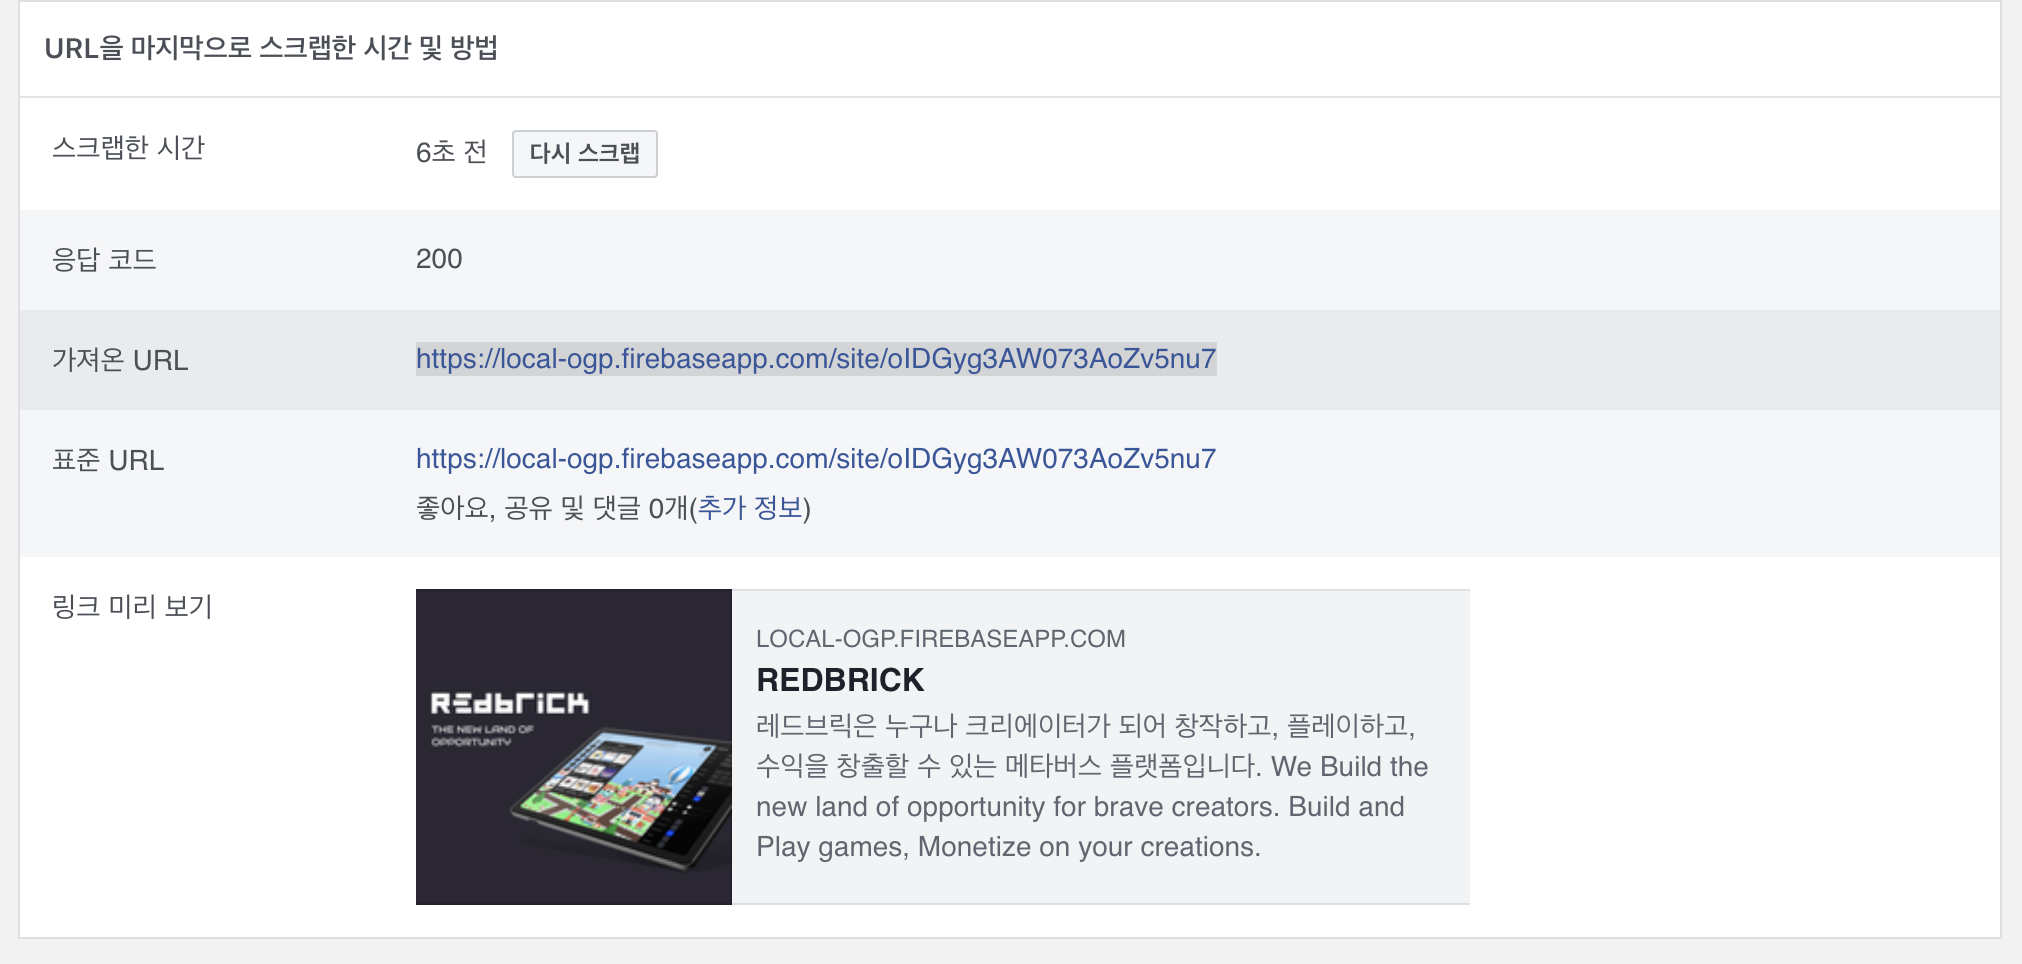
- Meta for Developers(페이스북 게시물 공유) 로 접속 후 링크 붙여넣기 → 디버그 버튼 클릭
- 아래와 같이 설정한 Og 값을 확인할 수 있다.
- 여기서 원하는 대로 나오지 않는다면 쉽게 디버깅 가능 !! 🤩
다음에는 사이트맵 작성하는 방법을 알아보겠다!!
To be continued...

로고, 브랜딩, 웹 UI 디자인과 웹개발 스튜디오를 운영하고 있습니다. 자세한 문의는 kakao - 퍼블작업자M 을 통해 상담 받으실 수 있습니다. 책임감을 가지고 최선의 결과물을 제공하겠습니다.