프레젠테이션 계층 - 도메인 계층 - 데이터 계층에서 벌어지게 되는 흐름에 맞춰서 단계를 나눠 아키텍처를 정의합니다. 사용자 관점에서 보았을때 아키텍처의 순서는 다음과 같습니다.
User Flow
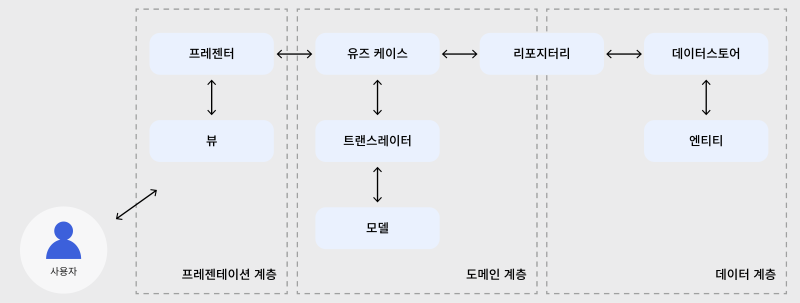
- UI → 프레젠터 → 유즈 케이스 → 엔티티 → 리포지터리 → 데이터 소스
- 데이터 계층의 엔티티는 DTO(Data Transfer Object)를 말합니다.
- 도메인 계층에서 모델이 트랜스레이터를 거쳐, 데이터 계층의 엔티티로 변환
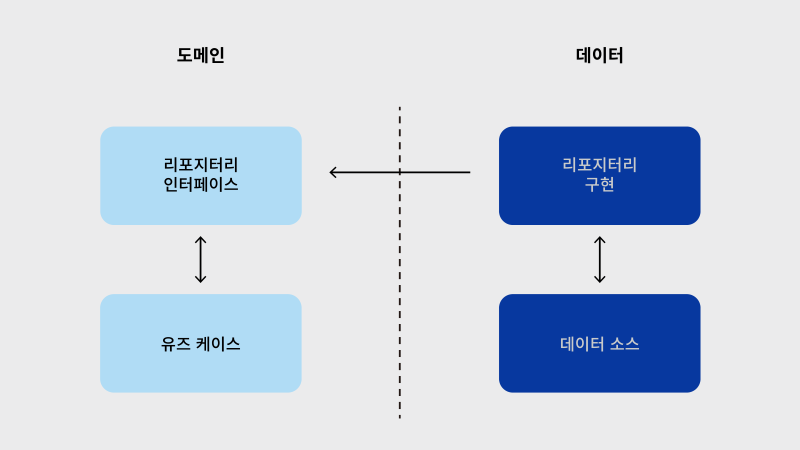 데이터 계층에서 도메인 계층의 인테페이스를 상속받아 적용하지만 실제로는 도메인과 데이터 계층은 철저히 분리 되어있습니다. 그렇다면 언제 의존성이 주입될까요? 그것에 대해서는 수동으로 DI를 적용해주는 방법도 있고, Hilt를 사용해서 Annotation을 적용하게 될 수도 있습니다.
전체 구조 살펴보기
Domain 계층
Repository Interface
- 실제로 행동할 동작 (select, update, delete) 들을 명시 하는 인터페이스 입니다.
interface CoinRepository {
    suspend fun getCoins(): List<CoinDto>
    suspend fun getCoinById(coindId: String): CoinDetailDto
}
UseCase
- 실제 비지니스 로직에 해당합니다.
class GetCoinUseCase @Inject constructor(private val repository: CoinRepository) {
    operator fun invoke(coinId : String): Flow<Resource<CoinDetail>> = flow {
        try {
            emit(Resource.Loading<CoinDetail>())
            val coins = repository.getCoinById(coinId).toCoinDetail()
            emit(Resource.Success<CoinDetail>(coins))
        } catch (e: HttpException) {
            emit(Resource.Error<CoinDetail>(e.localizedMessage ?: "An Expected error occured"))
        } catch (e: IOException) {
            emit(Resource.Error<CoinDetail>("Couldn't reach server. check your intract internet"))
        }
    }
}
Data 계층
Repository Implements
- Domain 계층의 Repository 를 상속받아서 실제 구현을 합니다.
- LocalDB 또는 Remote API 를 사용해서 select, update, delete 합니다.
class CoinRepositoryImpl @Inject constructor(
    private val api: CoinPaprikaApi
) : CoinRepository {
    override suspend fun getCoins(): List<CoinDto> {
        return api.getCoins()
    }

    override suspend fun getCoinById(coindId: String): CoinDetailDto {
        return api.getCoinById(coinId = coindId)
    }
}
DataSource
- 실제 데이터의 입출력
data class CoinDto(
    val id: String,
    val is_active: Boolean,
    val is_new: Boolean,
    val name: String,
    val rank: Int,
    val symbol: String,
    val type: String
)

// 도메인 계층에서 사용할 모델로 변경
fun CoinDto.toCoin(): Coin {
    return Coin(
        id = id,
        is_active = is_active,
        name = name,
        is_new = is_new,
        rank = rank,
        symbol = symbol,
        type = type
    )
}
Presentation 계층
View
- 사용자가에 단적으로 보여질 UI 만 명시한다
@Composable
fun CoinListScreen(
    navController: NavController,
    viewModel: CoinListViewModel = hiltViewModel()
) {
    val state = viewModel.state.value
    Box(modifier = Modifier.fillMaxSize()) {
        LazyColumn(modifier = Modifier.fillMaxSize()) {
            items(state.coins) {
                CoinListItem(coin = it, onItemClick = {
                    navController.navigate(Screen.CoinDetailScreen.route + "/${it.id}")
                })
            }
        }
    }
}
Presenter
- ViewModel 과 같은 어떤 데이터들을 보여줄 것인지 명시
@HiltViewModel
class CoinListViewModel @Inject constructor(
    private val getCoinsUseCase: GetCoinsUseCase
) : ViewModel() {

    private val _state = mutableStateOf(CoinListState())
    val state: State<CoinListState> = _state

    init {
        getCoins()
    }

    private fun getCoins() {
        getCoinsUseCase().onEach { result ->
            when (result) {
                is Resource.Error -> {
                    _state.value = CoinListState(
                        error = result.message ?: "An unexpected error occured"
                    )
                }
                is Resource.Success -> {
                    _state.value = CoinListState(coins = result.data ?: emptyList())
                }
                is Resource.Loading -> {
                    _state.value = CoinListState(istLoading = true)
                }
            }
        }.launchIn(viewModelScope)
    }
}
결론
해당 예시 코드는 github에 전부 업로드하였습니다. 저도 구조를 더 한번에 보기 위해서 포스팅 하였습니다. 해당 내용과 맞는 내용으로 저의 개인프로젝트도 리팩토링을 하게 되었습니다 리팩토링을 하고 보니 저의 프로젝트는 중간과정이 도메인 계층이 실종된 체라 생성해야 할 코드들이 매우 증가할 것 같군요
다음포스팅에서는 저의 이전 코드들과 비교해서 개선점을 포스팅하고 그 이후에는 테스트 코드까지 추가하는 방식으로 포스팅하겠습니다
Reference

develop life