이 튜토리얼에서는 Chainlink Automation을 사용하여 Chainlink Functions를 자동화하는 방법을 안내합니다. 자동화는 매일 날씨 데이터를 가져오거나 매 블록마다 자산 가격을 가져오는 것과 같이 동일한 함수를 정기적으로 트리거하고자 할 때 필수적입니다.
이 예제에서는 FunctionsConsumer.sol 대신 AutomatedFunctionsConsumer.sol을 배포합니다. AutomatedFunctionsConsumer.sol은 Chainlink Automation과 호환되는 Chainlink Functions Consumer 계약입니다. 계약을 배포하고 설정한 후, Chainlink Automation은 지정된 시간 일정에 따라 함수를 트리거합니다.
주의
Chainlink Functions는 아직 BETA 상태입니다. 테스트용으로 할당된 인증 정보를 사용하고, 민감한 데이터나 실제 가치를 보호하지 않도록 주의하십시오. 요청에서 시크릿을 사용하는 것은 실험적인 기능이며 예상대로 작동하지 않을 수 있으며 변경될 수 있습니다. 이 기능의 사용은 사용자의 책임하에 이루어져야 하며 예기치 않은 오류, 새 버전이 출시됨에 따른 시크릿 노출 또는 기타 문제가 발생할 수 있습니다.

위와 같이 AutomatedFunctionsConsumer.sol을 배포하고 설정하는 방법에 대한 단계를 따르기 전에 API multiple calls 튜토리얼을 읽어보시기 바랍니다. 이 예제는 동일한 예제를 사용하지만 중요한 차이가 있습니다.
시작하기 전에
사전 준비
링크에 있는 내용을 해보고, 준비하셔야 지금 페이지의 내용을 따라 올 수 있습니다.
Chainlink Functions Starter Kit의 tutorials 브랜치로 깃 체크아웃해야합니다.
git checkout tutorialsChainlink Functions Starter Kit의 tutorials 브랜치를 확인해보세요. 이 튜토리얼은 /tutorials/6-multiple-apis 디렉토리에 있습니다.
CoinMarketCap에서 무료 API 키를 받아 API 키를 기록하세요.
시작 키트는 암호화된 시크릿을 gist로 저장하여 Decentralized Oracle Network와의 오프체인 공유를 지원합니다. 시작 키트가 귀하를 대신하여 gist를 작성할 수 있도록 하려면 GitHub 세분화된 개인 액세스 토큰을 생성하세요.
GitHub 토큰 설정 페이지를 방문하세요.
Generate new token을 클릭하세요.
토큰에 이름을 지정하고 만료 날짜를 정의하세요.
Account permissions에서 Gists에 대한 읽기 및 쓰기를 활성화하세요. 참고: 추가 설정을 활성화하지 마세요.
Generate token을 클릭하고 세분화된 개인 액세스 토큰을 복사하세요.
.npx env-enc set을 실행하여 암호화된 GITHUB_API_TOKEN 및 COINMARKETCAP_API_KEY를 .env.enc 파일에 추가하세요.
튜토리얼
이 튜토리얼은 시간 일정에 따라 여러 데이터 소스에서 중앙값 BTC/USD 가격을 가져오도록 구성되어 있습니다. 코드 예제에 대한 자세한 설명은 설명 섹션을 읽으세요.
config.js를 열어보세요. args 값이 ["1", "bitcoin", "btc-bitcoin"]인 것을 확인하세요. 이 인수들은 CoinMarketCap, CoinGecko 및 Coinpaprika에서의 BTC ID입니다. 다른 자산 가격을 가져오기 위해 args를 조정할 수 있습니다. 자세한 내용은 CoinMarketCap, CoinGecko 및 CoinPaprika의 API 문서를 참조하세요. 요청에 대한 자세한 정보는 요청 구성 섹션을 읽으세요.
source.js를 열어 JavaScript 소스 코드를 분석하세요. 요청 소스 파일의 자세한 설명을 위해 소스 코드 설명을 읽으세요.
시뮬레이션
Chainlink Functions Hardhat Starter Kit에는 로컬 머신에서 Functions 코드를 테스트할 수 있는 시뮬레이터가 포함되어 있습니다. functions-simulate 명령을 사용하여 코드를 로컬 실행 환경에서 실행하고 엔드 투 엔드 이행을 시뮬레이션합니다. 이를 통해 Decentralized Oracle Network에 함수를 제출하기 전에 문제를 해결할 수 있습니다.
아래의 명령을 사용하여 functions-simulate 작업을 실행하고 config.js와 source.js가 올바르게 작성되었는지 확인하세요:
npx hardhat functions-simulate --configpath REPLACE_CONFIG_PATHexample:
$ npx hardhat functions-simulate --configpath tutorials/6-multiple-apis/config.js
secp256k1 unavailable, reverting to browser version

__Compiling Contracts__
Nothing to compile
Duplicate definition of Transfer (Transfer(address,address,uint256,bytes), Transfer(address,address,uint256))

Executing JavaScript request source code locally...

__Console log messages from sandboxed code__
Median Bitcoin price: $28347.05

__Output from sandboxed source code__
Output represented as a hex string: 0x00000000000000000000000000000000000000000000000000000000002b4111
Decoded as a uint256: 2834705

__Simulated On-Chain Response__
Response returned to client contract represented as a hex string: 0x00000000000000000000000000000000000000000000000000000000002b4111
Decoded as a uint256: 2834705

Gas used by sendRequest: 398311
Gas used by client callback function: 75029
위 예시의 출력을 읽어보면 BTC/USD 중앙값 가격이 28347.05 USD임을 알 수 있습니다. Solidity는 소수점을 지원하지 않기 때문에, 값을 정수 2834705와 같이 보이도록 소수점을 이동시킨 후에 콜백에서 bytes로 인코딩된 값 0x00000000000000000000000000000000000000000000000000000000002b4111을 반환합니다. 자세한 설명을 보려면 소스 코드 설명을 읽으세요.
Deploy an Automation Consumer contract
시뮬레이터를 실행하고 함수가 문제없이 실행되는 것을 확인한 후, functions-deploy-auto-client 명령을 실행하세요. 이 명령은 다음과 같은 작업을 수행합니다:
- AutomatedFunctionsConsumer.sol 컨트랙트를 배포합니다. 컨트랙트를 배포할 때 실행 간격을 설정할 수 있습니다.
- 배포된 컨트랙트를 구독에 추가합니다.
- 저장된 요청을 시뮬레이션합니다.
- 요청을 저장하세요. 이 요청에는 소스 코드, 암호화된 gist URL 및 인수가 포함됩니다. 참고: 저장된 요청은 제공된 시간 간격에 따라 DON에게 전송됩니다.
- 터미널에서 functions-deploy-auto-client 명령을 실행하세요.
npx hardhat functions-deploy-auto-client --network REPLACE_NETWORK --subid REPLACE_SUBSCRIPTION_ID --interval REPLACE_INTERVAL_SECONDS --configpath REPLACE_CONFIG_PATHExample
$ npx hardhat functions-deploy-auto-client --network polygonMumbai --subid 443 --interval 60 --configpath tutorials/6-multiple-apis/config.js
secp256k1 unavailable, reverting to browser version
Deploying AutomatedFunctionsConsumer contract to mumbai

__Compiling Contracts__
Nothing to compile

Waiting 1 block for transaction 0x6d68add0027ac0228c9e4b284fda4cedff87a2e73892545f8d34922e9fff338e to be confirmed...
Adding consumer contract address 0x6164Df3A2b2899124400c064306c74dA71804865 to subscription 443
Waiting 2 blocks for transaction 0x856e01a16b68bd273b44cd5935d451b334017eca238d5c90b93c415fe03238fd to be confirmed...

Added consumer contract address 0x6164Df3A2b2899124400c064306c74dA71804865 to subscription 443
2 authorized consumer contracts for subscription 443:
[
  '0x4B4BA2Fd6b93aDF8d6b6002E10540E58394388Ea',
  '0x6164Df3A2b2899124400c064306c74dA71804865'
]
Setting the Functions request in AutomatedFunctionsConsumer contract 0x6164Df3A2b2899124400c064306c74dA71804865 on mumbai
Simulating Functions request locally...

__Console log messages from sandboxed code__
Median Bitcoin price: $28365.03

__Output from sandboxed source code__
Output represented as a hex string: 0x00000000000000000000000000000000000000000000000000000000002b4817
Decoded as a uint256: 2836503

Successfully created encrypted secrets Gist: https://gist.github.com/aelmanaa/67631d9e07c58fd9903121947f2bf29e
Be sure to delete the Gist https://gist.github.com/aelmanaa/67631d9e07c58fd9903121947f2bf29e once encrypted secrets are no longer in use!

Setting Functions request

Waiting 2 block for transaction 0x2d14301323063d4f6e8e5910ffac4c2bfbea0fca7fcd39d6a76ce332c882da46 to be confirmed...

Created new Functions request in AutomatedFunctionsConsumer contract 0x6164Df3A2b2899124400c064306c74dA71804865 on mumbai

AutomatedFunctionsConsumer contract deployed to 0x6164Df3A2b2899124400c064306c74dA71804865 on mumbai
암호화된 비밀 정보가 더 이상 필요하지 않을 경우
npx hardhat functions-clear-gists 명령을 실행하여 생성된 gist를 삭제하는 것이 좋습니다. 이렇게 하면 컨트랙트가 실행될 때마다 암호화된 gist URL을 DON에게 보내지 않게 됩니다. 특히 Chainlink Automation에서 컨트랙트를 제거하는 경우에는 이 작업이 매우 중요합니다.
위의 예시에서는 Chainlink Functions 컨슈머 컨트랙트를 배포하고, 60초마다 중간 비트코인 가격을 가져오도록 구성했습니다.
참고: 요청의 매개변수를 변경하여 새로운 요청을 생성하거나, 시간 간격이나 컨트랙트가 연결된 구독 ID와 같은 다른 매개변수를 업데이트할 수 있습니다. 이를 위해서는 functions-set-auto-request를 실행하면 됩니다.
npx hardhat functions-set-auto-request --contract REPLACE_YOUR_CONTRACT --network REPLACE_NETWORK --subid REPLACE_SUBSCRIPTION_ID --interval REPLACE_INTERVAL_SECONDS --gaslimit REPLACE_GAS_LIMITS --configpath tutorials/6-multiple-apis/config.jsConfigure Chainlink Automation
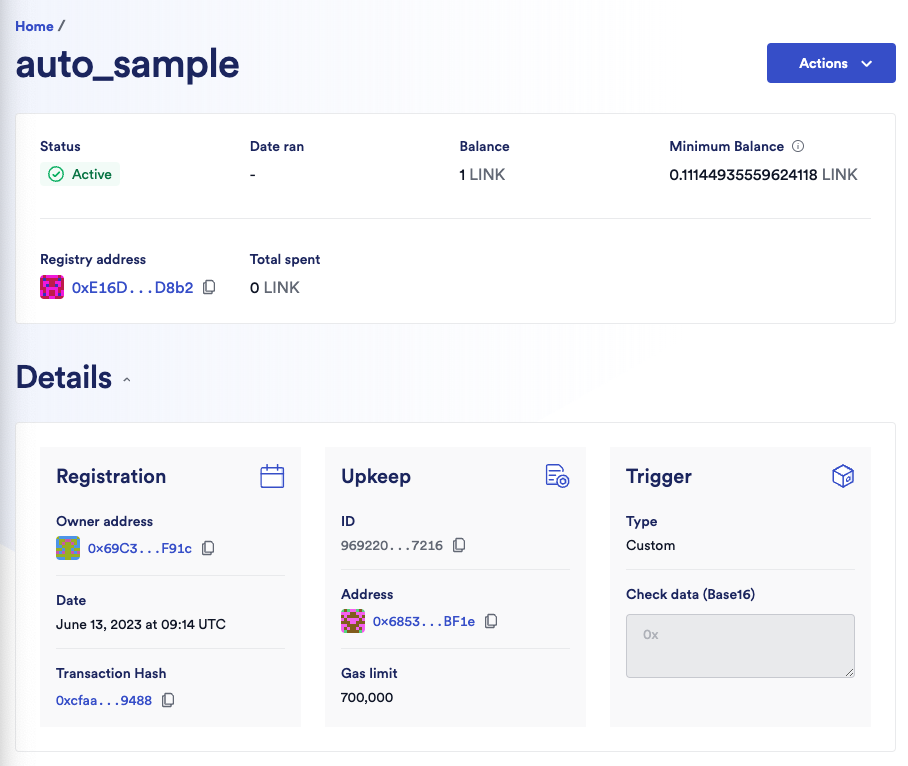
배포한 컨슈머 컨트랙트를 사용하기 위해 사용자 정의 로직 upkeep을 등록하는 지침에 따라 진행하세요. Chainlink Automation 앱을 사용하여 배포한 컨트랙트를 등록합니다. 다음 유지보수 설정을 사용하세요:
Trigger: Custom logic
Target contract address: 배포한 Chainlink Functions 컨슈머 컨트랙트의 주소
Gas limit: 700000
Starting balance (LINK): 1
이 튜토리얼의 예시에서는 다른 설정은 기본값으로 남겨둘 수 있습니다.
Chainlink Automation은 제공된 시간 간격에 따라 요청을 전송하도록 트리거됩니다.
MONITOR YOUR BALANCES
잔액을 모니터링해야 할 두 가지 항목이 있습니다:
구독 잔액: Chainlink Functions가 이행될 때마다 잔액이 차감됩니다. 잔액이 부족하면 컨트랙트가 요청을 보낼 수 없습니다. Chainlink Functions를 자동화하면 정기적으로 트리거되므로 구독 계정을 정기적으로 모니터링하고 충전해야 합니다. 구독 잔액을 확인하는 방법은 Get Subscription Details를 참조하세요.
유지보수 잔액: Chainlink Automation App에서 이 잔액을 확인할 수 있습니다. 유지보수 잔액은 제공된 시간 간격에 따라 요청을 전송하는 Chainlink Automation Network에 지불됩니다. 유지보수 잔액이 부족하면 Chainlink Automation은 요청을 트리거하지 않습니다.
Check Result
Chainlink Automation App에 가서 Polygon Mumbai에 연결하세요. 유지보수는 "My upkeeps" 아래에 나열됩니다.
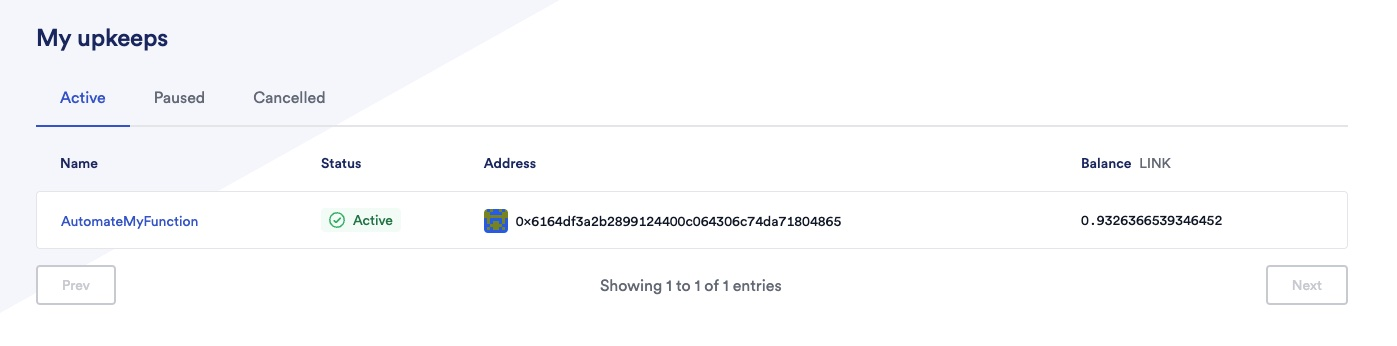
유지보수를 클릭하여 세부 정보를 가져옵니다.

터미널에서 functions-read 작업을 실행하여 contract 매개변수를 사용하여 최신 수신된 응답을 읽어봅니다.
npx hardhat functions-read --contract REPLACE_CONSUMER_CONTRACT_ADDRESS --network REPLACE_NETWORK --configpath REPLACE_CONFIG_PATHEample
$ npx hardhat functions-read  --contract 0x6164Df3A2b2899124400c064306c74dA71804865  --network polygonMumbai --configpath tutorials/6-multiple-apis/config.js
secp256k1 unavailable, reverting to browser version
Reading data from Functions client contract 0x6164Df3A2b2899124400c064306c74dA71804865 on network mumbai

On-chain response represented as a hex string: 0x00000000000000000000000000000000000000000000000000000000002af472
Decoded as a uint256: 2815090
Cleaning
가이드를 완료한 후:
Chainlink Automation 앱에서 유지보수를 취소하세요. 참고: 유지보수를 취소한 후 자금을 인출하는 것을 잊지 마세요.
유지보수를 취소한 후 자금을 인출할 수 있는 시간적 딜레이가 50 블록 존재합니다.
gist를 삭제하려면, functions-clear-gists 작업을 contract 매개변수와 함께 실행하세요.
npx hardhat functions-clear-gists --contract REPLACE_CONSUMER_CONTRACT_ADDRESS --network REPLACE_NETWORKExample
$ npx hardhat functions-clear-gists --contract 0x6164Df3A2b2899124400c064306c74dA71804865 --network polygonMumbai
secp256k1 unavailable, reverting to browser version
Off-chain secrets Gist https://gist.github.com/aelmanaa/67631d9e07c58fd9903121947f2bf29e deleted successfully

All off-chain secret Gists for Automated Consumer 0x6164Df3A2b2899124400c064306c74dA71804865 have been deleted.
Explanation
AutomatedFunctionsConsumer.sol
Chainlink Functions 소비자 컨트랙트를 작성하기 위해서는 컨트랙트에서 FunctionsClient.sol을 import해야 합니다. 이 컨트랙트는 NPM 패키지로 제공되지 않으므로 프로젝트 내에서 다운로드하여 import해야 합니다.
import {Functions, FunctionsClient} from "./dev/functions/FunctionsClient.sol";Chainlink Automation 컨트랙트를 생성하기 위해서는 컨트랙트에서 AutomationCompatible.sol의 AutomationCompatibleInterface를 import해야 합니다.
import {AutomationCompatibleInterface} from "@chainlink/contracts/src/v0.8/AutomationCompatible.sol";@chainlink/contracts NPM 패키지에서 ConfirmedOwner를 import하세요. 이 컨트랙트에는 소유자 설정, 소유권 이전, 그리고 onlyOwner 함수 변경자를 사용하여 특정 함수를 컨트랙트 소유자에게 제한하는 기능이 포함되어 있습니다.
import {ConfirmedOwner} from "@chainlink/contracts";컨트랙트는 FunctionsClient와 ConfirmedOwner 컨트랙트를 상속하고 AutomationCompatibleInterface 인터페이스를 구현해야 합니다.
contract AutomatedFunctionsConsumer is FunctionsClient, ConfirmedOwner, AutomationCompatibleInterface {
  // 컨트랙트 내용
}
Chainlink Functions 요청을 생성하기 위해 Functions.sol 라이브러리를 사용하세요. 이 라이브러리에는 Chainlink Functions 요청을 구성하는 데 필요한 모든 함수가 포함되어 있습니다.
using Functions for Functions.Request;Chainlink Functions에 전송되는 요청은 상태 변수로 정의됩니다. 컨트랙트 소유자는 이 요청을 저장하며, Chainlink Automation이 트리거할 때마다 주기적으로 Chainlink Functions에 전송됩니다.
bytes public requestCBOR;다음은 스마트 계약에 대한 최신 요청 ID, 최신 수신 응답 및 최신 수신 오류 (있는 경우)를 상태 변수로 정의합니다. 최신 응답 및 오류인 latestResponse와 latestError는 동적 크기의 바이트 배열인 bytes로 인코딩되어 있으므로, 응답이나 오류를 읽으려면 여전히 디코드해야 합니다:
bytes32 public latestRequestId;
bytes public latestResponse;
bytes public latestError;
구독 ID (계약이 연결된 구독 계정) 및 충족 가스 한도 (Chainlink 함수 요청을 충족하는 데 사용되는 최대 가스량)는 상태 변수로 정의되며, 이 변수들은 계약 소유자만 수정할 수 있습니다:
uint64 public subscriptionId;
uint32 public fulfillGasLimit;
업데이트 간격 (Chainlink 함수 요청을 트리거하는 시간 간격 (초))과 마지막 요청의 타임스탬프는 상태 변수로 정의되며, Chainlink Automation이 새로운 요청을 트리거할 시간 간격을 확인하는 데 사용됩니다:
uint256 public updateInterval;
uint256 public lastUpkeepTimeStamp;
upkeepCounter와 responseCounter를 정의하여 Chainlink Automation에 의해 트리거된 요청의 수와 (Chainlink Functions에 의해 충족된 요청의 수를 추적합니다).
스마트 계약이 콜백(callback) 중에 발생시킬 OCRResponse 이벤트를 정의합니다:
event OCRResponse(bytes32 indexed requestId, bytes result, bytes err);계약을 배포할 때 네트워크의 오라클 주소, Chainlink 함수 ID, 충족 가스 한도 및 업데이트 간격을 전달합니다:
constructor(
  address oracle,
  uint64 _subscriptionId,
  uint32 _fulfillGasLimit,
  uint256 _updateInterval
) FunctionsClient(oracle) ConfirmedOwner(msg.sender)
언제든지 오라클 주소를 변경하려면 updateOracleAddress 함수를 호출할 수 있습니다.
요청을 requestCBOR 상태 변수에 저장하려면, 계약 소유자는 다음을 수행해야 합니다:
generateRequest 함수를 호출합니다. 이 함수는 Functions 라이브러리를 사용하여 요청을 초기화하고 전달된 암호화된 비밀 또는 인수를 추가합니다. 마지막으로, 인코딩된 요청을 반환합니다. 요청의 초기화, 비밀 추가 및 인수 추가에 대한 API 참조를 읽을 수 있습니다. 참고: 이 호출은 setRequest 함수를 호출할 때 가스를 절약하기 위해
오프 체인(off-chain)에서 수행됩니다.
Functions.Request memory req;
req.initializeRequest(Functions.Location.Inline, Functions.CodeLanguage.JavaScript, source);
if (secrets.length > 0) {
  req.addRemoteSecrets(secrets);
}
if (args.length > 0) req.addArgs(args);

return req.encodeCBOR();
setRequest 함수를 호출하고 구독 ID, 충족 가스 한도, 업데이트 간격 및 인코딩된 요청(generateRequest에 의해 반환됨)을 전달합니다. setRequest는 updateInterval, subscriptionId, fulfillGasLimit 및 requestCBOR 상태 변수를 업데이트합니다.
Chainlink Automation에서 사용하는 checkUpkeep 및 performUpkeep 함수입니다:
- checkUpkeep: 시간 간격이 충족되면 Chainlink Automation이 performUpkeep 함수를 트리거할 수 있는지를 결정하는 불리언 값을 반환합니다.
upkeepNeeded = (block.timestamp - lastUpkeepTimeStamp) > updateInterval;- performUpkeep: FunctionsClient의 sendRequest 함수를 호출하여 요청을 오라클로 전송합니다. 요청을 보낸 후 현재 타임스탬프로 lastUpkeepTimeStamp를 업데이트하고 upkeepCounter를 증가시키며, latestRequestId를 마지막 요청 ID로 설정합니다.
lastUpkeepTimeStamp = block.timestamp;
upkeepCounter = upkeepCounter + 1;
...
bytes32 requestId = s_oracle.sendRequest(
subscriptionId,
requestCBOR,
fulfillGasLimit
);
...
latestRequestId = assignedReqID;
fulfillRequest는 Chainlink Functions에서 콜백 중에 호출됩니다. 이 함수는 FunctionsClient에서 가상(virtual)으로 정의되어 있으므로, 스마트 계약에서는 콜백을 구현하기 위해 이 함수를 오버라이드해야 합니다. 콜백의 구현은 간단합니다: 계약은 latestResponse와 latestError에 최신 응답과 오류를 저장하고, OCRResponse 이벤트를 발생시키기 전에 responseCounter를 증가시킵니다.
latestResponse = response;
latestError = err;
responseCounter = responseCounter + 1;
emit OCRResponse(requestId, response, err);
config.js
https://docs.chain.link/chainlink-functions/tutorials/api-multiple-calls#configjs
source.js
https://docs.chain.link/chainlink-functions/tutorials/api-multiple-calls#sourcejs
참고
https://docs.chain.link/chainlink-functions/tutorials/automate-functions/#check-result