이번에는 로그인 / 로그아웃 기능을 만들어본다.
config/urls.py에 다음과 같이 앱의 url을 추가해주었다.
from django.contrib import admin
from django.urls import path, include

urlpatterns = [
    path("admin/", admin.site.urls),
    path("", include("ws_chat.urls")),
]
app 이름의 경우 ws_chat이므로 여기와는 앱의 이름이 다르다.
다음으로는 앱에서의 url을 설정해준다.
from django.urls import path, include
from ws_chat import views as chat_views
from django.contrib.auth.views import LoginView, LogoutView


urlpatterns = [
    path("", chat_views.chatPage, name="chat-page"),

    # login-section
    path("auth/login/", LoginView.as_view
         (template_name="ws_chat/loginPage.html"), name="login-user"),
    path("auth/logout/", LogoutView.as_view(), name="logout-user"),
]
루트 url의 경우 채팅을 하는 페이지이다. (사실 잘 모른다. 이름 때문에 그러려니 하고 있다.)
로그인/로그아웃의 경우, 장고에 이미 존재하는 뷰들을 가져와주었다.
name 패러미터의 경우 장고 문법에서 redirect 등과 같은 함수 사용 시 name 패러미터를 url과매핑해주는 역할을 한다고 한다. 아래와 같이 쓰인다.
from django.shortcuts import render, redirect

# Create your views here.
def chatPage(request, *args, **kwargs):
    if not request.user.is_authenticated:
        return redirect("login-user")
    context = {}
    return render(request, "ws_chat/chatPage.html", context)
이제 필요한 html이 두가지 있다. 채팅 기능을 구현할 chatPage.html, loginPage.html 이렇게 두개를 만들어주어야 한다.
templates/ws_chat/chatPage.html
templates/ws_chat/loginPage.html
먼저 chatPage.html이다.
<!DOCTYPE html>
<html>
  <body>
    <center><h1>Hello , Welcome to my chat site ! {{request.user}}</h1></center>
    <br>
    {% if request.user.is_authenticated  %}
    <center> Logout the chat Page <a href = "{% url 'logout-user' %}">Logout</a></center>
    {% endif %}
    <div
      class="chat__item__container"
      id="id_chat_item_container"
      style="font-size: 20px"
    >
      <br />
      <input type="text" id="id_message_send_input" />
      <button type="submit" id="id_message_send_button">Send Message</button>
      <br />
      <br />
    </div>
    <script>
      const chatSocket = new WebSocket("ws://" + window.location.host + "/");
      chatSocket.onopen = function (e) {
        console.log("The connection was setup successfully !");
      };
      chatSocket.onclose = function (e) {
        console.log("Something unexpected happened !");
      };
      document.querySelector("#id_message_send_input").focus();
      document.querySelector("#id_message_send_input").onkeyup = function (e) {
        if (e.keyCode == 13) {
          document.querySelector("#id_message_send_button").click();
        }
      };
      document.querySelector("#id_message_send_button").onclick = function (e) {
        var messageInput = document.querySelector(
          "#id_message_send_input"
        ).value;
        chatSocket.send(JSON.stringify({ message: messageInput, username : "{{request.user.username}}"}));
      };
      chatSocket.onmessage = function (e) {
        const data = JSON.parse(e.data);
        var div = document.createElement("div");
        div.innerHTML = data.username + " : " + data.message;
        document.querySelector("#id_message_send_input").value = "";
        document.querySelector("#id_chat_item_container").appendChild(div);
      };
    </script>
  </body>
</html>
js가 나올줄은 몰랐는데 구아아악
웹소켓을 이용해 채팅을 구현한 것 같다.
다음으로 loginPage.html이다.
<!DOCTYPE html>
<html>
<body>
    <form method ="post">
        {% csrf_token %}
        {{form.as_p}}
        <br>
        <button type = "submit">Login</button>
    </form>
</body>
</html>
이제 로그인 기능을 테스트해보자.
마이그레이션 후 super user 만들어주기까지 추가로 해주었다.
super user도 마이그레이션을 완료해야 만들 수 있다. 지식이 늘었다...
python manage.py makemigrations
python manage.py migrate
python manage.py createsuperuser
이때, templates 디렉토리의 구조가 다음과 같을 경우 html 파일을 못 찾을 수 있다.
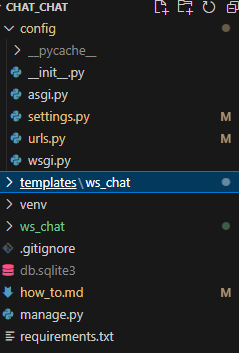
각 앱마다 templates 디렉토리가 존재할 수 있기 때문에 해당 앱 내부의 templates에 html을 추가하여야 한다... 라는 자료가 있었는데, 관리가 번거롭기 때문에 config/settings.py에 들어가 기본 디렉토리를 설정해주었다.
TEMPLATES = [
    {
        'BACKEND': 'django.template.backends.django.DjangoTemplates',
        'DIRS': [BASE_DIR / 'templates'], # base_dir 추가해주기
        'APP_DIRS': True,
        'OPTIONS': {
            'context_processors': [
                'django.template.context_processors.debug',
                'django.template.context_processors.request',
                'django.contrib.auth.context_processors.auth',
                'django.contrib.messages.context_processors.messages',
            ],
        },
    },
]
이제 멀쩡하게 출력이 된다.