Understanding Auto Layout
Auto Layout dynamically calculates the size and position of all the views in your view hierarchy, based on constraints placed on those views.
constraints제약사항에 따라 사이즈와 위치를 뷰 계층에 따라 동적으로 계산해준다.
External Changes
superview가 변화할 때
- The user resizes the window (OS X) 윈도우 사이즈 재배치
- The user enters or leaves Split View on an iPad (iOS) split View를 사용할 때
- The device rotates (iOS) 기기가 회전할 때
- The active call and audio recording bars appear or disappear (iOS) 전화가 오거나 녹음 할 때
- You want to support different size classes.
- You want to support different screen sizes.
Runtime에 발생한다.
Slide Over and Split View를 지원하기 위해 중요하다
Internal Changes
user interface가 변화할 때
- The content displayed by the app changes. 예를 들어 버튼을 눌렀을 때 어떻게 하라는 코드가 실행되는 거
- The app supports internationalization.
- The app supports Dynamic Type (iOS).
Internationalization 다른 언어, 지역, 문화에 적응하도록 한다.
dynamic type 유저가 폰트사이즈를 바꾸는 것이다.
frame based layout
뷰계층에 있는 모든 뷰의 사이즈와 크기를 프레임에 따라 계산해야한다.
auto layout

Anatomy of a Constraint
픽셀이 아니라 포인트라는 단위를 사용한다
attributes
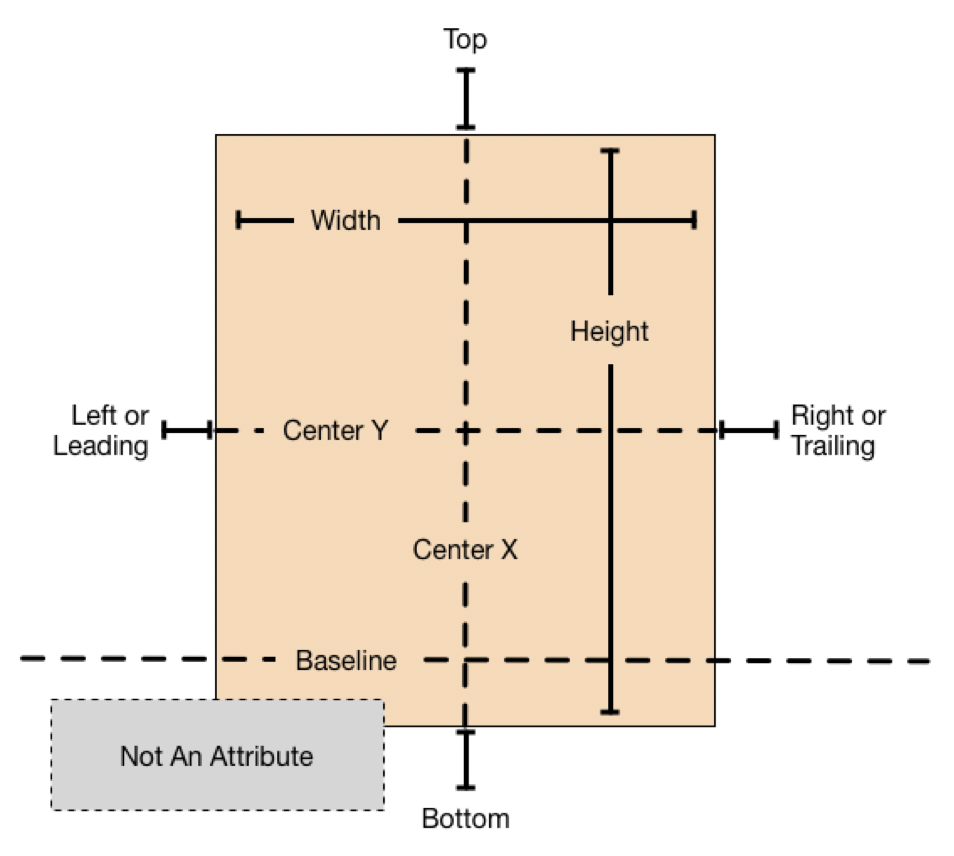
top
bottom
left or leading: 글이 시작하는 방향(왼쪽, 문화에 따라 다름)
right or trailing
centerY
centerX
Width -> 크기
Height -> 크기
baseline: 글자의 밑바닥
equations
There are two basic types of attributes. Size attributes (for example, Height and Width) and location attributes (for example, Leading, Left, and Top). 크기 vs 위치
- You cannot constrain a size attribute to a location attribute. 크기와 위치 제약사항 구분하기
- You cannot assign constant values to location attributes.
- You cannot use a nonidentity multiplier (a value other than 1.0) with location attributes. 위치의 multiplier는 1.0보다 클 수 없다
- For location attributes, you cannot constrain vertical attributes to horizontal attributes. vertical과 horizontal의 제약사항을 구분해서 사용한다
- For location attributes, you cannot constrain Leading or Trailing attributes to Left or Right attributes. leading과 trailing 제약사항을 구분해서 사용한다
// Setting a constant height
사이즈 관련해서는 NotAnAttribute를 사용할 수 있다. 높이가 40이라는 말
View.height = 0.0 * NotAnAttribute + 40.0
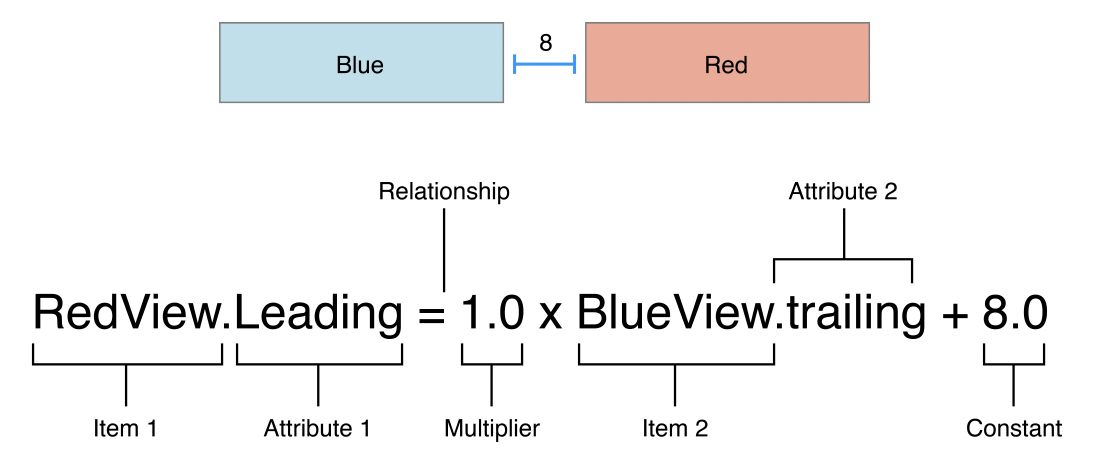
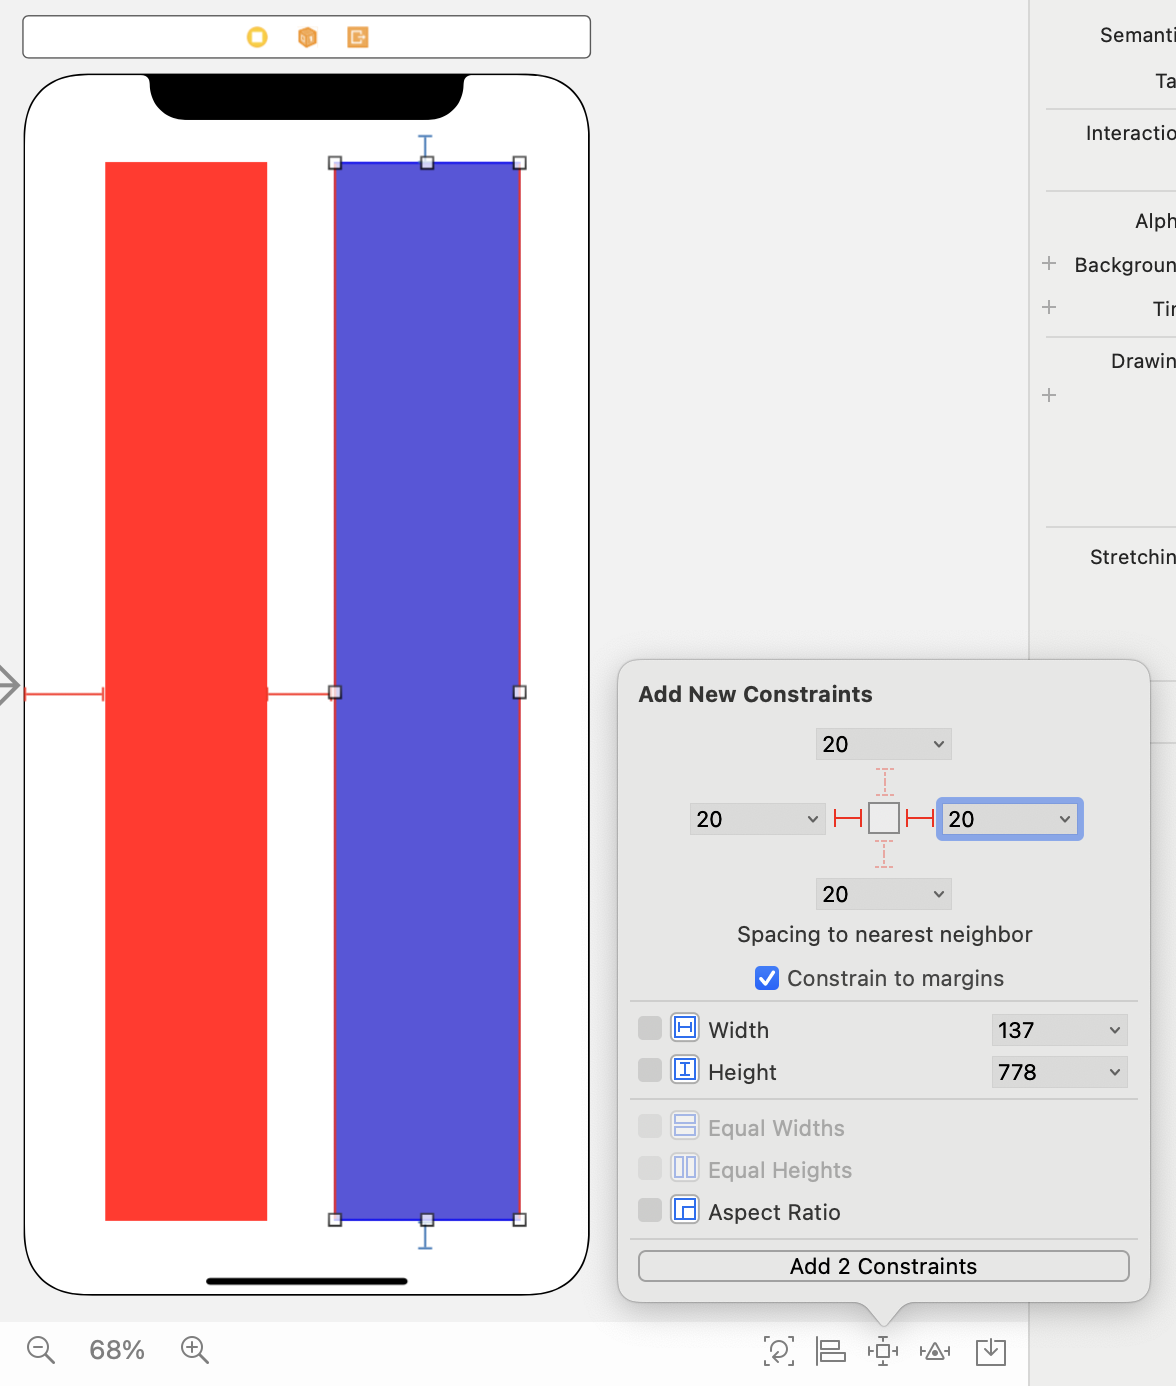
// Setting a fixed distance between two buttons
Button_2.leading = 1.0 * Button_1.trailing + 8.0
// Aligning the leading edge of two buttons
leading끼리 정렬
Button_1.leading = 1.0 * Button_2.leading + 0.0
// Give two buttons the same width
너비를 맞춘다
Button_1.width = 1.0 * Button_2.width + 0.0
// Center a view in its superview
View.centerX = 1.0 * Superview.centerX + 0.0
View.centerY = 1.0 * Superview.centerY + 0.0
// Give a view a constant aspect ratio
높이2:가로1의 비율
View.height = 2.0 * View.width + 0.0Equality, Not Assignment
할당하는 게 아니라 등식을 나타내는 것이다
- Whole number multipliers are favored over fractional multipliers. 전체 숫자가 부분 숫자 보다 우선한다
- Positive constants are favored over negative constants. 양수가 음수보다 우선한다
- Wherever possible, views should appear in layout order: leading to trailing, top to bottom. 리딩에서 트레일링, 탑에서 보텀으로 우선한다
Creating Nonambiguous, Satisfiable Layouts
모호하지 않은 레이아웃
x축과 y축 모두에 제약사항을 명확히 해야한다
variety solutions
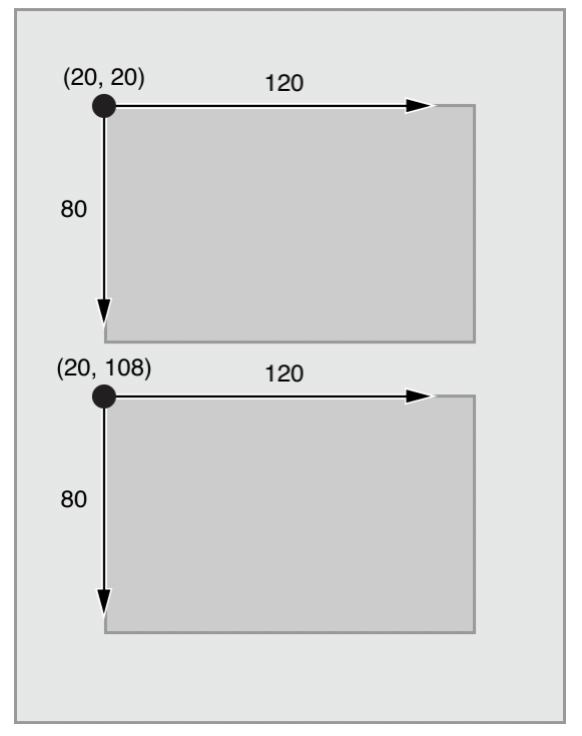
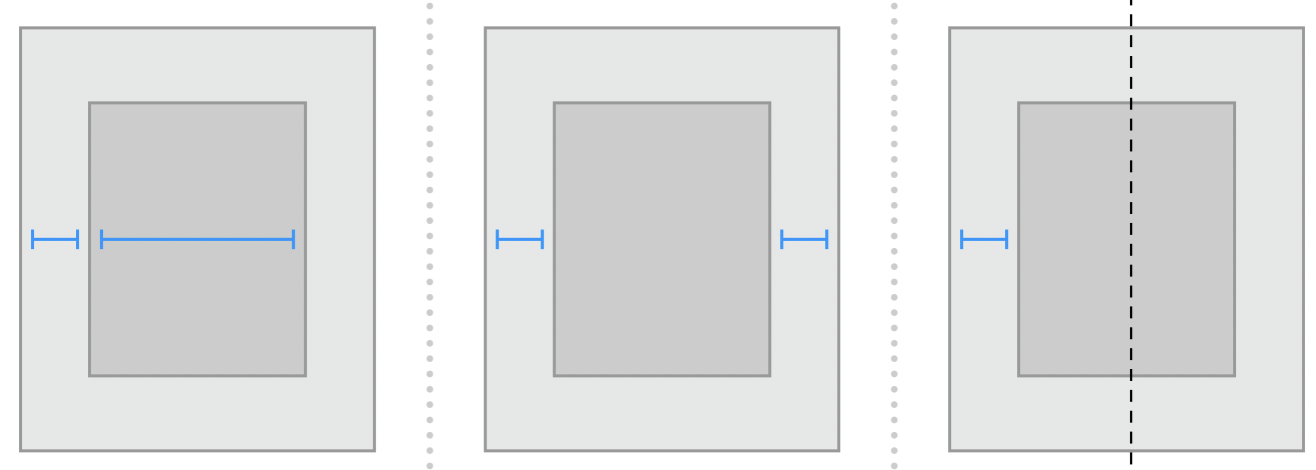
1. Equal Widths
왼쪽뷰와 오른쪽 뷰에 왼쪽 오른쪽 위 아래 20씩 주기
x축 빨간선... 오류...
왼쪽과 오른쪽이 같은 너비라는 것을 컴퓨터는 모르기 때문이다.
Equal Widths를 추가하면 오류가 없어진다.

2. 왼쪽 뷰와 오른쪽 뷰의 정렬을 맞춰준다
너비는 위와 동일하게 진행하고
왼쪽뷰에만 탑과 보텀값을 준 후
뷰 두 개를 선택하고 정렬 Top Edges, Bottom Edges를 누르면 오른쪽도 왼쪽처럼 정렬할 수 있게 된다.
제약사항 변경 시 주의사항
기존의 제약사항을 수정하거나
삭제하고 새로 추가해야한다
중복된다면 Constraint Priorities로 우선순위를 줄 수 있다
Constraint Inequalities
Listing 3-3
Assigning a minimum and maximum size 최솟값과 최댓값 사이즈를 지정한다
// Setting the minimum width
View.width >= 0.0 * NotAnAttribute + 40.0

// Setting the maximum width
View.width <= 0.0 * NotAnAttribute + 280.0
Constraint Priorities
All constraints have a priority between 1 and 1000. 1~1000까지의 수를 줄 수 있다
low (250), medium (500), high (750), and required (1000) priorities로 UILayoutPriority enum에 구현되어 있다.
제약사항이 충돌되면 Priorities가 높은 것이 우선되고, 충돌되지 않으면 두 가지의 속성이 적용된다.
Intrinsic Content Size 고유 콘텐츠 사이즈
| UIView and NSView | No intrinsic content size |
|---|---|
| Slider | Difines only the height(iOS) 너비만 정해주면 됨 |
| Labels, buttons, switches, and text field | Defines both the height and width 위치만 정해주면 됨 |
| Text View and image views | intrinsic content size can vary |
왼쪽과 위쪽에 20씩의 간격을 줬을 때...
-
A label or button’s intrinsic content size is based on the amount of text shown and the font used. 레이블이나 버튼은 텍스트의 양에 따라 사이즈가 정해진다 (오류가 발생하지 않음)
-
an empty image view does not have an intrinsic content size. As soon as you add an image, though, its intrinsic content size is set to the image’s size. 이미지뷰의 경우에는 이미지의 사이즈를 지정해줘야 한다 (그렇지 않으면 오류가 발생한다)
- Intrinsic Size: Placeholder로 변경하고 Width와 Height를 주면 임시적으로 위치시킬 수 있다. 앱 동작시에는 적용되지 않는다.
- 2-1. Intrinsic Size:Default로 다시 두고, File > New File > CocoaTouch Class > Class: MyView, Subclass of: UIView
import UIKit @IBDesignable class MyView: UIView { override var intrinsicContentSize: CGSize { return CGSize(width: 50, height: 50) } }- 2-2. Class: MyView 설정해준다
-
slider의 경우 높이가 지정되어 있기 때문에 너비를 지정해줘야 한다.
Content-Hugging and Compression-Resistance (CHCR) Priorities
hugging: 늘어나는 것을 방지하는 힘 (기본값: 250 priority), 우선순위가 높을 때 가장 작게 증가한다.
resistance: 찌그러지는 것을 방지하는 힘 (기본값: 750 priority), 우선순위가 높을 때 길이가 늘어나는 모습을 볼 수 있다.
우선순위의 기본값이 저렇게 되어있기 때문에 줄이는 것보다 늘리는 것이 더 쉽다.
- 뷰를 늘릴 때 hugging 우선순위가 동일하다면 오토레이아웃은 어떤 뷰를 늘려야할지 모른다.
- 수평선에서 text field는 남는 공간을 채우고 label은 그대로 두고 싶다면, text field의 hugging 우선순위를 label보다 낮게 설정해라.
- 사실 UI Builder는 label의 hugging priority를 251으로 자동 생성하게 되어있다.
- 보이지않는 백그라운드의 뷰에 예상치 못한 레이아웃이 발생하는 것을 방지하려면 (unwanted stretching), content-hugging priority를 높여라.
- baseline 제약조건은 고유 컨텐츠 높이의 뷰에만 적용된다.
- switches와 같은 뷰는 고유 콘텐츠 사이즈로 보여져야 한다. CHCR을 증가시켜라.
- 뷰가 고유의 콘텐츠 사이즈를 갖게 하고 싶으면 임의로 999로 설정하는 것을 꺼리지 말아라.
Working with Constraints in Interface Builder
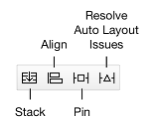
Using the Stack, Align, Pin and Resolve Tools
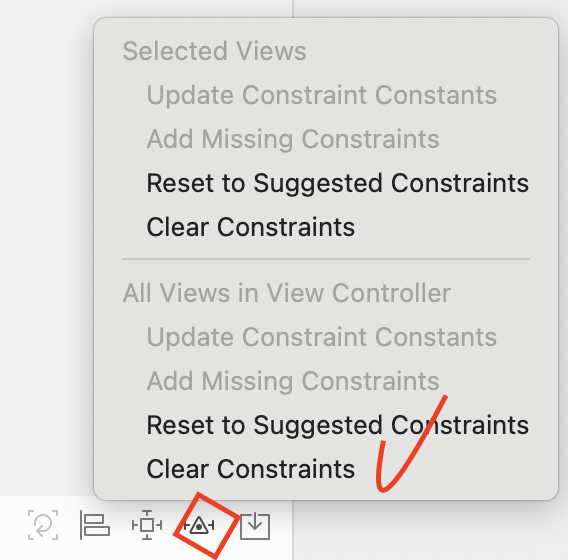
Resolve Tools
위의 Clear Constraints는 선택한 제약사항만 제거
Clear Constraints 모든 제약사항 없애기
Update Frame
주황색 선일 때 (작동에 문제는 없지만 constraint의 위치로 바꿔줌)
View, StackView, ScrollView
각각 언제쓰는고징?
Aspect Ratio
Image View에서 Option키를 누르면 1:1 설정하는 것을 추가할 수 있다.
Editor > Preview
방향이나 여러 기기 테스트할 때 사용하기