
Spring에서의 Bean은 핵심 중에 핵심이 되는 요소이다. Bean에 대해 알기 위해서는 먼저 DI / IoC에 대해 알고 있어야 한다. DI와 IoC에 대한 설명을 간략히 하자면 다음과 같다.
DI (Dependency Injection)
객체의 의존성을 외부에서 주입하는 방식
- 장점 : 객체 간의 결합도가 낮아져서 유지보수가 용이해짐, 의존성을 외부에서 관리하기 때문에 객체 간의 독립성이 증가함, 모의 객체(mock object)를 사용하여 쉽게 테스트 할 수 있게 됨.
IoC (Inversion of Controll)
프로그램의 제어 흐름을 개발자가 아니라 프레임워크가 관리하게 하는 디자인 원칙
IoC의 일반적인 구현 방법 중 하나가 바로 DI이다. DI를 사용하여 객체의 생성 및 라이프사이클을 프레임워크가 관리하게 함으로써 제어의 역전을 구현한다.
- 장점 : 애플리케이션의 유연성과 확장성이 증가함, 프레임워크가 객체의 생성 및 관리를 책임지므로 개발자는 비즈니스 로직에 집중할 수 있음, 모듈 간의 결합도가 낮아져서 독립적으로 개발 및 테스트가 가능함.
@Component
public class ServiceA {
    private final ServiceB serviceB;

    @Autowired
    public ServiceA(ServiceB serviceB) {
        this.serviceB = serviceB;
    }

    public void execute() {
        serviceB.performTask();
    }
}

@Component
public class ServiceB {
    public void performTask() {
        System.out.println("Task performed");
    }
}
예시 코드의 ServiceA는 ServiceB에 의존한다. 스프링 컨테이너는 ServiceB의 인스턴스를 생성하고 ServiceA의 생성자에 주입한다.
여기서 컨테이너는 IoC 컨테이너를 의미한다.
IoC 컨테이너란 의존성 주입(DI)을 관리하고 애플리케이션의 객체 생명 주기와 의존성을 관리하는 프레임워크의 핵심 구성 요소이다.
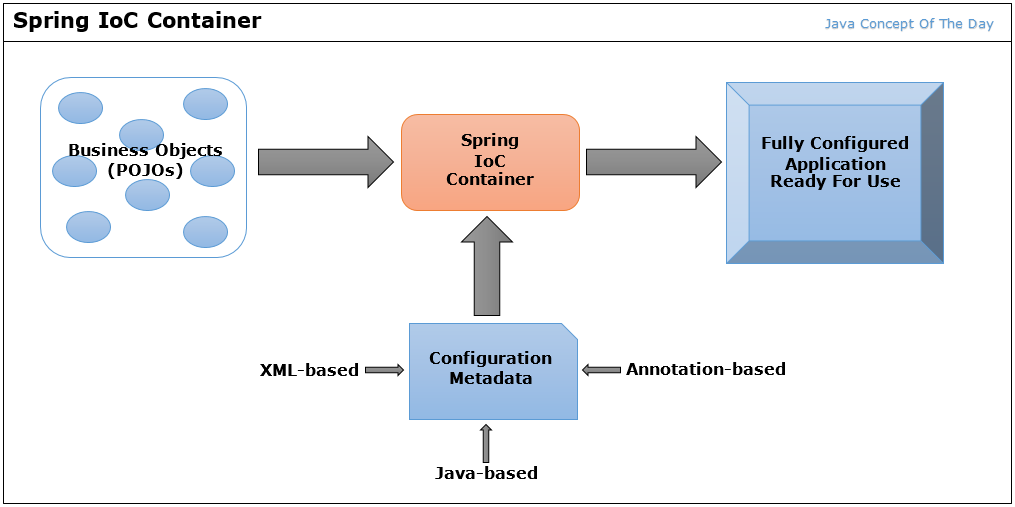
특별한 규칙이나 제한 없이 순수하게 자바 언어로 작성된 객체인 POJO(Plain Old Java Object)를 Bean으로 등록해두면, IoC 컨테이너 속에서 관리하다가 필요시 의존성이 주입된 객체를 사용할 수 있다. 일단 Bean에 대한 기본적인 설명은 잠시 미루어두겠다.
기본 객체를 Bean으로 등록해두면 컨테이너에 들어가게 되고 개발자가 직접 의존성을 주입을 하지 않아도 된다고 하는데... 이는 어떻게 구현이 될까?
1. XML 설정 파일을 통한 빈 등록
- XML 설정 파일 (applicationContext.xml)
<beans xmlns="http://www.springframework.org/schema/beans"
       xmlns:xsi="http://www.w3.org/2001/XMLSchema-instance"
       xsi:schemaLocation="http://www.springframework.org/schema/beans
       http://www.springframework.org/schema/beans/spring-beans.xsd">

    <bean id="person" class="com.example.Person">
        <property name="name" value="John"/>
        <property name="age" value="30"/>
    </bean>

</beans>
- Java 코드에서 컨텍스트를 로드하는 방법
import org.springframework.context.ApplicationContext;
import org.springframework.context.support.ClassPathXmlApplicationContext;

public class Main {
    public static void main(String[] args) {
        ApplicationContext context = new ClassPathXmlApplicationContext("applicationContext.xml");
        Person person = context.getBean(Person.class);
        System.out.println(person);
    }
}
2. 자바 어노테이션을 통한 빈 등록
스프링은 자바 어노테이션을 사용하여 POJO를 빈으로 등록하는 기능을 제공한다. 주요 어노테이션으로는 @Component, @Service, @Repository, @Controller 등이 있다.
- POJO 클래스에 어노테이션 추가
import org.springframework.stereotype.Component;

@Component
public class Person {
    private String name = "Minsoo";
    private int age = 24;

    // Getter 및 Setter 메서드
    public String getName() {
        return name;
    }

    public void setName(String name) {
        this.name = name;
    }

    public int getAge() {
        return age;
    }

    public void setAge(int age) {
        this.age = age;
    }

    @Override
    public String toString() {
        return "Person{name='" + name + "', age=" + age + "}";
    }
}
- 어노테이션 기반 설정 클래스
import org.springframework.context.ApplicationContext;
import org.springframework.context.annotation.AnnotationConfigApplicationContext;
import org.springframework.context.annotation.ComponentScan;
import org.springframework.context.annotation.Configuration;

@Configuration
@ComponentScan(basePackages = "com.example")
public class AppConfig {}

public class Main {
    public static void main(String[] args) {
        ApplicationContext context = new AnnotationConfigApplicationContext(AppConfig.class);
        Person person = context.getBean(Person.class);
        System.out.println(person);
    }
}
3. 설정 클래스를 통한 빈 등록
- POJO 클래스
public class Person {
    private String name;
    private int age;

    public Person(String name, int age) {
        this.name = name;
        this.age = age;
    }

    // Getter 및 Setter 메서드
    public String getName() {
        return name;
    }

    public void setName(String name) {
        this.name = name;
    }

    public int getAge() {
        return age;
    }

    public void setAge(int age) {
        this.age = age;
    }

    @Override
    public String toString() {
        return "Person{name='" + name + "', age=" + age + "}";
    }
}
- java 설정 클래스
import org.springframework.context.ApplicationContext;
import org.springframework.context.annotation.AnnotationConfigApplicationContext;
import org.springframework.context.annotation.Bean;
import org.springframework.context.annotation.Configuration;

@Configuration
public class AppConfig {

    @Bean
    public Person person() {
        return new Person("Minsoo", 24);
    }
}

public class Main {
    public static void main(String[] args) {
        ApplicationContext context = new AnnotationConfigApplicationContext(AppConfig.class);
        Person person = context.getBean(Person.class);
        System.out.println(person);
    }
}
(요약) POJO를 Bean으로 등록하기 위한 3가지 방법
- XML 설정 파일 사용
- 어노테이션 사용
- Config 클래스 사용
기본 객체를 Bean이란 것으로 등록해두기 위한 방법들을 알아봤으니 본격적으로 Bean이란 무엇인지 정리해보고자 한다.
Bean 이란?
빈(Bean)은 스프링 IoC 컨테이너에 의해 생성되고 관리되는 객체이다.
스프링 프레임워크에서는 빈의 생명 주기와 가시 범위를 관리하기 위해 여러 가지 스코프(scope)를 제공한다. 여기서 스코프는 빈이 생성되고 사용되는 범위를 뜻한다.
스코프가 중요한 이유는, 개발자가 적절한 스코프를 선택하여 사용하면 애플리케이션의 성능과 유지보수성을 향상시킬 수 있기 때문이다.
빈 스코프의 종류로는 싱글톤, 프로토타입, request, session, application 등이 있다. 간단히 정리하자면 다음과 같다.
1. Singleton : 기본 스코프로 스프링 컨테이너의 시작과 종료까지 유지되는 가장 넓은 범위의 스코프
-
사용 예시 : 주로 공유되어야 하는 서비스 객체에 사용
-
코드 예시
import org.springframework.context.annotation.Scope;
import org.springframework.stereotype.Component;

@Component
@Scope("singleton")
public class SingletonBean {
    public SingletonBean() {
        System.out.println("SingletonBean 생성");
    }

    public void doSomething() {
        System.out.println("싱글톤 빈 작업 수행");
    }
}

import org.springframework.context.ApplicationContext;
import org.springframework.context.annotation.AnnotationConfigApplicationContext;

public class SingletonExample {
    public static void main(String[] args) {
        ApplicationContext context = new AnnotationConfigApplicationContext(AppConfig.class);

        SingletonBean bean1 = context.getBean(SingletonBean.class);
        SingletonBean bean2 = context.getBean(SingletonBean.class);

        bean1.doSomething();
        bean2.doSomething();

        System.out.println(bean1 == bean2);  // true
    }
}
2. Prototype : 빈의 생성과 의존관계 주입까지만 관여하고 더는 관리하지 않는 매우 짧은 범위의 스코프
-
사용 예시 : 상태를 가지며 매번 새로운 인스턴스를 필요로 하는 객체에 사용
-
코드 예시
import org.springframework.context.annotation.Scope;
import org.springframework.stereotype.Component;

@Component
@Scope("prototype")
public class PrototypeBean {
    public PrototypeBean() {
        System.out.println("PrototypeBean 생성");
    }

    public void doSomething() {
        System.out.println("프로토타입 빈 작업 수행");
    }
}

import org.springframework.context.ApplicationContext;
import org.springframework.context.annotation.AnnotationConfigApplicationContext;

public class PrototypeExample {
    public static void main(String[] args) {
        ApplicationContext context = new AnnotationConfigApplicationContext(AppConfig.class);

        PrototypeBean bean1 = context.getBean(PrototypeBean.class);
        PrototypeBean bean2 = context.getBean(PrototypeBean.class);

        bean1.doSomething();
        bean2.doSomething();

        System.out.println(bean1 == bean2);  // false
    }
}
3. Request : 웹 요청이 들어오고 나갈때까지 유지하는 스코프
- 사용 예시 : 요청 범위에 국한된 데이터 처리가 필요할 때 사용
- 코드 예시
import org.springframework.context.annotation.Scope;
import org.springframework.stereotype.Component;
import org.springframework.web.context.annotation.RequestScope;

@Component
@RequestScope
public class RequestBean {
    public RequestBean() {
        System.out.println("RequestBean 생성");
    }

    public void doSomething() {
        System.out.println("리퀘스트 빈 작업 수행");
    }
}

import org.springframework.stereotype.Controller;
import org.springframework.web.bind.annotation.GetMapping;
import org.springframework.web.bind.annotation.RestController;

@RestController
public class RequestScopeController {

    private final RequestBean requestBean;

    public RequestScopeController(RequestBean requestBean) {
        this.requestBean = requestBean;
    }

    @GetMapping("/request")
    public String handleRequest() {
        requestBean.doSomething();
        return "Request scope example";
    }
}
4. Session : 웹 세션이 생성, 종료할때까지 유지하는 스코프
- 사용 예시 : 사용자 세션 동안 유지되어야 하는 상태를 저장할 때 사용
- 코드 예시
import org.springframework.context.annotation.Scope;
import org.springframework.stereotype.Component;
import org.springframework.web.context.annotation.SessionScope;

@Component
@SessionScope
public class SessionBean {
    private int counter = 0;

    public SessionBean() {
        System.out.println("SessionBean 생성");
    }

    public void incrementCounter() {
        counter++;
    }

    public int getCounter() {
        return counter;
    }
}

import org.springframework.stereotype.Controller;
import org.springframework.web.bind.annotation.GetMapping;
import org.springframework.web.bind.annotation.RestController;

@RestController
public class SessionScopeController {

    private final SessionBean sessionBean;

    public SessionScopeController(SessionBean sessionBean) {
        this.sessionBean = sessionBean;
    }

    @GetMapping("/session")
    public String handleSession() {
        sessionBean.incrementCounter();
        return "Session counter: " + sessionBean.getCounter();
    }
}
5. Applicaion : 웹 서블릿 컨텍스트와 같은 범위로 유지하는 스코프
- 사용 예시 : 애플리케이션 범위에서 공유되어야 하는 객체에 사용
- 코드 예시
import org.springframework.context.annotation.Scope;
import org.springframework.stereotype.Component;
import org.springframework.web.context.annotation.ApplicationScope;

@Component
@ApplicationScope
public class ApplicationBean {
    public ApplicationBean() {
        System.out.println("ApplicationBean 생성");
    }

    public void doSomething() {
        System.out.println("애플리케이션 빈 작업 수행");
    }
}

import org.springframework.stereotype.Controller;
import org.springframework.web.bind.annotation.GetMapping;
import org.springframework.web.bind.annotation.RestController;

@RestController
public class ApplicationScopeController {

    private final ApplicationBean applicationBean;

    public ApplicationScopeController(ApplicationBean applicationBean) {
        this.applicationBean = applicationBean;
    }

    @GetMapping("/application")
    public String handleApplication() {
        applicationBean.doSomething();
        return "Application scope example";
    }
}
동일하진 않지만, 각각의 빈은 생명주기를 가진다. 마지막으로 빈의 생명주기에 대해 정리를 해보려 한다.
스프링 빈의 생명 주기(Bean Lifecycle)는 빈이 생성되고 소멸될 때까지 거치는 일련의 단계들을 말한다.
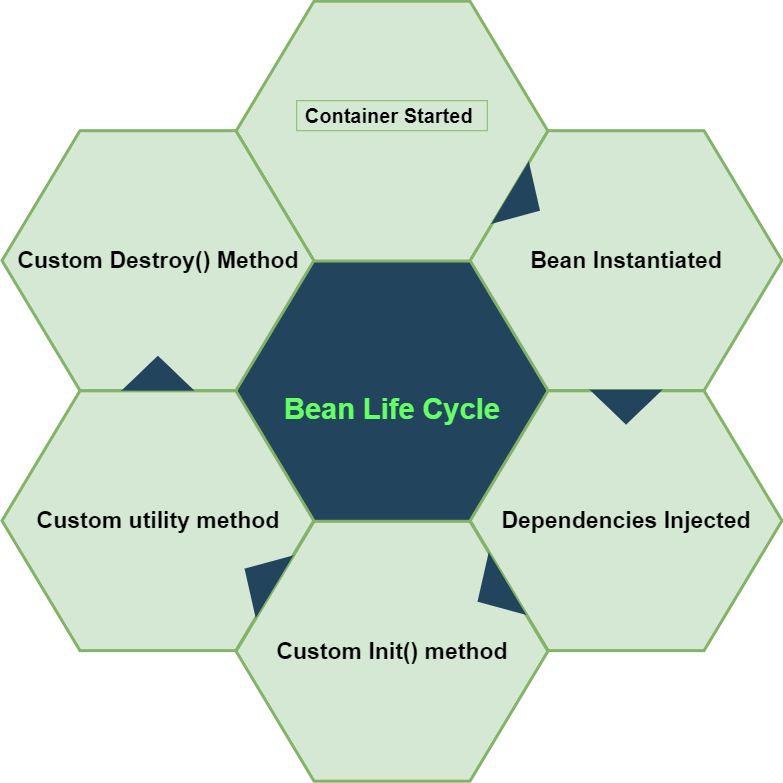
스프링 빈의 생명 주기
- 빈 정의(Bean Definition)
- 빈이 스프링 설정 파일(XML, 자바 설정 클래스)이나 어노테이션을 통해 정의된다. 이 단계에서는 빈의 클래스 타입, 의존성, 스코프 등이 정의된다.
- 빈 인스턴스화(Instantiation)
- 스프링 컨테이너가 빈의 인스턴스를 생성한다. (빈 정의를 기반으로 새로운 객체를 생성하는 과정)
- 의존성 설정(Population of Properties)
- 빈의 속성(properties)이나 생성자 파라미터에 의존성을 주입한다. (설정 파일이나 어노테이션에 정의된 대로 이루어짐)
- 빈 초기화(Initialization)
- 빈의 초기화 작업을 수행하며 다음과 같은 방식들로 구현된다.
@PostConstruct 어노테이션 사용
import javax.annotation.PostConstruct;

@Component
public class MyBean {
    @PostConstruct
    public void init() {
        System.out.println("MyBean 초기화");
    }
}
XML 설정에서 init-method 속성 사용
// XML 설정
<bean id="myBean" class="com.example.MyBean" init-method="init"/>
InitializingBean 인터페이스의 afterPropertiesSet 메서드 구현
import org.springframework.beans.factory.InitializingBean;

@Component
public class MyBean implements InitializingBean {
    @Override
    public void afterPropertiesSet() throws Exception {
        System.out.println("MyBean 초기화");
    }
}
- 빈 사용(Usage)
- 초기화된 빈을 애플리케이션에서 사용한다. 빈은 필요한 곳에서 의존성 주입을 통해 사용된다.
- 빈 소멸(Destruction)
- 애플리케이션 컨텍스트가 종료되면 빈의 소멸 작업이 수행된다. 소멸 메서드를 통해 소멸 작업을 수행할 수 있으며 다음과 같은 방식들로 이루어진다.
@PreDestroy 어노테이션 사용
import javax.annotation.PreDestroy;

@Component
public class MyBean {
    @PreDestroy
    public void destroy() {
        System.out.println("MyBean 소멸");
    }
}
XML 설정에서 destroy-method 속성 사용
// XML 설정
<bean id="myBean" class="com.example.MyBean" destroy-method="destroy"/>
DisposableBean 인터페이스의 destroy 메서드 구현
import org.springframework.beans.factory.DisposableBean;

@Component
public class MyBean implements DisposableBean {
    @Override
    public void destroy() throws Exception {
        System.out.println("MyBean 소멸");
    }
}
스프링 빈의 초기화 및 소멸 메서드를 명시적으로 지정하지 않아도 애플리케이션은 정상적으로 동작하겠지만 빈의 상태를 설정하거나 자원을 해제하는 등의 특정 작업을 수행할 때 사용하면 유용하다!!!