미들웨어
미들웨어는 서로 다른 애플리케이션이 서로 통신하는 데 사용되는 소프트웨어이다다.
MQTT
MQTT는 ISO 표준 발행-구독 기반의 메시징 프로토콜이다.
스마트 센서, 웨어러블 및 기타 사물 인터넷(IoT) 디바이스는 일반적으로 리소스 제약이 있는 네트워크를 통해 제한된 대역폭으로 데이터를 전송하고 수신해야 한다.
이러한 IoT 디바이스는 MQTT를 데이터 전송에 사용하는데, 구현이 쉽고 IoT 데이터를 효율적으로 전달할 수 있기 때문입니다. MQTT는 디바이스에서 클라우드로, 클라우드에서 디바이스로의 메시징을 지원한다.
MQTT 프로토콜 장점
확장성
- MQTT 구현에는 최소량의 코드가 필요하며 작업 시 아주 작은 전력만 소비된다.
- 이 프로토콜은 또한 많은 수의 IoT 디바이스와의 통신을 지원하기 위한 기본적인 기능을 갖추고 있다.
- MQTT 프로토콜을 구현하여 수백만 개의 디바이스에 연결할 수 있다.
신뢰성
- 많은 IoT 디바이스는 대역폭은 낮고 지연 시간은 긴 신뢰할 수 없는 셀룰러 네트워크를 통해 연결한다.
- MQT T에는 IoT 디바이스에서 클라우드에 다시 연결하는 데 소요되는 시간을 줄여주는 기능이 기본적으로 탑재되어 있다.
- 최대 1회(0), 최소 1회(1) 및 정확히 1회(2)라는 3가지 서비스 품질 수준을 정의하여 IoT 사용 사례에 필요한 신뢰성을 보장한다.
보안
- 개발자는 MQTT를 사용하면 메시지를 손쉽게 암호화하고 OAuth, TLS1.3, 고객 관리형 인증서 및 기타 최신 인증 프로토콜을 사용하여 디바이스와 사용자를 인증할 수 있다.
우수한 지원
- Python과 같은 다수의 언어가 MQTT 프로토콜 구현을 광범위하게 지원한다.
- 개발자는 모든 유형의 애플리케이션에서 최소한의 코드 작업으로 빠르게 이 프로토콜을 구현할 수 있다.
MQTT 프로토콜 특징
공간 분리
- 게시자와 구독자는 서로의 네트워크 위치를 모르며 IP 주소 또는 포트 번호와 같은 정보를 교환하지 않다.
시간 분리
- 게시자와 구독자는 동시에 실행되거나 네트워크를 통해 연결되지 않다.
동기화 분리
- 게시자와 구독자는 서로를 중단시키지 않고 메시지를 전송하거나 수신할 수 있습니다. 예를 들어 구독자는 게시자가 메시지를 전송할 때까지 기다리지 않아도 된다.
MQTT 구조
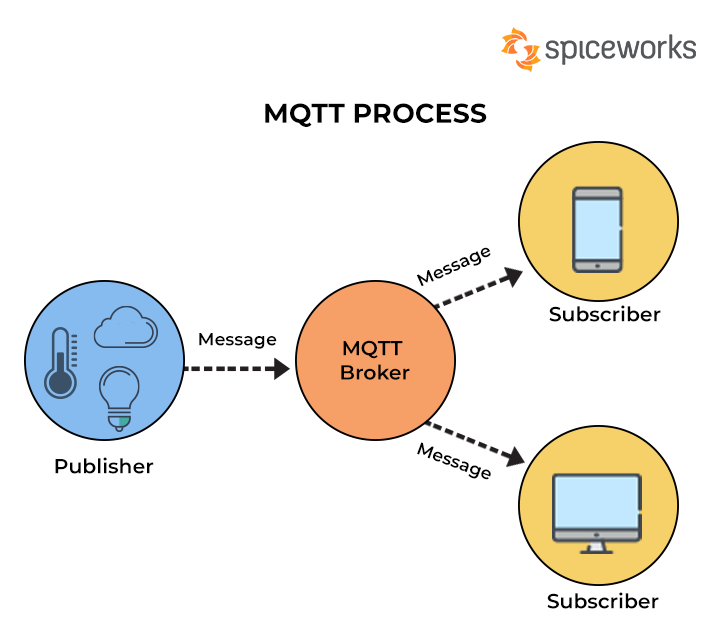
MQTT broker는 여러 클라이언트 간의 메시지를 조정하는 백엔드 시스템이다.
MQTT 클라이언트
- MQTT 클라이언트는 서버부터 MQTT 라이브러리를 실행하는 마이크로컨트롤러에 이르는 모든 디바이스가 될 수 있다.
- 클라이언트는 메시지를 보내는 경우 게시자 역할을, 메시지를 수신하는 경우 수신자 역할을 한다.
- 기본적으로 네트워크를 통해 MQTT를 사용하여 통신하는 모든 디바이스를 MQTT 클라이언트 디바이스라고 할 수 있다.
MQTT 브로커
- MQTT 브로커는 여러 클라이언트 간의 메시지를 조정하는 백엔드 시스템이다.
- 브로커는 메시지 수신 및 필터링, 각 메시지를 구독하는 클라이언트 식별, 메시지 전송 등과 같은 작업을 담당합니다. 또한 다음과 같은 다른 태스크도 처리한다.
- MQTT 클라이언트 권한 부여 및 인증
- 추가 분석을 위해 다른 시스템으로 메시지 전달
- 누락된 메시지 및 클라이언트 세션 처리
MQTT 연결
- 클라이언트와 브로커는 MQTT 연결을 사용하여 통신을 시작한다.
- 클라이언트는 CONNECT 메시지를 MQTT 브로커로 보내 연결을 시작합니다.
- 브로커는 CONNACK 메시지로 응답하여 연결이 설정되었음을 확인합니다. - MQTT 클라이언트와 브로커는 모두 TCP/IP 스택이 있어야 통신할 수 있습
니다. - 클라이언트는 서로 연결되지 않으며 브로커에만 연결합니다.
MQTT 시작하기
MQTT 개발용 클라이언트
https://github.com/eclipse/paho.mqtt-spy/wiki/Downloads
ubuntu
Step 1: 시스템 업데이트
sudo apt-get update
sudo apt-get upgrade
Step 2: 모스키토 설치
sudo apt-get install mosquitto
sudo apt-get install mosquitto-clients
Step 3: 서버동작 시작
sudo /etc/init.d/mosquitto start
Step 4: 두개의 터미널로 통신 테스트
Terminal 1: Type the following:
mosquitto_sub -d -t /test
Terminal 2: Type the Following:
mosquitto_pub -d -t /test -m "Hello!"
rabitmq(window용)
https://www.rabbitmq.com/install-windows.html
MQTT 실습1
hivemq
와이파이 보안 문제로 개인 MQTT 구축이 어려워 https://www.hivemq.com/public-mqtt-broker/ 에서 hivemq를 통해 MQTT 통신을 구현했다.
hivemq을 통해 쉽게 topic을 만들 수 있다.
💡 메시지를 발행-구독하는 행위는 채널 단위로 일어난다. 이를 MQTT에서는 토픽이라고 부르고, 토픽은 슬래시(/)로 구분되는 계층 구조를 갖는다.
보드와 통신을 하기 전에 python을 통해 임의 값을 publish를 테스트 했다.
publish.py
import paho.mqtt.client as mqtt
import json

def on_connect(client, userdata, flags, rc):
    if rc == 0:
        print("connected OK")
    else:
        print("Bad connection Returned code=", rc)

def on_disconnect(client, userdata, flags, rc=0):
    print(str(rc))

def on_publish(client, userdata, mid):
    print("In on_pub callback mid=", mid)

# 새로운 클라이언트 생성
client = mqtt.Client()
# 콜백 함수 설정
client.on_connect = on_connect # 브로커에 접속
client.on_disconnect = on_disconnect # 브로커에 접속 종료
client.on_publish = on_publish # 메세지 발행``
# address 설정
client.connect('bssmheavn/1', 1883)
client.loop_start()
# common topic 으로 메세지 발행
client.publish('common', json.dumps({"sucess":"hi"}), 1)
client.loop_stop()
# 연결 종료
client.disconnect()
client.publish('common', json.dumps({"sucess":"hi"}), 1)을 json 형식으로 값을 보내게 된다.
client.connect('bssmheavn/1', 1883)을 통해 topic은 bssmheavn/1이 된다.
subscribe.py
import paho.mqtt.client as mqtt

def on_connect(client, userdata, flags, rc):
    if rc == 0:
        print("connected OK")
    else:
        print("Bad connection Returned code=", rc)

def on_disconnect(client, userdata, flags, rc=0):
    print(str(rc))

def on_subscribe(client, userdata, mid, granted_qos):
    print("subscribed: " + str(mid) + " " + str(granted_qos))

def on_message(client, userdata, msg):
    print(str(msg.payload.decode("UTF-8")))

# 새로운 클라이언트 생성
client = mqtt.Client()
# 콜백 함수 설정 on_connect(브로커에 접속), on_disconnect(브로커에 접속종료), on_subscribe(topic 구독),
# on_message(발행된 메세지가 들아왔을 때)
client.on_connect = on_connect
client.on_disconnect = on_disconnect
client.on_subscribe = on_subscribe
client.on_message = on_message
# address : broker.hivemq.com, port: 1883에 연결
client.connect('broker.hivemq.com', 1883)
# common topic으로 메세지 발행
client.subscribe('bssmheavn/#', 1)
client.loop_forever()
client.subscribe('bssmheavn/#', 1)에서 #을 이용해 bssmheavn/에 들어오는 값과 topic을 전부 볼 수 있다.
MQTT 실습2
wemos d1 mini
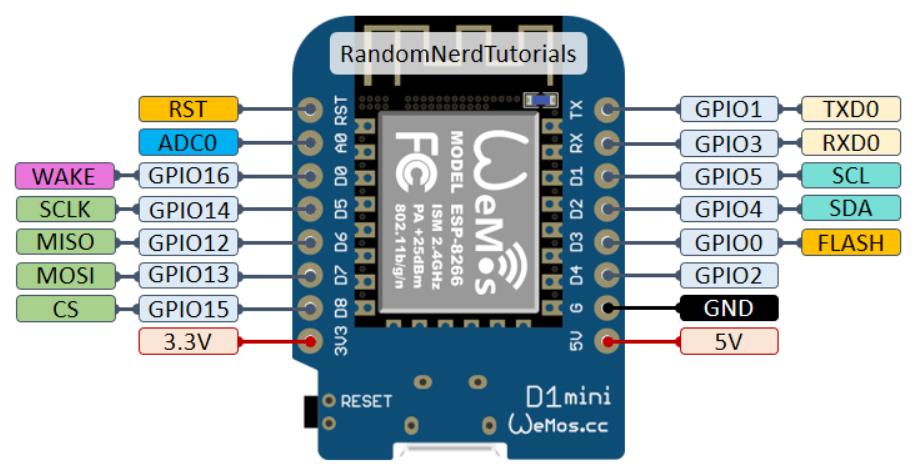
wemos d1 mini를 사용하였고 https://ieatt.tistory.com/47 을 참고하여 환경을 구축했다.
mqttesp.ino
#include <ESP8266WiFi.h>
#include <PubSubClient.h>
#include <sstream>

const char* ssid = "와이파이아디";
const char* password =  "와이파이비번";

const char* mqttServer = "broker.hivemq.com";
const int mqttPort = 1883;
// const char* mqttUser = "yourMQTTuser";
// const char* mqttPassword = "yourMQTTpassword";
const char* topic_pub = "bssmheavn/1";
const char* topic_sub = "bssmheavn/#";

#define UPDATE_INTERVAL 5000L
unsigned long prevUpdateTime = 0L;

WiFiClient espClient;
PubSubClient mqttClient(espClient);


void callback(char* topic, byte* payload, unsigned int length) {
  Serial.print("Message arrived in topic: ");
  Serial.println(topic);

  Serial.print("Message: ");
  for (int i = 0; i < length; i++) {
    Serial.print((char)payload[i]);
  }

  Serial.println();
  Serial.println("-----------------------");
}


void setup() {
  Serial.begin(115200);
  WiFi.begin(ssid, password);

  while (WiFi.status() != WL_CONNECTED) {
    delay(500);
    Serial.println("Connecting to WiFi..");
  }
  Serial.println("Connected to the WiFi network");

  mqttClient.setServer(mqttServer, mqttPort);
  mqttClient.setCallback(callback);

  while (!mqttClient.connected()) {
    Serial.println("Connecting to MQTT...");

    if (mqttClient.connect("minse")) {
      Serial.println("connected");
    } else {
      Serial.print("failed with state ");
      Serial.print(mqttClient.state());
      delay(2000);
    }
  }

  mqttClient.subscribe(topic_sub);
  mqttClient.publish(topic_pub, "ESP32 logged in");
  prevUpdateTime = millis();
}

void loop() {
  //시분할 서브루틴
  mqttClient.loop();

  unsigned long currentTime = millis();
  if(currentTime > prevUpdateTime + UPDATE_INTERVAL) {
    int i = 3;
    std::stringstream st;
    st<<i;
    mqttClient.publish(topic_pub, st.str().c_str());
    prevUpdateTime = currentTime;
  }
}
위 코드는 앞에 내용을 이해했다면 충분히 이해할 수 있다
subscribe.py
import paho.mqtt.client as mqtt

def on_connect(client, userdata, flags, rc):
    if rc == 0:
        print("connected OK")
    else:
        print("Bad connection Returned code=", rc)

def on_disconnect(client, userdata, flags, rc=0):
    print(str(rc))

def on_subscribe(client, userdata, mid, granted_qos):
    print("subscribed: " + str(mid) + " " + str(granted_qos))

def on_message(client, userdata, msg):
    print("topic: "+msg.topic+"   msg: " +str(msg.payload.decode("UTF-8")))

# 새로운 클라이언트 생성
client = mqtt.Client()
# 콜백 함수 설정 on_connect(브로커에 접속), on_disconnect(브로커에 접속종료), on_subscribe(topic 구독),
# on_message(발행된 메세지가 들아왔을 때)
client.on_connect = on_connect
client.on_disconnect = on_disconnect
client.on_subscribe = on_subscribe
client.on_message = on_message
# address : broker.hivemq.com, port: 1883에 연결
client.connect('broker.hivemq.com', 1883)
# common topic으로 메세지 발행
client.subscribe('bssmheavn/#', 1)
client.loop_forever()
print("topic: "+msg.topic+" msg: " +str(msg.payload.decode("UTF-8")))을 통해 topic을 표시하는 기능을 추가했다.