Flask-restx란?
- flask-restful 라이브러리 중 하나
- Swagger라는 rest api를 문서화해주는 도구를 지원
Flask-restx로 간단하게 rest api 구현
Flask Server
- 다음 코드를 통해 Flask Server 만들기
app.py
from flask import Flask  # 서버 구현을 위한 Flask 객체 import
from flask_restx import Api, Resource  # Api 구현을 위한 Api 객체 import

app = Flask(__name__)  # Flask 객체 선언, 파라미터로 어플리케이션 패키지의 이름을 넣어줌.
api = Api(app)  # Flask 객체에 Api 객체 등록


@api.route('/hello')  # 데코레이터 이용, '/hello' 경로에 클래스 등록
class HelloWorld(Resource):
    def get(self):  # GET 요청시 리턴 값에 해당 하는 dict를 JSON 형태로 반환
        return {"hello": "world!"}

if __name__ == "__main__":
app.run(debug=True, host='0.0.0.0', port=80)- 터미널에서 실행
python app.py- 'http://localhost/hello' 에 들어가 확인
구글 크롬의 확장 앱인, Advanced REST client를 이용하여 테스트 함
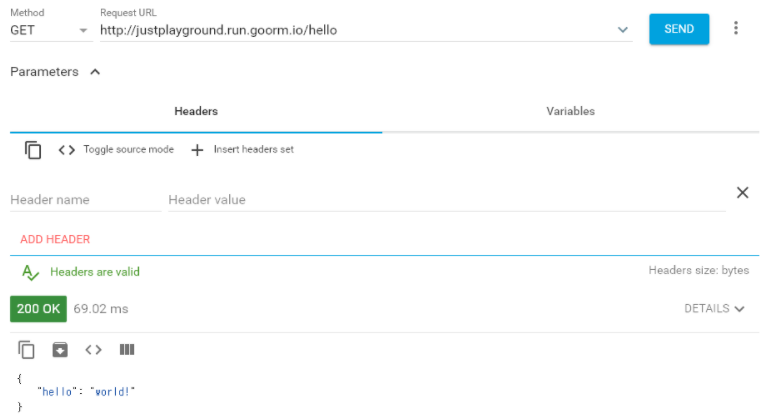
- 정상적으로 API 요청이 된 모습
구름 IDE 환경에서 실행하여, 구름 IDE에서 제공하는 도메인으로 서버에 접속 함
다양한 Resourceful Routing
-
route의 url에 query string이 아닌 url pattern을 이용 가능
-
url 자체에 변수를 삽입하는 방법으로 <타입명:변수명> 형태로 작성
-
변수는 class의 멤버 함수의 파라미터로 삽입하여 사용
app.py
from flask import Flask
from flask_restx import Resource, Api

app = Flask(__name__)
api = Api(app)


@api.route('/hello/<string:name>')  # url pattern으로 name 설정
class Hello(Resource):
    def get(self, name):  # 멤버 함수의 파라미터로 name 설정
        return {"message" : "Welcome, %s!" % name}

if __name__ == "__main__":
    app.run(debug=True, host='0.0.0.0', port=80)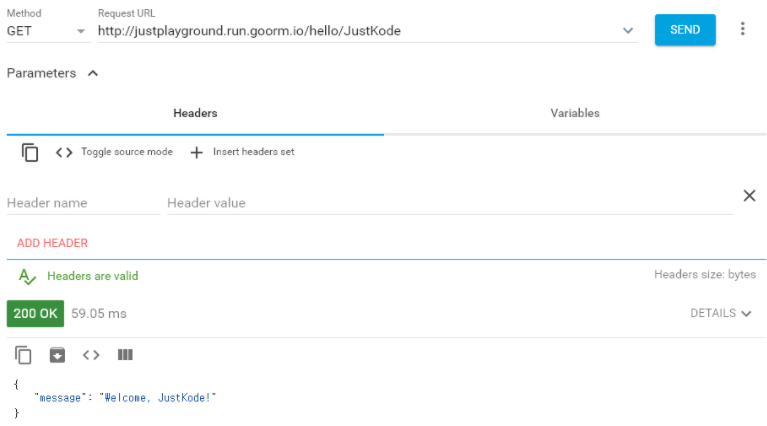
- url pattern으로 파라미터를 인식, 값이 잘 들어간 것을 볼 수 있음
Status Code와 Header 설정
- 반환 하고자 하는 리턴 값으로 iterable 하게 값을 넣으면 됨
순서
1. 반환 하고자 하는 dict 객체
2. 반환 하고자 하는 Status Code
3. 반환 하고자 하는 Header
app.py
from flask import Flask
from flask_restx import Resource, Api

app = Flask(__name__)
api = Api(app)


@api.route('/hello/<string:name>')
class Hello(Resource):
    def get(self, name):
        return {"message" : "Welcome, %s!" % name}

if __name__ == "__main__":
    app.run(debug=True, host='0.0.0.0', port=80)
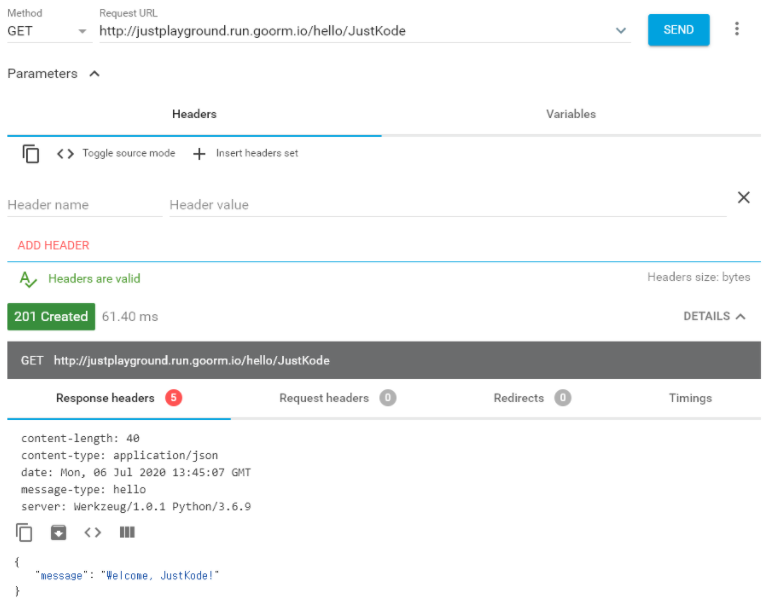
- Status Code와 Header값이 잘 들어간 것을 확인 할 수 있음
GET, POST, PUT, DELETE
-
get, post, put, delete 멤버 함수를 오버라이딩 하여 구현
-
body에 있는 데이터를 가져오기 위해 flask 모듈 request 내의 json 객체를 이용하여 request body로 들어온 json값을 파싱
json 객체는 dict 객체 입니다.
from flask import Flask, request
from flask_restx import Resource, Api
app = Flask(__name__)
api = Api(app)
todos = {}
count = 1
@api.route('/todos')
class TodoPost(Resource):
def post(self):
global count
global todos
idx = count
count += 1
todos[idx] = request.json.get('data')
return {
'todo_id': idx,
'data': todos[idx]
}
@api.route('/todos/<int:todo_id>')
class TodoSimple(Resource):
def get(self, todo_id):
return {
'todo_id': todo_id,
'data': todos[todo_id]
}
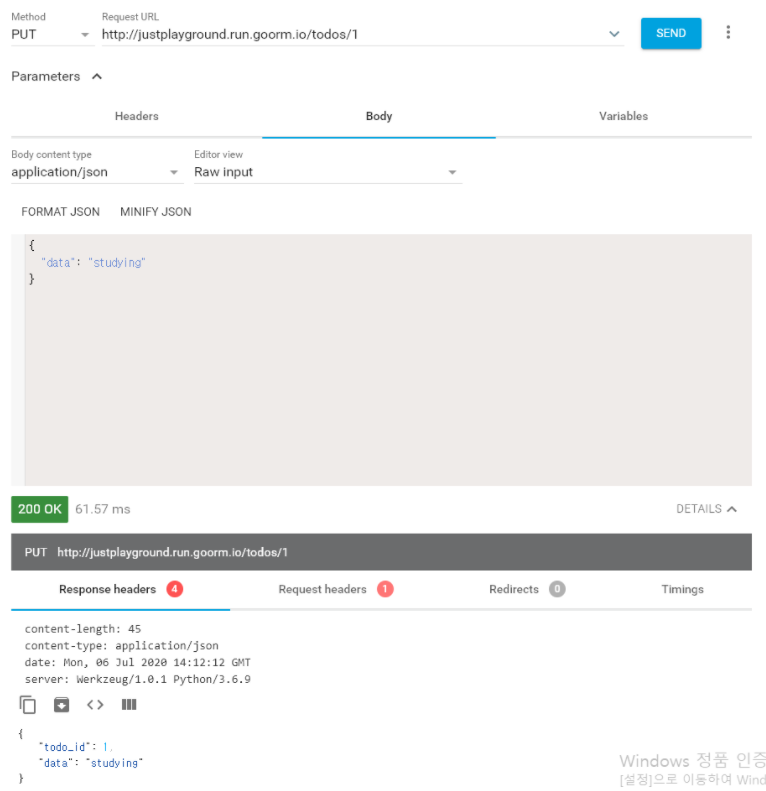
def put(self, todo_id):
todos[todo_id] = request.json.get('data')
return {
'todo_id': todo_id,
'data': todos[todo_id]
}
def delete(self, todo_id):
del todos[todo_id]
return {
"delete" : "success"
}
if __name__ == "__main__":
app.run(debug=True, host='0.0.0.0', port=80)
-
POST 요청

-
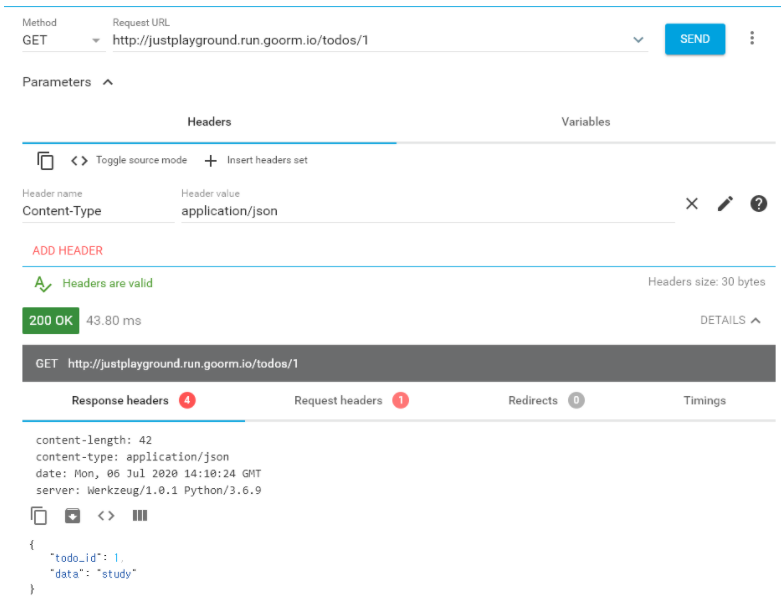
GET 요청
-
PUT 요청
-
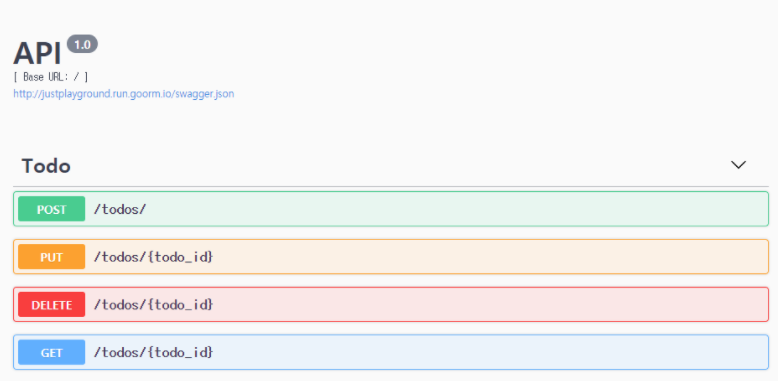
Resource를 상속한 클래스에 get, post, put 등 REST API method에 맞는 method를 만들면 swagger UI에 추가되고, route 데코레이터 안에 method 인자를 넣지 않아도 해당하는 method의 요청을 연결해줌
-
REST API method에 해당하지 않는 method들은 swagger UI에 추가되지 않음
# resource1.py

@resource1_api.route('/resource1')
class FirstResource(Resource):
    @resource1_api.expect(parser)
    def test_func(self): # swagger UI에 method가 추가되지 않는다.
        result = {'result_msg': 'Success'}
        return result, 200
파일 분리, 문서화
파일 분리
- 코드가 줄줄이 길어져 가독성이 떨어지지 않고 관리가 용이하려면 파일 분리는 무슨 어플리케이션을 만들던 필수적인 과정임
add_namespace()
-
flask-restx.Namespace 객체를 특정 경로에 등록 가능
-
flask-restx.Namespace: Flask 객체에 Blueprint와 같이 페이지나 기능에 맞게 백엔드를 분류해주는 역할
namespace = Namespace('hello')  # 첫 번째

@namespace.route('/')
class HelloWorld(Resource):
    def get(self):
        return {"hello" : "world!"}, 201, {"hi":"hello"}

api.add_namespace(namespace, '/hello')


@api.route('/hello')  # 두 번째
class HelloWorld(Resource):
    def get(self):
return {"hello" : "world!"}, 201, {"hi":"hello"}-
외부에서 클래스를 구현하고 이를 add_namespace()를 통해 클래스를 등록 해 주면 됨
-
다음은 이전에 Flask-RESTX 구현한 Todo API Server 와 같은 기능을 함
app.py
from flask import Flask
from flask_restx import Resource, Api
from todo import Todo

app = Flask(__name__)
api = Api(app)

api.add_namespace(Todo, '/todos')

if __name__ == "__main__":
    app.run(debug=True, host='0.0.0.0', port=80)
todo.py
from flask import request
from flask_restx import Resource, Api, Namespace


todos = {}
count = 1


Todo = Namespace('Todo')

@Todo.route('')
class TodoPost(Resource):
    def post(self):
        global count
        global todos

        idx = count
        count += 1
        todos[idx] = request.json.get('data')

        return {
            'todo_id': idx,
            'data': todos[idx]
        }


@Todo.route('/<int:todo_id>')
class TodoSimple(Resource):
    def get(self, todo_id):
        return {
            'todo_id': todo_id,
            'data': todos[todo_id]
        }

    def put(self, todo_id):
        todos[todo_id] = request.json.get('data')
        return {
            'todo_id': todo_id,
            'data': todos[todo_id]
        }

    def delete(self, todo_id):
        del todos[todo_id]
        return {
            "delete" : "success"
        }
문서화
-
만든 API들을 프론트앤드 개발자에게 전달 하는 방법
-
방금 만든 API 서버를 실행 한 후, 'http://localhost/'로 이동
-
flask-RESTX 의 기본 기능으로 제공하는 Swagger 기반의 홈페이지
-
API에 대한 설명, 예시, 데이터 타입 아무것도 명시 되어 있지 않는 상황
Api()
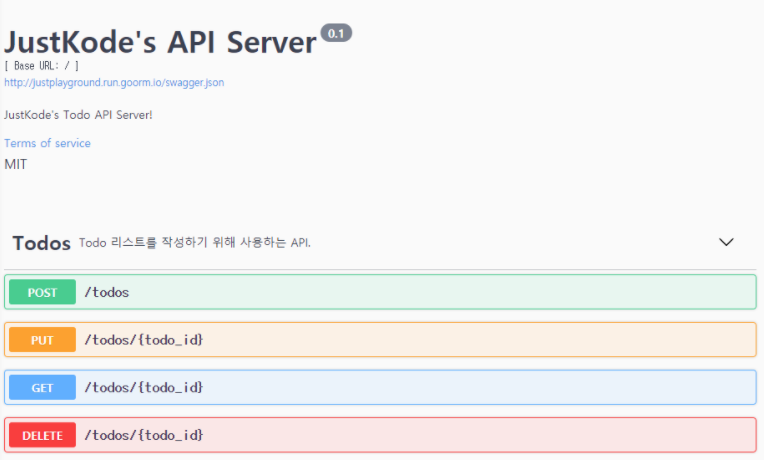
- 가장 위에 있는 Api설명
- 위 설명은 Api 객체의 생성자를 호출 할 때, 해당하는 파라미터로 값을 넣어 주어 수정 가능
파라미터
- version: API Server의 버전을 명시합니다.
- title: API Server의 이름을 명시합니다.
- description: API Server의 설명을 명시합니다.
- terms_url: API Server의 Base Url을 명시합니다.
- contact: 제작자 E-Mail 등을 삽입합니다.
- license: API Server의 라이센스를 명시 합니다.
- license_url: API Server의 라이센스 링크를 명시 합니다.
- app.py에 있는 Api 객체의 파라미터 수정
app.py
...

api = Api(
    app,
    version='0.1',
    title="JustKode's API Server",
    description="JustKode's Todo API Server!",
    terms_url="/",
    contact="justkode@kakao.com",
    license="MIT"
)

...
Namespace()
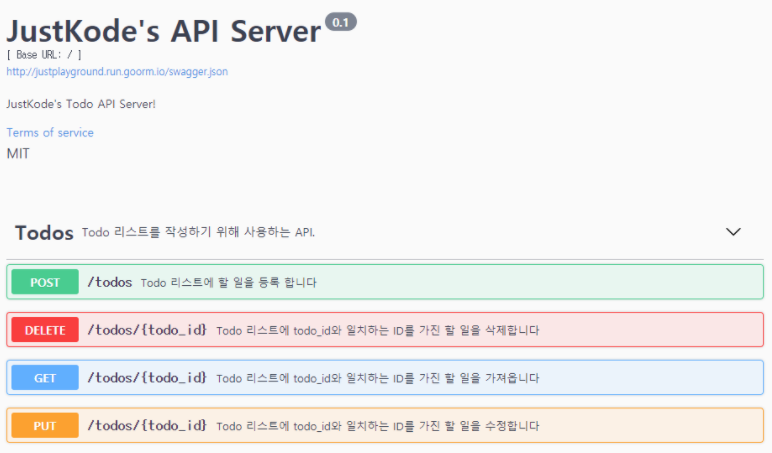
- Namespace 객체도 생성자 파라미터를 조정하여 내용을 수정
파라미터
- title: Namespace의 이름을 명시합니다.
- description: Namespace의 설명을 명시합니다.
- todo.py 에 있는 Namespace 객체의 생성자 파라미터를 수정
todo.py
...

Todo = Namespace(
    name="Todos",
    description="Todo 리스트를 작성하기 위해 사용하는 API.",
)

...
"""설명"""
- Python의 Comment를 이용하여 Document에 설명을 추가
todo.py
...

@Todo.route('')
class TodoPost(Resource):
    def post(self):
        """Todo 리스트에 할 일을 등록 합니다."""
        global count
        global todos

        idx = count
        count += 1
        todos[idx] = request.json.get('data')

        return {
            'todo_id': idx,
            'data': todos[idx]
        }


@Todo.route('/<int:todo_id>')
class TodoSimple(Resource):
    def get(self, todo_id):
        """Todo 리스트에 todo_id와 일치하는 ID를 가진 할 일을 가져옵니다."""
        return {
            'todo_id': todo_id,
            'data': todos[todo_id]
        }

    def put(self, todo_id):
        """Todo 리스트에 todo_id와 일치하는 ID를 가진 할 일을 수정합니다."""
        todos[todo_id] = request.json.get('data')
        return {
            'todo_id': todo_id,
            'data': todos[todo_id]
        }

    def delete(self, todo_id):
        """Todo 리스트에 todo_id와 일치하는 ID를 가진 할 일을 삭제합니다."""
        del todos[todo_id]
        return {
            "delete" : "success"
        }

...
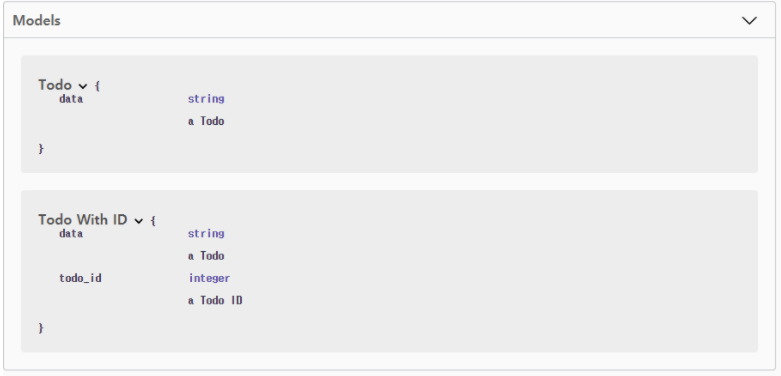
Namespace.Model()
-
입력, 출력에 대한 스키마를 나타내는 객체
-
flask_restx 내의 field 클래스를 이용하여 설명, 필수 여부, 예시를 넣을 수 있음
-
Namespace.inherit()을 이용하여 Namespace.model() 을 상속 받을 수 있음
todo.py
...

todo_fields = Todo.model('Todo', {  # Model 객체 생성
    'data': fields.String(description='a Todo', required=True, example="what to do")
})

todo_fields_with_id = Todo.inherit('Todo With ID', todo_fields, {  # todo_fields 상속 받음
    'todo_id': fields.Integer(description='a Todo ID')
})

...
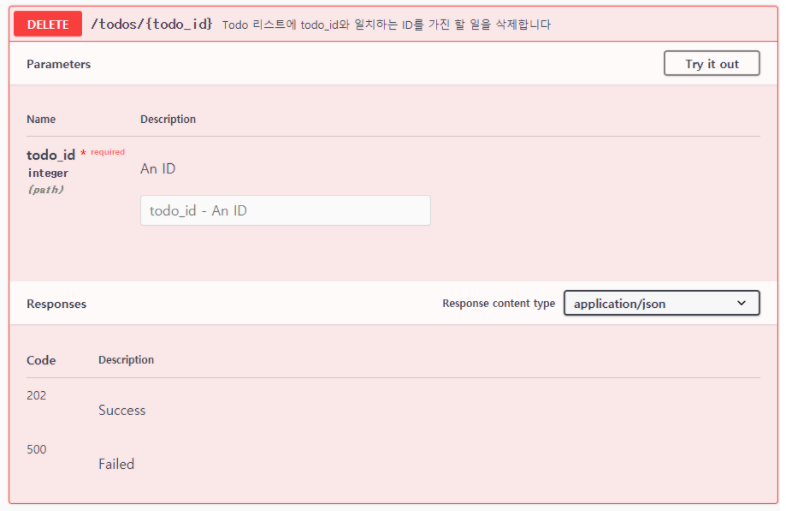
Namespace.doc()
- Status Code 마다 설명을 추가하거나, 쿼리 파라미터에 대한 설명을 추가 가능
- params: dict 객체를 받으며, 키로는 파라미터 변수명, 값으로는 설명을 적을 수 있음
- responses: dict 객체를 받으며, 키로는 Status Code, 값으로는 설명을 적을 수 있음
todo.py
...

@Todo.route('/<int:todo_id>')
@Todo.doc(params={'todo_id': 'An ID'})
class TodoSimple(Resource):

	[...]

	@Todo.doc(responses={202: 'Success'})
    @Todo.doc(responses={500: 'Failed'})
    def delete(self, todo_id):
        """Todo 리스트에 todo_id와 일치하는 ID를 가진 할 일을 삭제합니다."""
        del todos[todo_id]
        return {
            "delete" : "success"
        }, 202

...
Namespace.expect()
- "특정 스키마가 들어 올것을 기대한다." 라는 것을 알려 줌
Namespace.Model 객체를 등록하면 됩니다.
Namespace.response()
-
"특정 스키마가 반환 된다." 라는 것을 알려 줌
-
첫 번째 파라미터 Status Code, 두 번째 파라미터 설명, 세 번째 파라미터 Namespace.Model 객체
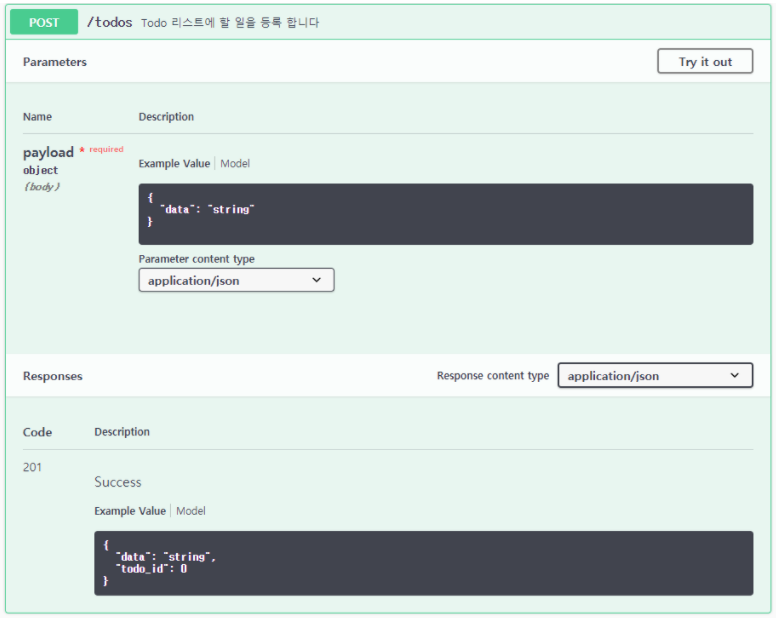
todo.py
...

class TodoPost(Resource):
    @Todo.expect(todo_fields)
    @Todo.response(201, 'Success', todo_fields_with_id)
    def post(self):
        """Todo 리스트에 할 일을 등록 합니다."""
        global count
        global todos

        idx = count
        count += 1
        todos[idx] = request.json.get('data')

        return {
            'todo_id': idx,
            'data': todos[idx]
        }, 201

...
- 참고: Namespace.model(), doc(), expect(), response()는 namespace 객체가 아닌 Api 객체에서도 작동
전체 코드
app.py
from flask import Flask
from flask_restx import Resource, Api
from todo import Todo

app = Flask(__name__)
api = Api(
    app,
    version='0.1',
    title="JustKode's API Server",
    description="JustKode's Todo API Server!",
    terms_url="/",
    contact="justkode@kakao.com",
    license="MIT"
)

api.add_namespace(Todo, '/todos')

if __name__ == "__main__":
    app.run(debug=True, host='0.0.0.0', port=80)
todo.py
from flask import request
from flask_restx import Resource, Api, Namespace, fields


todos = {}
count = 1


Todo = Namespace(
    name="Todos",
    description="Todo 리스트를 작성하기 위해 사용하는 API.",
)

todo_fields = Todo.model('Todo', {  # Model 객체 생성
    'data': fields.String(description='a Todo', required=True, example="what to do")
})

todo_fields_with_id = Todo.inherit('Todo With ID', todo_fields, {
    'todo_id': fields.Integer(description='a Todo ID')
})

@Todo.route('')
class TodoPost(Resource):
    @Todo.expect(todo_fields)
    @Todo.response(201, 'Success', todo_fields_with_id)
    def post(self):
        """Todo 리스트에 할 일을 등록 합니다."""
        global count
        global todos

        idx = count
        count += 1
        todos[idx] = request.json.get('data')

        return {
            'todo_id': idx,
            'data': todos[idx]
        }, 201

@Todo.route('/<int:todo_id>')
@Todo.doc(params={'todo_id': 'An ID'})
class TodoSimple(Resource):
    @Todo.response(200, 'Success', todo_fields_with_id)
    @Todo.response(500, 'Failed')
    def get(self, todo_id):
        """Todo 리스트에 todo_id와 일치하는 ID를 가진 할 일을 가져옵니다."""
        return {
            'todo_id': todo_id,
            'data': todos[todo_id]
        }

    @Todo.response(202, 'Success', todo_fields_with_id)
    @Todo.response(500, 'Failed')
    def put(self, todo_id):
        """Todo 리스트에 todo_id와 일치하는 ID를 가진 할 일을 수정합니다."""
        todos[todo_id] = request.json.get('data')
        return {
            'todo_id': todo_id,
            'data': todos[todo_id]
        }, 202

    @Todo.doc(responses={202: 'Success'})
    @Todo.doc(responses={500: 'Failed'})
    def delete(self, todo_id):
        """Todo 리스트에 todo_id와 일치하는 ID를 가진 할 일을 삭제합니다."""
        del todos[todo_id]
        return {
            "delete" : "success"
        }, 202
Quick start
Endpoints
-
Api 객체에서 add_resource() 메서드 또는 route() 데코레이터에 여러 URL을 전달할 수 있음
-
각각은 리소스로 라우팅 됨
api.add_resource(HelloWorld, '/hello', '/world')

# or

@api.route('/hello', '/world')
class HelloWorld(Resource):
pass- 경로의 일부를 자원 메소드에 대한 변수로 일치시킬 수 있음
api.add_resource(Todo, '/todo/<int:todo_id>', endpoint='todo_ep')

# or

@api.route('/todo/<int:todo_id>', endpoint='todo_ep')
class HelloWorld(Resource):
pass-
요청이 응용 프로그램의 끝점과 일치하지 않으면 Flask-RESTX는 요청된 끝점과 거의 일치하는 다른 끝점을 제안하는 404 오류 메시지를 반환
-
애플리케이션 설정에서 ERROR_404_HELP 를 False 로 설정하면 비활성화 할 수 있음
Argument Parsing
-
플라스크는 요청 데이터 (예 : 쿼리 스트링 또는 POST 양식 인코딩 데이터)에 쉽게 액세스 할 수 있지만 양식 데이터의 유효성을 검사하는 것은 어려움
-
Flask-RESTX는 argparse와 유사한 라이브러리를 사용하여 요청 데이터 유효성 검사를 기본적으로 지원함
from flask_restx import reqparse

parser = reqparse.RequestParser()
parser.add_argument('rate', type=int, help='Rate to charge for this resource')
args = parser.parse_args()-
argparse 모듈과 달리 parse_args()는 사용자 정의 데이터 구조 대신 Python dict 리턴
-
RequestParser 클래스를 사용하면 무료 오류 메시지가 나타남
-
인수가 유효성 검사를 통과하지 못하면 Flask-RESTX는 잘못된 요청 및 오류를 강조하는 "400" 상태코드로 응답
$ curl -d 'rate=foo' http://127.0.0.1:5000/todos
{'status': 400, 'message': 'foo cannot be converted to int'}-
inputs 모듈은 date() 및 url()과 같은 많은 공통 변환 함수를 제공
-
strict=True 와 함께 parse_args()를 호출하면 요청에 파서가 정의하지 않은 인수가 포함 된 경우 오류가 발생
args = parser.parse_args(strict=True)Data Formatting
-
기본적으로 반환 iterable의 모든 필드는 그대로 렌더링 됨
이것은 파이썬 데이터 구조를 다룰 때 효과적이지만 객체로 작업 할 때 매우 실망 스러울 수 있습니다. -
이 문제를 해결하기 위해 Flask-RESTX는 fields 모듈과 marshal_with () 데코레이터를 제공
-
Django ORM 및 WTForm과 유사하게 fields 모듈을 사용하여 응답 구조를 설명
from flask import Flask
from flask_restx import fields, Api, Resource

app = Flask(__name__)
api = Api(app)

model = api.model('Model', {
    'task': fields.String,
    'uri': fields.Url('todo_ep')
})

class TodoDao(object):
    def __init__(self, todo_id, task):
        self.todo_id = todo_id
        self.task = task

        # This field will not be sent in the response
        self.status = 'active'

@api.route('/todo')
class Todo(Resource):
    @api.marshal_with(model)
    def get(self, **kwargs):
return TodoDao(todo_id='my_todo', task='Remember the milk')-
위 예제는 파이썬 객체를 가져 와서 직렬화 할 준비
-
marshal_with () 데코레이터는 model 에 설명 된 변환을 적용
-
객체에서 추출 된 유일한 필드는 task
-
fields.Url 필드는 엔드 포인트 이름이며 응답에서 해당 엔드 포인트에 대한 URL을 생성
-
marshal_with () 데코레이터를 사용하여 출력을 swagger 사양으로 문서화
필요한 많은 필드 유형이 이미 포함되어 있습니다.
-
전체 목록은 field 안내서를 참조
Order Preservation
-
기본적으로 필드 순서는 성능 저하 효과가 있으므로 유지되지 않음
-
필드 순서 보존이 필요한 경우 ordered=True 매개 변수를 일부 클래스 또는 함수에 전달하여 순서 보존을 강제 할 수 있음
- globally on Api: api
- globally on Namespace: ns
- locally on marshal(): return
Reference

많은 도움이 되었습니다. 감사합니다:)