models.py는 장고DB의 설계도라고 할 수 있어요.
step#6에서 생성한 "user"라는 이름의 app의 db 모델을 설계해 볼게요.
"user"앱은 회원정보를 관리하는 앱이에요.
그래서 "user"앱 안의 models.py에 회원정보 db를 설계하려고 합니다.
1) 생성된 APP의 models.py에 DB 모델링하기
사용자 정보를 저장하기 위해서
"User"라는 클래스를 생성합니다.
그래고 우리가 생성하는 "User"라는 클래스는
장고 내에 이미 만들어진 models라는 파일의 "Model" 클래스를 상속받아서 장고에서 이미 만들어 둔 모델링을 위한 기능을 상속받아 사용합니다.
(test_project) marie@MarieJungui-MacBookPro:~/mynewdjango » pwd
/Users/marie/mynewdjango
(test_project) marie@MarieJungui-MacBookPro:~/mynewdjango » tree
.
├── manage.py
├── mynewjangodirec
│   ├── __init__.py
from django.db import models
│   ├── __pycache__
│   │   ├── __init__.cpython-37.pyc
│   │   └── settings.cpython-37.pyc
│   ├── asgi.py
│   ├── settings.py
│   ├── urls.py
│   └── wsgi.py
└── user
    ├── __init__.py
    ├── admin.py
    ├── apps.py
    ├── migrations
    │   └── __init__.py
    ├── models.py
    ├── tests.py
    ├── urls.py
    └── views.py

4 directories, 16 files
(test_project) marie@MarieJungui-MacBookPro:~/mynewdjango »
(test_project) marie@MarieJungui-MacBookPro:~/mynewdjango » cat ./user/models.py
from django.db import models

# Create your models here.
(test_project) marie@MarieJungui-MacBookPro:~/mynewdjango »
(test_project) marie@MarieJungui-MacBookPro:~/mynewdjango » vi ./user/models.py
(test_project) marie@MarieJungui-MacBookPro:~/mynewdjango »
(test_project) marie@MarieJungui-MacBookPro:~/mynewdjango » cat ./user/models.py
from django.db import models

# Create your models here.
class Users(models.Model):
    name       = models.CharField(max_length = 50)
    email      = models.CharField(max_length = 50, unique = True)
    password   = models.CharField(max_length = 300)
    created_at = models.DateTimeField(auto_now_add = True)
    updated_at = models.DateTimeField(auto_now = True)

    class Meta:
        db_table = 'users'


(test_project) marie@MarieJungui-MacBookPro:~/mynewdjango »
수정한 "user"앱의 models.py 내용을 살펴볼까요?
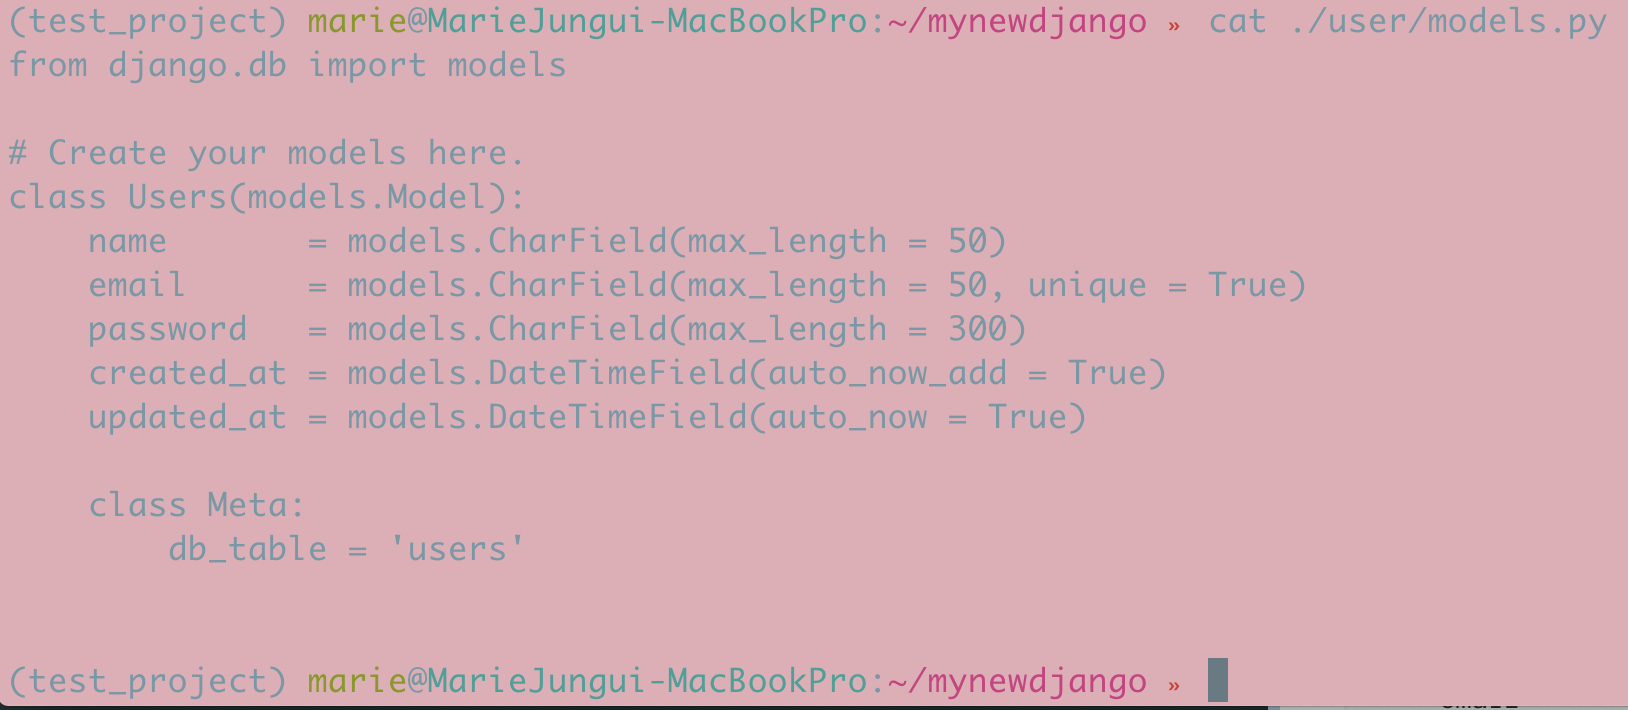
장고는 DB를 클래스 오브젝트의 형태로 설계를 합니다.
name, email, password, created_at, updated_at 라는 데이터 필드를 가진 테이블입니다.
그리고 그 데이터테이블의 이름을 "user"라고 마지막줄에서 명명하였습니다.
2) 생성된 db의 초기 마이그레이션 하기
데이터마이그레이션은 DB클래스 모델링에 변경사항이 있을 때 하는 것이에요!
DB안에 데이터를 넣는 것과는 관련이 없답니당!
"마이그레이션 관련 장고 명령어들!"
마이그레이션 파일 생성
python manage.py makemigrations <app-name>마이그레이션 적용
python manage.py migrate <app-name>마이그레이션 적용 현황
python manage.py showmigrations <app-name>지정 마이그레이션의 SQL 내역
python manage.py sqlmigrate <app-name> <migration-name>
2-1) python manage.py makemigraions 앱이름
(test_project) marie@MarieJungui-MacBookPro:~/mynewdjango » pwd
/Users/marie/mynewdjango
(test_project) marie@MarieJungui-MacBookPro:~/mynewdjango » tree
.
├── manage.py
├── mynewjangodirec
│   ├── __init__.py
│   ├── __pycache__
│   │   ├── __init__.cpython-37.pyc
│   │   └── settings.cpython-37.pyc
│   ├── asgi.py
│   ├── settings.py
│   ├── urls.py
│   └── wsgi.py
└── user
    ├── __init__.py
    ├── admin.py
    ├── apps.py
    ├── migrations
    │   └── __init__.py
    ├── models.py
    ├── tests.py
    ├── urls.py
    └── views.py

4 directories, 16 files
(test_project) marie@MarieJungui-MacBookPro:~/mynewdjango »
(test_project) marie@MarieJungui-MacBookPro:~/mynewdjango » python manage.py makemigrations user
Migrations for 'user':
  user/migrations/0001_initial.py
    - Create model Users
(test_project) marie@MarieJungui-MacBookPro:~/mynewdjango »
(test_project) marie@MarieJungui-MacBookPro:~/mynewdjango » pwd
/Users/marie/mynewdjango
(test_project) marie@MarieJungui-MacBookPro:~/mynewdjango » tree
.
├── db.sqlite3
├── manage.py
├── mynewjangodirec
│   ├── __init__.py
│   ├── __pycache__
│   │   ├── __init__.cpython-37.pyc
│   │   ├── settings.cpython-37.pyc
│   │   └── urls.cpython-37.pyc
│   ├── asgi.py
│   ├── settings.py
│   ├── urls.py
│   └── wsgi.py
└── user
    ├── __init__.py
    ├── __pycache__
    │   ├── __init__.cpython-37.pyc
    │   ├── admin.cpython-37.pyc
    │   └── models.cpython-37.pyc
    ├── admin.py
    ├── apps.py
    ├── migrations
    │   ├── 0001_initial.py
    │   ├── __init__.py
    │   └── __pycache__
    │       └── __init__.cpython-37.pyc
    ├── models.py
    ├── tests.py
    ├── urls.py
    └── views.py

6 directories, 23 files
(test_project) marie@MarieJungui-MacBookPro:~/mynewdjango »
(test_project) marie@MarieJungui-MacBookPro:~/mynewdjango » python manage.py showmigrations user
user
 [ ] 0001_initial
(test_project) marie@MarieJungui-MacBookPro:~/mynewdjango »
(test_project) marie@MarieJungui-MacBookPro:~/mynewdjango »
(test_project) marie@MarieJungui-MacBookPro:~/mynewdjango » python manage.py migrate user 0001
Operations to perform:
  Target specific migration: 0001_initial, from user
Running migrations:
  Applying user.0001_initial... OK
(test_project) marie@MarieJungui-MacBookPro:~/mynewdjango »
(test_project) marie@MarieJungui-MacBookPro:~/mynewdjango » python manage.py showmigrations user
user
 [X] 0001_initial
(test_project) marie@MarieJungui-MacBookPro:~/mynewdjango »
(test_project) marie@MarieJungui-MacBookPro:~/mynewdjango » tree
.
├── db.sqlite3
├── manage.py
├── mynewjangodirec
│   ├── __init__.py
│   ├── __pycache__
│   │   ├── __init__.cpython-37.pyc
│   │   ├── settings.cpython-37.pyc
│   │   └── urls.cpython-37.pyc
│   ├── asgi.py
│   ├── settings.py
│   ├── urls.py
│   └── wsgi.py
└── user
    ├── __init__.py
    ├── __pycache__
    │   ├── __init__.cpython-37.pyc
    │   ├── admin.cpython-37.pyc
    │   └── models.cpython-37.pyc
    ├── admin.py
    ├── apps.py
    ├── migrations
    │   ├── 0001_initial.py
    │   ├── __init__.py
    │   └── __pycache__
    │       ├── 0001_initial.cpython-37.pyc
    │       └── __init__.cpython-37.pyc
    ├── models.py
    ├── tests.py
    ├── urls.py
    └── views.py

6 directories, 24 files
(test_project) marie@MarieJungui-MacBookPro:~/mynewdjango »
2-2) 장고쉘에서 만들어진 모델을 테스트해보자
장고쉘을 아래와 같이 실행합니다.
[장고쉘 실행하기]
(test_project) marie@MarieJungui-MacBookPro:~/mynewdjango » python manage.py shell
Python 3.7.5 (default, Oct 25 2019, 10:52:18)
[Clang 4.0.1 (tags/RELEASE_401/final)] on darwin
Type "help", "copyright", "credits" or "license" for more information.
(InteractiveConsole)
 >>>
[테스트 할 DB클래스 import 하기]
models.py에서 방금 우리가 만든 "User"라는 클래스를 import하고
해당 클래스를 테스트 해봅시다.
>>> from user.models import Users[데이터 오브젝트 불러오기]
당연히 넣은게 없으니 없겠죠!
어머 ".objects.get()"은 하나의 데이터로우를 가지고 오는 명령어인데, 하나도 없으니 에러가 났군요!
[참고]장고DB에는 기존 python에는 없는 "Query Set"이라는 db데이터만을 위한 데이터타입이 있어요!
우선 데이터가 있는지 살펴볼까요?
>>> Users.objects.all()
<QuerySet []>
>>>
>>> Users.objects.get()
Traceback (most recent call last):
  File "<console>", line 1, in <module>
  File "/Users/marie/miniconda3/envs/test_project/lib/python3.7/site-packages/django/db/models/manager.py", line 82, in manager_method
    return getattr(self.get_queryset(), name)(*args, **kwargs)
  File "/Users/marie/miniconda3/envs/test_project/lib/python3.7/site-packages/django/db/models/query.py", line 417, in get
    self.model._meta.object_name
user.models.Users.DoesNotExist: Users matching query does not exist.
>>>
>>>
[데이터 오브젝트 저장하기]
데이터 오브젝트를 저장하는 2가지 방법
(1) 생성한DB클래스명.objects.create(속성="값", 속성="값", 속성="값")
(2) 생성한DB클래스명(속성="값", 속성="값", 속성="값").save()
>>> Users.objects.create(name='jek', email='jek@gmail.com', password='1234')
<Users: Users object (1)>
>>> Users.objects.all()
<QuerySet [<Users: Users object (1)>]>
>>> Users.objects.get()
<Users: Users object (1)>
>>>
>>>
>>> Users.objects.all()[0]
<Users: Users object (1)>
>>> Users.objects.all()[0].name
'jek'
>>> Users.objects.all()[0].email
'jek@gmail.com'
>>> Users.objects.all()[0].password
'1234'
>>>
>>>
>>> Users.objects.get()[0]
Traceback (most recent call last):
  File "<console>", line 1, in <module>
TypeError: 'Users' object is not subscriptable
>>>
>>> Users.objects.get().name
'jek'
>>> Users.objects.get().email
'jek@gmail.com'
>>> Users.objects.get().password
'1234'
>>>
>>> Users(name='jek02', email='jek02@gmail.com', password='1234')
<Users: Users object (None)>
>>>
>>> Users.objects.all()
<QuerySet [<Users: Users object (1)>]>
>>>
>>> temp = Users(name='jek02', email='jek02@gmail.com', password='1234')
>>> Users.objects.all()
<QuerySet [<Users: Users object (1)>]>
>>>
>>> temp.save()
>>>
>>> Users.objects.all()
<QuerySet [<Users: Users object (1)>, <Users: Users object (2)>]>
>>>
>>> Users.objects.all()[1].name
'jek02'
>>> Users.objects.all()[1].email
'jek02@gmail.com'
>>> Users.objects.all()[1].password
'1234'
>>>
[데이터타입인 "Query Set"인 것을 json화 하기]
>>> Users.objects.values()
<QuerySet [{'id': 1, 'name': 'jek', 'email': 'jek@gmail.com', 'password': '1234', 'created_at': datetime.datetime(2019, 12, 23, 11, 57, 45, 313456, tzinfo=<UTC>), 'updated_at': datetime.datetime(2019, 12, 23, 11, 57, 45, 313529, tzinfo=<UTC>)}, {'id': 2, 'name': 'jek02', 'email': 'jek02@gmail.com', 'password': '1234', 'created_at': datetime.datetime(2019, 12, 23, 12, 5, 32, 555005, tzinfo=<UTC>), 'updated_at': datetime.datetime(2019, 12, 23, 12, 5, 32, 555074, tzinfo=<UTC>)}]>
>>>