위 영상이 보이지 않을 경우, 아래 링크에서 시청 가능하다.
vimeo - Terraform 환경 구축
또한 Terraform 코드 예시는 Terraform example code - Github 에서 확인 가능하다.
개요
위 영상은 부하테스트 구조에 대해 정리한 내용으로, 시청한 뒤 아래 내용을 읽는 것을 추천한다.
사내 가능한 많은 양의 부하를 견딜 수 있어야 하는 프로젝트를 담당하게 되었다.
로직과 설계도 중요하지만, 어느만큼의 부하를 견딜 수 있는지도 필요했다.
기존 사내 부하테스트의 문제점은 아래와 같았다.
- JMeter 로 로컬PC 에서 적은 양의 부하를 주는 것 정도로는 적절한 양의 부하를 줄 수 없었다.
- 사내 대형 물리 서버 1개에 모든 application 에 띄워 정확한 리소스 사용량을 알 수 없었다.
- OS, 부하량, application 의 지연시간 등에 대한 모니터링이 적절하게 수행되지 않고 있었다.
그래서, 아래와 같이 신규 프로젝트에 대한 부하테스트 구조를 설계했다.
- JMeter 보다 훨씬 경량화 (Goroutine 기반) 된 K6 인스턴스를 여러 개 띄워 진정한 의미의 부하를 줄 수 있게 구성
- AWS EC2 에 다수의 인스턴스를 각각 서버 스펙을 다르게 설정한다. (사내 Nutanix 도 결국은 VM 이므로)
- OS 모니터링, 부하테스트 조건 및 결과에 대한 시각화, 오픈소스 기반 application metric 시각화
- Terraform 으로 Network, 인스턴스 스펙, application 설치 및 환경 구축 자동화
- AWS 비용 최적화
여기서 공개한 Terraform 코드는 예시일 뿐, 실제 instance_type 및 port 는 다르게 구성했음에 참고하길 바란다.
추가로 S3 에 업로드해 사용한 패키지와, 사용한 Grafana Dashboard 들은 아래 첨부한다.
- JDK 21.0.2
- JDK 17.0.2
- HBase 2.6.2
- Pinpoint Collector 3.0.0
- Pinpoint Web 3.0.0
- Pinpoint Agent 3.0.0
- Redis Exporter v1.70.0
- Prometheus v3.3.0
- Grafana v11.6.1
- Grafana Plugins
- Grafana Redis App v2.2.1
- InfluxDB v1.11.8
- Node Exporter v1.5.0
Grafana Dashboard
사전 개념
AWS S3 (Simple Storage Service)
AWS에서 제공하는 객체 스토리지 서비스. 인터넷을 통해 언제 어디서든 원하는 양의 데이터를 저장하고 검색할 수 있다.
-
주요 특징:
- 확장성: 거의 무제한의 데이터 저장 용량.
- 내구성 및 가용성: 매우 높은 내구성과 가용성 제공.
- 비용 효율성: 사용량 기반 과금 및 다양한 스토리지 클래스 제공.
-
주요 용도:
- 정적 웹사이트 호스팅.
- 데이터 백업 및 복구.
- 애플리케이션 파일 저장소 활용.
Terraform
HashiCorp에서 개발한 오픈 소스 IaC (Infrastructure as Code) 도구. 코드를 사용하여 클라우드 및 온프레미스 리소스를 프로비저닝하고 관리한다.
- 주요 특징:
- 선언적 구문: 원하는 인프라의 최종 상태를 코드로 정의.
- 다양한 프로바이더 지원: AWS, Azure, Google Cloud Platform 등 여러 클라우드 및 서비스 지원.
- 상태 관리: 인프라의 현재 상태 추적 및 효율적인 변경 관리.
- 모듈화: 재사용 가능한 코드 작성을 통한 인프라 구성 표준화 및 단순화.
- 주요 용도:
- 클라우드 인프라 자동 프로비저닝.
- 인프라 변경 관리 및 버전 관리.
- 개발, 스테이징, 프로덕션 환경 일관성 유지.
- 멀티 클라우드 환경 관리.
Terraform 은 AWS Console 의 기본값만 사용하던 유저들에게는 조금 학습이 필요할 수 있다.
예시로 EC2 의 인스턴스 생성을 하는 데에도 수십가지의 옵션이 존재하는데, 이를 일일이 지정해주어야 한다.
AWS SSM (Systems Manager)
AWS 환경 및 온프레미스 환경에서 인프라를 가시화하고 제어하는 서비스. 운영 체제 수준에서 인프라를 관리하고 자동화하는 데 사용된다.
- 주요 특징:
- 중앙 집중식 관리: 여러 서버와 인스턴스를 한 곳에서 관리.
- 자동화: 패치 적용, 소프트웨어 설치 등 반복 작업 자동화.
- 보안: SSH 접속 없이 원격 명령 실행 및 세션 시작 기능 제공.
- 가시성: 인스턴스 인벤토리 및 상태 파악 용이.
- 주요 용도:
- EC2 인스턴스 및 온프레미스 서버 패치 관리.
- 소프트웨어 배포 및 구성 관리.
- 원격 명령 실행 및 세션 관리.
- 인스턴스 인벤토리 수집 및 관리.
- 자동화된 운영 워크플로우 생성.
사전 준비
AWS 첫 계정이라면 Console 에서 기본적으로 세팅해야될 것들
- aws cli 로 접속하기 위한 Access key, Private key 생성
- ssh 접속 키를 사용자마다 변경하기 힘드므로, ssh .pem 키를 최초 생성한 (예진욱M) 에게 키를 요청한다.
- 관련 파일들을 s3 에 업로드
S3 에 k6 바이너리 업로드 예시
(public access 차단되지 않은 경우, 만약 차단되었다면 수동 업로드)
# powershell
# 변수 설정
$k6Version = "v0.58.0"
$k6FileName = "k6-$k6Version-linux-amd64.tar.gz"
$k6Url = "https://github.com/grafana/k6/releases/download/$k6Version/$k6FileName"
$localPath = "$PSScriptRoot\$k6FileName"
$s3Bucket = "your-bucket-name"   # ← 실제 S3 버킷명으로 변경
$s3Key = $k6FileName

# k6 바이너리 다운로드
Invoke-WebRequest -Uri $k6Url -OutFile $localPath

# S3에 파일이 이미 있는지 확인
$exists = aws s3 ls "s3://$s3Bucket/$s3Key"

if (-not $exists) {
    Write-Host "S3에 파일이 없으므로 업로드합니다."
    aws s3 cp $localPath "s3://$s3Bucket/$s3Key"
} else {
    Write-Host "이미 S3에 파일이 존재합니다. 업로드하지 않습니다."
}
Terraform install (Windows)
https://developer.hashicorp.com/terraform/install 에서 다운로드
-> C:\terraform 압축 해제 후 시스템 변수 -> Path -> C:\terraform 추가.
# terraform 설치 확인
terraform -version
기본적으로 main.tf 파일에 정의한다.
적용은 terraform apply, 취소는 terraform destory 명령어로 수행한다.
옵션으로는
- -auto-apoprove : 명령 수행 여부에 대한 질문을 스킵한다.
- -target="abc.def" : abc.def 에 대한 것만 apply 또는 destroy 한다.
또한 apply 된 것에 대해 중복 또는 crash 가 발생하지 않도록 .lock 파일로 정합성을 관리한다.
이번에는 나 혼자 수행해 여러 환경에서의 terraform 정합성을 맞출 필요가 없었지만, 여러 명이서 작업하는 경우에는 state locking 이라는 개념을 활용한다.
필요 시 S3, DynamoDB 를 활용한 Terraform state locking 에 대해 찾아보면 된다.
AWS CLI install (Windows)
가이드 : https://docs.aws.amazon.com/cli/latest/userguide/getting-started-install.html
# 설치
msiexec.exe /i https://awscli.amazonaws.com/AWSCLIV2.msi
# 설치 확인
aws --version
# 자격 증명
aws configure
> AWS Access Key ID (보안 자격 증명(Security credentials) - Access Key)
> AWS Secret Access Key (Access Key 발급 시에만 볼 수 있으므로 없는 경우 새로 생성)
> region (예: ap-northeast-2)
> output format: json
AWS SSM Plugin install (Windows)
가이드 : https://docs.aws.amazon.com/ko_kr/systems-manager/latest/userguide/install-plugin-windows.html
설치 파일 다운로드
VS Code Terraform 플러그인 설치
HashiCorp Terraform 설치
이후 main.tf 생성
terraform init  # Terraform 초기화
terraform plan  # 실행 계획 확인 (사전 오류 확인)
자동화 도구 (선택)
Former2
AWS 리소스를 Terraform 코드로 변환해주는 도구.
현재 EC2 인스턴스를 선택하면 자동으로 코드가 생성.
-> AWS 접근권한을 줘야되기 때문에.. 아무리 읽기 권한이라도 좀 꺼림칙해서 pass
Terraform 코드 작성
기본적으로 main.tf 코드에 작성한다.
기본 네트워크 변수 구성
vpc 및 subnet 이 어느 region 을 사용할 것인가,
CIDR block 을 어느 범위까지 허용할 것인가를 지정한다.
variable 은 변수로, 나중에 실제 resource 를 생성할 때 활용할 수 있게 해준다.
결국 terraform 도 언어이므로, 변수 지정 및 재활용하기 편하게 구성할 수 있다.
기존에 만들어둔 VPC 또는 subnet 이 있다면 하드코딩해도 되지만, 네트워크 설정까지 자동화하면 나중에 편하다.
172.31.0.0/16 - 이 값은 AWS의 기본 VPC CIDR 블록 중 하나.
172.31.32.0/20 - VPC CIDR 블록 (/16) 내에서 서브넷 CIDR 블록 (/20)이 할당.
variable "vpc_cidr_block" {
  description = "CIDR block for the VPC"
  type        = string
  default     = "172.31.0.0/16"
}

variable "subnet_cidr_block" {
  description = "CIDR block for the public subnet"
  type        = string
  default     = "172.31.32.0/20"
}

variable "availability_zone" {
  description = "Availability Zone for the subnet"
  type        = string
  default     = "ap-northeast-2c"
}

# AWS Provider 설정 (서울 리전)
provider "aws" {
  region = "ap-northeast-2"
}
네트워크 구성
위 설정한 변수를 활용해 vpc, igw, public subnet 을 생성한다.
여기서 resource란 terraform apply 또는 terraform destory 으로 생성 또는 제거할 수 있는 자원을 뜻한다.
꼭 EC2 인스턴스 뿐 아니라, 네트워크 구성도 resource 로 할당할 수 있음에 참고하자.
중간에 depends_on 이라는 것은 해당 리소스를 생성하기 전에 먼저 생성되어야 할 것을 명시한다.
depends_on 을 명시하면 resource 생성 순서를 보장할 수 있고, terraform apply 시 혹여 이전 설정이 누락됐을 때 depondes_on 안에 있는 resource 를 먼저 생성해준다.
# VPC 생성
resource "aws_vpc" "main" {
  cidr_block           = var.vpc_cidr_block
  enable_dns_support   = true
  enable_dns_hostnames = true

  tags = {
    Name = "ktc-vpc"
  }
}

# Internet Gateway 생성
resource "aws_internet_gateway" "gw" {
  vpc_id = aws_vpc.main.id

  tags = {
    Name = "ktc-igw"
  }
}

# Public Subnet 생성
resource "aws_subnet" "public" {
  vpc_id                  = aws_vpc.main.id
  cidr_block              = var.subnet_cidr_block
  availability_zone       = var.availability_zone
  map_public_ip_on_launch = true

  tags = {
    Name = "ktc-public-subnet"
  }
}

# --- 기본 라우팅 테이블 관리 (경로 및 태그) ---
resource "aws_default_route_table" "main" {
  default_route_table_id = aws_vpc.main.main_route_table_id

  route {
    cidr_block = "0.0.0.0/0"
    gateway_id = aws_internet_gateway.gw.id
  }

  tags = {
    Name = "ktc-main-route-table" # 기본 라우팅 테이블 이름 지정
  }

  # 인터넷 게이트웨이가 생성된 후에 이 설정이 적용되도록 의존성 명시
  depends_on = [aws_internet_gateway.gw]
}
Security Group (보안 그룹) 생성
기본적으로 EC2 인스턴스가 띄워질 때, 모든 Access 가 차단된다.
물론 AWS Console 에서는 설정에 따라 SSH 용 22 port 를 열거나 Outbound 는 열어두게 할 수 있으나,
이를 Terraform 에서 자동화하기 위해선 Security Group 에 명시해야 한다.
또한 동일 private network 에 있다고 하더라도 특정 port 만 열게 구성해야 하며,
아래 코드와 같이 작성할 수 있다.
추가로 from_port 와 to_port 는 <= 해당 범위 <= 안에 있는 모든 port 에 적용한다는 의미이다.
AWS Console 에서는 9991-9999 라는 뜻이 여기서는 from_port = 9991 to_port = 9999 를 의미한다.
resource "aws_security_group" "main_sg" {
  name        = "ktc-sg"
  description = "KTC main security group based on screenshot"
  vpc_id      = aws_vpc.main.id

  # Allow SSH from Anywhere
  ingress {
    from_port   = 22
    to_port     = 22
    protocol    = "tcp"
    cidr_blocks = ["0.0.0.0/0"]
    description = "Allow SSH access from anywhere"
  }

  # Allow Pinpoint-Web (8080) from Anywhere
  ingress {
    from_port   = 8080
    to_port     = 8080
    protocol    = "tcp"
    cidr_blocks = ["0.0.0.0/0"]
    description = "Allow Pinpoint-Web access from anywhere"
  }

  # Allow Grafana (9090) from Anywhere
  ingress {
    from_port   = 9090
    to_port     = 9090
    protocol    = "tcp"
    cidr_blocks = ["0.0.0.0/0"]
    description = "Allow Grafana access from anywhere"
  }

  # Allow Grafana (3000) from Anywhere
  ingress {
    from_port   = 3000
    to_port     = 3000
    protocol    = "tcp"
    cidr_blocks = ["0.0.0.0/0"]
    description = "Allow Grafana access from anywhere"
  }

  # Allow node_exporter (9100) from Self
  ingress {
    from_port = 9100
    to_port   = 9100
    protocol  = "tcp"
    self      = true
    description = "Allow node_exporter traffic from self"
  }

  # Allow influxdb (8086) from Self
  ingress {
    from_port = 8086
    to_port   = 8086
    protocol  = "tcp"
    self      = true
    description = "Allow influxdb traffic from self"
  }

  # Allow Pinpoint-Collector (9991-9999) from Self
  ingress {
    from_port = 9991
    to_port   = 9999
    protocol  = "tcp"
    self      = true
    description = "Allow Pinpoint Collector traffic from self"
  }

  # Allow External-to-KTC (12345-12346) from Self (Simplified)
  ingress {
    from_port = 12345
    to_port   = 12346
    protocol  = "tcp"
    self      = true
    description = "Allow KTC internal communication (Simplified)"
  }

  # Allow Redis-to-Redis (17000-17021) from Self
  ingress {
    from_port = 17000
    to_port   = 17021
    protocol  = "tcp"
    self      = true
    description = "Allow Redis Cluster communication"
  }

  # Allow External-to-Redis (7000-7021) from Self (Simplified)
  ingress {
    from_port = 7000
    to_port   = 7021
    protocol  = "tcp"
    self      = true
    description = "Allow internal access to Redis (Simplified)"
  }

  # Allow Redis Exporter
  ingress {
    from_port = 9121
    to_port   = 9121
    protocol  = "tcp"
    self      = true
    description = "Allow Redis Exporter"
  }

  # 모든 아웃바운드 트래픽 허용 (Default)
  egress {
    from_port   = 0
    to_port     = 0
    protocol    = "-1"
    cidr_blocks = ["0.0.0.0/0"]
  }

  tags = {
    Name = "ktc-sg"
  }
}
IAM Role
여기서는 아웃바운드 트래픽으로 인한 비용을 최소화하기 위해 S3 를 사용한다.
예를 들어 특정 패키지를 외부로부터 download 받는 행위 자체가 Outbound 트래픽이며, 보통 하나의 패키지 당 GB 단위이므로 이것도 쌓이면 무시할 수 없다.
AWS 에서 관리되는 여러 서비스에서, 같은 계정이라도 각각의 서비스에 접근하려면 특정 권한이 필요하다.
그래서 S3 및 EC2 접근 권한을 부여하며, 나중에 모든 인스턴스들에 특정 Shell Script 명령을 수행하기 위한 SSM 도 추가한다.
role(policy) 를 생성했음에도 별도로 profile 을 생성한 이유는 EC2 에서 Role 을 할당하기 위해선 별도의 profile 로 설정해야 하기 때문이다.
# S3 접근 관련 (아웃바운드 트래픽 비용 최소화를 위해 내부 네트워크인 S3 접근권한 부여)

# EC2에 접근할 수 있도록 IAM Role 생성
data "aws_iam_policy_document" "ec2_assume_role_policy" {
  statement {
    actions = ["sts:AssumeRole"]
    principals {
      type        = "Service"
      identifiers = ["ec2.amazonaws.com"]
    }
  }
}

# S3 읽기 권한이 있는 IAM Role 생성
resource "aws_iam_role" "ec2_s3_readonly" {
  name               = "ec2-s3-readonly-role"
  assume_role_policy = data.aws_iam_policy_document.ec2_assume_role_policy.json
}

# S3 ReadOnlyAccess 정책 연결
resource "aws_iam_role_policy_attachment" "s3_readonly_attach" {
  role       = aws_iam_role.ec2_s3_readonly.name
  policy_arn = "arn:aws:iam::aws:policy/AmazonS3ReadOnlyAccess"
}

resource "aws_iam_role_policy_attachment" "ssm_core_attach" {
  role       = aws_iam_role.ec2_s3_readonly.name
  policy_arn = "arn:aws:iam::aws:policy/AmazonSSMManagedInstanceCore"
}

# EC2 DescribeInstances 권한 정책 생성
resource "aws_iam_policy" "ec2_describe_instances_policy" {
  name        = "ec2-describe-instances-policy"
  description = "Allows EC2 instances to describe other EC2 instances"

  policy = jsonencode({
    Version = "2012-10-17",
    Statement = [
      {
        Action   = "ec2:DescribeInstances",
        Effect   = "Allow",
        Resource = "*"
      }
    ]
  })
}

# 생성한 DescribeInstances 정책 연결
resource "aws_iam_role_policy_attachment" "ec2_describe_attach" {
  role       = aws_iam_role.ec2_s3_readonly.name
  policy_arn = aws_iam_policy.ec2_describe_instances_policy.arn
}

# EC2 인스턴스 프로파일 생성
resource "aws_iam_instance_profile" "ec2_profile" {
  name = "ec2-s3-readonly-profile"
  role = aws_iam_role.ec2_s3_readonly.name
}
EC2 인스턴스 생성 (pinpoint)
이제 ec2 인스턴스를 생성해보자.
우선 다른 ec2 인스턴스의 depends_on 하지 않는 pinpoint 인스턴스부터 살펴보자.
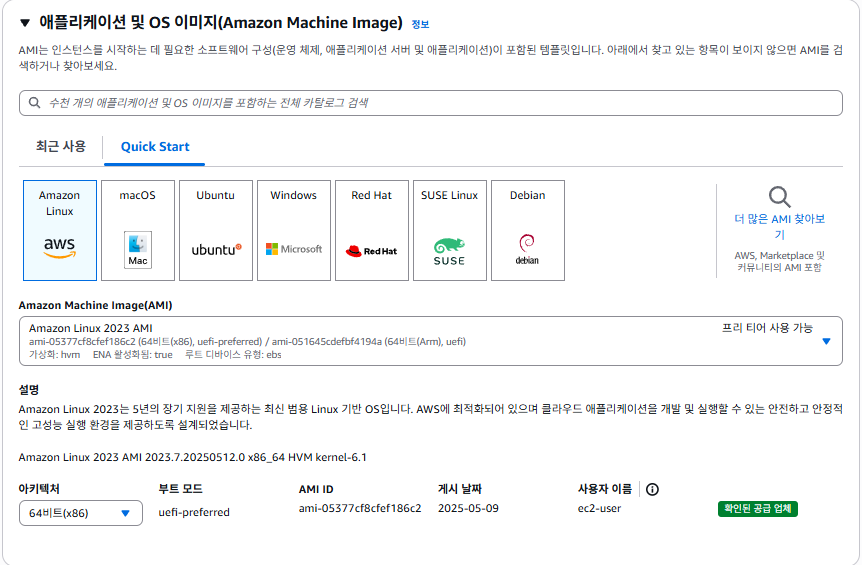
AMI
AMI 는 어느 OS 를 사용할 건지를 의미한다.
Amazon Linux 뿐 아니라 Ubuntu, Windows, Red Hat, SUSE, Debian 계열이 사용 가능하며, EC2 인스턴스를 생성할 때 이미 OS 가 설치된 상태로 나온다.
Amazon Linux 를 선택하면 나중에 Aws Console 웹뷰에서 바로 SSH 접속하는 기능을 기본적으로 지원하므로, 이를 선택했다.
참고 : Amazon Linux 가 아니더라도 다른 AMI 에서 특정 플러그인을 설치하면 AWS Console 웹뷰의 SSH 접속을 이용할 수 있다.
그리고, Amazon Linux 의 패키지 매니저는 Red Hat 계열의 패키지 매니저와 동일하므로 CentOS 또는 Rocky Linux 를 이용하던 사용자라면 더 익숙할 것이다.
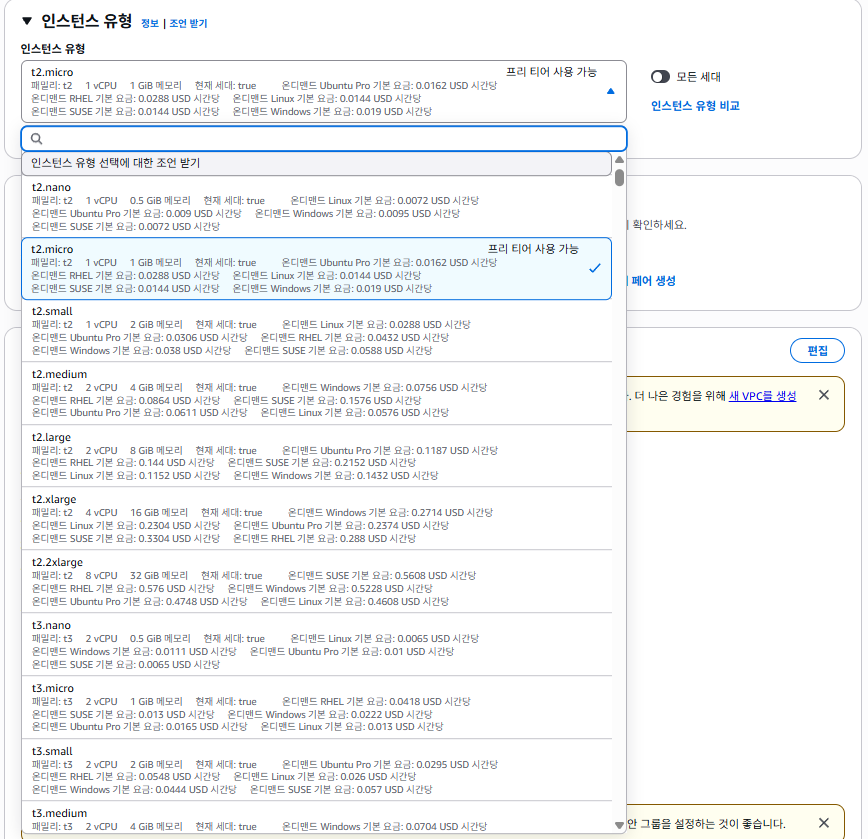
instance_type
instance_type 은 하나의 EC2 인스턴스가 컴퓨팅 리소스를 어떻게 할당받을 것인지 지정한다.
각 타입별로 무엇을 의미하는지는 AWS - EC2 instance_type 에서 확인이 가능하다.
간략하게 말하자면,
- 맨 앞의 알파벳은 어느 작업에 특화되어있는 인스턴스 타입인지 명시한다. (일반, DB, 빅데이터, CPU 최적화 ...)
- 그 뒤의 숫자는 세대를 의미한다. 일반적으로 세대가 올라갈수록 가격이 조금 내려가고 성능이 올라간다.
- 숫자 뒤의 알파벳 (옵션) 은 그 안에서도 세부적으로 특정 작업에 특화된 인스턴스 타입을 의미한다. 여기에는 Storage 를 HDD 가 아닌 SSD 기반으로 설정되어있거나, 대량의 네트워크 대역폭을 지원하는 등의 옵션에 따라 분기될 수 있다.
- 맨 뒤의 nano, micro, medium... 은 CPU, RAM 할당량을 AWS 가 직접 지정해
이 타입에서는 이 정도를 제공한다라는 의미로 받아들이면 된다.
또한 AMI (OS) 별로 가격이 다르니 참고하자.
key_name 에는 기존 AWS Console 에서 생성한 SSH Key 를 활용한다.
Terraform 에서는 직접 SSH Key 를 생성할 수 없다.
이후 위에서 설정한 네트워크 변수 및 profile 등을 지정할 수 있다.
tags 에는 생성되는 인스턴스들의 이름을 각각 지정할 수 있고, 이 tag 를 통해 나중에 SSM 또는 Lambda 에서 활용이 가능하다. (특정 tag 를 가진 인스턴스에서만 특정 명령을 수행하는 등)
root_block_device 에서는 storage (volume) 에 대한 속성을 지정할 수 있다.
volume_size 는 GB 단위이며, 최근 EC2 는 대부분 gp3 기반의 EBS volume 을 사용한다.
EC2 의 instance_type 별로 지원되는 volume 형태가 다르므로 참고하자.
AWS - EC2 instance_type
metadata_options 는 모든 EC2 인스턴스에 동일하게 적용했는데,
이는 일반적인 상황에서 해당 기본값 외에 사용되는 용도는 거의 없으니 저대로 사용해도 무방하다.
user_data 는 인스턴스를 띄운 후 어떤 동작을 수행할 것인지 정의할 수 있다.
레퍼런스 검색 시에는 .tf 파일 안에 단순히 몇 줄의 코드를 넣는 예시가 존재하지만,
여기서는 수십 줄 이상의 shell script 를 사용할 예정이므로 가독성과 편의를 위해 별도 파일로 분리했다.
${path.module} 은 main.tf 디렉토리가 위치한 곳이다.
.tpl 은 terraform 에서 사용할 shell script 를 파일로 관리하기 위한 확장자이다.
resource "aws_instance" "pinpoint" {
  ami                         = "ami-0a463f27534bdf246" # Amazon Linux 2 AMI
  instance_type               = "c6i.large"              # 인스턴스 타입
  key_name                    = "your-ssh-key-name"        # SSH 키페어 이름
  subnet_id                   = aws_subnet.public.id # 생성된 서브넷 사용
  vpc_security_group_ids      = [aws_security_group.main_sg.id] # 생성된 보안 그룹 사용
  iam_instance_profile        = aws_iam_instance_profile.ec2_profile.name # S3 접근 권한 추가
  depends_on = [
    aws_iam_role_policy_attachment.s3_readonly_attach,
    aws_iam_role_policy_attachment.ec2_describe_attach
  ]

  tags = {
    Name = "Pinpoint-Server"
    Role = "pinpoint"
  }

  root_block_device {
    delete_on_termination = true           # 인스턴스 종료 시 EBS 볼륨 삭제
    volume_size = 100                      # 루트 볼륨 크기(GB)
    volume_type = "gp3"                   # 루트 볼륨 타입
  }

  monitoring        = false     # 상세 모니터링 비활성화 (기본 5분 단위)
  ebs_optimized     = false     # EBS 최적화 비활성화

  metadata_options {
    http_tokens                  = "required"   # IMDSv2 필수
    http_put_response_hop_limit  = 2            # 메타데이터 응답 홉 제한
    http_endpoint                = "enabled"    # 인스턴스 메타데이터 엔드포인트 활성화
    http_protocol_ipv6           = "disabled"   # IPv6 메타데이터 비활성화
    instance_metadata_tags       = "disabled"   # 인스턴스 메타데이터 태그 비활성화
  }

  # Use templatefile for user_data
  user_data = templatefile("${path.module}/scripts/pinpoint_setup.sh.tpl", {})
}
pinpoint_setup.sh.tpl
아래는 위 EC2 인스턴스에 pinoint 를 설치하기 위한 shell script 이다.
- UTC time 은 Asiz/Seoul 로 설정하고,
- S3 에서 설치파일들을 가져와 여러 패키지들을 설치하고,
- 이를 나중에 쉽게 관리하기 위한 스크립트를 생성하고,
- 실행하는 명령어까지 존재한다.
여기서 굳이 ec2-user 권한으로 실행한 이유는, 해당 .sh.tpl 은 모두 root 유저로 실행되어 나중에 ssh 접속 시 해당 스크립트로 설치/생성된 모든 것들이 root 권한으로 되어있어
일일이 sudo 권한으로 조회/수정 해야하는 번거로움 때문에 기본적으로 제공하는 ec2-user 유저로 수행하는 것이다.
또한 해당 스크립트들은 EC2 인스턴스가 생성되어 접속이 가능해진 상태더라도, 계속해서 스크립트는 실행 중일 수 있다.
그래서 EC2 인스턴스 SSH 접속 시 아직 해당 스크립트가 수행 중인지 확인하려면,
tail -F /var/log/cloud-init-output.log 명령어로 지금 어느 단계까지 왔는지 확인이 가능하다.
중간중간 echo 명령어를 출력한 이유가 위 때문이다.
pinpoint 설치 과정에 대해서는 포스팅의 주제와 벗어나 설명하지는 않는다.
#!/bin/bash
# Set timezone to KST
sudo timedatectl set-timezone Asia/Seoul

# 모든 명령을 ec2-user 권한으로 실행
runuser -l ec2-user -c '
  # S3에서 OpenJDK 17.0.2 다운로드 및 설치
  echo "Downloading and installing OpenJDK 17.0.2..."
  cd /home/ec2-user
  aws s3 cp s3://your-bucket-name/pinpoint/openjdk-17.0.2_linux-x64_bin.tar.gz /home/ec2-user/
  tar -zxvf /home/ec2-user/openjdk-17.0.2_linux-x64_bin.tar.gz
  sudo mkdir -p /usr/lib/jvm
  sudo mv jdk-17.0.2 /usr/lib/jvm/jdk-17.0.2
  sudo update-alternatives --install /usr/bin/java java /usr/lib/jvm/jdk-17.0.2/bin/java 1
  sudo update-alternatives --install /usr/bin/javac javac /usr/lib/jvm/jdk-17.0.2/bin/javac 1
  echo "export JAVA_HOME=/usr/lib/jvm/jdk-17.0.2" >> ~/.bashrc
  source ~/.bashrc
  echo "export PATH=$PATH:$JAVA_HOME/bin" >> ~/.bashrc
  source ~/.bashrc
  java -version
  echo "OpenJDK 17.0.2 installed."

  # S3에서 HBase 다운로드 및 설치
  echo "Downloading and installing HBase..."
  aws s3 cp s3://your-bucket-name/pinpoint/hbase-2.6.2-bin.tar.gz /home/ec2-user/
  tar -zxvf /home/ec2-user/hbase-2.6.2-bin.tar.gz
  sudo mkdir -p /usr/lib/hbase
  sudo mv hbase-2.6.2 /usr/lib/hbase/hbase-2.6.2
  echo "export HBASE_HOME=/usr/lib/hbase/hbase-2.6.2" >> ~/.bashrc
  source ~/.bashrc
  echo "export PATH=$PATH:$HBASE_HOME/bin" >> ~/.bashrc
  source ~/.bashrc
  hbase version
  echo "HBase 2.6.2 installed."

  # HBase 환경 변수 설정
  echo "export JAVA_HOME=/usr/lib/jvm/jdk-17.0.2" >> /usr/lib/hbase/hbase-2.6.2/conf/hbase-env.sh
  # HBase 시작
  /usr/lib/hbase/hbase-2.6.2/bin/start-hbase.sh
  echo "HBase started."

  # HBase 테이블 생성 스크립트 다운로드
  echo "Waiting for HBase to start..."
  sleep 10
  echo "Creating HBase pinpoint table..."
  wget https://raw.githubusercontent.com/pinpoint-apm/pinpoint/master/hbase/scripts/hbase-create.hbase
  /usr/lib/hbase/hbase-2.6.2/bin/hbase shell hbase-create.hbase
  echo "HBase pinpoint table created."

  # pinpoint 설치
  echo "Installing Pinpoint web/collector..."
  mkdir -p /home/ec2-user/pinpoint
  cd /home/ec2-user/pinpoint
  aws s3 cp s3://your-bucket-name/pinpoint/pinpoint-collector-3.0.0-exec.jar /home/ec2-user/pinpoint
  aws s3 cp s3://your-bucket-name/pinpoint/pinpoint-web-3.0.0-exec.jar /home/ec2-user/pinpoint
  chmod +x pinpoint-collector-3.0.0-exec.jar
  chmod +x pinpoint-web-3.0.0-exec.jar
  echo "Pinpoint web/collector installed."

  echo "create pinpoint start.sh..."
  cat << "EOF" > $HOME/pinpoint/start.sh
#!/bin/bash
nohup java -jar -Dpinpoint.zookeeper.address=localhost pinpoint-collector-3.0.0-exec.jar >/dev/null 2>&1 &
nohup java -jar -Dpinpoint.zookeeper.address=localhost pinpoint-web-3.0.0-exec.jar >/dev/null 2>&1 &
EOF

  echo "create pinpoint stop.sh..."
  cat << "EOF" > $HOME/pinpoint/stop.sh
#!/bin/bash
kill -9 $(ps aux | grep "pinpoint-collector-3.0.0-exec.jar" | grep -v grep | awk "{print $2}")
kill -9 $(ps aux | grep "pinpoint-web-3.0.0-exec.jar" | grep -v grep | awk "{print $2}")
EOF

  echo "create pinpoint status.sh..."
  cat << "EOF" > $HOME/pinpoint/status.sh
#!/bin/bash
ps aux | grep "pinpoint-collector-3.0.0-exec.jar" | grep -v grep | awk "{print $2}")
ps aux | grep "pinpoint-web-3.0.0-exec.jar" | grep -v grep | awk "{print $2}")
EOF

  echo "Setting pinpoint permissions..."
  chmod +x $HOME/pinpoint/start.sh
  chmod +x $HOME/pinpoint/stop.sh
  chmod +x $HOME/pinpoint/status.sh

  echo "Starting Pinpoint collector / web..."
  $HOME/pinpoint/start.sh

  echo "waiting for pinpoint to start..."
  sleep 20

'
EC2 인스턴스 생성 (redis)
여기서는 추가 변수를 사용한다.
Redis 를 Cluster 형태로 구축할 것인데, 각 Node 가 어느포트를 할당할 것이고, 어느 포트가 master / replica 일지를 사전에 지정해서 shell script 에서 활용하고자 한다.
또한 EC2 resource 의 count 에는 몇 개의 인스턴스를 띄울 것인지도 지정할 수 있고,
tag 역시 변수를 사용해 각각의 인스턴스에 이름을 다르게 지정할 수 있다.
첨언하자면, Redis 는 In-memory 기반이므로 Storage 는 적게 할당, Memory 용량을 많이 할당하는 것이 이론 상 적절하다.
또한 CPU 집약적인 연산이 들어간다면 적절한 instance_type 을 설정하길 바란다.
Redis 는 backup 을 위해 RDB 또는 AOP 로깅 방식을 지원한다.
장애 대응을 위해 backup 사용 시 RDB 는 압축 형식이라 용량을 적게 차지하고 사람이 알아보기 힘들고 유실 가능성이 다소 있는 데 반해,
AOP 로깅은 압축 없이 사람이 볼 수 있는 형태이면서 유실 가능성이 거의 없는 대신 차지하는 용량이 많아질 뿐더러 성능에 영향이 갈 수 있음에 참고하자.
variable "redis_ports" {
  description = "Redis cluster ports"
  type        = list(number)
  default     = [7000, 7001, 7010, 7011, 7020, 7021]
}

variable "redis_master_ports" {
  description = "Redis master ports"
  type        = list(number)
  default     = [7000, 7010, 7020]
}

variable "redis_replica_ports" {
  description = "Redis replica ports"
  type        = list(number)
  default     = [7001, 7011, 7021]
}

variable "redis_replica_mapping" {
  description = "Redis replica to master mapping (index based)"
  type        = map(number)
  default     = {
    "7001" = 0  # 7001은 7000의 레플리카
    "7011" = 1  # 7011은 7010의 레플리카
    "7021" = 2  # 7021은 7020의 레플리카
  }
}

resource "aws_instance" "redis" {
  count                       = length(var.redis_ports) # 포트 개수만큼 인스턴스 생성
  ami                         = "ami-0a463f27534bdf246" # Amazon Linux 2 AMI
  instance_type               = "t3.medium"              # 인스턴스 타입
  key_name                    = "your-ssh-key-name"        # SSH 키페어 이름
  subnet_id                   = aws_subnet.public.id # 생성된 서브넷 사용
  vpc_security_group_ids      = [aws_security_group.main_sg.id] # 생성된 보안 그룹 사용
  iam_instance_profile        = aws_iam_instance_profile.ec2_profile.name # S3 접근 권한 추가
  depends_on = [
    aws_iam_role_policy_attachment.s3_readonly_attach,
    aws_iam_role_policy_attachment.ec2_describe_attach
  ]

  tags = {
    Name = "Redis-Server-${var.redis_ports[count.index]}" # 포트 번호를 인스턴스 이름에 추가
    RedisPort = "${var.redis_ports[count.index]}"         # 포트 번호 태그
    RedisCluster = "redis-cluster"                        # 클러스터 식별 태그
    RedisRole = contains(var.redis_master_ports, var.redis_ports[count.index]) ? "master" : "replica" # 역할 식별
    RedisIndex = "${count.index}"                         # 인덱스 식별용 태그
  }

  root_block_device {
    delete_on_termination = true
    volume_size           = 8
    volume_type           = "gp3"
  }

  monitoring        = false
  ebs_optimized     = false

  metadata_options {
    http_tokens                  = "required"
    http_put_response_hop_limit  = 2
    http_endpoint                = "enabled"
    http_protocol_ipv6           = "disabled"
    instance_metadata_tags       = "disabled"
  }

  user_data = templatefile("${path.module}/scripts/redis_setup.sh.tpl", {
    redis_port = var.redis_ports[count.index],  # 현재 인스턴스의 포트
    is_master = contains(var.redis_master_ports, var.redis_ports[count.index]), # 마스터 여부
    is_first_master = var.redis_ports[count.index] == var.redis_master_ports[0], # 첫 번째 마스터인지 여부
    redis_password = "123456" # Redis 비밀번호
  })
}
위에서 설정한 redis port, master/replica 여부 등을 활용해 redis 를 shell script 로 설치할 수 있게 .sh.tpl 을 구성했다.
추가로 현재 .sh.tpl 을 수행하는 인스턴스의 IP 를 가져오는 것을 TOKEN 및 MY_IP 변수에 담아두는 과정이 포함되어있으니 참고하면 좋을 듯 하다.
이 역시 상세 설치과정은 설명하지는 않겠지만, 변수를 어떻게 활용했는지 정도는 참고하길 바란다.
redis_setup.sh.tpl
#!/bin/bash

# Set timezone to KST
sudo timedatectl set-timezone Asia/Seoul

# 로그 파일 설정
exec > >(tee /home/ec2-user/redis_install.log) 2>&1
echo "Redis 설치 스크립트 시작: $(date)"

# Redis 포트 및 역할 설정
REDIS_PORT=${redis_port}
IS_MASTER=${is_master}
IS_FIRST_MASTER=${is_first_master}
REDIS_PASSWORD=${redis_password}

# Redis 설치
yum update -y
yum install -y gcc make jemalloc-devel tcl jq aws-cli

# Redis 소스 다운로드 및 설치
mkdir -p /home/ec2-user/redis-cluster
cd /home/ec2-user/redis-cluster
aws s3 cp s3://your-bucket-name/redis-7.4.0.tar.gz ./redis-7.4.0.tar.gz
tar xzf redis-7.4.0.tar.gz
cd redis-7.4.0
make distclean
make
make install

# 포트에 대한 디렉토리 생성
mkdir -p /home/ec2-user/redis-cluster/node-$REDIS_PORT/data
mkdir -p /home/ec2-user/redis-cluster/node-$REDIS_PORT/log

# EC2 메타데이터 획득
TOKEN=$(curl -s -X PUT "http://169.254.169.254/latest/api/token" -H "X-aws-ec2-metadata-token-ttl-seconds: 21600")
MY_IP=$(curl -s -H "X-aws-ec2-metadata-token: $TOKEN" http://169.254.169.254/latest/meta-data/local-ipv4)
MY_INSTANCE_ID=$(curl -s -H "X-aws-ec2-metadata-token: $TOKEN" http://169.254.169.254/latest/meta-data/instance-id)
REGION=$(curl -s -H "X-aws-ec2-metadata-token: $TOKEN" http://169.254.169.254/latest/meta-data/placement/region)

echo "My IP: $MY_IP" >> /home/ec2-user/redis_install.log
echo "My Instance ID: $MY_INSTANCE_ID" >> /home/ec2-user/redis_install.log
echo "Region: $REGION" >> /home/ec2-user/redis_install.log

# redis.conf 파일 생성
tee /home/ec2-user/redis-cluster/node-$REDIS_PORT/redis.conf <<EOF
port $REDIS_PORT
bind 127.0.0.1 $MY_IP
cluster-enabled yes
cluster-config-file nodes-$REDIS_PORT.conf
cluster-node-timeout 5000
dbfilename dump-$REDIS_PORT.rdb
appendonly yes
daemonize yes
dir /home/ec2-user/redis-cluster/node-$REDIS_PORT/data
logfile /home/ec2-user/redis-cluster/node-$REDIS_PORT/log/redis-$REDIS_PORT.log
requirepass $REDIS_PASSWORD
masterauth $REDIS_PASSWORD
EOF

# Redis 서버 시작
echo "Starting Redis on port $REDIS_PORT" >> /home/ec2-user/redis_install.log
redis-server /home/ec2-user/redis-cluster/node-$REDIS_PORT/redis.conf

# 상태 확인
sleep 5
if redis-cli -p $REDIS_PORT -a $REDIS_PASSWORD ping | grep -q PONG; then
  echo "Redis is running on port $REDIS_PORT" >> /home/ec2-user/redis_install.log
else
  echo "Failed to start Redis on port $REDIS_PORT" >> /home/ec2-user/redis_install.log
  exit 1
fi

# 클러스터 구성 (첫 번째 마스터 노드에서만 실행)
if [ "$IS_FIRST_MASTER" = "true" ]; then
  echo "This is the first master node, waiting for all instances to be ready..." >> /home/ec2-user/redis_install.log

  # 모든 Redis 인스턴스를 찾기 위해 최대 30번 시도
  for attempt in {1..30}; do
    echo "Attempt $attempt to find all Redis instances..." >> /home/ec2-user/redis_install.log

    # AWS CLI를 사용하여 같은 클러스터에 속한 모든 Redis 인스턴스 가져오기
    INSTANCES=$(aws ec2 describe-instances \
      --region $REGION \
      --filters "Name=tag:RedisCluster,Values=redis-cluster" "Name=instance-state-name,Values=running" \
      --query "Reservations[*].Instances[*].[InstanceId,PrivateIpAddress,Tags[?Key=='RedisPort'].Value|[0],Tags[?Key=='RedisRole'].Value|[0]]" \
      --output json)

    # 인스턴스 수 확인 (마스터 3개, 레플리카 3개)
    INSTANCE_COUNT=$(echo $INSTANCES | jq '. | flatten | length / 4' | awk '{print int($1)}')
    echo "Found $INSTANCE_COUNT Redis instances" >> /home/ec2-user/redis_install.log

    if [ "$INSTANCE_COUNT" -eq "6" ]; then
      echo "All 6 Redis instances are running" >> /home/ec2-user/redis_install.log
      break
    fi

    if [ $attempt -eq 30 ]; then
      echo "Timed out waiting for all Redis instances!" >> /home/ec2-user/redis_install.log
      exit 1
    fi

    echo "Waiting for all Redis instances, retrying in 10 seconds..." >> /home/ec2-user/redis_install.log
    sleep 10
  done

  # 추가 시간 대기 (모든 인스턴스가 완전히 준비될 때까지)
  echo "Waiting additional time for instances to fully initialize..." >> /home/ec2-user/redis_install.log
  sleep 60

  # 마스터 및 레플리카 노드 정보 수집
  MASTER_INFO=$(echo $INSTANCES | jq -c '[.[][] | select(.[3] == "master") | [.[1], .[2]]]')
  REPLICA_INFO=$(echo $INSTANCES | jq -c '[.[][] | select(.[3] == "replica") | [.[1], .[2]]]')

  echo "Master info: $MASTER_INFO" >> /home/ec2-user/redis_install.log
  echo "Replica info: $REPLICA_INFO" >> /home/ec2-user/redis_install.log

  # 모든 Redis 노드가 응답하는지 확인
  echo "Checking if all Redis nodes are responsive..." >> /home/ec2-user/redis_install.log
  ALL_RESPONSIVE=true

  # 마스터 노드 확인
  for node in $(echo "$MASTER_INFO" | jq -c '.[]'); do
    IP=$(echo $node | jq -r '.[0]')
    PORT=$(echo $node | jq -r '.[1]')

    if ! redis-cli -h $IP -p $PORT -a $REDIS_PASSWORD ping | grep -q PONG; then
      echo "Master node $IP:$PORT is not responsive!" >> /home/ec2-user/redis_install.log
      ALL_RESPONSIVE=false
    else
      echo "Master node $IP:$PORT is responsive" >> /home/ec2-user/redis_install.log
    fi
  done

  # 레플리카 노드 확인
  for node in $(echo "$REPLICA_INFO" | jq -c '.[]'); do
    IP=$(echo $node | jq -r '.[0]')
    PORT=$(echo $node | jq -r '.[1]')

    if ! redis-cli -h $IP -p $PORT -a $REDIS_PASSWORD ping | grep -q PONG; then
      echo "Replica node $IP:$PORT is not responsive!" >> /home/ec2-user/redis_install.log
      ALL_RESPONSIVE=false
    else
      echo "Replica node $IP:$PORT is responsive" >> /home/ec2-user/redis_install.log
    fi
  done

  if [ "$ALL_RESPONSIVE" = "false" ]; then
    echo "Not all Redis nodes are responsive. Exiting." >> /home/ec2-user/redis_install.log
    exit 1
  fi

  # 클러스터 생성 (마스터 노드만 사용)
  echo "Creating Redis cluster..." >> /home/ec2-user/redis_install.log
  master_nodes=""
  for node in $(echo "$MASTER_INFO" | jq -c '.[]'); do
    IP=$(echo $node | jq -r '.[0]')
    PORT=$(echo $node | jq -r '.[1]')
    master_nodes="$master_nodes $IP:$PORT"
  done

  # 마스터 노드로 클러스터 생성
  echo "Creating cluster with masters:$master_nodes" >> /home/ec2-user/redis_install.log
  redis-cli --cluster create $master_nodes -a $REDIS_PASSWORD --cluster-yes >> /home/ec2-user/redis_install.log 2>&1
  sleep 10

  # 레플리카 노드 추가
  echo "Adding replica nodes to the cluster..." >> /home/ec2-user/redis_install.log

  # 레플리카-마스터 매핑 (포트 기준)
  # 7001 -> 7000, 7011 -> 7010, 7021 -> 7020
  declare -A REPLICA_TO_MASTER
  REPLICA_TO_MASTER["7001"]="7000"
  REPLICA_TO_MASTER["7011"]="7010"
  REPLICA_TO_MASTER["7021"]="7020"

  # 레플리카 노드 추가
  for node in $(echo "$REPLICA_INFO" | jq -c '.[]'); do
    REPLICA_IP=$(echo $node | jq -r '.[0]')
    REPLICA_PORT=$(echo $node | jq -r '.[1]')

    # 마스터 포트 찾기
    MASTER_PORT=$${REPLICA_TO_MASTER[$REPLICA_PORT]}

    if [ -z "$MASTER_PORT" ]; then
      echo "No master port mapping found for replica port $REPLICA_PORT" >> /home/ec2-user/redis_install.log
      continue
    fi

    # 마스터 IP 찾기
    MASTER_IP=""
    for master_node in $(echo "$MASTER_INFO" | jq -c '.[]'); do
      IP=$(echo $master_node | jq -r '.[0]')
      PORT=$(echo $master_node | jq -r '.[1]')
      if [ "$PORT" = "$MASTER_PORT" ]; then
        MASTER_IP=$IP
        break
      fi
    done

    if [ ! -z "$MASTER_IP" ]; then
      echo "Adding replica $REPLICA_IP:$REPLICA_PORT to master $MASTER_IP:$MASTER_PORT" >> /home/ec2-user/redis_install.log
      redis-cli --cluster add-node $REPLICA_IP:$REPLICA_PORT $MASTER_IP:$MASTER_PORT --cluster-slave -a $REDIS_PASSWORD >> /home/ec2-user/redis_install.log 2>&1
      sleep 5
    else
      echo "Could not find master IP for port $MASTER_PORT" >> /home/ec2-user/redis_install.log
    fi
  done

  # 클러스터 상태 확인
  echo "Checking cluster status..." >> /home/ec2-user/redis_install.log
  FIRST_MASTER=$(echo "$MASTER_INFO" | jq -c '.[0]')
  FIRST_MASTER_IP=$(echo $FIRST_MASTER | jq -r '.[0]')
  FIRST_MASTER_PORT=$(echo $FIRST_MASTER | jq -r '.[1]')
  redis-cli -h $FIRST_MASTER_IP -p $FIRST_MASTER_PORT -a $REDIS_PASSWORD cluster info >> /home/ec2-user/redis_install.log 2>&1
  redis-cli -h $FIRST_MASTER_IP -p $FIRST_MASTER_PORT -a $REDIS_PASSWORD cluster nodes >> /home/ec2-user/redis_install.log 2>&1

  echo "Cluster configuration completed!" >> /home/ec2-user/redis_install.log
else
  echo "This is not the first master node, skipping cluster configuration." >> /home/ec2-user/redis_install.log
fi

echo "Redis 설치 및 구성 완료: $(date)" >> /home/ec2-user/redis_install.log
EC2 인스턴스 생성 (ktc, spring boot)
springboot, pinpoint-agent, node_exporter ec2 인스턴스를 띄우는 단순 코드이지만,
특이사항으로는 depends_on 에 redis 가 존재한다.
이 의미는 terraform apply -auto-approve -target="aws_instance.ktc" 와 같이 ktc ec2 인스턴스만 띄우고 싶다는 명령어를 수행할 때,
aws_instance.ktc 인스턴스를 먼저 띄우고 ktc 인스턴스를 띄우게 된다.
또한 redis 에 의존성이 걸려있으므로 redis 인스턴스들이 가진 private ip 들을 가져와서 ktc 를 설치하는 .sh.tpl 파일에 적용할 수 있게 된다.
# 생성할 ktc EC2 인스턴스의 개수를 지정하는 변수
variable "ktc_instance_count" {
  description = "Number of EC2 instances to create"
  type        = number
  default     = 2
}

# s3 에서 ktc 디렉토리를 가져와서 /bin/start.sh 를 수행하는 리소스
resource "aws_instance" "ktc" {
  count                       = var.ktc_instance_count  # 인스턴스 개수만큼 반복 생성
  ami                         = "ami-0a463f27534bdf246" # 사용할 AMI ID
  instance_type               = "t3.medium"              # 인스턴스 타입 (메모리 키운 인스턴스 타입)
  # instance_type               = "t2.medium"
  key_name                    = "your-ssh-key-name"        # SSH 키페어 이름
  subnet_id                   = aws_subnet.public.id # 생성된 서브넷 사용
  vpc_security_group_ids      = [aws_security_group.main_sg.id] # 생성된 보안 그룹 사용
  iam_instance_profile        = aws_iam_instance_profile.ec2_profile.name    # S3 읽기권한 허용
  depends_on = [
    aws_iam_role_policy_attachment.s3_readonly_attach,
    aws_iam_role_policy_attachment.ec2_describe_attach,
    aws_instance.redis,         # Added dependency on redis instances
  ]

  tags = {
    Name = "KTC-Server-${count.index + 1}"
    Role = "ktc"
  }

  root_block_device {
    delete_on_termination = true
    volume_size           = 8
    volume_type           = "gp3"
  }

  monitoring        = false     # 상세 모니터링 비활성화 (기본 5분 단위)
  ebs_optimized     = false     # EBS 최적화 비활성화

  metadata_options {
    http_tokens                  = "required"
    http_put_response_hop_limit  = 2
    http_endpoint                = "enabled"
    http_protocol_ipv6           = "disabled"
    instance_metadata_tags       = "disabled"
  }

  # Use templatefile for user_data
  user_data = templatefile("${path.module}/scripts/ktc_setup.sh.tpl", {
    redis_ports       = var.redis_ports
    redis_private_ips = aws_instance.redis.*.private_ip
  })
}
ktc_setup.sh.tpl
여기서는 pinpoint 에 데이터를 보내는 pinpoint-agent 뿐 아니라 redis instance 들의 private ip 를 /etc/hosts 에 등록해 자동화하는 과정이 들어있다.
추가로 node_exporter 설치 과정도 들어있지만,
역시 자세한 설치 설명은 생략한다.
#!/bin/bash
# Set timezone to KST
sudo timedatectl set-timezone Asia/Seoul

# Add Redis hosts entries
echo "Adding Redis entries to /etc/hosts"
%{ for i, port in redis_ports ~}
echo "${redis_private_ips[i]} redis.${port}.com" | sudo tee -a /etc/hosts
%{ endfor ~}
echo "Finished adding Redis entries to /etc/hosts"

# 모든 명령을 ec2-user 권한으로 실행
runuser -l ec2-user -c '
# S3 ktc-load-test-kona 버킷의 ktc/ 디렉토리 전체 복사
aws s3 cp --recursive s3://your-bucket-name/ktc/ $HOME/
# jdk 디렉토리 실행권한 부여
chmod -R +x $HOME/jdk-21.0.5/bin
# bin 디렉토리 실행권한 부여
chmod 755 $HOME/bin/*
# 디렉토리 없으면 생성
mkdir -p $HOME/log
mkdir -p $HOME/gclogs/backup
# 심볼릭 설정 (jdk-21.0.5 -> jdk)
# Check if symlink exists before creating
if [ ! -L $HOME/jdk ]; then
  ln -s $HOME/jdk-21.0.5 $HOME/jdk
fi

# Pinpoint Agent 설치
mkdir -p $HOME/pinpoint-agent
aws s3 cp s3://your-bucket-name/pinpoint/pinpoint-agent-3.0.0.tar.gz $HOME/pinpoint-agent/
tar -zxvf $HOME/pinpoint-agent/pinpoint-agent-3.0.0.tar.gz -C $HOME/pinpoint-agent

# Pinpoint Agent config 파일 수정
echo "Configuring Pinpoint Agent..."
sed -i "s/^profiler.transport.grpc.collector.ip=.*/profiler.transport.grpc.collector.ip=${pinpoint_private_ip}/" $HOME/pinpoint-agent/pinpoint-agent-3.0.0/pinpoint-root.config
sed -i "s/^profiler.sampling.counting.sampling-rate=.*/profiler.sampling.counting.sampling-rate=1/" $HOME/pinpoint-agent/pinpoint-agent-3.0.0/pinpoint-root.config
# 로그로 인한 과부하 방지.. 로그레벨 전부 INFO 로 변경
sed -i 's/DEBUG/INFO/g' $HOME/pinpoint-agent/pinpoint-agent-3.0.0/log4j2-agent.xml

# start.sh 실행 및 로그 저장
echo "Starting application..."
$HOME/bin/start.sh > $HOME/bin/start.log 2>&1

# node_exporter 설치 (OS 모니터링)
aws s3 cp s3://your-bucket-name/monitoring/node_exporter-1.9.1.linux-amd64.tar.gz $HOME/

# node_exporter-1.9.1 에 압축 해제
tar -zxvf $HOME/node_exporter-1.9.1.linux-amd64.tar.gz
mv node_exporter-1.9.1.linux-amd64 $HOME/node_exporter-1.9.1

# node_exporter.service 생성
cat << "EOF" | sudo tee /etc/systemd/system/node_exporter.service
[Unit]
Description=Node Exporter
Wants=network-online.target
After=network-online.target

[Service]
User=root
Group=root
Type=simple
ExecStart=/home/ec2-user/node_exporter-1.9.1/node_exporter

[Install]
WantedBy=multi-user.target
EOF

  echo "create node_exporter start.sh..."
  cat << "EOF" > $HOME/node_exporter-1.9.1/start.sh
#!/bin/bash
sudo systemctl start node_exporter
EOF

  echo "create node_exporter stop.sh..."
  cat << "EOF" > $HOME/node_exporter-1.9.1/stop.sh
#!/bin/bash
sudo systemctl stop node_exporter
EOF

  echo "create node_exporter status.sh..."
  cat << "EOF" > $HOME/node_exporter-1.9.1/status.sh
#!/bin/bash
sudo systemctl status node_exporter
EOF

echo "Setting node_exporter permissions..."
chmod +x $HOME/node_exporter-1.9.1/start.sh
chmod +x $HOME/node_exporter-1.9.1/stop.sh
chmod +x $HOME/node_exporter-1.9.1/status.sh

echo "start node_exporter..."
sudo systemctl daemon-reload
sudo systemctl enable node_exporter
sudo systemctl start node_exporter

'
EC2 인스턴스 생성 (nginx)
nginx 는 여러 개의 ktc (springboot) 인스턴스들의 IP 들을 하나로 묶어 Reverse Proxy 하기 위한 용도로 띄웠다.
AWS ELB 를 사용해도 되지만, 사내에서 사용하는 형태가 아니므로 Nginx 로 구현한다.
당연하게도 ktc 인스턴스들의 private IP 들을 전부 가져와서 Nginx 설정 파일에 집어넣어야 하는 과정이 들어간다.
resource "aws_instance" "nginx" {
  ami                         = "ami-0a463f27534bdf246" # 사용할 AMI ID
  instance_type               = "t3.medium"              # 인스턴스 타입 (메모리 키운 인스턴스 타입)
  key_name                    = "your-ssh-key-name"        # SSH 키페어 이름
  subnet_id                   = aws_subnet.public.id # 생성된 서브넷 사용
  vpc_security_group_ids      = [aws_security_group.main_sg.id] # 생성된 보안 그룹 사용
  iam_instance_profile        = aws_iam_instance_profile.ec2_profile.name    # S3 읽기권한 허용
  depends_on = [
    aws_iam_role_policy_attachment.s3_readonly_attach,
    aws_iam_role_policy_attachment.ec2_describe_attach,
    aws_instance.redis,         # Added dependency on redis instances
    aws_instance.ktc            # Added dependency on ktc instance
  ]

  tags = {
    Name = "Nginx-Server"
    Role = "nginx"
  }

  root_block_device {
    delete_on_termination = true
    volume_size           = 8
    volume_type           = "gp3"
  }

  monitoring        = false     # 상세 모니터링 비활성화 (기본 5분 단위)
  ebs_optimized     = false     # EBS 최적화 비활성화

  metadata_options {
    http_tokens                  = "required"
    http_put_response_hop_limit  = 2
    http_endpoint                = "enabled"
    http_protocol_ipv6           = "disabled"
    instance_metadata_tags       = "disabled"
  }

  user_data = templatefile("${path.module}/scripts/nginx_setup.sh.tpl", {
    ktc_private_ips = aws_instance.ktc.*.private_ip
  })
}
nginx_setup.sh.tpl
nginx 는 본인의 private IP 로 호출되는 것을 특정 IP 로 proxy 하는 구성이기 때문에,
.sh.tpl 이 수행되는 nginx 의 private IP 와 ktc instance 들의 private IP 들이 필요하다.
추가로 SSE 방식은 sticky 한 세션을 유지해야 하므로 (한 번 연결된 것은 계속 동일한 인스턴스로 라우팅 되어야 함) 동일한 IP 에서 호출된 것은 동일한 인스턴스로 유지되게 하는 ip_hash 방식을 사용했다.
Nginx 자체적으로 제공하는 stikcy 기능을 활용하려면 상용 버전을 사용해야 하므로, 여기서는 생략한다.
그 과정은 아래 포함되어있고, 역시 설치 과정까지 자세히 설명하지는 않는다.
#!/bin/bash
# Set timezone to KST
sudo timedatectl set-timezone Asia/Seoul

# 모든 명령을 ec2-user 권한으로 실행
TOKEN=$(curl -s -X PUT "http://169.254.169.254/latest/api/token" -H "X-aws-ec2-metadata-token-ttl-seconds: 21600")
MY_IP=$(curl -s -H "X-aws-ec2-metadata-token: $TOKEN" http://169.254.169.254/latest/meta-data/local-ipv4)

sudo dnf update -y # 시스템 패키지 목록 업데이트 (선택 사항이지만 권장)
sudo dnf install nginx -y # Nginx 설치

sudo systemctl start nginx # Nginx 서비스 시작
sudo systemctl enable nginx # 시스템 부팅 시 Nginx 자동 실행 설정

# Create KTC Nginx configuration file
cat << EOF | sudo tee /etc/nginx/conf.d/ktc.conf
# 일반적인 endpoint (예: /, /api 등)를 위한 백엔드 그룹
# 기본 round-robin 방식 또는 다른 방식 (least_conn 등) 사용
upstream ktc_common {
%{ for ip in ktc_private_ips ~}
    server ${ip}:12345;
%{ endfor ~}
    # ...
}

# SSE 엔드포인트 (예: /sse-stream)를 위한 백엔드 그룹
# ip_hash 방식 적용하여 세션 유지 시도
upstream ktc_ip_hash {
    ip_hash; # <-- 이 upstream 그룹에 ip_hash 적용
%{ for ip in ktc_private_ips ~}
    server ${ip}:12345;
%{ endfor ~}
    # ...
}

server {
    listen 12345; # Nginx가 클라이언트 요청을 받을 포트
    server_name $MY_IP spring.ktc.com; # 서버 이름 또는 IP 주소

    # 일반 HTTP 요청 처리
    location / {
        proxy_pass http://ktc_common; # 정의한 upstream 그룹으로 요청 전달
        proxy_set_header Host \$host;
        proxy_set_header X-Real-IP \$remote_addr;
        proxy_set_header X-Forwarded-For \$proxy_add_x_forwarded_for;
        proxy_set_header X-Forwarded-Proto \$scheme;
        # 다른 필요한 일반 proxy 설정들...
    }

    # SSE 엔드포인트 설정 (예시: /sse-stream 경로)
    location /sse-stream { # 실제 SSE 엔드포인트 경로로 변경
        proxy_pass http://ktc_ip_hash;

        # SSE를 위해 추가 설정
        proxy_buffering off; # <-- 매우 중요! SSE 스트리밍을 위해 버퍼링 비활성화
        proxy_cache off;     # <-- 캐싱 비활성화 (스트리밍 데이터에 불필요)
        proxy_set_header Connection "";

        # SSE 연결 유지를 위한 타임아웃 설정 (기본값보다 길게)
        proxy_read_timeout 300s; # 백엔드로부터 응답 읽기 타임아웃
        proxy_send_timeout 300s; # 백엔드로 요청 보내기 타임아웃

        proxy_set_header Host \$host;
        proxy_set_header X-Real-IP \$remote_addr;
        proxy_set_header X-Forwarded-For \$proxy_add_x_forwarded_for;
        proxy_set_header X-Forwarded-Proto \$scheme;
        # 다른 필요한 일반 proxy 설정들...
    }

    # SSL/TLS 설정 (HTTPS 사용 시 주석 해제 및 인증서 경로 설정)
}
EOF


sudo nginx -t # 문법오류 검증
sudo systemctl reload nginx  # 설정 리로드 (재기동 X)
EC2 인스턴스 생성 (monitoring)
monitoring 인스턴스는 prometheus (pull 방식 시계열DB), Grafana (데이터 시각화), InfluxDB(push 방식 시계열 DB), redis_exporter 를 설치하기 위한 인스턴스이다.
이를 위해 redis/ktc 인스턴스들의 private 를 .sh.tpl 에 변수로 넘긴다.
모니터링을 위한 데이터가 많이 적재될 예정이므로 instance_type 은 적절히 큰 값으로 수행하자.
resource "aws_instance" "monitoring" {
  ami                         = "ami-0a463f27534bdf246" # 사용할 AMI ID
  instance_type               = "c6i.xlarge"              # 인스턴스 타입 (메모리 키운 인스턴스 타입)
  key_name                    = "your-ssh-key-name"        # SSH 키페어 이름
  subnet_id                   = aws_subnet.public.id # 생성된 서브넷 사용
  vpc_security_group_ids      = [aws_security_group.main_sg.id] # 생성된 보안 그룹 사용
  iam_instance_profile        = aws_iam_instance_profile.ec2_profile.name    # S3 읽기권한 허용
  depends_on = [
    aws_iam_role_policy_attachment.s3_readonly_attach,
    aws_iam_role_policy_attachment.ec2_describe_attach,
    aws_instance.redis,         # Added dependency on redis instances
    aws_instance.ktc            # Added dependency on ktc instance
  ]

  tags = {
    Name = "Monitoring"
    Role = "monitoring"
  }

  root_block_device {
    delete_on_termination = true           # 인스턴스 종료 시 EBS 볼륨 삭제
    volume_size = 100                        # 루트 볼륨 크기(GB)
    volume_type = "gp3"                   # 루트 볼륨 타입
  }

  monitoring        = false     # 상세 모니터링 비활성화 (기본 5분 단위)
  ebs_optimized     = false     # EBS 최적화 비활성화

  metadata_options {
    http_tokens                  = "required"   # IMDSv2 필수
    http_put_response_hop_limit  = 2            # 메타데이터 응답 홉 제한
    http_endpoint                = "enabled"    # 인스턴스 메타데이터 엔드포인트 활성화
    http_protocol_ipv6           = "disabled"   # IPv6 메타데이터 비활성화
  }

  user_data = templatefile("${path.module}/scripts/monitoring_setup.sh.tpl", {
    redis_ports       = var.redis_ports
    redis_private_ips = aws_instance.redis.*.private_ip
    ktc_private_ip = aws_instance.ktc[0].private_ip
  })
}
monitoring_setup.sh.tpl
Grafana / Prometheus / InfluxDB / redis_exporter 들을 설치하고,
플러그인 설치 및 설정 적용, DB schema 생성, shell script 생성 및 수행까지의 과정이 포함되어 다소 내용이 길다.
역시 자세한 설치 과정은 생략한다.
#!/bin/bash
# Set timezone to KST
sudo timedatectl set-timezone Asia/Seoul

# Add KTC host entry
echo "Adding KTC entry to /etc/hosts"
echo "${ktc_private_ip} spring.ktc.com" | sudo tee -a /etc/hosts
echo "Finished adding KTC entry to /etc/hosts"

# Add Redis hosts entries
echo "Adding Redis entries to /etc/hosts"
%{ for i, port in redis_ports ~}
echo "${redis_private_ips[i]} redis.${port}.com" | sudo tee -a /etc/hosts
%{ endfor ~}
echo "Finished adding Redis entries to /etc/hosts"

# 모든 명령을 ec2-user 권한으로 실행
runuser -l ec2-user -c '
  echo "Downloading and installing redis_exporter, prometheus, grafana, influxdb.."

  aws s3 cp s3://your-bucket-name/monitoring/redis_exporter-v1.70.0.linux-amd64.tar.gz $HOME/redis_exporter-v1.70.0.linux-amd64.tar.gz
  mkdir -p $HOME/redis_exporter-v1.70.0 && tar -xvf $HOME/redis_exporter-v1.70.0.linux-amd64.tar.gz -C $HOME/redis_exporter-v1.70.0 --strip-components=1

  echo "setting redis_exporter..."

  # /etc/systemd/system/redis_exporter.service 에 아래 내용 삽입
  cat << "EOF" | sudo tee /etc/systemd/system/redis_exporter.service
[Unit]
Description=Redis Exporter
Wants=network-online.target
After=network-online.target

[Service]
User=ec2-user
Group=ec2-user
Type=simple
ExecStart=/home/ec2-user/redis_exporter-v1.70.0/redis_exporter \
    -web.listen-address ":9121" \
    -redis.addr "redis.7000.com:7000" --is-cluster\
    -redis.password "123456"

[Install]
WantedBy=multi-user.target

EOF

  echo "create redis_exporter start.sh..."
  cat << "EOF" > $HOME/redis_exporter-v1.70.0/start.sh
#!/bin/bash
sudo systemctl start redis_exporter
EOF

  echo "create redis_exporter stop.sh..."
  cat << "EOF" > $HOME/redis_exporter-v1.70.0/stop.sh
#!/bin/bash
sudo systemctl stop redis_exporter
EOF

  echo "create redis_exporter status.sh..."
  cat << "EOF" > $HOME/redis_exporter-v1.70.0/status.sh
#!/bin/bash
sudo systemctl status redis_exporter
EOF

  echo "Setting redis_exporter permissions..."
  chmod +x $HOME/redis_exporter-v1.70.0/start.sh
  chmod +x $HOME/redis_exporter-v1.70.0/stop.sh
  chmod +x $HOME/redis_exporter-v1.70.0/status.sh

  echo "Starting redis_exporter..."
  sudo systemctl daemon-reload
  sudo systemctl enable redis_exporter
  sudo systemctl start redis_exporter


  echo "install prometheus..."

  aws s3 cp s3://your-bucket-name/monitoring/prometheus-3.3.0.linux-amd64.tar.gz $HOME/prometheus-3.3.0.linux-amd64.tar.gz
  mkdir -p $HOME/prometheus-3.3.0 && tar -xvf $HOME/prometheus-3.3.0.linux-amd64.tar.gz -C $HOME/prometheus-3.3.0 --strip-components=1

  echo "Creating prometheus.yml..."
  cat << "EOF" > $HOME/prometheus-3.3.0/prometheus.yml
global:
  scrape_interval: 5s
  external_labels:
    monitor: "monitor"
scrape_configs:
  - job_name: "ktc"
    metrics_path: /ktc/actuator/prometheus
    scrape_interval: 5s
    static_configs:
      - targets: ["spring.ktc.com:12346"]
  - job_name: "node_exporter"
    static_configs:
      - targets: ["spring.ktc.com:9100"]
  - job_name: "redis_exporter_cluster_nodes"
    http_sd_configs:
      - url: http://localhost:9121/discover-cluster-nodes
        refresh_interval: 10m
    metrics_path: /scrape
    relabel_configs:
      - source_labels: [__address__]
        target_label: __param_target
      - source_labels: [__param_target]
        target_label: instance
      - target_label: __address__
        replacement: localhost:9121
  - job_name: "redis_exporter"
    static_configs:
      - targets:
        - localhost:9121

EOF

  mkdir -p $HOME/prometheus-3.3.0/log

  echo "Creating start.sh..."
  cat << "EOF" > $HOME/prometheus-3.3.0/start.sh
#!/bin/bash
LOG_PREFIX="$HOME/prometheus-3.3.0/log/prometheus.log"
mkdir -p "$(dirname "$LOG_PREFIX")"
$HOME/prometheus-3.3.0/prometheus \
    --config.file=$HOME/prometheus-3.3.0/prometheus.yml \
    --storage.tsdb.path=$HOME/prometheus-3.3.0/data \
    > >(split -b 100M -d - "$LOG_PREFIX") \
    2>&1 &
EOF

  echo "Creating stop.sh..."
  cat << "EOF" > $HOME/prometheus-3.3.0/stop.sh
#!/bin/bash
kill -9 $(ps aux | grep "prometheus" | grep -v grep | awk "{print $2}")
EOF

  echo "Setting prometheus permissions..."
  chmod +x $HOME/prometheus-3.3.0/start.sh
  chmod +x $HOME/prometheus-3.3.0/stop.sh

  echo "Starting prometheus..."
  $HOME/prometheus-3.3.0/start.sh

  echo "waiting for prometheus to start..."
  sleep 10


  echo "install Grafana..."
  aws s3 cp s3://your-bucket-name/monitoring/grafana-enterprise-11.6.1-1.x86_64.rpm $HOME/grafana-enterprise-11.6.1-1.x86_64.rpm

  # $HOME/grafana-enterprise-11.6.1-1 에 설치
  mkdir -p $HOME/grafana-enterprise-11.6.1-1
  sudo rpm -Uvh $HOME/grafana-enterprise-11.6.1-1.x86_64.rpm

  echo "create grafana start.sh..."
  sudo systemctl daemon-reload
  cat << "EOF" > $HOME/grafana-enterprise-11.6.1-1/start.sh
#!/bin/bash
sudo systemctl start grafana-server
EOF

  echo "create grafana stop.sh..."
  cat << "EOF" > $HOME/grafana-enterprise-11.6.1-1/stop.sh
#!/bin/bash
sudo systemctl stop grafana-server
EOF

  echo "create grafana status.sh..."
  cat << "EOF" > $HOME/grafana-enterprise-11.6.1-1/status.sh
#!/bin/bash
sudo systemctl status grafana-server
EOF

  sudo systemctl daemon-reload
  sudo systemctl enable grafana-server

  echo "Setting Grafana permissions..."
  chmod +x $HOME/grafana-enterprise-11.6.1-1/start.sh
  chmod +x $HOME/grafana-enterprise-11.6.1-1/stop.sh
  chmod +x $HOME/grafana-enterprise-11.6.1-1/status.sh

  echo "Starting Grafana..."
  $HOME/grafana-enterprise-11.6.1-1/start.sh

  echo "waiting for grafana to start..."
  sleep 10

  echo "Setting Grafana log symlink..."
  mkdir -p $HOME/grafana-enterprise-11.6.1-1/log
  sudo ln -s /var/log/grafana $HOME/grafana-enterprise-11.6.1-1/log

  echo "Setting Grafana provisioning..."
  sudo ln -s /etc/grafana/provisioning/ $HOME/grafana-enterprise-11.6.1-1/provisioning

  echo "add Grafana plugins.."
  sudo ln -s /var/lib/grafana/plugins $HOME/grafana-enterprise-11.6.1-1/plugins

  sudo aws s3 cp s3://your-bucket-name/monitoring/redis-app-2.2.1.zip $HOME/grafana-enterprise-11.6.1-1/plugins/
  sudo unzip $HOME/grafana-enterprise-11.6.1-1/plugins/redis-app-2.2.1.zip -d $HOME/grafana-enterprise-11.6.1-1/plugins/
  sudo aws s3 cp s3://your-bucket-name/monitoring/redis-datasource-2.2.0.zip $HOME/grafana-enterprise-11.6.1-1/plugins/
  sudo unzip $HOME/grafana-enterprise-11.6.1-1/plugins/redis-datasource-2.2.0.zip -d $HOME/grafana-enterprise-11.6.1-1/plugins/

  echo "add prometheus datasource localhost:9090"
  cat << "EOF" | sudo tee /etc/grafana/provisioning/datasources/prometheus.yaml
apiVersion: 1
datasources:
  - name: prometheus
    type: prometheus
    url: http://localhost:9090
    isDefault: true
    access: proxy
    readOnly: false
    orgId: 1
EOF

  echo "restart Grafana.."
  $HOME/grafana-enterprise-11.6.1-1/stop.sh
  echo "waiting for grafana to stop..."
  sleep 10

  $HOME/grafana-enterprise-11.6.1-1/start.sh
  echo "waiting for grafana to start..."
  sleep 10


  echo "install InfluxDB..."
  aws s3 cp s3://your-bucket-name/monitoring/influxdb-1.11.8.x86_64.rpm $HOME/influxdb-1.11.8.x86_64.rpm
  mkdir -p $HOME/influxdb-1.11.8.x86_64
  sudo rpm -Uvh $HOME/influxdb-1.11.8.x86_64.rpm

  echo "create influxdb start.sh..."
  cat << "EOF" > $HOME/influxdb-1.11.8.x86_64/start.sh
#!/bin/bash
sudo systemctl start influxdb
EOF

  echo "create influxdb stop.sh..."
  cat << "EOF" > $HOME/influxdb-1.11.8.x86_64/stop.sh
#!/bin/bash
sudo systemctl stop influxdb
EOF

  echo "create influxdb status.sh..."
  cat << "EOF" > $HOME/influxdb-1.11.8.x86_64/status.sh
#!/bin/bash
sudo systemctl status influxdb
EOF

  echo "Setting InfluxDB permissions..."
  chmod +x $HOME/influxdb-1.11.8.x86_64/start.sh
  chmod +x $HOME/influxdb-1.11.8.x86_64/stop.sh
  chmod +x $HOME/influxdb-1.11.8.x86_64/status.sh

  echo "Starting InfluxDB..."
  $HOME/influxdb-1.11.8.x86_64/start.sh

  echo "waiting for influxdb to start..."
  sleep 10

  echo "Creating InfluxDB databases..."
  influx -execute "CREATE DATABASE metrics"

'
EC2 인스턴스 생성 (k6)
K6 는 부하테스트를 수행하는 인스턴스이므로, 여러개의 인스턴스를 띄울 필요가 있다.
하나의 클라이언트(서버) 에서는 최대 65535 개의 소켓을 생성할 수 있으므로, 인스턴스는 많을 수록 좋다.
참고로, K6 는 JMeter 에 비해 매우 경량화된 Goroutine 기반이라 동시 유저 (VUs) 수를 JMeter 보다 이론 상 10배 이상 가져갈 수 있다.
이는 그만큼 더 부하를 많이 줄 수 있다는 의미가 된다.
물론 k6 의 공식 문서 상에서는 하나의 인스턴스 당 VUs 를 30,000 정도까지 처리할 수 있다고 명시되어 있기는 한데,
이 말인 즉슨 JMeter 는 가상 유저 수 (VUs)를 3000명을 넘기기 힘들다는 방증이 되기도 한다.
아래 K6 인스턴스는 Nginx 에 요청을 보내야 하므로 Nginx 의 private IP 와,
부하테스트 결과를 Monitoring (InfluxDB) 에 저장해야 하므로 monitoring 인스턴스의 IP 를 .sh.tpl 에 변수로 넘긴다.
variable "k6_instance_count" {
  description = "Number of EC2 instances to create"
  type        = number
  default     = 2
}

resource "aws_instance" "k6" {
  count                       = var.k6_instance_count  # 인스턴스 개수만큼 반복 생성
  ami                         = "ami-0a463f27534bdf246" # 사용할 AMI ID
  instance_type               = "t3.medium"              # 인스턴스 타입
  key_name                    = "your-ssh-key-name"        # SSH 키페어 이름
  subnet_id                   = aws_subnet.public.id # 생성된 서브넷 사용
  vpc_security_group_ids      = [aws_security_group.main_sg.id] # 생성된 보안 그룹 사용
  iam_instance_profile        = aws_iam_instance_profile.ec2_profile.name    # S3 읽기권한 허용
  depends_on = [
    aws_iam_role_policy_attachment.s3_readonly_attach,
    aws_iam_role_policy_attachment.ec2_describe_attach,
    aws_iam_role_policy_attachment.ssm_core_attach,
    aws_instance.redis,
    aws_instance.ktc,
    aws_instance.monitoring,
    aws_instance.nginx
  ]

  tags = {
    # 인스턴스 이름에 순번을 붙임 (예: k6-1, k6-2 ...)
    Name = "k6-${count.index + 1}"
    Role = "k6"
  }

  root_block_device {
    delete_on_termination = true           # 인스턴스 종료 시 EBS 볼륨 삭제
    volume_size = 8                        # 루트 볼륨 크기(GB)
    volume_type = "gp3"                   # 루트 볼륨 타입
  }

  monitoring        = false     # 상세 모니터링 비활성화 (기본 5분 단위)
  ebs_optimized     = false     # EBS 최적화 비활성화

  metadata_options {
    http_tokens                  = "required"   # IMDSv2 필수
    http_put_response_hop_limit  = 2            # 메타데이터 응답 홉 제한
    http_endpoint                = "enabled"    # 인스턴스 메타데이터 엔드포인트 활성화
    http_protocol_ipv6           = "disabled"   # IPv6 메타데이터 비활성화
    instance_metadata_tags       = "disabled"   # 인스턴스 메타데이터 태그 비활성화
  }

  # Use templatefile for user_data
  user_data = templatefile("${path.module}/scripts/k6_setup.sh.tpl", {
    nginx_private_ip = aws_instance.nginx.private_ip,
    monitoring_private_ip = aws_instance.monitoring.private_ip,
    instance_name = "k6-${count.index + 1}"
  })
}
k6_setup.sh.tpl
S3 에 저장된 k6 수행 스크립트를 다운받고,
/etc/hosts 에 nginx 의 private IP 를 등록해 바로 부하테스트를 수행할 수 있게 한다.
monitoring 의 private IP 는 나중에 SSM 을 통해 어떻게 부하테스트 결과 데이터를 저장하는지 따로 설명하겠다.
#!/bin/bash
# Set timezone to KST
sudo timedatectl set-timezone Asia/Seoul

# Add KTC host entry
echo "Adding KTC entry to /etc/hosts"
echo "${nginx_private_ip} spring.ktc.com" | sudo tee -a /etc/hosts
echo "Finished adding KTC entry to /etc/hosts"

echo "Adding monitoring entry to /etc/hosts"
echo "${monitoring_private_ip} monitoring.influxdb" | sudo tee -a /etc/hosts
echo "Finished adding monitoring entry to /etc/hosts"

# 모든 명령을 ec2-user 권한으로 실행
runuser -l ec2-user -c '
  # S3에서 k6 바이너리 다운로드 및 설치
  echo "Downloading and installing k6..."
  aws s3 cp s3://your-bucket-name/k6-v0.58.0-linux-amd64.tar.gz /tmp/k6.tar.gz
  cd /tmp
  tar -xzf k6.tar.gz
  sudo mv k6-v0.58.0-linux-amd64/k6 /usr/local/bin/k6
  sudo chmod +x /usr/local/bin/k6
  rm k6.tar.gz
  rm -rf k6-v0.58.0-linux-amd64
  echo "k6 installation complete."

  # k6 script 복사
  echo "k6 script copy start."
  aws s3 cp --recursive s3://your-bucket-name/k6-script/ /home/ec2-user/
  echo "k6 script copy complete."

  # test_name 값을 현재 인스턴스 이름으로 변경
  sed -i "s/ktc-basic-test/${instance_name}/g" /home/ec2-user/k6-sample.js
'
SSM 으로 여러 개의 K6 Instance 에 일괄 부하테스트 명령어 수행
K6 는 기본적으로 shell script 로 수행이 가능하다.
ex) k6 run k6-sample.js --out influxdb=http://monitoring.influxdb:8086/metrics
AWS 에서는 인스턴스에 자동화된 명령 수행을 위해 AWS Lambda 혹은 SSM 이라는 도구를 제공한다.
다만 AWS Lambda 는 API 에 특화된 도구라, API 를 제공하지 않는 k6 에 적용하려면 오히려 번거로운 상황이 발생해 SSM(AWS Systems Manager)을 사용한다.
그래서 SSM(AWS Systems Manager) 이란?
- AWS CLI 기반으로, 원격으로 인스턴스에 스크립트나 명령을 실행할 수 있게 한다.
- Shell Script 를 수행하는 형식이지만, 그렇다고 매번 SSH Key 기반으로 접속하는 과정이 필요없다.
- 띄워진 인스턴스들의 정보를 수집하고, 필터링하고, 특정 인스턴스들에게만 명령어를 수행할 수 있는 기능을 제공한다.
참고로, SSM 의 명령어 수행에 따른 과금 비용은 무시해도 될 만큼 매우 작다.
하루에 수만 건 이상 요청하지 않는 이상 그냥 넘어가자.
SSM 명령어 설명 전 가정
위 Terraform 코드로 EC2 인스턴스들을 띄웠다고 가정한다.
우리는 여기서 K6 인스턴스들에게 명령을 수행하라고 보내야 한다.
k6 인스턴스들이 잘 띄워졌다면, k6-1,k6-2,k6-3 ... 과 같은 Tag 가 붙어있을 것이다.
SSM 사전 준비
AWS CLI 에 연결된 상황이어야 하며, 아래 공식 가이드대로 수행한다.
가이드
설치 파일 다운로드 (Windows)
SSM 명령어 수행 예시
요구사항은 k6-* 라는 패턴의 태그명을 가진 EC2 인스턴스들에게 명령을 수행하는 것이다.
이는 --filters 로 필터링하고,
해당 인스턴스들에게 명령을 수행하려면 우선 InstanceId 를 가져와야 하는데, --query 로 이를 수행한다.
또한 region 을 지정하고 수행 결과값을 INSTANCE_IDS 라는 변수에 담는다.
위 과정을 수행했다면 aws ssm send-command 명령어로 특정 스크립트를 수행하도록 전송할 수 있다.
--document-name "AWS-RunShellScript" 라는 속성이 명시되어야 하며,
--targets "Key=InstanceIds,Values=$INSTANCE_IDS" 와 같이 변수에 지정한 타겟들을 지정한다.
--parameters 에는 실행할 shell script 를 넣으면 된다.
참고로, powershell 에서는 줄바꿈 인식이 잘 되지 않아, 별도 스크립트를 만들거나 bash terminal 에서 수행하는 것을 추천한다.
k6 를 수행하는 부하테스트 스크립트 작성법과 변수 지정법은 내가 작성한 아래 링크를 참고하자.
INSTANCE_IDS=$(aws ec2 describe-instances \
  --filters "Name=tag:Name,Values=k6-*" "Name=instance-state-name,Values=running" \
  --query "Reservations[*].Instances[*].InstanceId" \
  --output text \
  --region ap-northeast-2 | grep . | paste -s -d ',')

echo "Found Instance IDs (comma-separated): $INSTANCE_IDS"

aws ssm send-command \
  --document-name "AWS-RunShellScript" \
  --targets "Key=InstanceIds,Values=$INSTANCE_IDS" \
  --parameters '{
    "commands": [
      "cd /home/ec2-user",
      "STAGE1_DURATION=5s",
      "STAGE1_TARGET=5000",
      "STAGE2_DURATION=20s",
      "STAGE2_TARGET=10000",
      "STAGE3_DURATION=5s",
      "STAGE3_TARGET=0",
      "k6 run --env STAGE1_DURATION=$STAGE1_DURATION --env STAGE1_TARGET=$STAGE1_TARGET --env STAGE2_DURATION=$STAGE2_DURATION --env STAGE2_TARGET=$STAGE2_TARGET --env STAGE3_DURATION=$STAGE3_DURATION --env STAGE3_TARGET=$STAGE3_TARGET --out influxdb=http://monitoring.influxdb:8086/metrics k6-sample.js | tee >(split -b 10M -d - k6_log_)"
    ]
  }' \
  --comment "Run k6 load test (targeting by Instance IDs)" \
  --region ap-northeast-2