테스트 코드의 필요성
인턴 1차 프로젝트를 진행하면서 사수님께 코드리뷰를 받았고 그 중 하나의 조언이 테스트코드를 작성하라는 것이었다. 테스트 코드를 작성하기 전에는
- 코드 작성
- 코드 빌드 & 서버 실행
- 브라우저를 통해 요청
- 로그 확인 후 코드 수정
위 4가지 행동을 반복하면서 동작 테스트를 진행했다. 하지만 mock 객체를 이용해 controller 테스트 코드를 작성하면 복잡했던 테스트 절차가 간편해지고 더 빠르게 응답 결과에 대해 피드백 받을 수 있다.
테스트를 위한 부모클래스
@RunWith(SpringRunner.class)
@SpringBootTest(classes = IbssAdminApplication.class)
@FixMethodOrder(MethodSorters.NAME_ASCENDING)//junit은 어떤 유닛이 먼저 실행될지 모른다. 메서드명 오름차순으로 테스트 실행한다.
public class AbstractJunit {

    protected MediaType contentType = new MediaType(
            MediaType.APPLICATION_JSON.getType(),
            MediaType.APPLICATION_JSON.getSubtype(),
            Charset.forName("utf8")
    );
    //MockMvc 인스턴스를 생성할 때 필요
    @Autowired
    protected WebApplicationContext webApplicationContext;
    //Mock객체 세팅
    protected MockMvc mockMvc;
    protected MvcResult result;
    @Autowired
    protected ObjectMapper objectMapper;
    @SuppressWarnings("rawtypes")
    private HttpMessageConverter mappingJackson2HttpMessageConverter;

    @Autowired
    public void setConverters(HttpMessageConverter<?>[] converters) {
        this.mappingJackson2HttpMessageConverter = Arrays.asList(converters).stream().filter(
                converter -> converter instanceof MappingJackson2HttpMessageConverter).findAny().get();
    }

    @Before
    public void setup() throws Exception {
        this.mockMvc = webAppContextSetup(webApplicationContext).build();
    }

    @SuppressWarnings("unchecked")
    public String toJsonString(Object obj) throws IOException {
        MockHttpOutputMessage mockHttpOutputMessage = new MockHttpOutputMessage();
        this.mappingJackson2HttpMessageConverter.write(obj, MediaType.APPLICATION_JSON, mockHttpOutputMessage);
        return mockHttpOutputMessage.getBodyAsString();
    }

    /**
     * 특정 경로의 Json File을 Object형으로 반환한다.
     *
     * @param resourcePath json 파일 경로
     * @param returnType
     * @return
     * @throws Exception
     */
    protected <T> T getResourceObject(String resourcePath, Class<T> returnType) throws Exception {
        Resource resource = new ClassPathResource(resourcePath);
        return jsonMapper.readValue(resource.getInputStream(), returnType);
    }

}
@RunWith(SpringRunner.class)
Junit의 기본 러너 대신에 사용할 러너를 지정해주는 것이고, 지정된 러너는 Junit의 Life cycle method를 호출하는 책임도 갖고 있다. 실제로 테스트 할 클래스는 제공받은 Runner에게 던져져서, 러너에서 실행시키게 되는 것이다. SpringRunner.class는 SpringJUnit4ClassRunner의 alias 인데 SpringJUnit4ClassRunner은 JUnit's BlockJUnit4ClassRunner의 커스텀 확장버전이다. Junit 버전 4.12 이상이어야 사용가능하다.
@SpringBootTest
Junit5부터는 @RunWith을 사용하지 않고 @ExtendWith이라는 어노테이션을 사용해서 @ExtendWith(MyExtenstion.class)처럼 Extension 구현체를 지정해줄 수 있다. @RunWith에 비해 몇 가지 중요한 차이가 있다.
- 메타 어노테이션을 지원한다.
- 여러번 중복 사용할 수 있다.
이 중에서 메타 어노테이션으로 사용할 수 있다는 장점을 스프링 부트가 적극적으로 활용하면서 @ExtendWith을 생략할 수 있게 됐다. 따라서 @SpringBootTest 어노테이션의 소스 코드 일부에 @ExtendWith(SpringExtension.class)를 포함하고 있다.
MockMvc
테스트를 위해 브라우저나 WAS의 동작을 똑같이 처리해줄 수 있는 환경이다.
@SuppressWarnings("unchecked")
경고를 제외할 때에 사용되는 어노테이션이다.

만약 이 어노테이션을 지우면 노락색 경고 문구가 뜬다.

@Slf4j
@WithMockCustomUser(username = "2021081", password = "f")
@ActiveProfiles("local")
public class TnsEnterpriseListControllerTest extends AbstractJunit {

    MultiValueMap<String, String> params;

    @Before
    public void setUp() throws Exception{
        params = new LinkedMultiValueMap<>();
        params.add("notiRegDtSrt", "2011-03-02");
        params.add("notiRegDtEnd", "2011-03-02");
        params.add("p", "1");
        params.add("s", "30");
    }
    /**
     *
     * 컨트롤러 자체에는 단위 테스트가 필요할 만한 비지니스 로직이 존재하지 않는다.
     * 요청 경로와 처리 내용의 매핑이나 요청 데이터의 취득, 입력값 검사와 같은 부분은 스프링 MVC의 프레임워크 기능을 사용해야만
     * 그 처리결과가 제대로 됐는지 검증 가능하다. 따라서 컨트롤러의 테스트는 단위테스트라기 보단 통합테스트의 관점으로 봐야한다.
     *
     * @throws Exception
     */
    @Test
    public void 조회_TEST() throws Exception {

        this.mockMvc.perform(
                get("/stdservice/tnsenterpriselist.do?_method=listTnsEnterprise")
                        .params(params).contentType(this.contentType))
                .andExpect(status().isOk()) // 200 ok 인가?
                .andExpect(content().contentType(MediaType.APPLICATION_JSON)) // json 타입인가?
                .andExpect(jsonPath("$.code").value(200)) // "code" : 200 인가?
                .andExpect(jsonPath("$.data[0].entrNm").value("최준")) "data" : {["entrNm" : "최준"]} 인가?
                .andDo(print()); // 결과 출력
    }

    @Test
    public void 엑셀다운_TEST() throws Exception {

        this.mockMvc.perform(
                get("/stdservice/tnsenterpriselist.do?_method=downExcel")
                    .params(params))
                .andExpect(status().isOk())
                .andExpect(model().attributeExists("ExcelDto"))
                .andDo(print());
    }
}
@Test
@Test가 선언된 메소드는 테스트를 수행하는 메소드를 의미한다.
@Test마다 객체가 생성되어 각각의 @Test가 붙은 객체끼리 영향을 주지 않는다.
조회, 엑셀다운 test를 진행하기 위해 두 가지 메소드를 정의했다.
@Before
@Before가 선언된 메소드는 @Test 메소드가 실행되기 전에 반드시 실행된다.
조회, 엑셀다운 test 메소드에서 사용할 파라미터를 test 진행 전에 설정한다.
MockMvc 주요 메소드
-
perform : 가상의 요청을 처리한다. return값으로 ResultActions 객체를 받으며, 이 객체는 리턴 값을 검증하고 확인할 수 있는 andExpect()를 제공한다.
-
andExpect : 응답을 검증하는 역할을 한다.
상태 코드 검증 ( status() )
응답 본문 내용 검증 ( content() )
스프링 MVC 모델 상태 검증 ( model() ) -
andDo
전체 결과 출력 ( print() )
테스트 결과

HTTP servlet request에 대해서 기술되어있다.

HTTP 상태 코드, content type, body에 실제 데이터가 실려있는 것을 볼 수 있다.
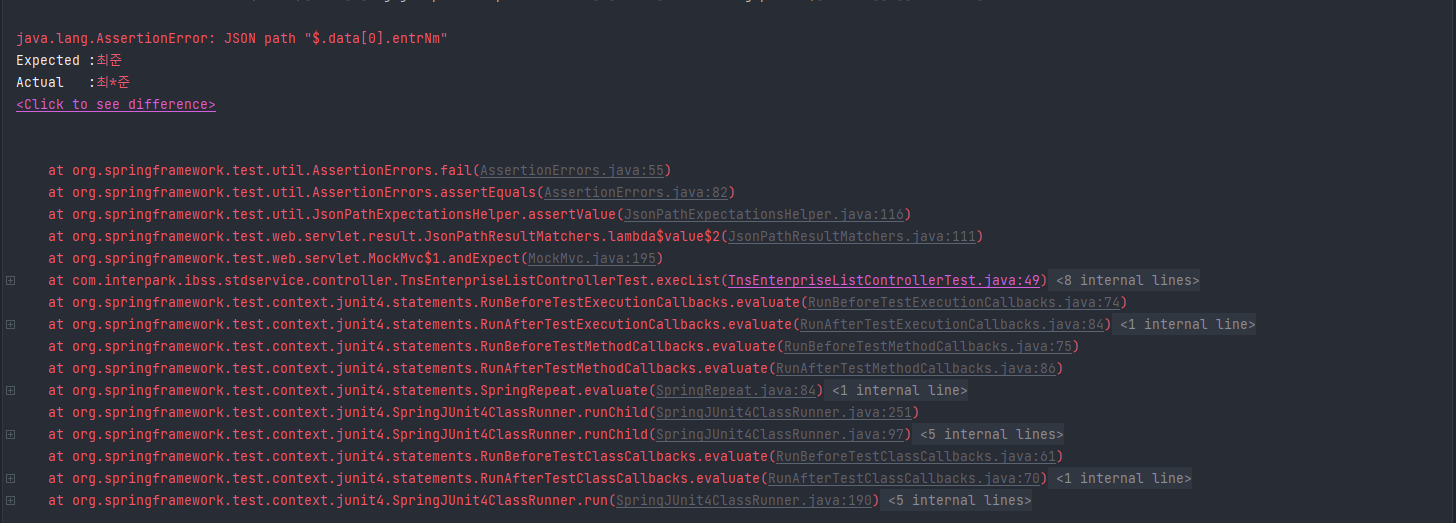
andExpect 메서드를 사용하여 미리 설정한 예상된 결과와 다를 시에 출력되는 오류 로그이다. Excpected가 예상된 결과값, Actual이 실제 결과값을 나타낸다.