
코루틴의 동작원리인 Continuation 과 CPS에 대한 사전지식이 있으면 이해가 좀 더 쉬울겁니다!
Continuation 을 잘 모르시는 분은 우테코 크루 빙티의 코루틴의 동작 원리 을 보고 와주세요 🙏
코틀린 코루틴의 생성, 실행 그리고 종료까지 개념적으로 큰 그림을 그려본 후, 코루틴 라이브러리에서 코드로 어떻게 구현해놨는지 알아보도록 하겠다.
개념: 코루틴 일대기
실행환경: kotlin: 2.1.0, kotlinxCoroutines : 1.10.1
CoroutineScope(Dispatcher.Default).launch {
	delay(100L)
}
지금부터 위 코드를 기준으로 코루틴의 일대기에 대해 설명하겠다~
- new (생성)

코루틴 스코프함수(CoroutineScope)를 통해 코루틴 컨택스트를 부여 받고, 코루틴 스코프의 확장함수인 코루틴 빌더함수(CoroutineScope.launch{}) 를 통해 생성된다.
-
active (실행 준비 & 실행)

생성된 코루틴은 부여받은 코루틴 컨택스트의 요소 중 하나인
코루틴 디스패처(CoroutineDispatcher)에 의해 스레드(Thread)로 분배되어 작업을 수행한다. -
active (중단/재개)
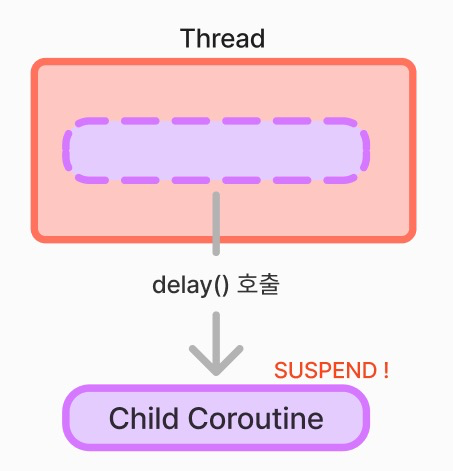
그러다, delay(100L) 와 같은 중단 지점을 만나면 잠시 중단(suspend)된다. 이때, 다른 코루틴이 실행 대기 상태라면 free 해진 스레드에 분배되어 실행될 것이다.
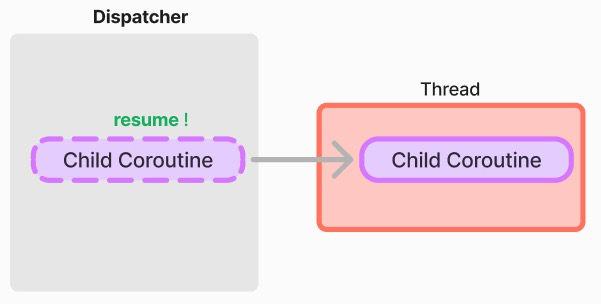
delay 가 종료되면 코루틴은 재개(resume)되고, Dispatcher 에 의해 다시 스레드에 분배되어 작업을 수행한다. 이때, 중단되기 전에 분배받은 스레드와 동일한 스레드임은 보장하지 않는다. 디스패처의 관리 하에 있는 스레드풀 내 놀고 있는 스레드에 분배받는다!
- completing & complete (완료 준비 & 완료)
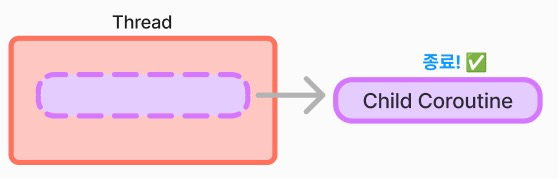
작업을 완수하면, 코루틴은 완료(Complete)되어 종료된다.
이렇듯, 코루틴은 코루틴 스코프, 코루틴 빌더, 정지/재개 매커니즘을 활용하여 Thread를 block 시키지 않고 효율적으로 동시성 프로그래밍을 지원한다.
이제, 코드적으로 코루틴이 어떻게 생성, 실행, 정지, 재개, 종료되는지 살펴보자 💪
1. New (코루틴 생성)
코루틴은 CoroutineScope.launch{} 에서 생성되고 실행된다.
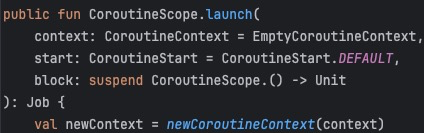
먼저, 코루틴 생성 부분에 해당하는 launch 코드를 살펴보자!
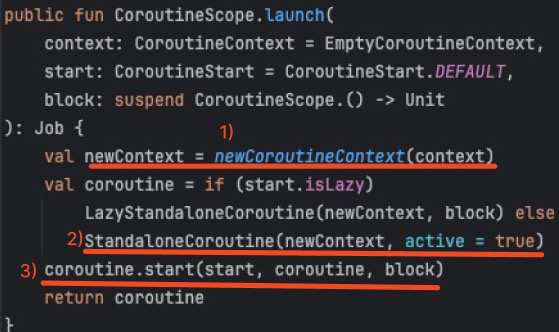
context: CoroutineContext: 생성될 코루틴의 부모 컨텍스트를 설정한다. 생성될 코루틴은 부모 컨텍스트를 상속받아 사용한다. (Job 제외 🚨)start: CoroutineStart: 코루틴의 시작 전략을 정의한다.CoroutineStart.Default을 기본으로 지정하고 있다. 이는 코루틴을 생성하자 마다 실행하겠다는 것을 의미한다.block: suspend CoroutineScope.() -> Unit: 실행할 코루틴 블록이다. 코루틴 스코프 확장 람다 형식으로 되어 있어, 코루틴은 코루틴 스코프의 관리하에 실행된다는 것을 암시적으로 알 수 있다.
이제 내부 코드를 하나씩 살펴볼 것이다.
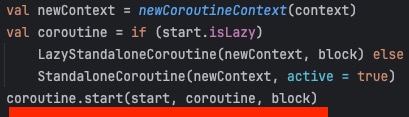
newCoroutineContext -> StandaloneCoroutine 순으로 살펴보겠다.
1-1) newCoroutineContext
newCoroutineContext() 에 context(코루틴 컨텍스트)를 넘겨주고 있다.

함수 이름 그대로 코루틴 컨텍스를 생성하고 있는데, 눈여겨볼 곳이 2군데 있다 👀
먼저, newCoroutineContext() 내부를 보면 foldCopies 를 통해 CoroutineScope 의 코루틴 컨텍스트와 넘겨준 코루틴 컨택스트를 합치고 있다.
개념 파트에서, 코루틴스코프가 자식 코루틴에게 Context 를 제공한다는 것을 기억하는가?
바로 이 부분에서 자식 코루틴에게 Context를 제공하는 것이다.
두번째로는 디스패처를 지정하지 않으면, Dispatchers.Default를 부여하고 있는 것을 확인할 수 있다.
✅ 코루틴 스코프는 자식 코루틴에게 코루틴 컨택스트를 제공한다
✅ 코루틴 디스패처를 지정하지 않으면,Dispatcher.Default가 디스패처로 지정된다.
1-2) StandaloneCoroutine
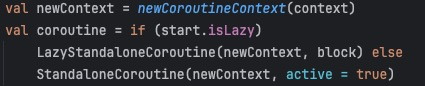
실제로 생성된 코루틴은 바로 StandaloneCoroutine 요 녀석이다.

active 값을 true로 지정하여 Job State 의 isActive를 true로 지정해주었다.
그리고, StandaloneCoroutine 의 super 인 AbstractCoroutine, JobSupport 의 내부 코드를 살펴보면 initParent 값과 넘겨준 context를 활용하여 구조화를 한다.

그리고, 넘겨준 context와 자기 자신을 더하여 코루틴 컨텍스트를 생성한다.

이를 통해, 코루틴 컨텍스트 중 Job만 유일하게 상속이 안된다는 것을 알 수 있다.
✅ 코루틴은 구조화된 동시성 메커니즘을 따른다.
✅ 코루틴 컨텍스트는 Job을 제외하고 자식에게 모두 상속된다.
⭐️ ContinuationInterceptor
public interface ContinuationInterceptor : CoroutineContext.Element {

    public fun <T> interceptContinuation(continuation: Continuation<T>): Continuation<T>
ContinuationInterceptor 는 코루틴 컨텍스트의 요소 중 하나이다.
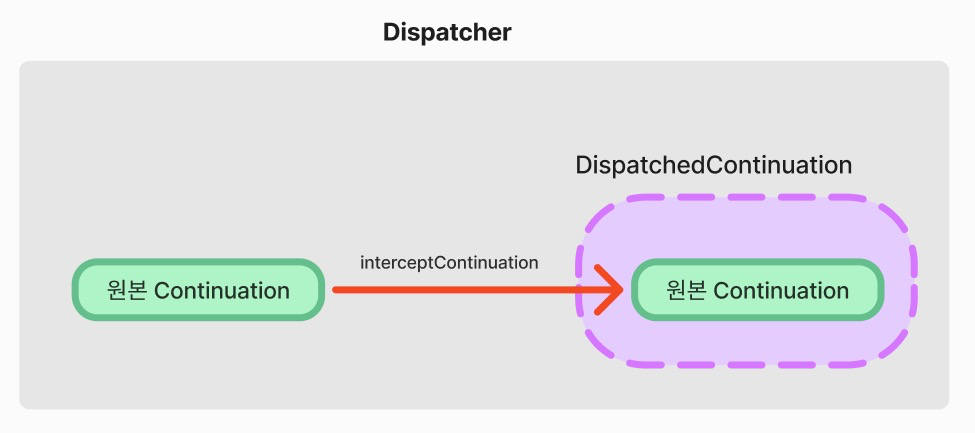
ContinuationInterceptor 는 이름 그대로 Continuation을 가로채서 특정 작업을 해주는 코루틴 컨텍스트이다. 그리고, 그 일련의 작업을 interceptContinuation을 통해 해준다.
interceptContinuation 은 매개변수로 넘어오는 원본 Continuation 을 가로채고, 새로운 Continuation 로 wrapping 하여 특정 작업을 추가해준 후 반환한다. (Decorate Pattern )
ContinuationInterceptor 의 대표 구현체로는 CoroutineDispatcher가 있다.
class CoroutineDispatcher:
 AbstractCoroutineContextElement(ContinuationInterceptor), ContinuationInterceptor {{

	public final override fun <T> interceptContinuation(continuation: Continuation<T>): Continuation<T> =
        DispatchedContinuation(this, continuation)
}
Dispatcher 는 interceptContinuation 을 통해 원본 continuation 을 DispatchedContinuation 로 wrapping해주고 있다.
그럼 이제, DispatchedContinuation에 내부 코드를 살펴보자
internal class DispatchedContinuation<in T>(
    @JvmField internal val dispatcher: CoroutineDispatcher,
    @JvmField val continuation: Continuation<T>
) : DispatchedTask<T>(MODE_UNINITIALIZED), CoroutineStackFrame, Continuation<T> by continuation {
	...

    override fun resumeWith(result: Result<T>) {
        val state = result.toState()
        if (dispatcher.safeIsDispatchNeeded(context)) {
            _state = state
            resumeMode = MODE_ATOMIC
            dispatcher.safeDispatch(context, this)
        } else {
            executeUnconfined(state, MODE_ATOMIC) {
                withCoroutineContext(context, countOrElement) {
                    continuation.resumeWith(result)
                }
            }
        }
    }
}

internal fun CoroutineDispatcher.safeDispatch(context: CoroutineContext, runnable: Runnable) {
    try {
        dispatch(context, runnable)
    } catch (e: Throwable) {
        throw DispatchException(e, this, context)
    }
}
DispatchedContinuation 의 resumeWith() 함수를 보자.
코루틴이 재개(resume)할 때, dispatcher.safeDispatch(context, this) 함수를 호출하고 있다. 이때,DispatchedContinuation 자기 자신을 넘기는 것을 확인할 수 있다. 이는 DispatchedContinuation 가 Runnable 을 상속하고 있어 가능하다.
상속 구조) DispatchedContinuation ---> DispatchedTask ---> (SchedulerTask == Task) ---> Runnable그리고, super class 인 DispatchedTask 의 run() 함수 내부 코드를 확인해보자
internal abstract class DispatchedTask<in T> internal constructor(
    @JvmField var resumeMode: Int
) : SchedulerTask() {
    internal abstract val delegate: Continuation<T> {

		final override fun run() {
	        try {
    	        val delegate = delegate as DispatchedContinuation<T>
        	    val continuation = delegate.continuation
	            withContinuationContext(continuation, delegate.countOrElement) {
    	            val context = continuation.context
        	        val state = takeState()
            	    val exception = getExceptionalResult(state)
                	val job = if (exception == null && resumeMode.isCancellableMode) context[Job] else null
	                if (job != null && !job.isActive) {
    	                val cause = job.getCancellationException()
        	            cancelCompletedResult(state, cause)
            	        continuation.resumeWithStackTrace(cause)
               	 } else {
                	    if (exception != null) {
                    	    continuation.resumeWithException(exception)
	                    } else {
    	                    continuation.resume(getSuccessfulResult(state))
        	            }
                }
            }
        }
    }
}
내부에서 실행 시 continuation.resumeXXX() 함수를 호출하여 코루틴을 실행하고 있다.
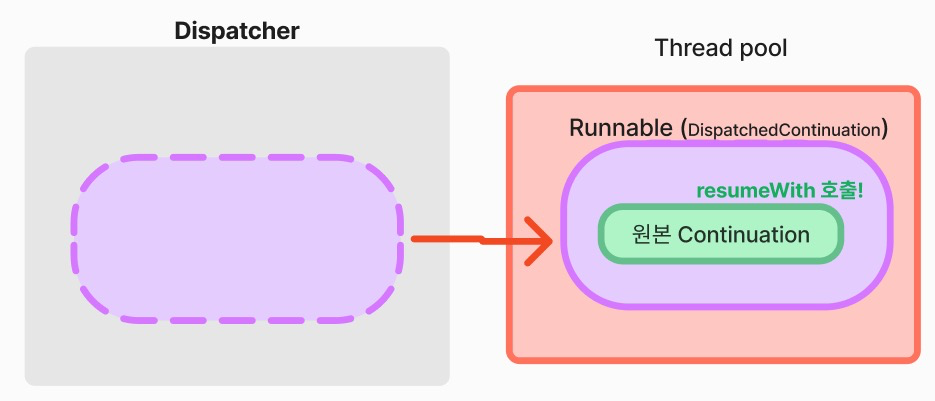
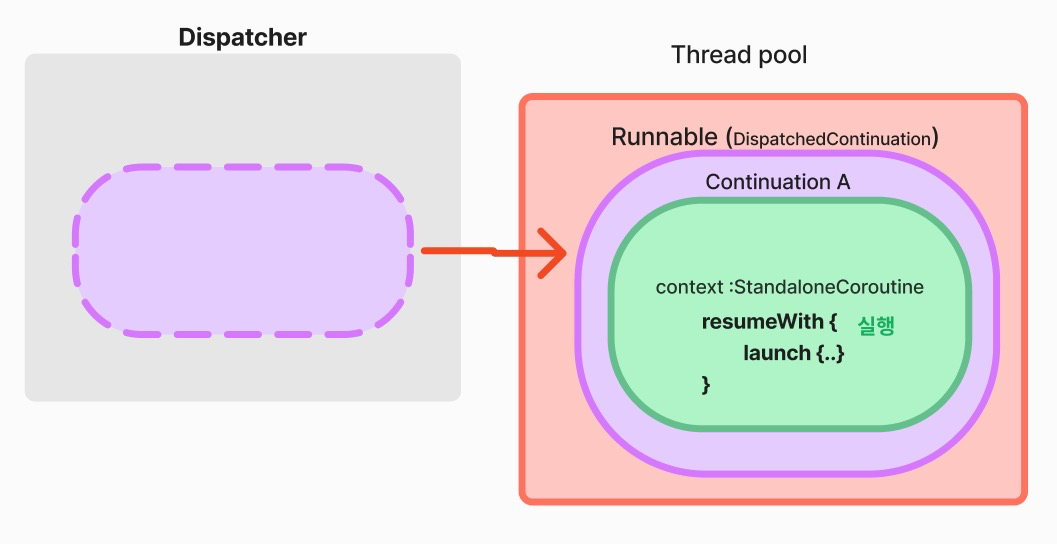
⭐️ 정리하자면, Dispatcher 는
interceptContinuation를 통해 Continuation 을 실행 가능한Runnable한 형태로 변환한 후, 적절한 스레드풀 내에 코루틴을 분배한다는 것이다!
참고로, 일반 디스패처의 경우에는
dispatcher.safeIsDispatchNeeded가 기본적으로 true 이지만, Dispatchers.UnConfined 의 경우false이다.
Dispatchers.UnConfined 의 경우에는 dispatch 과정없이 바로 실행된다!
그럼, 이제 다시 "코루틴 실행 준비 & 실행"에 대해 알아보자
2) Active(코루틴 실행 준비 & 실행)
코루틴을 생성했으니,이제 시작하면 된다!

StandaloneCoroutine의 super인 AbstractCoroutine.start() 확장 함수를 통해 시작된다. 내부에서는 CoroutineStart 의 invoke() 함수를 호출한다.

CoroutineStart.Default 이기 때문에 block.startCoroutineCancellable 을 호출한다.
depth 깊어져서 헷갈릴 수 있어, 파라미터 값을 정리해보자.
- block :
launch{..}내부 코드 - receiver : StandaloneCoroutine
- completion : StandaloneCoroutine

createCoroutineUnintercepted() -> intercepted() -> resumeCancellableWith() 순으로 설명하겠다.
createCoroutineUnintercepted()
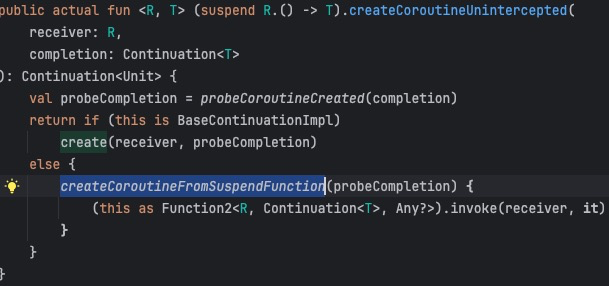
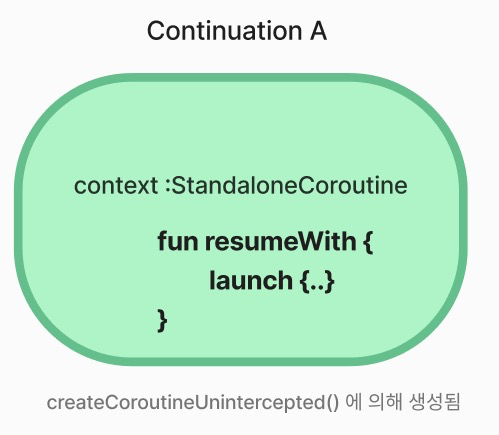
createCoroutineUnintercepted 는 completion 과 suspend 함수나 suspend 람다를 wrapping 하여 Continuation 객체로 변환하는 함수이다.
즉, Continuation 의 context 를 StandaloneCoroutine 으로 지정하고, resume 하게 되면 launch{..} 코드가 실행되도록 Wrapping 한 것이라 생각하면 된다.
intercept 과정을 생략하고 Continuation 으로 변환한 이유가 궁금한데..
오버헤드를 줄이기 위해 intercept 과정을 생략한 것으로 추측된다.
자세한 내용을 아시는 분은 댓글로 남겨주세요 🙏
Continuation.intercepted()

class ContinuationImpl {
    ...
  public fun intercepted(): Continuation<Any?> =
    intercepted
      ?: (context[ContinuationInterceptor]?.interceptContinuation(this) ?: this)
        .also { intercepted = it }
}
ContinuationImpl.intercepted() 코드를 보면 위에서 배운 ContinuationInterceptor 를 가져오고 있다.
CoroutineScope(Dispatchers.Default).launch{..}우리는 코드에서 Dispatcher.Default 를 지정해준바 있고, Dispatcher 는 ContinuationInterceptor 를 상속하고 있기 때문에 context[ContinuationInterceptor] 는 Dispatchers.Default를 뜻한다.
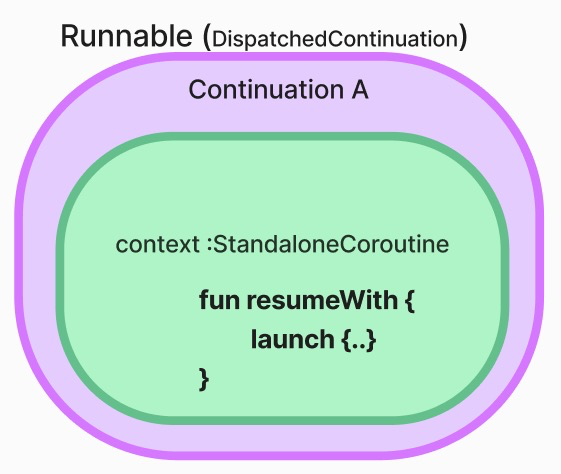
그리고, interceptContinuation(this) 가 DispatchedContinuation 로 래핑되어 반환된다는 것도 배웠다.
결국 intercepted() 의 반환값은 DispatchedContinuation 인 것이다.
Continuation.resumeCancellableWith
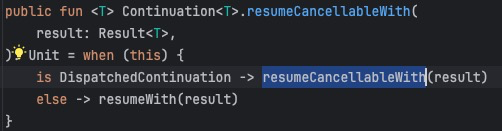
현재 Continuation 은 DispatchedContinuation 이므로 바로 resumeCancellableWith(result)를 호출한다. (resumeCancellableWith 은 resumeWith 과 거의 동일한 함수이다.)
이제 실행 준비는 끝났다!
Dispatcher 로 DispatchedContinuation 보내지고, 적절한 스레드에 분배되면 launch{..} 코드가 실행될 것이다 👍
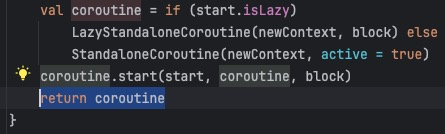
이제 다시 launch{..} 함수로 돌아와 StandaloneCoroutine을 반환해준다.
3) Active (코루틴 중단/재개)
CoroutineScope(Dispatcher.Default).launch {
    println("시작!")
	delay(100L)	 // 정지!
}
디스패처에 의해 분배받은 스레드에서 launch {..} 코드가 동작하다가 delay(100L) 를 만났다.
public suspend fun delay(timeMillis: Long) {
    if (timeMillis <= 0) return // don't delay
    return suspendCancellableCoroutine sc@ { cont: CancellableContinuation<Unit> ->
        // if timeMillis == Long.MAX_VALUE then just wait forever like awaitCancellation, don't schedule.
        if (timeMillis < Long.MAX_VALUE) {
            cont.context.delay.scheduleResumeAfterDelay(timeMillis, cont)
        }
    }
}
delay() 는 suspendCancellableCoroutine() 로 구성되어 있다. suspendCancellableCoroutine() 는 호출자의 람다 블럭({..})내부에서 resumeWith을 호출할 때까지 호출자의 continuation을 중단(suspend)시키는 함수이다.
따라서, delay()를 호출하면 곧바로 Coroutine은 중지되고, Thread는 free해진다.
이제 눈여겨볼 코드는 cont.context.delay.scheduleResumeAfterDelay(timeMillis, cont) 이다.
internal val CoroutineContext.delay: Delay get() = get(ContinuationInterceptor) as? Delay ?: DefaultDelay

// ⬇️ DefaultDelay()

@PublishedApi
internal actual val DefaultDelay: Delay = initializeDefaultDelay()

// ⬇️ initializeDefaultDelay()

private fun initializeDefaultDelay(): Delay {
   if (!defaultMainDelayOptIn) return DefaultExecutor
   val main = Dispatchers.Main // 안드로이드에서는 HandlerContext 다!
   return if (main.isMissing() || main !is Delay) DefaultExecutor else main
}

// ⬇️ DefaultExecutor

internal actual object DefaultExecutor : EventLoopImplBase(), Runnable {
   const val THREAD_NAME = "kotlinx.coroutines.DefaultExecutor"
   ..
내부 코드를 따라가면 DefaultExecutor 에서 scheduleResumeAfterDelay 를 호출하고 있다. 즉, delay(1000) 초를 호출하면 DefaultExecutor 는 1000ms 초 이후에 continuation을 resume 하도록 task를 만들어 Schedule 해놓는다.
Android 에서는 DefaultExecutor 가 아닌
HandlerContext가 Delay 구현체이다. 이는 추후 다른 포스팅에서 다루겠다!
실제로 resume 되는 코드는 CancellableContinuationImpl.resumeImpl() 함수 내부이다.
이정도까지는 알 필요 없는 것 같다 😂
1000ms 가 지나면 continuation 이 다시 resume 된다. continuation 은 DispatchedContinuation 을 Wrapping 하고 있는 CancallableContinuationIpl 인데, 내부적으로 DispatchedContinuation.resumeWith()을 호출하여 디스패처에 의해 다시 스레드에 분배되어 실행된다.

4) Complete (코루틴 완료!)
코루틴은 모든 작업을 마치면 순차적으로 wrapping 되어 있는 Continuation 객체들의 resource 를 해제시킨다. 그리고, StandaloneCoroutine 의 상태를 completed 로 바꾼 후 resource를 해제한다.
따로 정리할 필요성이 느껴지지 않아, 몇가지 키워드만 남겨두어야겠다.(나중에 궁금할 수도 있느니)
BaseContinuationImpl.resumeWithCoroutineDispatcher.releaseInterceptedContinuationAbstractCoroutine.resumeWith→JobSupport.makeCompletingOnce
후기
아마 이 포스팅을 보고 "이 사람 왜 이렇게 쓸데없는 짓을 하지??" 라고 생각할 수도 있다.
솔직히 나도 그 생각에 공감한다. 코루틴의 모든 내부 구현 코드를 보고 분석하는 것은 체력적으로도 너무 힘들고, 사실 굳이 그렇게까지 할 필요가 없기 때문이다. 😫
그런데도 내가 이렇게 코루틴의 내부 구현 코드를 까보고 정리하게 된 이유는, 특정 라이브러리를 사용하다가 예상치 못한 버그를 마주했기 때문이다. 단순히 표면적으로 드러난 문제를 분석해선 해결이 안 됐고, 결국 코루틴의 내부 구조를 들여다보는 과정에서야 버그의 진짜 원인을 알 수 있었다.
해당 버그가 무엇이었는지는 추후 포스팅으로 다루겠다 😉