
본 내용은 내일배움캠프에서 활동한 내용을 기록한 글입니다.
💻 TIL(Today I Learned)
📌 Today I Done
✏️ TypeORM 소개 및 설치
-
TypeORM은 지금까지 계속 Epxress에서 사용하던 Prisma와 비슷하다고 생각하면 됨
-
똑같이 TypeScript 코드를 통해서 데이터베이스(Repository)와 소통할 수 있게 해주는 것
-
설치 명령어
npm i @nestjs/typeorm typeorm mysql2- app.module.ts에서 기본적인 TypeORM를 적용한 코드
import { Module } from '@nestjs/common';
import { TypeOrmModule } from '@nestjs/typeorm';

import { AppController } from './app.controller';
import { AppService } from './app.service';
import { Post } from './post/entities/post.entity';
import { PostModule } from './post/post.module';

@Module({
  imports: [
    TypeOrmModule.forRoot({
      type: 'mysql',
      host: 'localhost',
      port: 3306,
      username: '여러분들의 데이터베이스 아이디',
      password: '여러분들의 데이터베이스 비밀번호',
      database: 'board',
      entities: [Post],
      synchronize: true,
    }),
    PostModule,
  ],
  controllers: [AppController],
  providers: [AppService],
})
export class AppModule {}
✏️ @nestjs/config를 통해 환경변수 사용하기
- 패키지 설치 명령어
npm i @nestjs/config joi- app.module.ts에서 환경 변수를 적용한 코드
import Joi from 'joi';

import { Module } from '@nestjs/common';
import { ConfigModule, ConfigService } from '@nestjs/config';
import { TypeOrmModule, TypeOrmModuleOptions } from '@nestjs/typeorm';

import { AppController } from './app.controller';
import { AppService } from './app.service';
import { Post } from './post/entities/post.entity';
import { PostModule } from './post/post.module';

const typeOrmModuleOptions = {
  // useFactory는 동적 모듈의 속성을 설정하기 위해 사용
  // useFactory에서 ConfigService를 주입받아 환경변수(.env)로부터
  // 데이터베이스 설정값을 가져와서 TypeOrmModuleOptions 객체를 반환함
  useFactory: async (
    configService: ConfigService,
  ): Promise<TypeOrmModuleOptions> => ({
    type: 'mysql',
    host: configService.get('DB_HOST'),
    port: configService.get('DB_PORT'),
    username: configService.get('DB_USERNAME'),
    password: configService.get('DB_PASSWORD'),
    database: configService.get('DB_NAME'),
    entities: [Post],
    synchronize: configService.get('DB_SYNC'),
    logging: true,
  }),
  // useFactory에서 사용할 의존성을 주입받기 위해 사용
  inject: [ConfigService],
};

@Module({
  imports: [
    // forRoot는 ConfigModule의 정적인(하드코딩된) 기초 설정을 위해 사용
    // 여기서는 Joi를 통한 유효성 검사 설정
    ConfigModule.forRoot({
      isGlobal: true,
      validationSchema: Joi.object({
        DB_HOST: Joi.string().required(),
        DB_PORT: Joi.number().required(),
        DB_USERNAME: Joi.string().required(),
        DB_PASSWORD: Joi.string().required(),
        DB_NAME: Joi.string().required(),
        DB_SYNC: Joi.boolean().required(),
      }),
    }),
    // forRootAsync는 TypeOrmModule의 동적인 기초 설정을 위해 사용 (환경변수나 데이터베이스)
    TypeOrmModule.forRootAsync(typeOrmModuleOptions),
    PostModule,
  ],
  controllers: [AppController],
  providers: [AppService],
})
export class AppModule {}-
@nestjs/config패키지를 통한 각종 메서드나 구조에 대한 설명이 아래 블로그에 자세히 설명되어 있음 (공식 문서의 설명이 이해하기 어려워 다른 자료를 찾아봄)
✏️ 엔티티 생성
-
엔티티는 데이터베이스의 특정 테이블을 대표하는 객체
-
이 객체를 통해서 ORM 프레임워크가 데이터베이스와 통신함
-
엔티티는 통해 생성된 객체를 하나의 레코드(튜플, 로우)를 의미
-
그 객체가 어떤 컬럼으로 구성되어 있는지 class에 정의되어 있음
// Post 클래스로 생성되는 객체를 하나의 레코드(튜플, 로우)를 의미
// 그 객체가 어떤 컬럼으로 구성되어 있는지 class에 정의되어 있음

import { IsNumber, IsString } from 'class-validator';
import {
  Column,
  CreateDateColumn,
  DeleteDateColumn,
  Entity,
  PrimaryGeneratedColumn,
  UpdateDateColumn,
} from 'typeorm';

// 엔티티 === 테이블 명을 정의하는 데코레이터
@Entity({
  name: 'posts',
})
export class Post {
  // Primary Key로 사용하고 autoIncrement()를 한다는 의미의 데코레이터
  @PrimaryGeneratedColumn()
  id: number;

  // 컬럼의 타입을 의미하는 데코레이터
  @IsString()
  // 컬럼의 속성을 설정하는 데코레이터 (일반적인 기본 컬럼을 정의할때 사용)
  @Column('varchar', { length: 50, nullable: false })
  title: string;

  @IsString()
  @Column('varchar', { length: 1000, nullable: false })
  content: string;

  @IsNumber()
  // select: false는 연산 시 기본적으로 password를 빼고 보여주겠다는 의미
  // 명시적으로 작성해야 보여줌
  @Column('int', { select: false, nullable: false })
  password: number;

  // 레코드가 생성되는 날짜가 자동으로 기록되는 데코레이터
  @CreateDateColumn()
  createdAt: Date;

  // 레코드가 수정되는 날짜가 자동으로 기록되는 데코레이터
  @UpdateDateColumn()
  updatedAt: Date;

  // 레코드가 삭제되는 날짜가 자동으로 기록되는 데코레이터 (Soft Delete)
  // ?는 Nullable이라는 의미
  @DeleteDateColumn()
  deletedAt?: Date;
}- Post 모듈에서 사용할 엔티티를 설정
import { Module } from '@nestjs/common';
import { TypeOrmModule } from '@nestjs/typeorm';

import { Post } from './entities/post.entity';
import { PostController } from './post.controller';
import { PostService } from './post.service';

@Module({
  // 현재 모듈(PostModule)에서 사용할 엔티티를 설정
  // PostService와 같은 다른 곳에서 Repository를 통해 Post에 접근 가능
  // PostService에서 @InjectRepository(Post) 데코레이터를 사용하면
  // Post 엔티티에 대한 Repository를 주입받을 수 있음
  imports: [TypeOrmModule.forFeature([Post])],
  controllers: [PostController],
  providers: [PostService],
})
export class PostModule {}
✏️ 레포지토리 생성
-
레포지토리는 DDD(Domain-Driven Design)에서 나온 개념 중 하나로, 엔티티와 데이터베이스 간의 중간 계층을 형성하는 객체
-
프로그래머는 데이터베이스와의 통신 과정을 몰라도 추상화된 레포지토리의 함수가 데이터베이스에서 원하는 결과를 가져올 수 있게 함
-
레포지토리를 주입받은 post.service.ts 코드 일부 (생성자를 통해 레포지토리 생성)
  constructor(
    // @InjectRepository는 어떤 엔티티(테이블)을 주입해서 사용할지 정의하는 데코레이터
    @InjectRepository(Post) private postRepository: Repository<Post>,
  ) {}
✏️ TypeORM을 적용한 post.service.ts 전체 코드
import _ from 'lodash';
import { Repository } from 'typeorm';

import {
  BadRequestException,
  Injectable,
  NotFoundException,
  UnauthorizedException,
} from '@nestjs/common';
import { InjectRepository } from '@nestjs/typeorm';

import { CreatePostDto } from './dto/create-post.dto';
import { RemovePostDto } from './dto/remove-post.dto';
import { UpdatePostDto } from './dto/update-post.dto';
import { Post } from './entities/post.entity';

@Injectable()
export class PostService {
  private articles: { id: number; title: string; content: string }[] = [];
  private articlePasswords = new Map<number, number>();

  constructor(
    // @InjectRepository는 어떤 엔티티(테이블)을 주입해서 사용할지 정의하는 데코레이터
    @InjectRepository(Post) private postRepository: Repository<Post>,
  ) {}

  async create(createPostDto: CreatePostDto) {
    return (await this.postRepository.save(createPostDto)).id;
  }

  async findAll() {
    return await this.postRepository.find({
      where: { deletedAt: null },
      select: ['id', 'title', 'updatedAt'],
    });
  }

  async findOne(id: number) {
    if (_.isNaN(id)) {
      throw new BadRequestException('게시물 ID가 잘못되었습니다.');
    }

    return await this.postRepository.findOne({
      where: { id, deletedAt: null },
      select: ['title', 'content', 'updatedAt'],
    });
  }

  async update(id: number, updatePostDto: UpdatePostDto) {
    if (_.isNaN(id)) {
      throw new BadRequestException('게시물 ID가 잘못되었습니다.');
    }

    const { content, password } = updatePostDto;
    const post = await this.postRepository.findOne({
      where: { id },
      select: ['password'],
    });

    if (_.isNil(post)) {
      throw new NotFoundException('게시물을 찾을 수 없습니다.');
    }

    if (!_.isNil(post.password) && post.password !== password) {
      throw new UnauthorizedException('비밀번호가 일치하지 않습니다.');
    }

    await this.postRepository.update({ id }, { content });
  }

  async remove(id: number, removePostDto: RemovePostDto) {
    if (_.isNaN(id)) {
      throw new BadRequestException('게시물 ID가 잘못되었습니다.');
    }

    const { password } = removePostDto;

    const post = await this.postRepository.findOne({
      select: ['password'],
      where: { id },
    });

    if (_.isNil(post)) {
      throw new NotFoundException('게시물을 찾을 수 없습니다.');
    }

    if (!_.isNil(post.password) && post.password !== password) {
      throw new UnauthorizedException('비밀번호가 일치하지 않습니다.');
    }

    return this.postRepository.softDelete({ id });
  }
}
✏️ .env 파일 및 데이터베이스 생성 (로컬 DB)
- .env 파일
DB_HOST="여러분들이 사용하는 데이터베이스 주소"
DB_PORT=3306
DB_USERNAME="데이터베이스 계정"
DB_PASSWORD="데이터베이스 암호"
DB_NAME="board"
DB_SYNC=true-
로컬 서버로 진행할 경우에는 본인 컴퓨터에 MySQL을 설치해야 함 (설치 과정은 구글링....)
-
MySQL이 설치되어 있다면 CMD창에서 다음과 같은 명령어를 입력
mysql -uroot -p-
다음은 비밀번호를 입력하면 다음과 같은 형태의 모습으로 바뀜
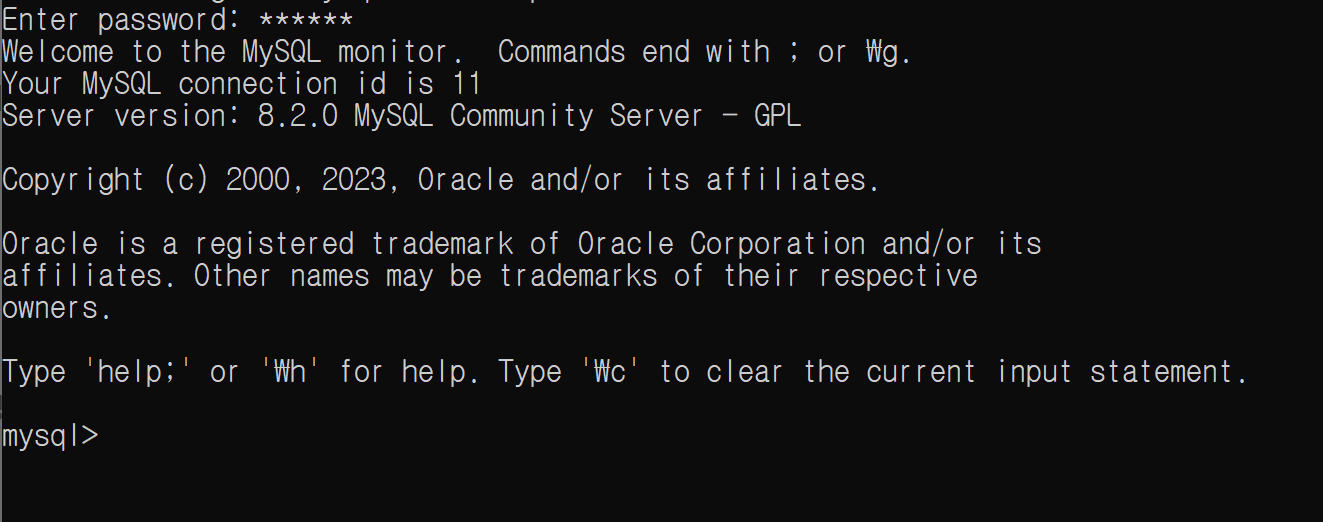
-
마지막으로 데이터베이스를 생성하면 끝!
mysql> create database board;✏️ .env 파일 및 데이터베이스 생성 (AWS RDS)
- .env 파일
DB_HOST="여러분들이 사용하는 데이터베이스 주소"
DB_PORT=3306
DB_USERNAME="데이터베이스 계정"
DB_PASSWORD="데이터베이스 암호"
DB_NAME="board"
DB_SYNC=true-
AWS의 RDS를 데이터베이스로 사용한다면
DB_HOST자리에 해당 RDS의 엔드포인트 주소를 입력하면 됨 -
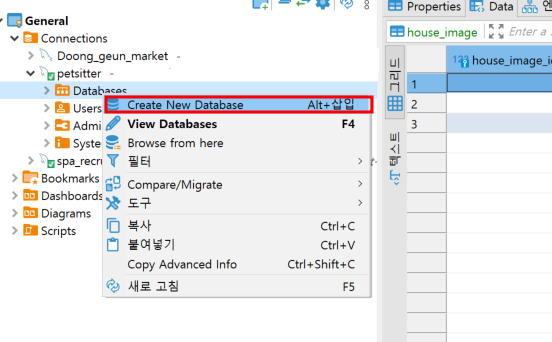
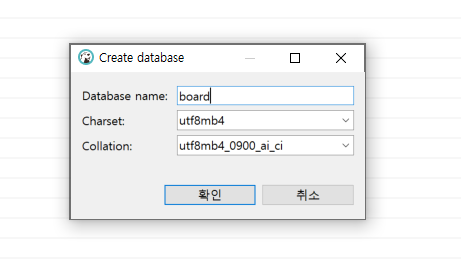
그리고 데이터베이스 생성은 MySQL 워크벤치나 DBeaver 등을 사용해서 직접
board라는 데이터베이스를 생성해야 함 (커넥션 이름은 무시해도 됨)
✏️ 서버 실행
- 서버 실행
npm run start📌 Tomorrow's Goal
✏️ 개인과제 기본 설계 및 코드 구현
-
Nest.js 프로젝트 생성, 깃허브 연결 등과 같은 기본적인 프로젝트 세팅을 진행할 예정
-
그리고 프로젝트에 대한 ERD와 API 명세서도 구상해서 작성할 예정
-
기본적인 설계 뿐만 아니라 세팅한 것들이 잘 돌아가는지 웹 서버를 구동할 예정
-
가능하다면 추가적인 몇가지 API도 구현할 예정
-
일단 주말 안으로 진행할 예정
📌 Today's Goal I Done
✔️ Nest.js 강의 시청
-
오늘은 TypeORM 실습을 해보는 4주차 강의를 학습함
-
TypeORM이 처음은 너무 많은 걸 지원해줘서 어려웠음
-
하지만 복잡해도 코드가 간단해질 수 있는 기능들이 있기에 활용하기 나름일 것 같음
-
강의에서 진행한 실습에서 조금 바꿔서 RDS로도 진행해보니 실제 개인과제에서 어떻게 적용할지 조금은 알 것 같음
