
비트맵(Bitmap)이라 하면 흔히 이런 이미지를 생각할 수 있다. 물론 이것도 비트맵은 맞지만 이번 장에서 말하고자 하는 리눅스 커널의 비트맵은 이것과는 살짝 다르다. 물론 근본 개념은 bit + map 이라는점에서 같다. 아무튼 비트(bit)를 지도처럼 쭉 늘여 놓은(mapped) 것이 bitmap 이다.
1. 리눅스 커널의 Bitmap 이란
리눅스에서 비트맵(bitmap) 이란 데이터를 비트 단위로 처리하기 위해 long 형의 배열로 할당한 자료형이라 볼 수 있다. 다만 비트 단위로 데이터를 다루려 해도 알다시피 C 의 모든 자료형은 최소 단위가 byte 이다. 따라서 딱 300 bit 의 비트맵을 만들고 싶어도 실제론 그 크기를 살짝 넘길 수 있다.
// 300-bit 크기의 비트맵을 만들기 위해 선언한 my_bitmap
long my_bitmap[5]; // long 이 64-bit 이라 가정, 20-bit 초과
구현에 관한 코드는 리눅스 커널의 파일을 뜯어가며 살펴볼 것이다.
2. 비트 관련 매크로 정의
// tools/include/linux/bitops.h
#define BITS_TO_BYTES(bits) (((bits) + BITS_PER_BYTE - 1) / BITS_PER_BYTE)

// include/uapi/linux/kernel.h
#define __KERNEL_DIV_ROUND_UP(n, d) (((n) + (d) - 1) / (d))
#define DIV_ROUND_UP __KERNEL_DIV_ROUND_UP

// include/linux/bitops.h
#define BITS_PER_TYPE(type) (sizeof(type) * BITS_PER_BYTE)
#define BITS_TO_LONGS(nr) DIV_ROUND_UP(nr, BITS_PER_TYPE(long))
위 코드는 리눅스 커널의 비트맵 관련 매크로를 모아서 묶어 놓은 것이다.
위에서 부터 순서대로 설명하면...
BITS_TO_BYTES(bits)>include/linux/bitops.h
비트 수를 표현하기 위한 최소 바이트 수를 나타낸다. (1 byte는8 bit로 가정) 가령30 bit를 표현하고 싶다면, 적어도4 byte가 필요(8 * 4 = 32)하다. 실제 리눅스 커널 내의 코드에선 위와 같이 풀려있지 않고 아래의DIV_ROUND_UP함수를 사용한다.__KERNEL_DIV_ROUND_UP(n, d)>include/linux/kernel.h
n을d로 나눈 결과를 무조건 올림한 값을 나타낸다. 가령4 / 3은 그 값이1.333...이지만 위 함수를 사용하면2가 반환된다.DIV_ROUND_UP>include/linux/kernel.h
그냥__KERNEL_DIV_ROUND_UP을 매핑한 매크로다.BITS_PER_TYPE(type)>include/linux/bitops.h
데이터 타입을 비트 수로 나타낸다.short는sizeof(short) * 8이므로16을 반환한다. (short는2 byte라 가정)BITS_TO_LONGS(nr)>include/linux/bitops.h
비트수nr을 받아서 이 비트를 담을 수 있는long자료형의 크기를 계산한다. 1번 에서 본my_bitmap을 만들기 위해300을 전달하면5를 반환한다.
실제 해당 경로에 들어가서 어떤 식으로 정의되어 있는지 이해하고 또 확인하는 것이 중요하다. BITS_TO_BYTES(bits) 의 경우 필자가 작성한 정의와는 다르게 생겼으므로 한번쯤 확인해봐도 좋을 것이다.
3. 예제 코드 작성 (bitmap1.c)
위 매크로를 테스트하기 위한 예제 코드를 작성해보겠다. 2번 에서 각 매크로에 대해 설명할 때, 다음과 같이 매크로 > 파일 의 형태로 표시했으므로 각 파일에 삽입하면 된다.
test/bits/bitmap1.c/** M: Yeounsu Moon <yyyynoom@gmail.com> W: https://velog.io/@mythos F: test/bits/bitmap1.c This program is free software; you can redistribute it and/or modify it under the terms of the GNU General Public License */ #include <stdio.h> #include <stdlib.h> #include "linux/types.h" #include "linux/bits.h" #include "linux/bitops.h" #include "linux/kernel.h" #include <inttypes.h> int main(void) { s32 i; u64 size; printf("char = %zu bits\n", BITS_PER_TYPE(char)); printf("int = %zu bits\n", BITS_PER_TYPE(int)); printf("long = %zu bits\n", BITS_PER_TYPE(long)); for (i = 0; i < 321; i+= 32) { size = BITS_TO_LONGS(i); printf("%3" PRId32 ": size = %" PRIu64 " \n", i, size); } DECLARE_BITMAP(bitv, 300); printf("bitv size = %zu bits\n", sizeof(bitv) * BITS_PER_BYTE); return 0; }
위 코드를 컴파일하여 실행하면 다음과 같은 결과가 나온다:
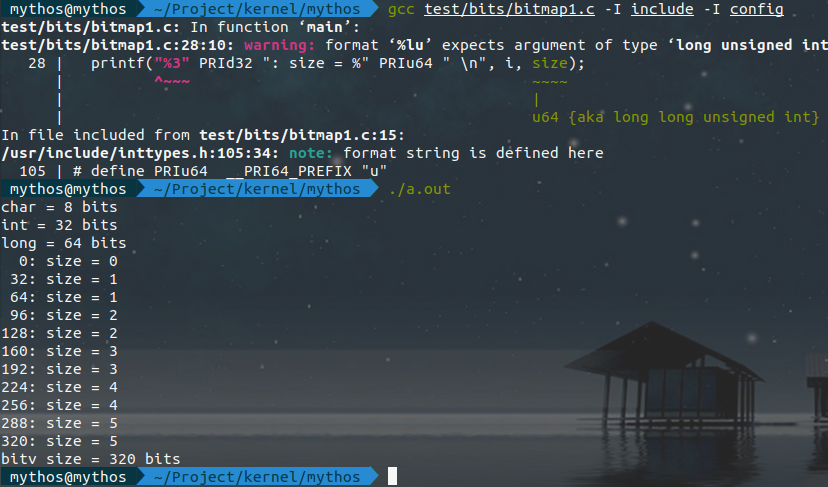
코드 내에서 linux 경로를 명시했으므로 gcc 로 컴파일할 경로를 include 로 바꾸는 것에 유의하라. 또한 서식 문자와 관련한 에러가 발생할 수 있으나 큰 문제는 아니므로 무시해도 된다.
4. 비트맵 선언하기
// include/linux/types.h
#define DECLARE_BITMAP(name, bits) \
unsigned long name[BITS_TO_LONGS(bits)]
DECLARE_BITMAP 은 bits 크기의 비트 수를 포함할 수 있는 name 이라는 이름의 가진 변수를 정의한다. 위에서 설명했던 매크로를 모두 이해했다면 이해하는데 별 무리는 없을 것이다. 이제 이 매크로와 include/linux/bitmap.h 헤더 파일에서 제공하는 함수들을 통해 작은 프로그램을 만들어 볼 것이다.
 위 헤더파일에선 비트맵과 관련된 다양한 함수를 제공한다. 매우 다양한 함수가 있지만 필자는
 bitmap_zero() 와 bitmap_fill() 함수를 사용해보려 한다. 다음 함수의 정의를 복사해서 로컬의 include/linux/bitmap.h 헤더의 복사 붙여넣기 한다.
include/linux/bitmap.h#include <string.h> static inline void bitmap_zero(unsigned long *dst, unsigned int nbits) { unsigned int len = BITS_TO_LONGS(nbits) * sizeof(unsigned long); memset(dst, 0, len); } static inline void bitmap_fill(unsigned long *dst, unsigned int nbits) { unsigned int len = BITS_TO_LONGS(nbits) * sizeof(unsigned long); memset(dst, 0xff, len); }
bitmap_zero 함수는 인자로 들어온 dst 비트맵의 nbits 를 0 으로 가득 채운다. 반대로 bitmap_fill 함수는 인자로 들어온 dst 비트맵의 nbits 를 1 로 채운다. 이 밖에도 다양한 함수가 있으므로 한번쯤 헤더파일을 흝어보는걸 추천한다.
5. 예제 코드 작성 (bitmap2.c)
test/bits/bitmap2.c/** M: Yeounsu Moon <yyyynoom@gmail.com> W: https://www.kernel.bz F: test/bits/bitmap2.c This program is free software; you cna redistribute it and/or modify it under the terms of the GNU General Public License */ #include <stdio.h> #include <stdlib.h> #include "linux/types.h" #include "linux/bits.h" #include "linux/bitops.h" #include "linux/kernel.h" #include "linux/bitmap.h" void bits_print(unsigned long *v, u32 nbits) { s32 i; u32 wc = BIT_WORD(nbits); u64 mask1, mask2 = BIT(BITS_PER_TYPE(long) - 1); for (i = wc; i >= 0; i--) { printf("v[%d] = ", i); mask1 = mask2; while (mask1) { printf("%d", (v[i] & mask1 ? 1 : 0)); mask1 >>= 1; } printf("\n"); } printf("\n"); } int main(int argc, char *argv[]) { long nbits; char *test; if (argc != 2) exit(EXIT_FAILURE); nbits = strtol(argv[1], &test, 10); if (argv[1] == test) exit(EXIT_FAILURE); u32 v = BITS_TO_LONGS(nbits); u32 len = BITS_TO_LONGS(nbits) * sizeof(unsigned long); printf("nbits = %u, array = %u, bytes = %u, bits = %u\n\n", nbits, v, len, len * BITS_PER_BYTE); DECLARE_BITMAP(bitv, nbits); bits_print(bitv, nbits); bitmap_zero(bitv, nbits); bits_print(bitv, nbits); bitmap_fill(bitv, nbits); bits_print(bitv, nbits); return 0; }
bits_print 는 이전에 작성했던 함수와 비슷하지만 nbits 만큼 출력한다는 점에서 이전 함수와는 다소 다르다. mask2 의 마지막 비트를 켜고 오른쪽으로 한번씩 shifting 하여 v[i] 의 각 비트를 출력한다. main 함수에서는 선언하고 초기화하지 않은 bitv 를 출력(쓰레기값)하고, 두 번째로 모든 비트를 비운 결과를, 마지막으로 모든 비트를 가득 채운 결과를 출력한다. 실제 실행 결과는 다음과 같다:
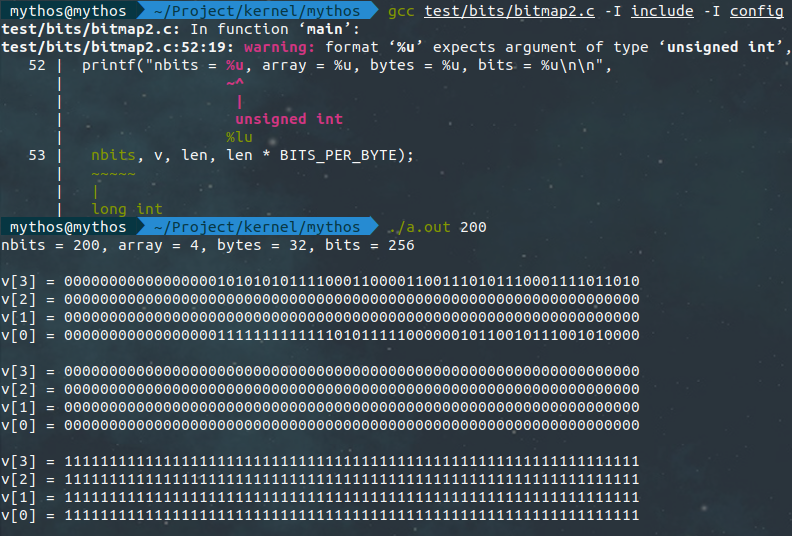
컴파일 시 나오는 경고 메세지는 무시해도 좋다. 실행결과에 주목하라. 처음으로 출력한 v 는 쓰레기 값을 가지고 있으므로 컴퓨터마다 그 출력결과가 다를 수 있다. 필자의 경우는 요상한 비트가 출력 되었다.
두 번째는 모든 비트를 clear 한 것인데 보는 것과 같이 깔끔하게 0 으로 비워진 상태로 출력 되었다. 마지막 출력 결과 역시 모든 비트가 켜진 상태임을 확인할 수 있다.
출처
[사진] https://www.vectorstock.com/royalty-free-vector/africa-bitmap-8-bit-tech-logo-icon-vector-24171577
[책] 리눅스 커널 소스 해설: 기초입문 (정재준 저)