MCP
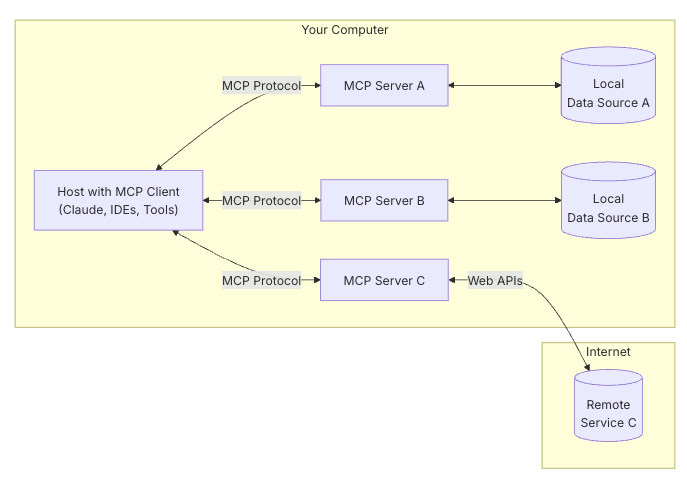
시작하기 앞서 MCP의 구조부터 간단히 다시 짚고 넘어가겠습니다.
MCP(ModelContextProtocol) 는 호스트가 MCPServer에 MCPClient를 통해 다양한 Tool을 표준화된 방식으로 제공받아 사용하는 것을 뜻합니다.
그리하여 다양한 호스트에서 표준화된 방식으로 Tool에 접근하는 것을 가능하게 합니다.
간단 소개
제가 부딪혀 볼 것은 SpringAI(host) 에서 stdio Client를 생성해 MCP 서버에 접근 및 Tool을 사용하는 것입니다.
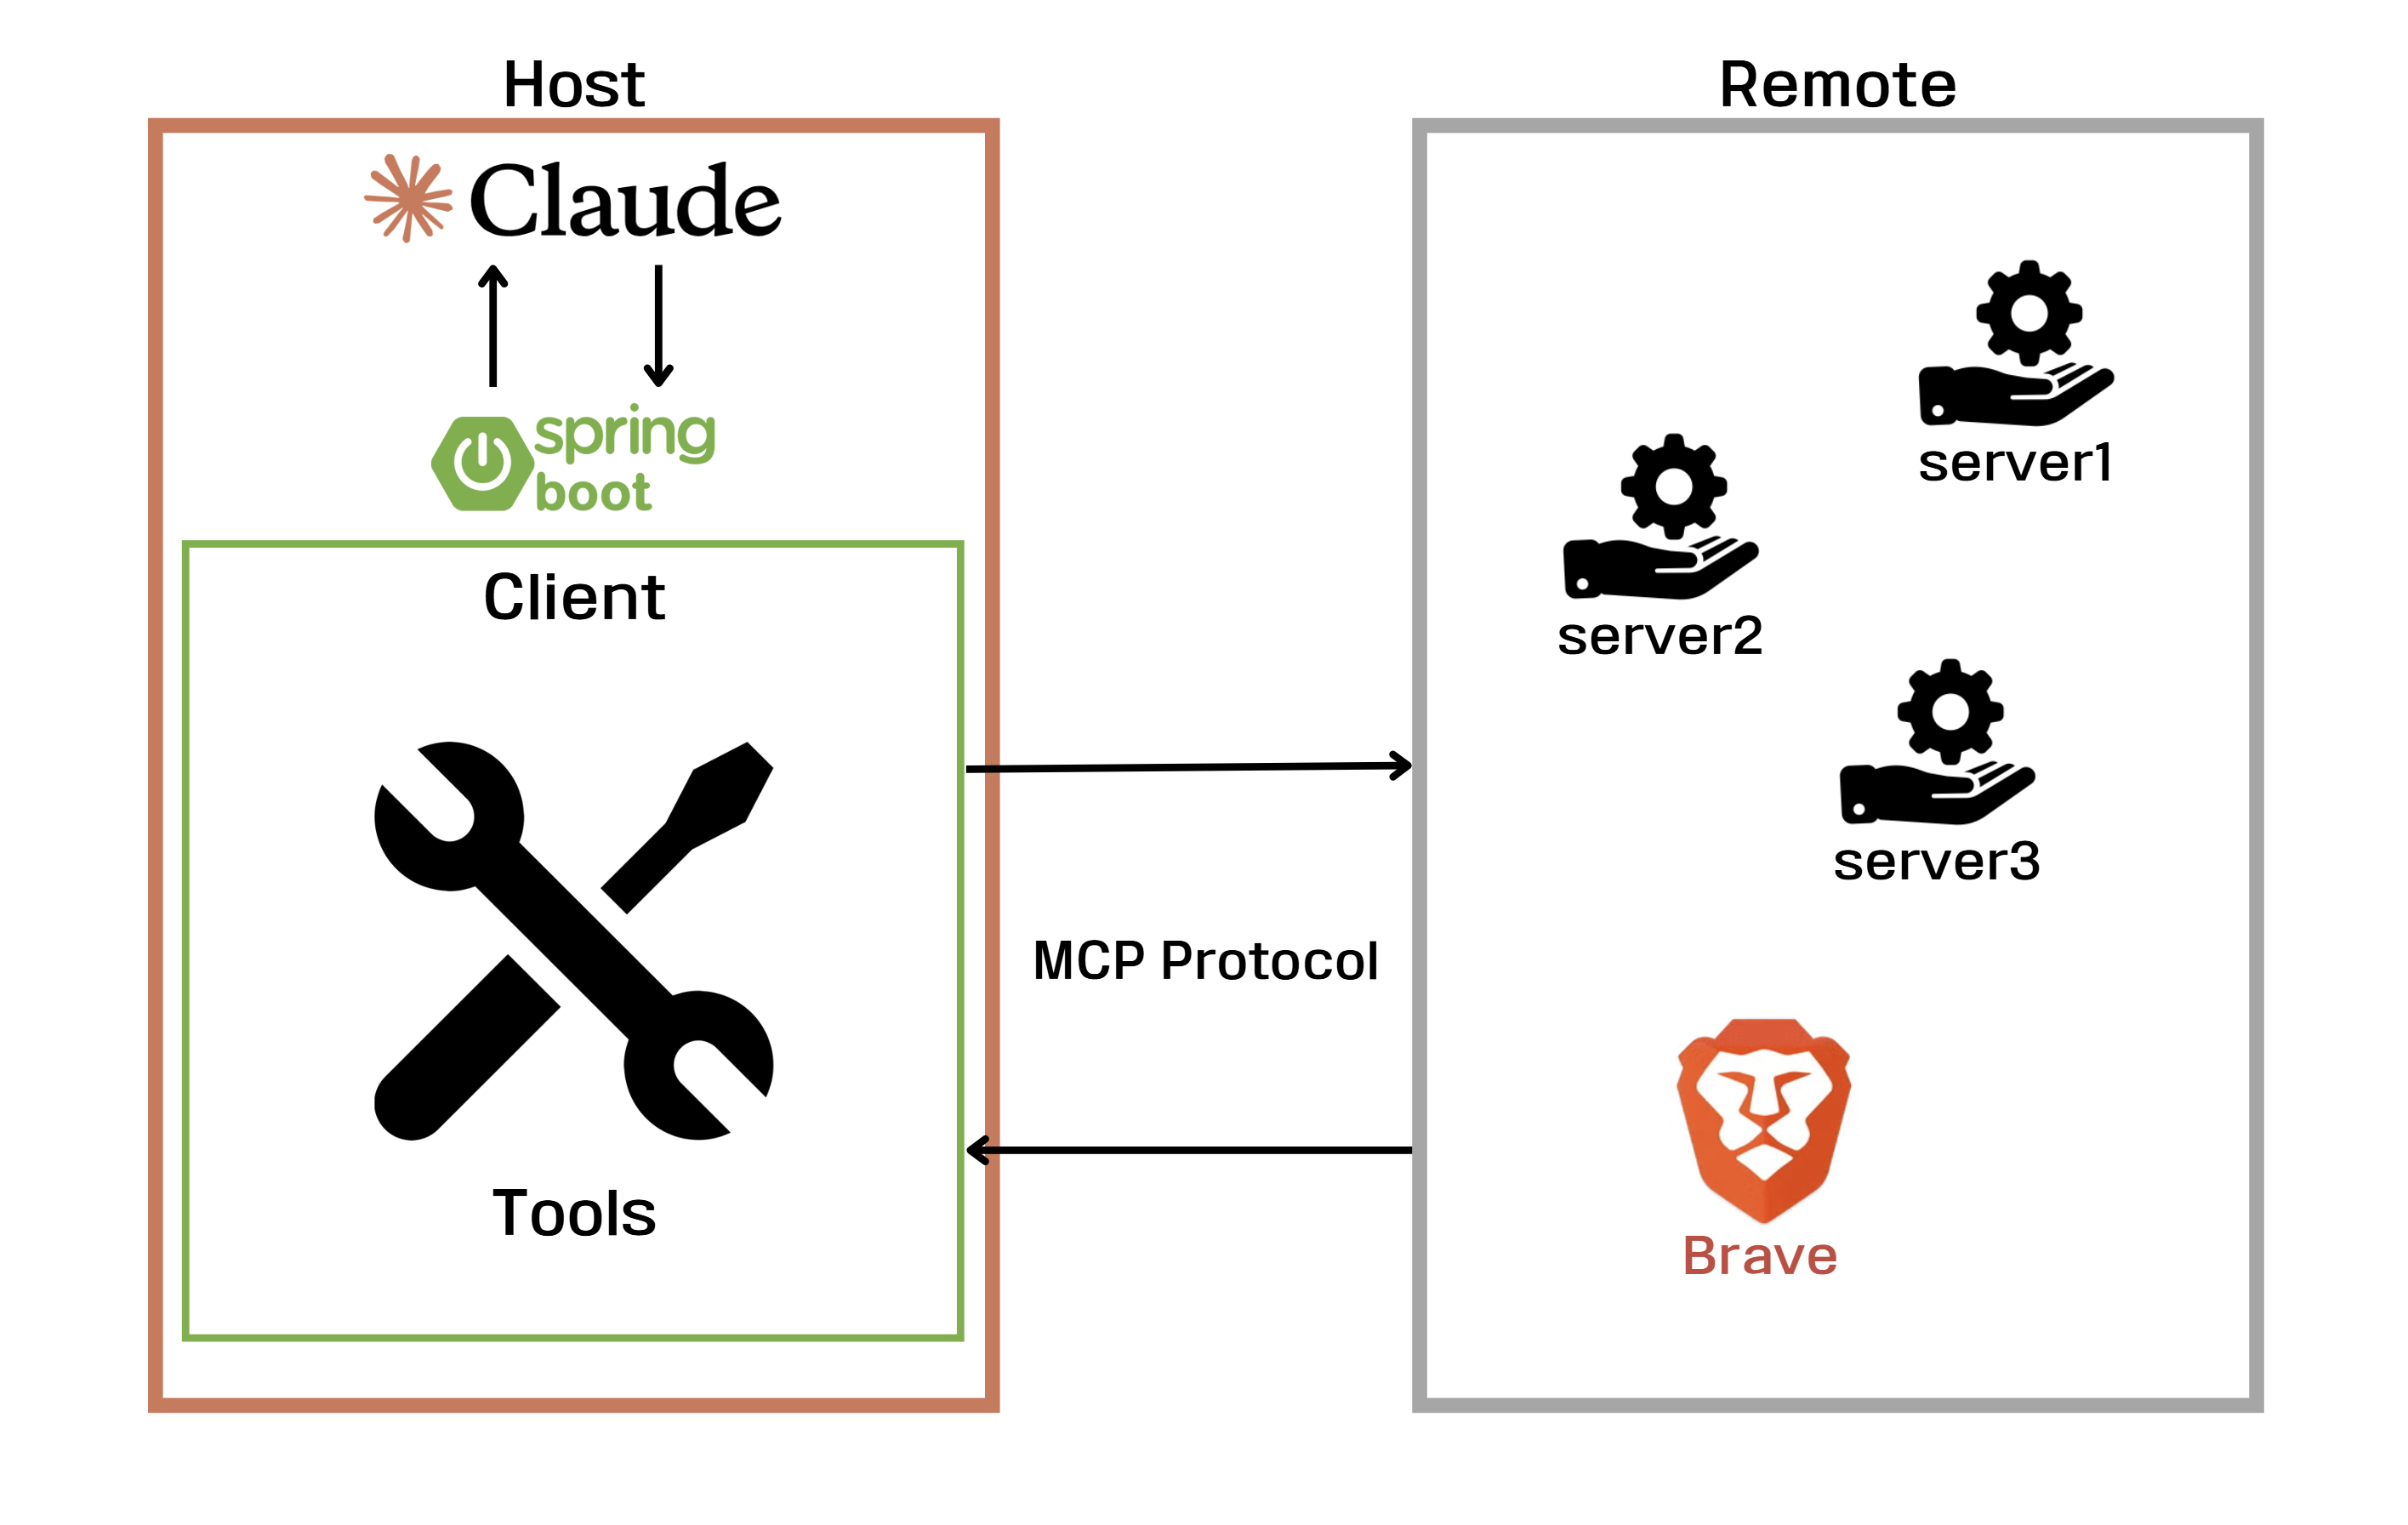
- Host: SpringAI claude-3-7-sonnet
- Client: SpringAI mcp-client:1.0.0-SNAPSHOT
- Server: @modelcontextprotocol/server-brave-search
최종적으로 websearch 기능을 탑재한 Agent를 만드는 것이 목표입니다.
참고: https://docs.spring.io/spring-ai/reference/api/mcp/mcp-overview.html
Pom
필요한 종속성은 두가지입니다.
<dependency>
	<groupId>org.springframework.ai</groupId>
	<artifactId>spring-ai-starter-model-anthropic</artifactId>
</dependency>
호스트인 LLM과
<dependency>
	<groupId>org.springframework.ai</groupId>
	<artifactId>spring-ai-starter-mcp-client</artifactId>
</dependency>
MCP Server와 연결을 하기 위한 Client.
spring initializr로 생성한 경우 milestone repo와 dependency management가 자동으로 추가 되지만 기존 프로젝트에 경우 필요에 따라 추가 해줘야 합니다.
<repository>
	<id>spring-milestones</id>
	<name>Spring Milestones</name>
	<url>https://repo.spring.io/libs-milestone-local</url>
	<snapshots>
		<enabled>false</enabled>
	</snapshots>
</repository>
Properties
저는 yaml로 구성했습니다.
application.yaml
server:
  port: 9000

spring:
  ai:
    mcp:
      client:
        enabled: true
        name: brave-search-client
        version: 1.0.0
        type: SYNC  # or ASYNC for reactive applications
        request-timeout: 20s
        stdio:
          root-change-notification: true
          servers-configuration: classpath:/mcp-servers-config.json
    anthropic:
      api-key: ${ANTHROPIC_API_KEY}
      chat:
        options:
          model: claude-3-7-sonnet-20250219
mcp-servers-config.json
{
  "mcpServers": {
    "brave-search": {
      "command": "npx",
      "args": [
        "-y",
        "@modelcontextprotocol/server-brave-search"
      ],
      "env": {
        "BRAVE_API_KEY": "BraveApiKey"
      }
    }
  }
}

// brave-search의 mcp server는 stdio를 사용하기에
// cli에서 npx를 사용할 수 있는 상태여야 합니다.
Agent (LLM)
@Configuration
public class Agent {
	private String systemPrompt = "You are a professional economic analyst. The user will supply a date in \"YYYY-MM-DD\" format. "
			+ "Based on the provided date, immediately search for and analyze the latest economic news relevant to that day (e.g., market trends, financial updates, major economic events). Your output must consist of exactly three lines in English:\r\n"
			+ "-title: [a one-line summary capturing the essence of the news]\r\n"
			+ "-body: [a concise summary highlighting the main details]\r\n"
			+ "-positive or -negative: [a single word indicating whether the overall news sentiment is positive or negative]\r\n"
			+ "Do not include any additional commentary or information. Also, if conversation data accumulates and repetitive content arises, avoid duplicating previously provided summary details. Always aim for fast analysis and clear, de-duplicated output.";

	@Bean
    ChatClient chatClient(ChatClient.Builder chatClientBuilder, List<McpSyncClient> mcpSyncClients) {
    	return chatClientBuilder
				.defaultSystem(systemPrompt)
				.defaultTools(new SyncMcpToolCallbackProvider(mcpSyncClients))
				.build();
    }
}
SpringAI에서 제공하는 ChatClient를 통해 기본 구성을 해줍니다.
저는 시스템 프롬프트로 3가지를 지정해줬습니다.
- Role
- Input은 어떻게 들어올 것이며, 어떤 방식으로 처리를 해라
- Output(Respawns)은 어떤 식으로 해라
또한 config 해 놓은 MCP Server 와의 연결 Client의 List를 주입 받아
ToolCallback 을 통해 Tools를 제공 받습니다.
이제 모든 구성은 끝났습니다.
Main
@Bean
public CommandLineRunner chatbot(ChatClient chatClient) {
    String date = new SimpleDateFormat("yyyy-MM-dd").format(new Date());

	return args -> {
		System.out.println(String.format("\nNow date: %s\r\n", date));
		System.out.println("Agent: "+chatClient.prompt(date).call().content());
	};
}
동작 코드는 간단합니다. <CommandLineRunner> Bean을 생성할 때 Date를 prompt로 보내고 출력하는 형태입니다.

SpringAI Docs를 보면 output을 text(String)방식이 아닌 entity(someClass) 방식으로 return 할 수 있다는데. 객체로 관리한다면 더욱 디버깅이며, 확장, 유지보수 등 다양하게 쓰일 수 있을 것 같습니다.
TODO
진행을 하면서 궁금했던 것이나 문제 발생에 대한 정리 입니다.
체크가 없는 것은 아직 해결 전이며, 체크된 부분은 참고에 대한 링크입니다.
- Client가 npx를 못읽는 문제
- SSE MCP Server
- Prompt Caching