Redux (3)
Redux로 Create, Delete 기능을 구현하기 !
🍰 시작하기
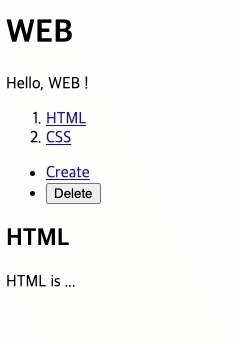
우선 함수형 모듈로 구현되어있는 간단한 페이지를 생성한다.
<body>
    <div id="subject"></div>
    <div id="toc"></div>
    <div id="control"></div>
    <div id="content"></div>
    <script>
function subject() {
    document.querySelector('#subject').innerHTML = `
    <header>
        <h1>WEB</h1>
        Hello, WEB !
    </header>
    `
}
function TOC() {
    document.querySelector('#toc').innerHTML = `
    <nav>
        <ol>
            <li><a href="1.html">HTML</a></li>
            <li><a href="2.html">CSS</a></li>
        </ol>
    </nav>
    `
}
function control() {
    document.querySelector('#control').innerHTML = `
    <ul>
        <li><a href="/create">Create</a></li>
        <li><button href="/delete" value="delete">Delete</button></li>
    </ul>
    `
}
function article() {
    document.querySelector('#content').innerHTML = `
    <article>
        <h2>HTML</h2>
        HTML is ...
    </article>
    `
}
subject();
TOC();
control();
article();
    </script>
</body>
🍭 store 생성
Redux store 를 생성한다.
(store 에 nav 컨텐츠를 넣어준다)
function reducer(state, action) {
    if (state === undefined) {
        return {
            contents: [
                {id: 1, title: 'HTML', desc: 'HTML is ...'},
                {id: 2, title: 'CSS', desc: 'CSS is ...'},
            ]
        }
    }
}
var store = Redux.createStore(reducer);
생성된 store 의 컨텐츠를 써먹기위해 TOC() 함수를 수정한다.
// before 👉
function TOC() {
    document.querySelector('#toc').innerHTML = `
    <nav>
        <ol>
            <li><a href="1.html">HTML</a></li>
            <li><a href="2.html">CSS</a></li>
        </ol>
    </nav>
    `
}
// after 👉
function TOC() {
    var state = store.getState();
    var i = 0;
    var liTags = '';

    while (i < state.contents.length) {
        liTags = liTags + `
        <li><a href="${state.contents[i].id}">${state.contents[i].title}</a></li>
        `;
        i++;
    }

    document.querySelector('#toc').innerHTML = `
    <nav>
        <ol>
            ${liTags}
        </ol>
    </nav>
    `
}
🍦 action과 dispatch
각 nav 클릭시 store 값이 변경되게 해보자.
우선 a태그 클릭이벤트에 action값을 넣어 dispatch를 실행한다.
while (i < state.contents.length) {
  liTags = liTags + `
    <li>
    <a href="${state.contents[i].id}"
     token interpolation">${state.contents[i].id}};
      store.dispatch(action);
    ">
    ${state.contents[i].title}
    </a>
    </li>
    `;
      i++;
}
필수속성인 type 값은 'SELECT' 로 넣어주고 클릭한 대상을 알려주기 위해 id 값을 추가로 넣어준다.
그리고 실행되는 reducer 에서 action의 type이 'SELECT'인 경우에 기존 state 값을 복제하여 새로운 state 값을 만든다.
(selected_id 값을 추가해서 변경되는 값으로 사용한다)
function reducer(state, action) {

    if (state === undefined) {
        return {
            selected_id: null,
            contents: [
                {id: 1, title: 'HTML', desc: 'HTML is ...'},
                {id: 2, title: 'CSS', desc: 'CSS is ...'},
            ]
        }
    }
    var newState;
    if (action.type === 'SELECT') {
        newState = Object.assign({}, state, {selected_id: action.id});
    }
    console.log(action, state, newState);
    return newState;
}
🍿 subscribe
subscribe 을 사용하여 TOC() 의 각 메뉴를 클릭시 article() 이 자동갱신되게 해보자.
지금 각 메뉴를 클릭시
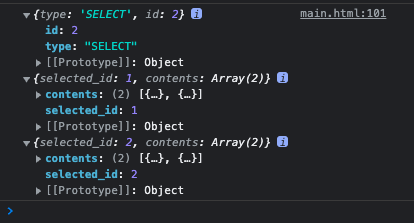
( 🔼 reducer 의 console.log(action, state, newState) 결과이다 )
state에서 contents 의 id 값과 selected_id 값이 같은 배열의 title 과 desc 값이 article 태그 내부로 들어가면 되겠다.
function article() {
    var state = store.getState();
    var i = 0;
    var aTitle, aDesc;

    while (i < state.contents.length) {
        if (state.contents[i].id === state.selected_id) {
            aTitle = state.contents[i].title;
            aDesc = state.contents[i].desc;

            break;
        }
        i = i + 1;
    }

    document.querySelector('#content').innerHTML = `
    <article>
        <h2>${aTitle}</h2>
        ${aDesc}
    </article>
    `
}
여기까지만 하면 TOC() 클릭시 아무변화가 없다.
갱신이 안됐기때무네 => subscribe 에 등록한다.
var store = Redux.createStore(reducer);
store.subscribe(article);
요렇게 store 생성 라인 아래에 subscribe 을 등록한다.
( 아 초기에는 article 에 undefine으로 뜨기때문에 reducer 에서 state 가 undefined 일때 selected_id 값을 지정해준다 )
🥨 Create 구현
Create 기능일경우 article() UI를 변경해주기위해 state에 mode 를 추가해준다.
if (state === undefined) {
  return {
    mode: 'create', // 'read'일 경우엔 상세보기, 'create'일 경우엔 form이 노출되도록 분기처리
    selected_id: 1,
    contents: [
      {id: 1, title: 'HTML', desc: 'HTML is ...'},
      {id: 2, title: 'CSS', desc: 'CSS is ...'},
    ]
  }
}
그리고 article() 에서 state.mode 가 'create'인 경우에 form 이 노출되도록한다.
if (state.mode === 'create') {

  document.querySelector('#content').innerHTML = `
  <article>
    <form>
    <p>
      <input type="text" name="title" placeholder="title"/>
    </p>
    <p>
      <textarea name="desc" placeholder="description"></textarea>
    </p>
    <p>
      <input type="submit"/>
    </p>
    </form>
  </article>
  `

}
submit 했을때 입력한 title, desc 값을 type 값과 함께 dispatch로 넘겨준다.
그리고 reducer가 action.type 이 'CREATE'로 올경우 새로 state를 반환해주면 된다.
} else if (action.type === 'CREATE') {

  var newMaxId = state.max_id + 1;
  var newContents = state.contents.concat(); // 배열복제는 concat()
  newContents.push({id: newMaxId, title: action.title, desc: action.desc});

  newState = Object.assign({}, state,
    {max_id: newMaxId, mode: 'read', selected_id: newMaxId, contents: newContents});

}
Object.assign(target, source)
: target 객체에 source 객체를 붙여넣기한다. (중복되는값은 업데이트되고, 없는값은 추가됨)
array1.concat(array2)
: array1 배열에 array2 배열을 추가해서 반환한다. (기존배열을 변경하지않는다)
우선, 입력한 contents의 값을 업데이트해주기위해 contents 배열만 가져와서 concat() 으로 복제후 새 배열값을 push 해준뒤
state 전체를 assign() 할때 새로운 state의 contents 자리에 concat() 으로 복제한 새로운 배열값을 인자로 넣어준다.
여기서 새로 입력되는 id 값이 필요하기때문에 기존 state 에 max_id 값을 초기값인 2로 추가해주고 action.type 이 'CREATE'일 때마다 1씩 더해서 업데이트한다.
if (state === undefined) {
  return {
    max_id: 2,
    mode: 'create',
    selected_id: 1,
    contents: [
      {id: 1, title: 'HTML', desc: 'HTML is ...'},
      {id: 2, title: 'CSS', desc: 'CSS is ...'},
    ]
  }
}
마무리로 UI가 새로 랜더링되도록 subscribe 한다.
store.subscribe(TOC);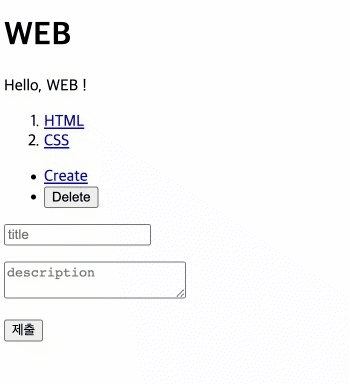
🥯 Delete 구현
우선, delete 버튼 클릭시 'DELETE' type을 dispatch 한다.
( TOC 에서 컨텐츠를 클릭 후 삭제하기 때문에 id 값은 필요없다 )
<button href="/delete" value="delete"
onclick="
event.preventDefault();
store.dispatch({
type: 'DELETE'
})
"
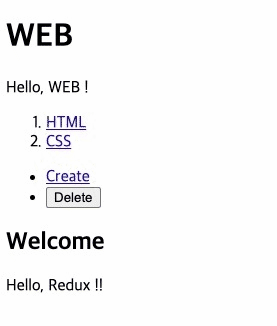
>Delete</button>reducer 에서 action.type 이 'DELETE'로 온경우 현재 select 된 id 값과 다른 id 값들의 contents 만으로 새로운 state 를 만들어서 반환한다.
( 클릭한 컨텐츠를 제외한 나머지 컨텐츠들로 다시 state 를 만드는 것 )
else if (action.type === 'DELETE') {

  var newContents = [];
  var i = 0;
  while(i < state.contents.length) {
    if (state.selected_id !== state.contents[i].id) {
      newContents.push(
        state.contents[i]
      )
    }
    i = i + 1;
  }
  newState = Object.assign({}, state, {
    contents: newContents,
    mode: 'welcome'
  })

}
삭제가 끝난뒤에는 'welcome'으로 mode를 변경해준다.
( mode 가 추가된부분의 코드는 하단에 전체코드로 첨부함..! )
👉 전체코드
mode 에 'welcome' 을 추가하여 초기 mode 값을 'welcome'으로 설정했고,
TOC 클릭시 article 이 변경되지 않는 부분과 Create 버튼 클릭시 form 이 노출되지 않는 부분등을 수정했다.
<!DOCTYPE html>
<html lang="en">
<head>
    <meta charset="UTF-8">
    <meta http-equiv="X-UA-Compatible" content="IE=edge">
    <meta name="viewport" content="width=device-width, initial-scale=1.0">
    <script src="https://cdnjs.cloudflare.com/ajax/libs/redux/4.2.0/redux.min.js"></script>
    <title>Document</title>
</head>
<body>
    <div id="subject"></div>
    <div id="toc"></div>
    <div id="control"></div>
    <div id="content"></div>
    <script>
function subject() {
    document.querySelector('#subject').innerHTML = `
    <header>
        <h1>WEB</h1>
        Hello, WEB !
    </header>
    `
}
function TOC() {
    var state = store.getState();
    var i = 0;
    var liTags = '';

    while (i < state.contents.length) {
        liTags = liTags + `
        <li>
            <a href="${state.contents[i].id}"
           token interpolation">${state.contents[i].id}};
                store.dispatch(action);
            ">
                ${state.contents[i].title}
            </a>
        </li>
        `;
        i++;
    }

    document.querySelector('#toc').innerHTML = `
    <nav>
        <ol>
            ${liTags}
        </ol>
    </nav>
    `
}
function control() {
    document.querySelector('#control').innerHTML = `
    <ul>
        <li><a href="/create"

        >Create</a></li>
        <li>
            <button href="/delete" value="delete"

        >Delete</button>
        </li>
    </ul>
    `
}
function article() {
    var state = store.getState();

    if (state.mode === 'create') {

        document.querySelector('#content').innerHTML = `
        <article>
            <form>
                <p>
                    <input type="text" name="title" placeholder="title"/>
                </p>
                <p>
                    <textarea name="desc" placeholder="description"></textarea>
                </p>
                <p>
                    <input type="submit"/>
                </p>
            </form>
        </article>
        `

    } else if (state.mode === 'read') {

        var i = 0;
        var aTitle, aDesc;

        while (i < state.contents.length) {
            if (state.contents[i].id === state.selected_id) {
                aTitle = state.contents[i].title;
                aDesc = state.contents[i].desc;

                break;
            }
            i = i + 1;
        }

        document.querySelector('#content').innerHTML = `
        <article>
            <h2>${aTitle}</h2>
            ${aDesc}
        </article>
        `

    } else if (state.mode === 'welcome') {
        document.querySelector('#content').innerHTML = `
        <article>
            <h2>Welcome</h2>
            Hello, Redux !!
        </article>
        `
    }
}

function reducer(state, action) {

    if (state === undefined) {
        return {
            max_id: 2,
            mode: 'welcome',
            selected_id: 1,
            contents: [
                {id: 1, title: 'HTML', desc: 'HTML is ...'},
                {id: 2, title: 'CSS', desc: 'CSS is ...'},
            ]
        }
    }

    var newState;
    if (action.type === 'SELECT') {

        newState = Object.assign({}, state, {
            selected_id: action.id,
            mode: 'read'
        });

    } else if (action.type === 'CREATE') {

        var newMaxId = state.max_id + 1;
        var newContents = state.contents.concat(); // 배열복제는 concat()
        newContents.push({id: newMaxId, title: action.title, desc: action.desc});

        newState = Object.assign({}, state,
        {max_id: newMaxId, mode: 'read', selected_id: newMaxId, contents: newContents});

    } else if (action.type === 'DELETE') {

        var newContents = [];
        var i = 0;
        while(i < state.contents.length) {
            if (state.selected_id !== state.contents[i].id) {
                newContents.push(
                    state.contents[i]
                )
            }
            i = i + 1;
        }
        newState = Object.assign({}, state, {
            contents: newContents,
            mode: 'welcome'
        })

    } else if (action.type === 'CHANGE_MODE') {

        newState = Object.assign({}, state, {
            mode: action.mode
        })

    }

    console.log(action, state, newState);
    return newState;
}
var store = Redux.createStore(reducer);
store.subscribe(article);
store.subscribe(TOC);

subject();
TOC();
control();
article();
    </script>
</body>
</html>