컴포넌트 방식으로 생각하기
- 컴포넌트 방식으로 만들기 위해 추상화 익숙해지기!
선언적 프로그래밍의 중요성
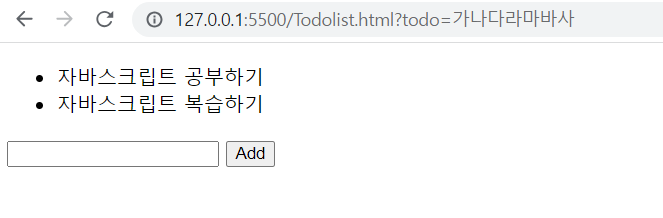
To do list

- 그림처럼 간단한 To do list를 만든다면 표현하는 부분을 이렇게 추상화 할 수 있을 것이다.
- 이런 하나하나들을
컴포넌트라고 할 수 있다.- 독립적으로 사용할 수 있고 다른 곳에 영향을 미치지 않는다.
- 이러한 특징들 때문에 재사용성이 좋다👍
- 코드도 간결해진다.. 기능 추가나 수정도 편함!!
<!DOCTYPE html>
<html lang="en">
<head>
<meta charset="UTF-8">
<title>Todolist</title>
</head>
<body>
<h1>Simple Todo list</h1> ----------> header
<div>
<form> -------------------> TodoForm
<input type="text">
<button>Add</button>
</form>
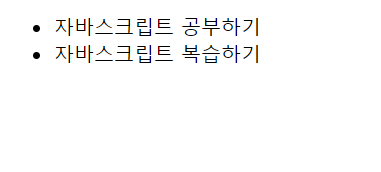
<ul> ---------------------> Todolist
<li>JS 공부하기</li>
<li>JS 복습하기</li>
</ul>
</div>
</body>
</html>To do list 컴포넌트 만들어보기
//params.$target : 해당 컴포넌트가 추가 될 DOM 엘리먼트
//params.initialState : 해당 컴포넌트의 초기 상태

function todoList(params) {
    const $todoList = document.createElement('div');
    const $target = params.$target;
    $target.appendChild($todoList);

    this.state = params.initialState;

    this.render = () => {
        let html = '';

        for(let i=0; i<this.state.length; i++){
            html + `<li>${this.state[i].text}</li>`;
        }

        html = `<ul>${html}</ul>`;

        $todoList.innerHTML = html;
    }
}
위의 방식으로도 표현할 수 있겠지만 기능이 추가된다면 코드가 복잡해 질 것이며
html변수에render함수가 의존성이 생기기 때문에 좋지 않다.
this.state : [{ text : '자바스크립트 공부하기' }, {text : '...' }]this.state는 이런 배열이 들어있으므로 좀 더 간단하게 수정도 가능하다.
function todoList(params) {
    const $todoList = document.createElement('div');
    const $target = params.$target;
    $target.appendChild($todoList);

    this.state = params.initialState;

    //this.state : [{ text : '자바스크립트 공부하기' }, {text : '...' }]
    this.render = () => {
        $todoList.innerHTML = `
            <ul>
                ${this.state.map((todo) => `<li>${todo.text}</li>`).join('')}
            </ul>
        `
    }

    this.render(); // 내부에서 호출했으므로 컴포넌트가 생성되자마자 즉시 렌더된다.
}- 괄호를 한번 더 감쌈으로 객체 안의 값을 처음부터 꺼내올 수 있는 ES6의 기능으로 더 간단하게 수정이 가능하다.
- object destructuring
function todoList( { $target, initialState } ) {
    const $todoList = document.createElement('div');
    $target.appendChild($todoList);

    this.state = initialState;

    //this.state : [{ text : '자바스크립트 공부하기' }, {text : '...' }]
    this.render = () => {
        $todoList.innerHTML = `
            <ul>
                ${this.state.map(({text}) => `<li>${text}</li>`).join('')}
            </ul>
        `
    }
    this.render();
}- main.js를 만들어 데이터와
new todoList를 만들고 html 파일에서 불러오면
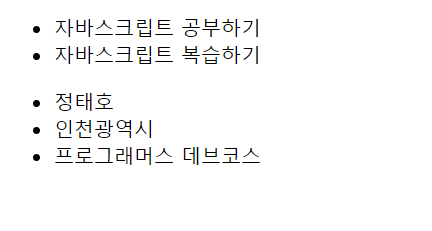
const data = [
    {
        text : '자바스크립트 공부하기'
    },
    {
        text : '자바스크립트 복습하기'
    }
]

const $main = document.querySelector('.app')

new todoList({
    $target : $main,
    initialState : data,
})
- todoList는 컴포넌트화 되어 있기 때문에 재사용이 쉽다.
new todoList({
    $target : $main,
    initialState : data1,
})- 데이터를 새로 만든 뒤 만들어주면 똑같은 todoList를 바뀐 데이터로 쉽게 만들 수 있다.
To do form 컴포넌트 만들어보기
- To do list와 비슷한 형식으로 만들 수 있다.
function todoForm( {$target} ){

    const $form = document.createElement('form');
    $target.appendChild($form)

    this.render = () => {
        $form.innerHTML =
            `<input type = "text" name = "todo" />
             <button>Add</button>
            `
    }

    this.render()
}
form을 만들었지만 form의 기본적인 action 속성 때문에 action에 정의된 url로 form 안의 값을 전송시켜버리기 때문에 결국에 화면이 새로고침된다.
$form.addEventListener('submit', e => {
            e.preventDefault() //태그의 기본 동작 끄기!!
        })
- 이 코드를 추가함으로써 해결할 수 있었다!!
function todoForm( {$target} ){

    const $form = document.createElement('form');
    $target.appendChild($form)

    this.render = () => {

        let isInit = false;

        $form.innerHTML =
            `<input type = "text" name = "todo" />
             <button>Add</button>
            `;

        if(!isInit){
            $form.addEventListener('submit', e => {
                e.preventDefault() //태그의 기본 동작 끄기

                const text = $form.querySelector('input[name=todo]').value // form에 입력된 값이 저장된다.
                console.log(text);
            })
            isInit = true;
        }
    }

    this.render()
}
👍 Tip. 버튼에 type을 지정하지 않으면 기본적으로 submit이기 때문에 엔터나 버튼을 클릭해도 동작이 된다.

To do form에서 입력받은 값을 To do list에 넣으려면?
- TodoForm 생성 파라메터에 TodoList 넣고 직접 참조하기?
- 이렇게 될 경우 TodoForm가 TodoList 컴포넌트에 의존성이 강하게 생기게 된다.
해결법은?
- TodoForm 생성 파라메터에 이벤트 콜백을 넣고, text를 입력 받으면 해당 콜백을 통해 text를 넘겨준다..?
//main.js
new todoForm({
    $target : $main,
    onSubmit: (text) => {
        alert(text)
    }
})
//TodoForm.js
function todoForm( {$target, onSubmit} ){
const $form = document.createElement('form');
$target.appendChild($form)
this.render = () => {
let isInit = false;
$form.innerHTML =
`<input type = "text" name = "todo" />
<button>Add</button>
`;
if(!isInit){
$form.addEventListener('submit', e => {
e.preventDefault() //태그의 기본 동작 끄기
const text = $form.querySelector('input[name=todo]').value // form에 입력된 값이 저장된다.
//Tip 버튼에 type을 지정하지 않으면 기본적으로 submit이기 때문에 엔터나, 버튼을 클릭해도 동작이 된다.
onSubmit(text);
})
isInit = true;
}
}
this.render()
} - submit이 발생했을 때 처리하는 코드는
main.js, todoForm 밖에 있기 때문에 영향을 받지 않는다.
main.js
const TodoList = new todoList({
    $target : $main,
    initialState : data,
})

new todoForm({
    $target : $main,
    onSubmit: (text) => {
        const nextState = [...TodoList.state, {text} ]
        TodoList.setState(nextState)
    }
})
todoList.js
setState-> 현재 상태를 새로운 상태로 변경하고 render()를 다시 호출
function todoList( {$target, initialState} ) {
    const $todoList = document.createElement('div');
    $target.appendChild($todoList)

    this.state = initialState;

    this.setState = nextState => {
        this.state = nextState
        this.render();
    }

    //this.state : [{ text : '자바스크립트 공부하기' }, {text : '...' }]
    this.render = () => {
        $todoList.innerHTML = `
            <ul>
                ${this.state.map(({text}) => `<li>${text}</li>`).join('')}
            </ul>
        `
    }
    this.render();
}
todoForm.js
function todoForm( {$target, onSubmit} ){

    const $form = document.createElement('form');
    $target.appendChild($form)

    this.render = () => {

        let isInit = false;

        $form.innerHTML =
            `<input type = "text" name = "todo" />
             <button>Add</button>
            `;

        if(!isInit){
            $form.addEventListener('submit', e => {
                e.preventDefault() //태그의 기본 동작 끄기

                const text = $form.querySelector('input[name=todo]').value // form에 입력된 값이 저장된다.
                onSubmit(text); // 그냥 onSubmit만 호출
            })
            isInit = true;
        }
    }

    this.render()
} 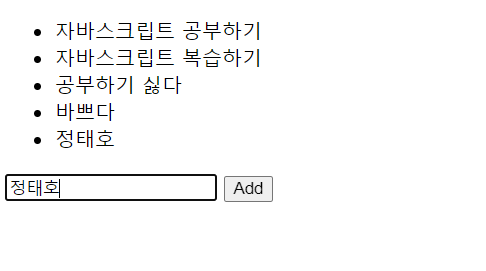
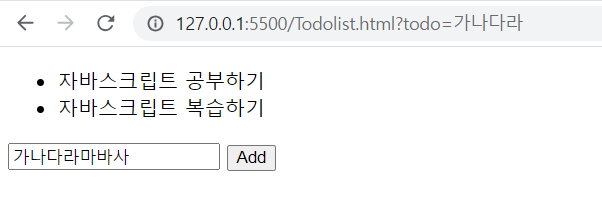
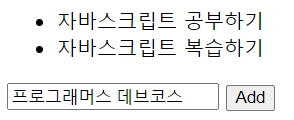
- form에 입력한 값이 List에도 추가된다.
const $input = $form.querySelector('input[name=todo]')
	const text = $input.value
    if(text.length >= 1){
		$input.value = ''
		onSubmit(text);
    }
- 코드 추가를 통해 submit 한 후 폼의 값을 비워준다!!
이렇게 코드를 짠다면 좋은 점!!
명령형으로 코드를 짰다면 유지보수를 하든 기능을 추가하든 변경할 부분을 추적하기가 매우 힘들 것이다... 하지만 선언형으로 이렇게 해준다면 그저 기능을 넣은 부분에서만 고치면 되기 때문에 매우 편하다!!
Client Side에서 데이터 저장하기
쿠키
쿠키 추가하기
- 이전 cookie를 덮어쓰지 않고 새로 추가된다.
docunment.cookie = 'language=javascript' 쿠키 읽어오기
- 각 쿠키는 ;으로 구분되어 있어 불러온 후 split 등으로 쪼개서 사용하자!
document.cookie쿠키 유효기간 넣기
// expries 경우 GMT string을 넣어야한다.
// GMT 기준이기 때문에 이 쿠키는 한국 시간 기준으로
// 2023년 8월 18일 11시 13분 37초 까지 유효하다
document.cookie - 'user=taeho; expries=Wed, 18 Aug 2023 02:13:37 GMT'

// max-age를 넣으면 생성시점 기준으로 유효기간 설정 가능
// 단위는 1초, 1시간은 3600
document.cookie = 'user=taeho; max-age=3600'
요즘 쿠키는..? 주의사항
- HTTP요청 시 헤더에 쿠키가 같이 나가기 때문에 쿠키 사이즈가 커지면 HTTP요청 또한 커져버린다.
- 사이즈에 제한이 있다.
- 여러가지 보안 취약점을 조심해야 한다.
Local Storage
key,value(객체)기반으로 Local에 데이터를 저장한다.- 도메인 기반으로 Storage가 생성이 된다.
- 도메인만 같다면, 여러 탭 내에서 같은 Storage가 공유된다.
- Storage를 삭제하지 않는 한 날라가지 않는다.
Local Storage에 값을 저장하는 방법
- 크게 세 가지 방법이 존재한다.
window.localStorage.name = 'taeho'
window.localStorage['name'] = 'taeho'
window.localStorage.setItem('name','taeho') // 적극 권장- 저장, 불러오기, 삭제하기, 전체 삭제
//저장
localStorage.setItem('name','taeho');

//불러오기
localStorage.getItem('name');

//삭제하기
localStorage.removeItem('name');

//전체 삭제
localStorage.clear();
localStorage는 string만 넣을 수 있기 때문에, JSON.stringfy로 넣고 꺼낸 값을 JSON.parse로 파싱해서 쓰는 것이 좋다.
const user = {
  name : 'taeho',
  position : 'student',
  condition : ['happy','bad']
}
//저장
localStorage.setItem('user',JSON.stringfy(user));

//불러오기
const item = JSON.parse(localStorage.getItem('name'));
Test
const storedName = localStorage.getItem('name') || ''

  if(storedName){
	document.querySelector('#name').value = storedName
  }

  document.querySelector('#save').addEventListener('click', () => {
	localStorage.setItem('name', document.querySelector('#name').value)
  })

  document.querySelector('#remove').addEventListener('click', () => {
	localStorage.removeItem('name');
  })
Session Storage
- 전체적으로 Local Storage와 같지만 브라우저를 닫으면 저장된 내용이 초기화 된다.
📌 느낀 점
아직은 추상화하는 방법에 익숙하지 않아 코드를 이해하는 것에도 많은 시간이 걸리지만 다른 것들에 영향을 주지않고 손쉽게 다른 데이터를 가진 같은 구조를 만들 수 있다는게 신기한 것 같다. 바닐라 자바스크립트 챌린지를 시작한 만큼 컴포넌트 방식에 더욱 익숙해져보자!
주니어 프론트엔드 개발자가 되고 싶습니다!