
Fastlane을 이용해 Flutter IOS App distribution에 자동배포 하기
지난글에서 설명한 부분은 따로 설명하지 않도록 하겠음
- 먼저 fastlane에서 firebase를 사용하기 위해 설정을 해줘야함
이 블로그 참고
[깃헙액션 workflow.yaml]
- 워크플로우는 fastlane lane이름 변경한것 말고 바뀐 부분 없음
name: IOS DEV App Distribution Release

on:
  push:
    tags:
      - "v_dev*"

jobs:
  release:
    runs-on: macos-latest

    steps:
      # 1. 코드 체크아웃
      - name: Checkout repository
        uses: actions/checkout@v3

      # 2. SSH 키 설정 - fastLane match에서 사용
      - name: Setup SSH
        uses: shimataro/ssh-key-action@v2
        with:
          key: ${{ secrets.SSH_KEY }}
          known_hosts: ${{ secrets.KNOWN_HOSTS }}

      # 3. Ruby 설정 및 캐싱
      - name: Setup Ruby with caching
        uses: ruby/setup-ruby@v1
        with:
          ruby-version: 3.0
          bundler-cache: true

      # 4. Fastlane 캐싱
      - name: Cache Fastlane
        uses: actions/cache@v3
        with:
          path: |
            ~/.bundle
            ~/.fastlane
          key: ${{ runner.os }}-fastlane-${{ hashFiles('**/Gemfile.lock') }}
          restore-keys: |
            ${{ runner.os }}-fastlane-

      # 5. Install Fastlane
      - name: Install Fastlane
        run: |
          cd ios
          gem install bundler
          bundle install

      # pubspec.lock 파일이 바뀌기 전까지는 이전 플러터 디펜던시 활용
      - name: Cache Flutter dependencies
      uses: actions/cache@v3
        with:
        path: /Users/runner/hostedtoolcache/flutter
        key: ${{ runner.os }}-flutter-${{ hashFiles('**/pubspec.lock') }}
        restore-keys: |
          ${{ runner.os }}-flutter-

      # 6. Flutter 설치
      - name: Setup Flutter
        uses: subosito/flutter-action@v1
        with:
          channel: 'stable'

      #7. github에서 가져오는 dependency에 접근하기위한 설정
      - name: Configure Git
        run: |
          git config --global url."https://${{ vars.USER_NAME }}:${{ secrets.TOKEN_GITHUB }}@github.com/".insteadOf "https://github.com/"

      # 8. Flutter 의존성 설치
      - name: Install Dependencies
        run: flutter pub get

      # 9. config.dart 생성
      - name: Generate Config
        run: |
          echo '${{ secrets.CONFIG }}' | base64 --d >> ./lib/common/config.dart

      # 10. Fastlane 실행
      - name: Build and Upload to TestFlight
        run: |
          cd ios
          fastlane ios_dev_release_to_app_distribution
        env:
          CI: true
          APPLE_ID: ${{ secrets.APPLE_ID }}
          TEAM_ID: ${{ secrets.TEAM_ID }}
          MATCH_PASSWORD: ${{ secrets.MATCH_PASSWORD }}
          SLACK_WEBHOOK_URL: ${{ secrets.SLACK_WEBHOOK_URL }}
          FASTLANE_USER: ${{ secrets.FASTLANE_USER }}
          FASTLANE_APPLE_APPLICATION_SPECIFIC_PASSWORD: ${{ secrets.FASTLANE_APPLE_APPLICATION_SPECIFIC_PASSWORD }}
          FIREBASE_CLI_TOKEN: ${{ secrets.FIREBASE_CLI_TOKEN }}
#          FASTLANE_PASSWORD: ${{ secrets.FASTLANE_PASSWORD }}
          FIREBASE_APP_ID: ${{ secrets.FIREBASE_APP_ID }}
[Fastfile]
default_platform(:ios)

platform :ios do
  desc "IOS Dev App Push to App Distribution"
  lane :ios_dev_release_to_app_distribution do
    # CI 환경 설정 (GitHub Actions 등)
    setup_ci if ENV['CI']

    # 인증서 및 프로비저닝 프로파일 설정
#     produce(
#       username: ENV["FASTLANE_USER"],
#       app_identifier: "co.example.example.dev.NotificationServiceExtension",
#       app_name: "AppName Dev NotificationServiceExtension",
#       skip_itc: true,
#     )

    match(
     git_url: "git@github.com:...",
      app_identifier: ["co.example.example.dev", "co.example.example.dev.NotificationServiceExtension"],
      type: "adhoc",
      readonly: true
    )

    # 버전 관리
    pubspec = YAML.load_file("../../pubspec.yaml")
    version = pubspec["version"].split('+')

    increment_version_number(
      version_number: version[0],
      xcodeproj: "Runner.xcodeproj"
    )

    increment_build_number(
      build_number: version[1],
      xcodeproj: "Runner.xcodeproj"
    )

    # 코코아팟 업데이트 및 빌드
    cocoapods(
      repo_update: true,
      clean_install: true,
      use_bundle_exec: false
    )

    # match가 서명할 것이므로 no-codesign 추가
    sh("flutter build ios --release --flavor dev --no-codesign")

    # 앱 빌드
    build_app(
      workspace: "Runner.xcworkspace",
      scheme: "dev",
      export_method: "ad-hoc",
      export_options: {
        provisioningProfiles: {
          "co.example.example.dev" => "match AdHoc co.example.example.dev",
          "co.example.example.dev.example" => "match AdHoc co.example.example.dev.NotificationServiceExtension"
        },
      }
    )

    # app distribution 업로드
    firebase_app_distribution(
    # Firebase Console/Project 설정/일반/내 앱/앱 ID에서 찾을 수 있음
    app: ENV["FIREBASE_APP_ID"],
    # https://firebase.google.com/docs/app-distribution/ios/distribute-fastlane?hl=ko
    # 여기서 1단계, 2단계 Firebase CLI를 사용하여 로그인를 진행 후
    # firebase login:ci 를 실행해서 나온 값을 활용
    firebase_cli_token: ENV["FIREBASE_CLI_TOKEN"],
    # ex) A,B,C
    groups: ENV["APP_DISTRIBUTION_GROUPS"],
#     release_notes: "자동배포 테스트",
    )

    # Slack 알림
    slack(
      message: "IOS Dev App Distribution 배포 완료 🎉",
      slack_url: ENV["SLACK_WEBHOOK_URL"]
    )
  end

  error do |lane, exception, options|
    # 배포 실패 시 Slack 알림
    slack(
      message: "IOS Dev App Distribution 배포 실패 🥲\n #{exception}",
      success: false,
      slack_url: ENV["SLACK_WEBHOOK_URL"]
    )
  end
end
이번에는 flavor dev를 app distribution에 자동배포한다.
이 앱같은 경우
flavor dev 인 경우 패키지명이 co.example.example.dev이고
flavor prod인 경우 패키지명이 co.example.example 이다.
export method
앱디스트리뷰션에 배포할 ipa를 뽑기위해 export option은 ad-hoc으로 설정을 했다.
원래는 build_app > export_method을 development로 했는데 development로 빌드하면 문제가 생길 수 있는데 정말 development로 빌드할것이냐는 이슈가 계속 나와 ad-hoc으로 진행하였다.
그런데 생각해보니 development는 xcode에서 직접 빌드가능 & 디버깅 목적으로 빌드하는 경우이고
앱디스트리뷰션 처럼 디바이스와 컴퓨터가 연결되어 있지 않은 상태에서도 빌드가능 & 디버깅이 필요하지 않음 인 경우에는 ad-hoc으로 빌드하는게 더 맞는 방향이였다.
ad-hoc의 cert는 distribution type을 활용하지만 bundle id는 fastlane match의 app_identifier의 첫번째 값을 활용해 직접 설정이 가능하다.
지피티가 이부분을 활용해서 설정하는거라는데 맞는지 잘 모르겠음
//fastlane match
//"co.example.example.dev" < 이부분
app_identifier: ["co.example.example.dev", "co.example.example.dev.NotificationServiceExtension"],
flavor에 따라 패키지명이 달라서 여러개의 distribution type cert 생성 및 관리
export method가 appstore인 경우 cert의 bundle id : co.example.example
export method가 ad-hoc인 경우 cert의 bundle id : co.example.example.dev
이렇게 총 두개의 distribution type cert가 만들어졌다.
그리고 이번에는 당연히 두번째 cert가 선택된 profile이 만들어졌다.

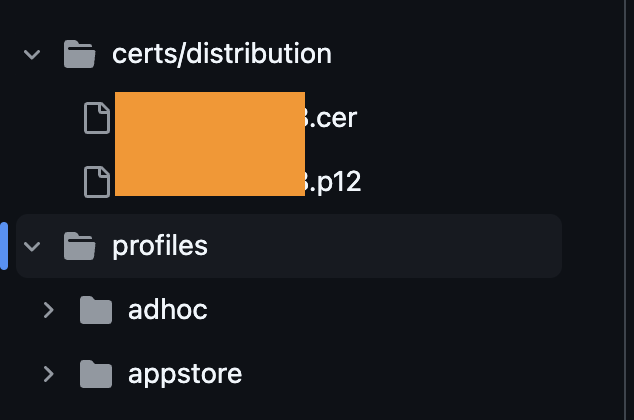
하나의 레포에 co.example.example.dev distribution type cert랑 co.example.example distribution type cert 둘다 넣어서 관리하고 싶었지만 사진에서 보듯이 cert와 profile은 type에 따라 디렉토리가 생성된다. 그런데 지금은 둘다 distribution타입 이기 때문에 같은 certs/distribution 디렉토리에 두 cert를 모두 관리 못해서 레포를 새로 팠다
나머지는 이전과 모두 동일하여 설명 패스
- Appfile의 app_identifier를 co.example.example.dev로 변경
- matchFile의 type을 adhoc으로 변경